Bedienungsanleitung
User manual
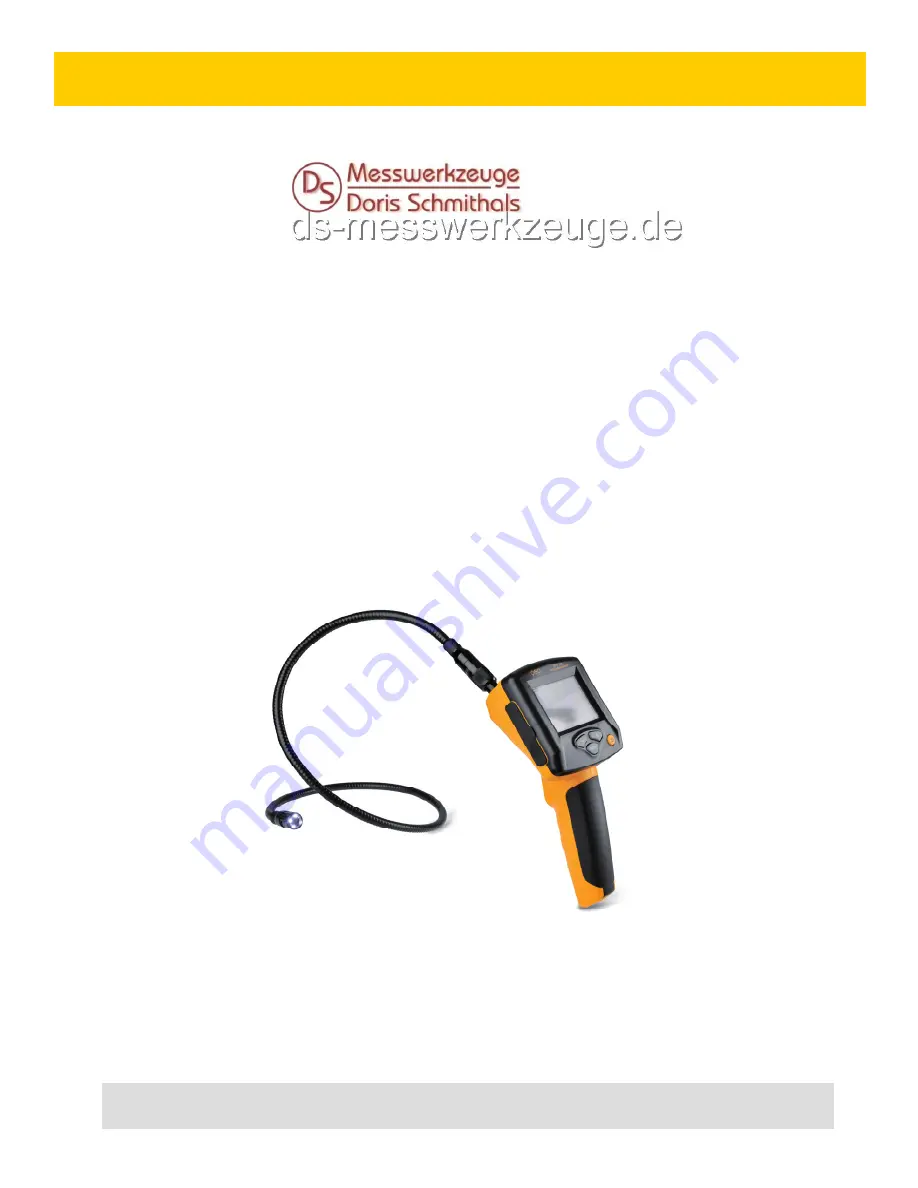
Video-Endoskop
Video Borescope
[ FVE 100 ] und [ FVE 150 ]
DS
Artikel-Nr.: P 340 100
Artikel-Nr.: P 340 150
[ FVE 100 ]
x106244x @ http://www.ds-messwerkzeuge.de/bedienungsanleitungen/fve.pdf
Страница 1: ...dienungsanleitung User manual Video Endoskop Video Borescope FVE 100 und FVE 150 DS Artikel Nr P 340 100 DS Artikel Nr P 340 150 FVE 100 x106244x http www ds messwerkzeuge de bedienungsanleitungen fve pdf ...
Страница 2: ...en Gerät nicht in feuchter nasser Umgebung Regen betreiben Doppelte Isolierung nach CE Standards Sonde sorgfältig an das Gerät anschrauben um Elektrounfälle zu vermeiden Das Gerät nicht direkter Sonnenstrahlung star ken Lichtquellen oder Reflektoren aussetzen INTENDED USE OF INSRUMENT Optical check survey of unaccessible places via borescope i e sanitary installations elec trical industry construc...
Страница 3: ...g 2000mAh Li Ion Akku wird über Mini USB Anschluss geladen Kontrast Helligkeit und Farben einstellbar Bild auf Display um 180 drehbar Standby Funktion CARE AND CLEANING Please handle measuring instruments with care Clean with soft cloth only after any use If necessary damp cloth with some water If instrument is wet clean and dry it carefully Pack it up only if it is perfectly dry Transport in orig...
Страница 4: ... 50 C Feuchtigkeitsbereich 15 85 RH Abmessungen 240 x 160 x 100 mm Gewicht mit Sonde 0 584 kg TECHNICAL DATA Camera head Viewable angle 0 and 180 Focal length 6 7 cm Viewable distance 5 15 cm Diameter of camera 17 mm Light source LED Display Display size 3 Resolution 960 x 240 pixels Image transmisstion Gooseneck tube to LCD CMOS image sensor 300 000 pixels Video output to TV PAL NTSC Various Prob...
Страница 5: ...alter 6 Auswahl Modus 7 TV Ausgang 8 USB Ladeanschluss 9 Reset Taste 10 Li Ion Akku 11 Kamera 12 Kameraanschluss 5 1 Gooseneck 2 Display 3 Adjustment contrast illumination 4 Adjustment contrast illumination 5 On Off button 6 Mode button 7 TV output 8 USB charge port 9 Reset button 10 Li Ion battery 11 Camera 12 Camera connection ...
Страница 6: ... the instrument enters into its main menu BEDIENUNG Taste 6 drücken um das Gerät einzuschalten Taste erneut drücken um es wieder auszu schalten Wenn das Gerät ausgeschaltet ist und mit dem Mini USB Ladeanschluss verbunden wird startet automatisch der Ladevorgang und das Display schaltet sich ein Das Gerät fordert die Bestätigung oder den Ab bruch des Ladevorganges Auswahl ja nein Bestätigung der A...
Страница 7: ...tly press MODE button Now the image rotates by 90 BATTERIEZUSTANDSANZEIGE Voll geladen Leer Wird geladen BATTERY STATUS INDICATOR Fully loaded Empty Being charged BILDROTATION UND BILDEINSTELLUNG 1 Bildrotation Bei eingeschaltetem Gerät MODE Taste kurz drücken das Bild schwenkt um 90 7 ...
Страница 8: ...nnen z B folgende Parameter eingestellt werden Helligkeit Kontrast Auflö sung Farbe etc 2 Image setting When instrument is switched on press MODE button long to enter into image setting mode Now you can regulate i e brightness contrast definition colour etc Mit den Tasten und können Sie den Cursor zum gewünschten Menüpunkt bewegen Den ausgewählten Menüpunkt mit der MODE Taste bestätigen Hier nun m...
Страница 9: ...hieht nur beim ersten Ein schalten des Gerätes Die Werkseinstellung ist PAL AUTOMATIC IMAGE FORMAT CONVERSION PAL NTSC The instrument automatically recognizes the image format when switched on for the fist time and enters into the corresponding standard mode ATTENTION This recognition only works when the instrument is switched on for the first time The standard setting is PAL EINSTELLUNG DER BILDH...
Страница 10: ...n den dabei das schwarze Ende an das Gerät und das gelbe Ende an den Monitor anschließen Im Hauptmenü TV AUSGANG wählen und mit OK bestätigen Aus dem Auswahlmenü zutreffen den Parameter auswählen und mit OK bestäti gen Danach sind Sie automatisch wieder im Hauptmenü 10 TV OUTPUT Connect TV cable supplied with with monitor plug the black end into the instrument and the yellow into the monitor Choos...
Страница 11: ...rom misuse or abuse CE KONFORMITÄT Das Gerät ist gemäß den gültigen CE Normen zertifiziert CE CONFORMITY Instrument is certified as per required CE regu lations ELEKTROMAGNETISCHE VERTRÄGLICHKEIT Es kann nicht generell ausgeschlossen werden dass das Gerät andere Geräte stört z B Navi gationseinrichtungen durch andere Geräte gestört wird z B elektro magnetische Strahlung bei erhöhter Feldstärke z B...
Страница 12: ...ESPONSIBILITY The user of this product is expected to follow the instructions given in operators manual Although all instruments left our warehouse in perfect condition and adjustment the user is expected to carry out periodic checks of the product s accuracy and general performance The manufacturer or its representatives assumes no responsibility of results of a faul ty or intentional usage or mi...
Страница 13: ...Bedienungsanleitung User manual Video Endoskop Video Borescope FVE 150 FVE 150 ...
Страница 14: ... Was ser tauchen Gerät nicht in feuchter nasser Umgebung Regen betreiben Doppelte Isolierung nach CE Standards Sonde sorgfältig an das Gerät anschrauben um Elektrounfälle zu vermeiden Das Gerät nicht direkter Sonnenstrahlung star ken Lichtquellen oder Reflektoren aussetzen INTENDED USE OF INSRUMENT Optical check survey of unaccessible places via borescop i e sanitary installations elec trical indu...
Страница 15: ...panisch LED Beleuchtung für Arbeiten in dunkler Um gebung 2000mAh Li Ion Akku wird über Mini USB Anschluss geladen Stromsparmodus CARE AND CLEANING Please handle measuring instruments with care Clean with soft cloth only after any use If necessary damp cloth with some water If instrument is wet clean and dry it carefully Pack it up only if it is perfectly dry Transport in original container case o...
Страница 16: ...eich 10 50 C Feuchtigkeitsbereich 15 85 RH Abmessungen 240 x 160 x 100 mm Gewicht mit Sonde 0 584 kg TECHNICAL DATA Camera head Viewable angle 0 and 180 Focal length 6 7 cm Viewable distance 5 15 cm Diameter of camera 17 mm Light source LED Display Display size 3 2 Resolution 320 x 240 pixels Image transmisstion Gooseneck tube to LCD CMOS image sensor 300 000 pixels Video output to TV PAL NTSC Pic...
Страница 17: ...dle with Li Ion battery 7 Cursor down 8 Display illumination down 9 Display illumination up BEDIENELEMENTE 1 9 2 8 3 7 5 4 6 1 Display 2 OK Taste 3 An Aus Taste 4 Cursor auf 5 Exit ESC 6 Griff mit Li Ion Batterie 7 Cursor ab 8 Displaybeleuchtung dunkler 9 Displaybeleuchtung heller 5 ...
Страница 18: ... 18 Foto Taste SNAP 19 Video Taste RECORD 20 Anschluss Hauptplatine 21 Kameraanschluss 14 15 16 13 17 10 11 12 21 20 18 19 10 Camera adapter 11 Gooseneck 12 Camera 13 TV output 14 USB charging adapter 15 RESET button 16 SD card 17 Built in socket cover 18 Foto button SNAP 19 Video button RECORD 20 Mainboard socket 21 Camera adapter 6 ...
Страница 19: ...N Mit Taste 3 Gerät einschalten Das Gerät ist nun im Videomodus Um das Gerät wieder auszu schalten erneut Taste 3 drücken Anzeige Displaybeleuchtung an aus Indication of display illumination on off Anzeige aktuelles Datum mit Uhrzeit Indication of current date and time Bildanzeige Picture display Speicheranzeige Current memory display EINSTELLUNG DER BILDHELLIGKEIT Mit den Tasten Bright und Bright...
Страница 20: ...ät einschalten und OK drücken Dann er scheint folgendes Dialogfeld SAVE PHOTOS When the instrument is switched on press SNAP button on the reverse side to save photos For this press button shortly Date and time will be displayed on the photos Photos can be browsed in the explorer VIDEOAUFNAHMEN Wenn das Gerät eingeschaltet ist können Sie mit der RECORD Taste auf der Geräterückseite Videos speicher...
Страница 21: ... den Cursortasten den gewünschten Menüpunkt auswählen und mit OK bestätigen Aktuelle Zeit Current time Hauptmenu Main menu Cursoranzeige State of cursor SPRACHE WÄHLEN Gehen Sie mit dem Cursor auf SPRACHE und bestätigen Sie mit OK Nun können Sie die ge wünschte Sprache auswählen und mit OK be stätigen 9 SET LANGUAGE Choose LANGUAGE with the cursor and confirm with OK Now you can choose the languag...
Страница 22: ...e the parameter requested The yellow arrow shows which parameter you have chosen With the buttons SNAP up and RECORD down you can set the parameter Confirm with OK Thereafter you automatically return to the main menu AUTOMATISCHE ABSCHALTUNG Gehen Sie mit dem Cursor auf AUTO AUS und bestätigen Sie mit OK Wählen Sie nun aus dem Auswahlmenü den gewünschten Parameter und bestätigen Sie mit OK Danach ...
Страница 23: ...d the yellow into the monitor Choose TV OUT in the main menu and confirm with OK Choose the correct parameter with the cursor and confirm with OK Thereafter you automatically return to the main menu SPEICHERFUNKTION Gehen Sie mit dem Cursor auf SPEICHER und bestätigen Sie mit OK Wählen Sie mit SNAP oder RECORD das gewünschte Speichermedium Flash oder SD und bestätigen Sie mit OK Danach gelangen Si...
Страница 24: ...nd bestätigen Sie mit OK Zum Löschen wählen Sie das gewünschte Bild Video und löschen Sie mit BRIGHT PICTURE AND VIDEO EXPLORER Choose EXPLORER with the cursor and confirm with OK Choose VIDEO PLAYER or PICTURE VIEW and confirm with OK For deletion choose the picture video required with BRIGHT Explorer Video Player Picture View 12 ...
Страница 25: ...it OK bestätigen gelan gen sie automatisch wieder ins Hauptmenü STROMSPARMODUS Wählen Sie mit dem Cursor STROMSPARMO DUS und bestätigen Sie mit OK Hier stellen Sie ein ob und nach welcher Zeit bei dem Ge rät der Stormsparmodus einsetzt Mit OK be stätigen danach befindet sich das Gerät auto matisch wieder im Hauptmenü Im Stromspar modus geht der Bildschirm nach der eingestell gen Zeit aus das Gerät...
Страница 26: ...mittelbaren Nähe von Industrie anlagen oder Rundfunksendern EXIT MODE You can leave any menu by pressing ESC Then you are in the video mode and can switch off the intrument HINWEISE Schwanenhals nicht stärker als 90 biegen Bei längerem Nichtgebrauch Batterien aus dem Gerät nehmen Kamera vor Benutzung reinigen Nur Original Akku verwenden CE KONFORMITÄT Das Gerät ist gemäß den gültigen CE Normen zer...
Страница 27: ...hnischen Daten auszutauschen Ebenso gilt das Auslaufen der Batterie nicht als Garantiefall WARRANTY This product is warranted by the manufacturer to the original purchaser to be free from defects in material and workmanship under normal use for a period of two 2 years from the date of purchase During the warranty period and upon proof of purchase the product will be repaired or re placed with the ...
Страница 28: ...duct is expected to follow the instructions given in operators manual Although all instruments left our warehouse in perfect condition and adjustment the user is expected to carry out periodic checks of the product s accuracy and general performance The manufacturer or its representatives assumes no responsibility of results of a faul ty or intentional usage or misuse including any direct indirect...