MAINTENANCE
SECTION 5
Page 15
DRESSTA
OM515C520C99/1E
5.6. AIR CLEANING SYSTEM
5.6.1. AIR CLEANER
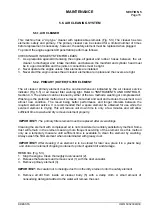
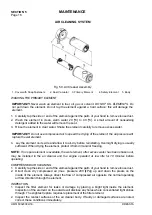
This machine has a “dry-type” cleaner with replaceable elements (Fig. 5.3.) The cleaner has two
elements: safety and primary. The primary cleaner can be cleaned for a limited number of times
before replacement is necessary, however, the safety element must be replaced when plugged.
To protect the engine against dirt penetration perform as follows:
CHECKING AIR INTAKE SYSTEM FOR LEAKS
1. As a precaution against dirt entering the engine, all gasket and rubber hoses between the air
cleaner, turbocharger and intake manifold, and between the manifold and cylinder head must
be in a good condition and the joints or connections must be tight.
2. Never operate the engine unless filter elements are installed.
3. Never start the engine unless the air cleaner elements are in place and the covers are tight.
5.6.2. PRIMARY (OUTER) FILTER ELEMENT
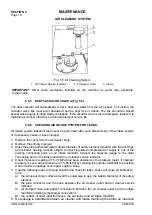
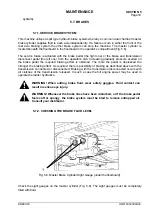
The air cleaner primary element must be serviced whenever indicated by the air cleaner service
indicator (Fig. 5.5) or air cleaner filter warning light. Refer to "INSTRUMENTS AND CONTROLS”,
Section 4.3. The element can be cleaned by either of the two methods: washing or compressed air.
Washing is the preferred method as it removes more dust and soot and restores the element to an
almost new condition. The result being better performance and longer intervals between the
required element service. It is recommended that a spare element be obtained for use while the
serviced element is drying. This will reduce unit down time to only a few minutes and will allow
sufficient time to wash and dry removed element properly.
IMPORTANT!
The primary filter element must be replaced after six washings.
Cleaning the element with compressed air is not considered an entirely satisfactory method. Some
dust will remain in the element causing more frequent servicing of the element. Use this method
only as a temporary measure until sufficient time is available to clean the element by washing.
Always wash the filter element when contaminated with greasy dust.
IMPORTANT!
After cleaning, if an element is to be stored for later use, place it in a plastic bag
and store in an element shipping container to protect against dirt and damage.
REMOVAL (Fig. 5.3)
1. Stop the engine. Clean thoroughly dust vacuator (2).
2. Release the fasteners and remove cover (1) with the dust vacuator.
3. Remove primary element (3).
IMPORTANT:
Be careful not to dislodge dust from the dirty element onto the safety element.
4. Remove all dirt from inside air cleaner body (5) with a damp cloth. A small amount of
nonsudsing detergent added to the water will remove the soot.
Содержание 515C
Страница 3: ...OM515C520C99 1E DRESSTA ...
Страница 5: ......
Страница 7: ......
Страница 10: ...SECTION 1 INTRODUCTION ...
Страница 11: ...INTRODUCTION SECTION 1 DRESSTA OM515C520C99 1E SECTION CONTENTS 1 1 Introduction 3 1 2 Serial Numbers 5 ...
Страница 12: ......
Страница 17: ...SECTION 2 SAFETY PRECAUTIONS ...
Страница 19: ......
Страница 37: ...SECTION 3 MACHINE TRANSPORT AND STORAGE ...
Страница 39: ......
Страница 49: ...SECTION 4 OPERATING ...
Страница 51: ......
Страница 55: ...SECTION 4 OPERATING Page 6 OM515C520C99 1E DRESSTA UNIVERSAL SYMBOLS FOR INSTRUMENTS AND CONTROLS ...
Страница 107: ...SECTION 5 MAINTENANCE ...
Страница 165: ...SECTION 6 SPECIFICATIONS ...
Страница 167: ......
Страница 181: ...SECTION 6 SPECIFICATIONS Page 16 OM515C520C99 1E DRESSTA WIRING DIAGRAMS ...
Страница 182: ...SPECIFICATIONS SECTION 6 Page 17 DRESSTA OM515C520C99 1E WIRING DIAGRAMS ...
Страница 187: ...SECTION 6 SPECIFICATIONS Page 22 OM515C520C99 1E DRESSTA WIRING DIAGRAMS ...
Страница 192: ...SPECIFICATIONS SECTION 6 Page 27 DRESSTA OM515C520C99 1E SPECIFICATIONS Fig 6 10A Overall Dimensions Wheel Loader 520C ...

