

DWS-7P6IN-001
WEATHER STATION
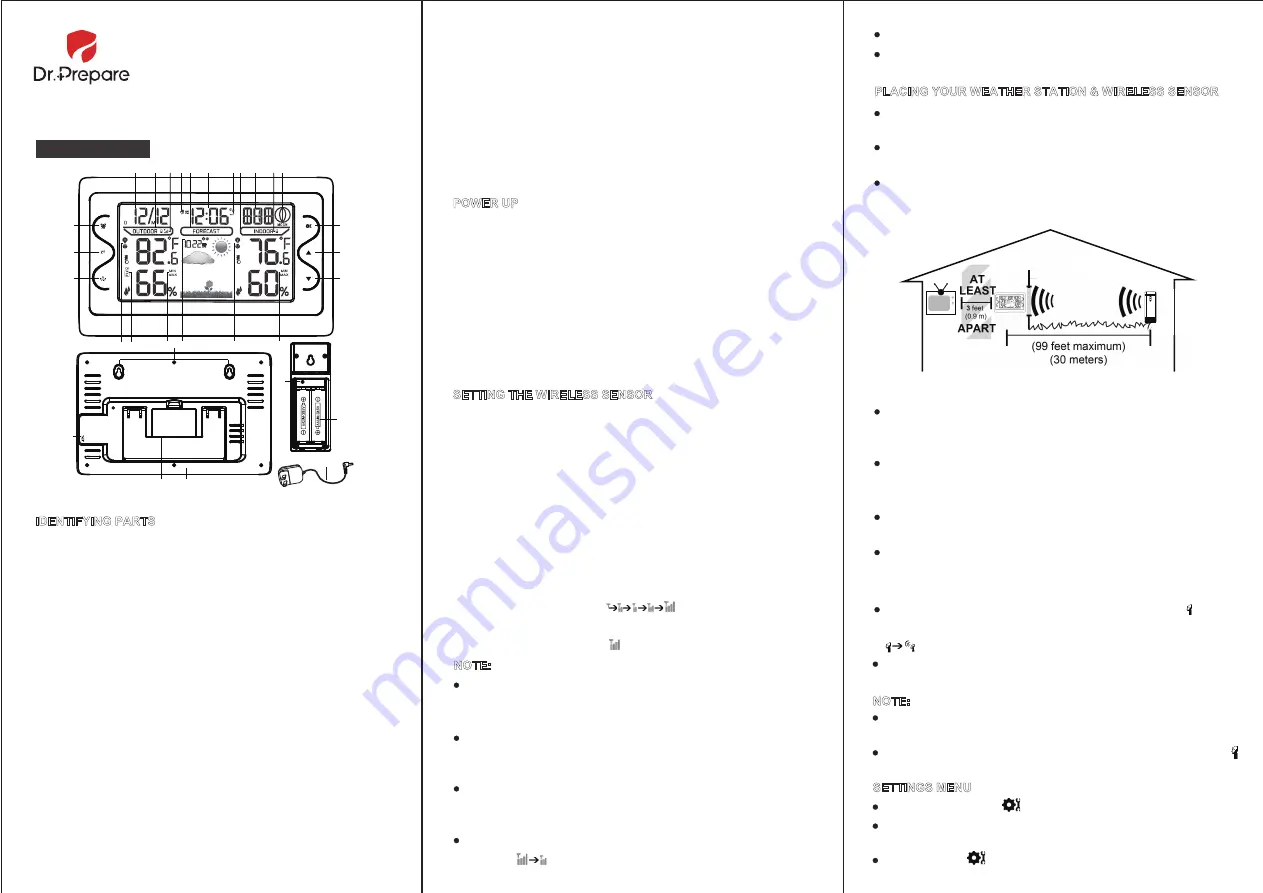
IDENTIFYING PARTS
CH
Adapter
PRESSURE
inHg
hPa
1
2
3
4 5
6
7 8
9
10 11
12 13
14
15
16
17
18
19
20
21
22
23
24
25
26
27
28
29
1. Calendar
2. Outdoor Temperature / Humidity
3. Outdoor Sensor Strength & Low Battery (Sensor)
4. Alarm and Snooze
5. Weather Forecast
6. Time
7. RCC Reception (Time Calibration)
8. Indoor Temperature / Humidity
9. Weekday
10. Low Battery (Weather Station)
11. Lunar Phase
12. Outdoor Temperature Trend
13. Channel Numbers (Weather Station)
14. Max/Min Records of Outdoor Temperature & Humidity
15. Barometric Pressure & Trend
16. Indoor Temperature Trend
17. Max/Min Records of Indoor Temperature & Humidity
18. ALARM Button
19. SNZ Button (Snooze Button)
20. LIGHT Button
POWER UP
SETTING THE WIRELESS SENSOR
NOTE:
This weather station is able to pair with 3 wireless sensors. The
weather station only comes with one sensor and the remaining 2
sensors are optional.
PLACING YOUR WEATHER STATION & WIRELESS SENSOR
RCC TIME SIGNAL
21. MODE Button
22. ▲ (UP) Button
23. ▼ (DOWN) Button
24. Mounting Holes
25. Socket for Power Cord
26. Battery Compartment for 3 X AAA Batteries (Not Included)
27. Pedestal
28. CH Channel Selector (Select Channel Number of the Wireless
Sensor)
29. Compartment for 2xAA Batteries (Not Included)
1.Open the battery compartment (26) on the back of weather station
and insert 3-AAA batteries with correct polarity (+ / -).
2.Insert the power cord into the socket (25) of the weather station and
into a wall outlet.
3.Open the battery compartment (29) of the wireless sensor and insert
2-AA batteries with correct polarity (+ / -).
4.Adjust time, date, and other settings on your weather station.
1.Power up the weather station.
2.Insert the batteries to the wireless sensor and use CH channel
selector (28) to choose a channel number (1, 2, or 3).
The weather station will search RF signal for 3 minutes automatically
when it is plugged in. Then, it will continue to search for RCC signal
for time calibration.
3.
Short press the ▼ button (23) to select the channel number that has
been set on the wireless sensor in the previous step. The icon of
channel number flashes in sequence of 1, 2, and 3.
4.
Long press the ▼ button to make the weather station search for
signals sent from the outdoor sensor for 3 minutes. Sensor Strength
icon will change as follow: .
5.Once the sensor connects with the weather station, place the sensor
in a shaded location (please follow the guidelines listed in PLACING
YOUR WEATHER STATION & WIRELESS SENSOR).
5.When the weather station connects with the sensor successfully, it
will display four signal bars .
You can follow the steps above when you first connect the sensor
with the weather station or when the weather station loses signals
of the sensor.
If you are seeing dashes (indicating signal of the sensor is not
received) in place of outdoor temperature, first check batteries in
the sensor. Then repeat the steps above.
If sensor signal is lost for once, the number of signal bars will
decrease .
If sensor signal is lost for over 1 hours, the sensor signal will flash.
If sensor signal is lost for over 2 hours, the weather station will
automatically search for signals every hour.
Keep the weather station away from direct sunlight and any heat
sources.
The maximum distance between the weather station and the
wireless sensor is 98 feet (30m).
The clock starts receiving RCC signal automatically after the weath-
er station connects with the sensor. The screen will go dark during
this procedure.
Please make sure you have selected the correct time zone from the
list in the Settings Menu. When the RCC time signal is received, the
station will set to the time zone selected. Default is Eastern Time.
From normal time display, long press the ▲ button (22) to search for
the RCC time signal.
The radio will search for time signal at 1:00 (compulsory), 2:00
(compulsory), 3:00 (compulsory), 4:00 (alternative), 5:00 (alterna-
tive) a.m. every day.
TV
When the clock is searching for RCC time signal, the icon (7)
flashes; If the reception succeeds, the antenna icon changes from
.
NOTE:
SETTINGS MENU
The screen will go dark when the weather station is searching for RCC
time signal.
The DST symbol will appear on the screen when daylight saving time
is practised.
To quit searching for time signal, long press the ▲ button and the
icon will disappear.
Hold, then release the button (21) to enter time setting mode.
Short press the ▲ or ▼ button to adjust the values. Hold to adjust
quickly.
Short press the button to confirm and move to the next item.
Place the weather station at least 3 feet (0.9m) away from equipment
that generates magnetic fields such as mobile phones, televisions,
etc. and other devices that may interfere with connection.


