background image

E

xp

er

ie

n

ce

 M

o

b

il

O

ff

ic

L

iv

in

g

8

CH08_ENG1025.indd   220

2006/11/10   ¤W¤È 11:54:51

Содержание C800

Страница 1: ...User Man u al catalog_ENG1024 indd 1 2006 11 10 W È 11 23 38 ...

Страница 2: ... Corporation in the United States of America and or other countries QuickMark and its icons are registered trademarks of SimpleAct Inc Our company reserves the right to make modifications to this manual without further notice Warning This device is limited for indoors use under the guaranteed conditions that it will not interfere with legal radio stations and will not be interfered during operatio...

Страница 3: ...cal factories demolition worksites potentially hazardous explosive locations such as fuel area under ship holds transport and storage of fuel or chemical substance facilities or locations with particles dust metal dust chemical substances etc in the air Please remember that sparks in these environments can cause explosions or fire hazards resulting in human casualties Road Safety Unless in an emer...

Страница 4: ...chased product meets the following conditions you may request replacement of the LCD display module within seven days from the purchase date 1 Total count of three or more malfunctioning pixels lit or dark or 2 Any two malfunctioning pixels lit or dark within 5mm of each other Lit Pixels blue red white or green dots on specific locations of LCD screen Dark Pixel black dot on specific locations of ...

Страница 5: ...6 Table of Contents Learning the Input Modes Using the Communication 3 1 Using the Phone 40 3 2 Making Voice Calls 45 3 3 Receiving Voice Calls 50 3 4 Call Option 53 3 5 Additional Information on Dialing 59 3 6 SmartDailing 62 3 7 Managing Call History 63 3 8 Configure Speed Dial 65 2 3 1 2 3 2 1 Using the Input Methods 22 2 2 Using Block Recognizer 28 2 3 Using Letter Recognizer 29 2 4 Using Tran...

Страница 6: ...Multiple Computers 139 6 7 Synchronize Through Bluetooth Connection 141 6 8 Syncing with an Exchange Server 147 6 9 Using ActiveSync to Transfer and Manage Files 150 6 10 Advanced PC Sync Settings 153 6 11 Syncing Music Video and Pictures 159 6 12 Installing Software 163 6 13 ActiveSync Connection Troubleshooting 164 5 1 Contacts 97 5 2 Calendar 107 5 3 Tasks 115 5 4 Notes 120 Experiencing Multime...

Страница 7: ...240 9 4 Bluetooth Explorer 247 9 5 Configure Network Service Provider Settings 249 9 6 Internet Sharing 251 Setting the Phone Information 11 1 My Information 278 11 2 Phone 280 11 3 Configure Incoming Ring Tone 285 11 4 Function Button 286 11 5 Start Menu 288 11 6 Input 289 11 7 Password Protection 291 11 8 Sounds and Notifications 293 11 9 Removing Programs 294 11 10 Local Area Setting 296 11 11 ...

Страница 8: ...ettings 307 11 21 Connections 310 11 22 Task Manager 316 11 23 Keyboard sliding sound effect 317 Using More Programs Q A 13 1 Q A 347 12 1 Java MIDlet Manager 322 12 2 File Explorer 324 12 3 Voice Commander 331 12 4 ZIP 336 12 5 Search 340 12 6 Calculator 341 12 7 Game 342 12 8 Recorder 344 catalog_ENG1024 indd 8 2006 11 10 W È 11 23 39 ...

Страница 9: ...ard PIN number in order to connect to the GSM mobile network When using this device you can control wireless functions e g activate deactivate the phone You can also adjust the headset volume anytime during a call or when using the device 3 1 1 Phone Functions At the Phone screen you can access dial search contacts or save phone numbers to the contacts list Under certain circumstances such as on a...

Страница 10: ...ecute the screen that appears for this procedure and the de scriptions for this procedure Select Change PIN code About Action Icons This manual provides tip symbols to remind users of some pointers notes and precautions Tip Symbols Caution Tips Action to take Procedure Number Mobile phone or computer screen Action descriptions Action Change PIN Code Mouse Cursor 1 Select digit keys then select Ent...

Страница 11: ... Getting to now the unit and accessories 2 Insert SIM card 3 Insert MicroSD card 4 Initial startup 5 Familiarize with the Home screen 6 Using the Start Menu 7 Standby mode and power on off 8 Restore to Default Hard Reset 1 CH01_ENG1024 indd 1 2006 11 10 U È 12 02 40 ...

Страница 12: ...IM card 7 Insert MicroSD card 8 Screen calibration 9 Install default program 9 Familiarize With the Today Screen 10 Status indicator and program icons 11 Using the Start Menu 14 Power off 15 Using the Restore to Default 16 Hard Reset restore to default 17 CH01_ENG1024 indd 2 2006 11 10 U È 12 02 40 ...

Страница 13: ...or 5 seconds After the phone has been turned off you will not be able to make calls or receive messages 2 Left LED indicator The left LED will indicate event notifications charging status and GSM GPRS connection status For descriptions on the flashing indicators please refer to the upcoming chapters 3 Speaker Listen to voice calls 4 Right LED indicator The right LED will indicate the Wi Fi and Blu...

Страница 14: ...ns Press the confirmation button to select the option that the cursor lands on 10 Right confirmation button Press the right confirmation button to execute the corresponding action or application on lower left of the screen 11 OK button Press the OK button to enter the input data or terminate a application The OK button corresponds to the function identically of icon in upper right corner of screen...

Страница 15: ...lug to use When not in use please replace the rubber cap 20 Back cover Remove the back cover to reveal the battery and SIM card 21 Amplifier speaker Listen to device sounds and music 22 Self photo mirror Use the self photo mirror to preview the scene when taking a photo of yourself 23 Camera lens 2 megapixel CMOS camera Capture photographs and record movies 24 Comm Manager Press this button to ope...

Страница 16: ...ator The left LED indicator green is used to indicate the battery and network status of the phone The right LED indicator blue green is used to indicate the Bluetooth and Wi Fi wireless network connection status Left LED indicator status Indicators Status Solid green Batter charging is complete Not lit Battery compartment is empty Flashing green 1 Found GSM GRPS EDGE network 2 System messages Righ...

Страница 17: ...emove the battery cover pull the battery cover up 3 Remove the batter hold on to the groove to left side of battery then lift off the battery 4 Slide the SIM card latch downwards slide down to open the SIM card latch 5 Insert the SIM card in the direction to the right insert the SIM card into the slot 6 Slide the SIM card latch upwards slide up to close the SIM card latch 7 Install the battery and...

Страница 18: ...card You can store pictures music documents and program data etc on the MicroSD memory card Insert MicroSD card 1 2 Hold on to the MicroSD memory card protective cover on left side of unit then pull outwards Insert the MicroSD memory card CH01_ENG1024 indd 8 2006 11 10 U È 12 02 43 ...

Страница 19: ... on how to use the quick menu calibrate the screen on your device install the preset applications and configure the mobile network Please follow the onscreen directions Screen calibration Install default program Please wait for the automatic program installation to complete installing the preset applications Screen calibration screen Default program installation screen CH01_ENG1024 indd 9 2006 11 ...

Страница 20: ...hown items on the Home screen background picture etc Please select Start Settings Today For configuring the Today screen please refer to section 7 4 Today screen themes Familiarize With the Today Screen 1 Click to show Start menu 2 Click to check connection status 3 Shows the current signal strength click to open phone settings 4 Click to adjust vibrate ring tone level 5 Show system time 6 Show sy...

Страница 21: ...ected Call forwarding activated Detected Wi Fi signal Call waiting Connected to wireless network connecting to wireless network when arrow is moving Missed call Using Wi Fi to sync data Signal strength Vibrate mode activated No signal Audio on Wireless is off Audio off No service Ring tone Searching for service SIM card not inserted Using GPRS service Comm Manager GPRS connecting Battery level Usi...

Страница 22: ...le Direct Push etc Contacts Record and manage contact information Download Agent Provide download status and information such as the content of the downloaded material Excel Mobile Enables you to edit spreadsheets on the handset or create new Excel documents File Explorer Allow you to organize and manage files on the phone My Connect Instantly connect to the provided Dopod network services games T...

Страница 23: ...or memory card Default folder is My Pictures folder Pocket MSN Provide MSN Messenger instant messaging and MSN Hotmail e mail services PowerPoint Mobile Enable you to read PowerPoint Documents on the phone Search Search for data files and other information on the handset SIM Manager Allow you to manage the contacts stored on the SIM card as well as copy the contacts onto the phone STK services Ena...

Страница 24: ... the figure to the right press I to launch Internet Explorer or press A to launch the calendar application Action Using the Start Menu Select Program Files 1 Select Program Items 2 The handset has been installed with various applications for use You will be able to obtain other applications and install to the handset from the Windows Mobile Quick User CD download from the Internet or purchase from...

Страница 25: ... You can long press the power button to completely turnoff the power After power to the handset has been turned off the communications and other functions will cease to operate If you only wish to turnoff the communication function of the handset please refer to section 3 1 3 Activate deactivate phone function Action Power off Press and hold Power button 1 Select Yes 2 System power off Properly tu...

Страница 26: ...id the loss of data This will avoid the lost of data When the handset malfunctions due to inappropriate controls you can attempt to restore to factory default For data synchronization please refer to Chapter 6 Synchronizing Your Phone When the system is unable to startup you can try to use hard reset to restore to default settings We recommend that you contact our customer service representatives ...

Страница 27: ...ss Other buttons to cancel 2 Simultaneously press and hold the left right confirmation button plus the power button then use the stylus to push in the reset button on left side of the unit 3 1 Turn off the phone Reset button Please enter 1234 then select Yes The phone will restart after resetting This operation will delete all your personal data and reset all settings to manufacturer default Press...

Страница 28: ...G e t t i n g t o K n o w t h e C 8 0 0 1 18 CH01_ENG1024 indd 18 2006 11 10 U È 12 02 51 ...

Страница 29: ... Input Methods In this topic you will learn to 1 Using the Input Methods 2 Using Block Recognizer 3 Using Letter Recognizer 4 Using Transcriber 5 Using the Physical Keyboard 2 CH02_ENG1024 indd 19 2006 11 10 W È 11 27 15 ...

Страница 30: ...ymbol pad 25 Switching to phone pad alphanumerical input 26 Phone pad alphanumerical input interface 26 Switch to Phone pad input keyboard 27 Using the phone pad T9 English input 27 Block recognizer input screen 28 Using block recognizer 28 Letter recognizer input screen 29 Using Letter Recognizer 29 Transcriber screen 30 Using transcriber 31 Handwriting recognition 31 Using the physical keyboard ...

Страница 31: ...cal keyboard to enter uppercase 34 Using the physical keyboard to continuously enter uppercase 34 Using the physical keyboard to enter numbers 35 Using the physical keyboard to continuously enter numbers 35 Using the physical keyboard to enter symbols 36 CH02_ENG1024 indd 21 2006 11 10 W È 11 27 15 ...

Страница 32: ...oard on the touch screen The status of current input method is displayed at the center of the taskbar The input method icons Keyboard Letter Recognizer or Block Recognizer Transcriber Symbol Pad Action Show hide the on screen keyboard Click 1 Click 2 You can use the stylus to select and enter text from the on screen keyboard The on screen keyboard has been deactivated You can click on the input me...

Страница 33: ...tween uppercase and lowercase quickly switch to numbers symbol or Latin keyboard layouts You can also use the symbol pad input method to easily enter symbols Action Entering uppercase or symbols Click on screen keyboard 1 Click on screen keyboard 2 3 The on screen keyboard will become uppercase and symbols etc After entering a character the input method will switch back to lowercase CH02_ENG1024 i...

Страница 34: ...oard will become uppercase Before you click on the input method will remain in uppercase Action Switching to number symbols keyboard layout Click upper left of osk 1 Click upper left of osk You can now select and enter the shown numbers and symbols on the osk 3 Click to return to the alphabets keyboard layout 2 CH02_ENG1024 indd 24 2006 11 10 W È 11 27 20 ...

Страница 35: ...ts keyboard layout You can now select and enter the shown Latin letters on the osk Action Switching to symbol pad Click right of the input method icon 1 Click and selec Symbol Pad 2 Click the symbol 3 You can choose the symbol or click pages up down exit The icon will only be shown when the osk has been activated CH02_ENG1024 indd 25 2006 11 10 W È 11 27 22 ...

Страница 36: ...haracters switch to T9 numbers 123 standard English abc keypad input switch to upper lowercase enter spacing character Tab and open the symbol pad keyboard 1 Word selection area 2 Delete characters backspace 3 Go to words to the right 4 Enter selected word 5 Switch to T9 English numbers 123 standard English abc input method The icon shows the input keypad currently in use 6 Enter spacing character...

Страница 37: ... the word you wish to type for example L O V E Action Switch to Phone pad input keyboard Click 1 Click 2 Click 3 Currently using numeric input keypad click to switch to standard English input keypad Currently using standard English input keypad click to switch to T9 English input keypad Currently using T9 English input keypad click to switch to numeric input keypad CH02_ENG1024 indd 27 2006 11 10 ...

Страница 38: ...nizer 2 The icon will only be shown when the osk has been activated 3 Block recognizer input screen Block recognizer input screen 1 Phrase selection area Select the phrase to use 2 Character input area Write the characters 3 Numbers symbols input area Write the numbers symbols Block recognizer shortcut icon descriptions Delete Insert blank Symbols keypad Next line Move cursor left Move cursor righ...

Страница 39: ...nly be shown when the osk has been activated 3 Letter recognizer input screen Letter recognizer input screen 1 Phrase selection area Select the phrase to use 2 Uppercase input area For uppercase input 3 Lowercase input area For lowercase input 4 Numbers symbols input area For numbers symbols input Letter recognizer shortcut icon descriptions Delete Insert blank Symbols keypad Next line Move cursor...

Страница 40: ...d on it interprets stylus movements anywhere on the screen as handwriting input Transcriber screen Transcriber shortcut icon descriptions Automatically convert recognized characters to uppercase Default recognition mode Recognize numbers activate calculation function Insert blank Next line Move cursor forwards Move cursor backward Delete Activate deactivate assisting input keypad for numbers symbo...

Страница 41: ...Transcriber 2 3 The icon will only be shown when the osk has been activated Transcriber input screen Action Handwriting recognition Handwrite Characters 1 2 Please handwrite characters on the screen for example Dopod Successfully recognized the characters CH02_ENG1024 indd 31 2006 11 10 W È 11 27 32 ...

Страница 42: ...ll then automatically rotate its orientation to the horizontal reading direction for your typing convenience 2 5 1 Open the physical keyboard Physical keyboard layout diagram Action Using the physical keyboard Push the screen to the right 1 2 Please push the screen to the right The screen will rotate to the horizontal reading orientation for your typing convenience CH02_ENG1024 indd 32 2006 11 10 ...

Страница 43: ...hen and then press the corresponding keys To enter a single number or symbol please first press and then press the corresponding numbers symbols indicated in blue on the keys Press twice to continuously enter the corresponding symbol or number indicated in blue on the keys First press then press to access the symbol pad Use to move the cursor position Action Using the physical keyboard to enter lo...

Страница 44: ...ase Press then press 1 2 Using the physical keyboard to enter text Enter uppercase letters Action Usingthephysicalkeyboardtocontinuouslyenteruppercase Press then press 1 Press 2 Continuously enter uppercase letters 3 Text has been entered CH02_ENG1024 indd 34 2006 11 10 W È 11 27 41 ...

Страница 45: ...hen press 1 2 Using the physical keyboard to enter numbers Numbers have been entered Action Using the physical keyboard to continuously enter numbers Press twice then press 1 2 Using the physical keyboard to enter numbers Numbers have been entered CH02_ENG1024 indd 35 2006 11 10 W È 11 27 42 ...

Страница 46: ...ysical keyboard to enter symbols Press then press 1 Select 2 The symbols table opened you can click or use the up down left right buttons to select the symbol Open the symbols table 3 Symbol has been entered CH02_ENG1024 indd 36 2006 11 10 W È 11 27 43 ...

Страница 47: ...opic you will learn 1 Using the Phone 2 Dial Voice Call 3 Receiving Voice Calls 4 Call Options 5 Additional Information on Dialing 6 Smart Dailing 7 Managing Call Records 8 Configure Speed Dial 3 CH03_ENG1024 indd 37 2006 11 10 W È 11 33 06 ...

Страница 48: ...aling 51 Using SIM Card Manager Dialing 51 Use Speed Dialing from Phone Screen 52 Use Speed Dialing Application to Dial 52 Use Voice Command Dialing 53 Answering Incoming Calls 54 Reject Incoming Calls 55 View Missed or Rejected Incoming Calls 55 Dialing Missed Calls 56 End Call 56 Answer New Incoming Call Hold Original Call 57 End New Incoming Call Return to Original Call 58 Continue with Origina...

Страница 49: ...er 63 Dialing Emergency Calls 64 Dialing International Calls 64 Using SIM Card Services STK 65 Use Phone Application to Ceate Call Notes 65 Using SmartDailing at the phone application 66 Configure Smart Dialing 66 Browse Call Information 67 Filter call history 68 Delete Single Call History 68 Creating a Speed Dial Entry 69 Removing a Speed Dial Entry 70 CH03_ENG1024 indd 39 2006 11 10 W È 11 33 06...

Страница 50: ...ing Speed Dialing browse call records create notes and configure the phone 3 1 2 Enter PIN code Each time you activate the phone functions you will need to enter the SIM card PIN code per sonal identification number provided by your account s telecom service provider Action Enter PIN Code Select Number buttons 1 Select Enter 2 Finish entering the PIN code Phone Screen 3 Enter your SIM card PIN cod...

Страница 51: ...PIN code again for confirmation Enter the PUK unlock code If an incorrect PIN code is entered more than 3 times the SIM card will automatically be locked and you will not be able to use the phone functions If this occurs please contact your account s telecom service provider to obtain the SIM card code PUK to unlock the SIM card Please enter your new custom PIN code CH03_ENG1024 indd 41 2006 11 10...

Страница 52: ...y be required to turn off the phone and other wireless communication functions Briefly pressing the power button to turn off the device merely enables standby mode on the phone and does not completely turn off the phone functions After turning off the phone function you will still be able to operate the application programs on the phone Using Comm Manager to turn off phone functions Today screen U...

Страница 53: ... at i on 43 Select 1 Select 2 Today screen Using Comm Manager to turn on phone func tions Note 1 Note 1 Please enter your SIM card PIN code if required Action Turn on the Phone Function CH03_ENG1024 indd 43 2006 11 10 W È 11 33 08 ...

Страница 54: ... music volume When using Vibrate mode calls and de vice volume will automatically be set to mute When a call is received the phone will vibrate When using Off mode calls and device volume will automatically be set to mute and the vibrate function will not be activated Action Adjust Phone Volume Select 1 Select Volume Slider or move volume slider or press Volume key 2 Select Vibrate or Off 3 Adjust...

Страница 55: ...and hold the number 2 button on the phone screen to dial the contact You can also access the speed dial application from the phone screen Voice commands provide voice dialing functions to enable voice control of the device You must activate voice commands before use When in use follow the provided voice operation hints For contact management please refer to 5 1 for browse call history please refer...

Страница 56: ...ction Dialing When Browsing Contact Information Select Contacts 1 Select Call mobile Call home Call work or send SMS 2 Select the contact to call Select dialing location for example select Call mobile 3 Dialing the Contact Dialing the Contact Note 1 Press the left right direction button to dial the contact s mobile home or office number CH03_ENG1024 indd 46 2006 11 10 W È 11 33 12 ...

Страница 57: ...ton 3 At the phone Home screen access the call Choose the contact to call in call history Dial contact in call his tory Action Using SIM Card Manager Dialing Select Programs 1 2 Select and hold Contacts Then select Call 3 Open SIM Manager Please first select the SIM card contact to dial then select Call CH03_ENG1024 indd 47 2006 11 10 W È 11 33 14 ...

Страница 58: ...ntact Action Use Speed Dialing Application to Dial Select Speed Dialing 1 Select Speed Dialing number index 2 3 You can also access the Speed Dial application from the Phone screen Select the speed dialing number index to dial for example 2 Dial the speed dialing specified contact Note 1 If the specified contact number is 12 you can select 1 and then select and hold 2 to dial the contact numbered ...

Страница 59: ...ion 4B 5 If you said the dialing location for example office please confirm whether to dial the contact If you did not specify the dialing location please say or select the location on the screen for example mobile phone Voice dialing to the Contact Select Programs 1 You can also press the Voice Commander button to activate directly Action Use Voice Command Dialing CH03_ENG1024 indd 49 2006 11 10 ...

Страница 60: ... can choose to accept or reject the incoming call When you are on a call you can still select the start menu and access other application programs at any time or return to the Today screen Action Answering Incoming Calls Press Call button or tap Answer 1 2 Incoming call prompt Answering Incoming Calls In call screen CH03_ENG1024 indd 50 2006 11 10 W È 11 33 18 ...

Страница 61: ...ow to remind you that you have missed calls Action View Missed or Rejected Incoming Calls Select Notification or prests the device s Left Shortcut Button 1 Select View or press on the device Left Shortcut Button 2 3 The missed call notifi cation screen The call notification screen lists the missed call information CH03_ENG1024 indd 51 2006 11 10 W È 11 33 19 ...

Страница 62: ...Action Dialing Missed Calls Select Missed Calls Then select Call Or press Call button 1 2 Call list screen Dialing missed calls Action End Call Select End or press Hang up button 1 2 In call End call CH03_ENG1024 indd 52 2006 11 10 W È 11 33 20 ...

Страница 63: ...way conferencing If you wish to initiate multi way conferencing please place the first call on hold and then dial the second phone number You can use the built in speaker phone to speak with callers without using the handset Using the speak erphone allows other people to hear the conversation You can mute the speaker so that the other party will not be able to hear your voice but continue to hear ...

Страница 64: ... New Incoming Call Return to Original Call Select End 1 2 End new incoming call return to original call Continue with original call Action Continue with Original Call Select Swap 1 2 Switch call to other side CH03_ENG1024 indd 54 2006 11 10 W È 11 33 21 ...

Страница 65: ...Second Number Select Hold 1 Select Keypad or press Left shortcut button 2 Select Number buttons 3 Hold original call Orginal call holding Enter the second phone number Select Talk 4 5 Create new call Dial the second phone number CH03_ENG1024 indd 55 2006 11 10 W È 11 33 22 ...

Страница 66: ...port multi way conferencing please contact your service provider for more information Action Switch to Private Call Select Menu Private 1 Select private call to create then select Private 2 3 Select your private call contacts or call to create During multi way conferencing you can create a private call with one side and hold other calls Creating private call with one side and holding other calls C...

Страница 67: ...one function to prevent the damage to the hear ings Action Speaker Phone on Select Speaker On 1 2 In Call screen Note1 When speakerphone is activated the top of the screen will display Icon Action Turn the Hands free Off 2 Select Speaker Off 1 Hands free speakerphone is off Hands free speakerphone is activated Note 1 Note 1 You can also select menu Speaker Off CH03_ENG1024 indd 57 2006 11 10 W È 1...

Страница 68: ...s activated the top of screen will display Icon Action Turn off Mute Function Select Select Unmute 1 2 Mute function activated Note 1 Mute function turned off the other side can hear you Note1 You can also select Menu Mute Note1 You can also select Menu Unmute CH03_ENG1024 indd 58 2006 11 10 W È 11 33 23 ...

Страница 69: ...d to dial the local emergency help number do so by dialing directly from the phone ap plication When the phone functions are off or the keypad is locked you can still dial emergency calls You can use various information services such as customer service and voicemail that are built into the SIM card by the service provider To use the SIM card services please first insert your SIM card into the pho...

Страница 70: ...y help numbers please ask your service provider for more information Action Dialing International Calls Select and hold 0 1 Select Numbers then select Call 2 3 Until phone screen shows will replace the country code for your current location Enter the complete international phone number including country code area code and the number to dial Make international call CH03_ENG1024 indd 60 2006 11 10 W...

Страница 71: ... Programs 1 The STK icon displayed name is your service provider name Action Use Phone Application to Ceate Call Notes Select Create Note 2 Edit Note Content 3 Select Menu 1 Phone Screen For phone screen edit ing notes please refer to 5 4 Notes Application CH03_ENG1024 indd 61 2006 11 10 W È 11 33 25 ...

Страница 72: ...e application screen to Select number pad to execute SmartDailing SmartDailing Screen Using SmartDailing at the phone application Configure Smart Dialing Smart Dailing Con figuration screen Enter Smart Dailing Configuration Screen at the phone screen Select Menu Smart Dialing Options Smart Dailing Configuration Option Option Description Enable SmartDailing Choose if to enable this func tion Automa...

Страница 73: ... follows all calls missed calls incoming calls video calls and by contact name for your convenience to brower the call history Call history icon description Incoming voice call Dial Voice Call Outgoing voice call Action Browse Call Information 2 Select phone list item 1 Call history screen Please select the call item to browse Call information display screen Note 1 Note1 You can browse call date t...

Страница 74: ...ct Menu Delete all calls Select and hold Contacts Then select delete 1 Call history screen Confirm to delete single call history Note 1 Action Filter call history Select Filter Criteria 2 3 Select Menu Filter 1 Call history screen Select the call type to browse For example Outgoing List all outgoing calls CH03_ENG1024 indd 64 2006 11 10 W È 11 33 27 ...

Страница 75: ... create speed dial entries using the speed dial application You will also be able to delete and edit the speed dial entries Action Creating a Speed Dial Entry Select Contacts 2 Select Menu Add 1 Edit Name 3 Speed Dial application screen Please enter the name The default is the contact name Choose the contact to set up for speed dialing For example Franky Speed Dial Screen CH03_ENG1024 indd 65 2006...

Страница 76: ...ry Select the corresponding number button For example 2 Finish creating a speed dial entry Select Menu Delete 2 Select Contacts 1 Select Yes 3 Action Removing a Speed Dial Entry Speed dial application screen Select the contact to delete Removing a Speed Dial Entry Confrim to delete this Speed Dial entry CH03_ENG1024 indd 66 2006 11 10 W È 11 33 28 ...

Страница 77: ...Topic View Message In this topic you will learn 1 Use the Messaging Center 2 SMS 3 MMS 4 Outlook E mail 5 POP3 IMAP4 Account 4 CH04_ENG1024 indd 67 2006 11 10 W È 11 59 36 ...

Страница 78: ...messages 77 Copy message to SIM card 78 Copy message to Inbox 78 New multimedia MMS message 79 New multimedia MMS message 80 Browser MMS message 81 Reply to a MMS messaging 82 Deleting MMS message 82 Moving MMS message 83 Configure MMS message Option 83 Drafting and sending e mails 85 Drafting and sending e mails 86 Recieving e mail 87 Browse e mail 87 Download complete e mail contents 88 CH04_ENG...

Страница 79: ...ownload attached files 88 Save the attached file to storage card 89 Reply to e mails 89 Reply all 90 Forward mail 91 Adds a new POP3 IMAP mail account 92 Send and receive e mail 94 CH04_ENG1024 indd 69 2006 11 10 W È 11 59 36 ...

Страница 80: ...essages You can use the messaging center to send and receive SMS MMS Outlook e mails and other messages from custom e mail accounts By switching accounts you can browse SMS MMS Outlook e mail or other e mail accounts Action Open the messaging Center 2 Select Messaging Center 1 CH04_ENG1024 indd 70 2006 11 10 W È 11 59 38 ...

Страница 81: ...hed to Outlook e mail You can also use the following two methods to switch accounts Use the track ball moving left right to switch between SMS MMS and Outlook E mail accounts Action Switch folders Select Inbox 1 Select Folder to open 2 3 Open the folder to view Note 1 for example Drafts Folder switched CH04_ENG1024 indd 71 2006 11 10 W È 11 59 41 ...

Страница 82: ...ox Stores all received messages Deleted Items Deleted messages are saved in Deleted Items Drafts Stores message drafts Outbox Stores outgoing messages that are ready to be sent Sent Items Sent messages are saved in Sent Items as a backup CH04_ENG1024 indd 72 2006 11 10 W È 11 59 41 ...

Страница 83: ...y split the text into two or more messages before sending Browse received messages Read and unread messages are indicated by the following icons Unread messages Read messages When you receive messages you can use the reply message option to reply to the original sender The recipient of the reply message is automatically filled in You can also delete unwanted messages to conserve memory on the phon...

Страница 84: ... 4 Select the lower empty field then Enter Text 4 Select Send 5 6 Message sent Action Open messages Select Message to browse 1 2 Message opened you can browse the message contents CH04_ENG1024 indd 74 2006 11 10 W È 11 59 46 ...

Страница 85: ... ss a ge 4 Action Reply messages Select and hold Message to reply 1 Select Reply 2 3 Message editing screen Action Close messages Select 1 2 Browse message icon changed to CH04_ENG1024 indd 75 2006 11 10 W È 11 59 48 ...

Страница 86: ...nd hold Message to delete 1 Select Delete 2 3 Deleted messages are moved to the Deleted Items folder Action Add new message folder Select Menu Tools Manage Folders 1 Select and hold Text Message 2 Select New Folder 3 CH04_ENG1024 indd 76 2006 11 10 W È 11 59 51 ...

Страница 87: ...messages Enter folder name Select again 4 5 Select folder to move to Select again 3 For example select Company For example company New folder added Select and hold Message to move 1 Select Move 2 CH04_ENG1024 indd 77 2006 11 10 W È 11 59 54 ...

Страница 88: ...Select Menu copy to SIM card 1 2 Message copied to SIM card Action Copy message to SIM card Action Copy message to Inbox Select Menu Copy to Inbox 1 2 Message has been copied to Inbox CH04_ENG1024 indd 78 2006 11 10 W È 11 59 56 ...

Страница 89: ... original sender The recipient of the reply message is automatically filled in You can also delete unnecessary MMS messages to save memories and also configure the MMS message sent options Action New multimedia MMS message Select Add 1 Select MMS example to use 2 Select Recipient Then enter Recipient phone number 3 Before using MMS messages you must first activate GPRS service through your telecom...

Страница 90: ...Select Select 6 Insert pictures or videos Choose a picture or video to send Note1 Select Enter text here then Enter Text to send 7 Select Insert audio clipe here 8 Choose audio clip 9 You can also select Recordings Continue New multimedia MMS message CH04_ENG1024 indd 80 2006 11 10 U È 12 00 04 ...

Страница 91: ...rowse 1 2 MMS message playing Note1 If you are having large pictures size it is likely resulted in MMS sent fail It is recommended to use the Pictures Videos to select the files to be sent via Pictures Videos the program will compress the file for your automatically CH04_ENG1024 indd 81 2006 11 10 U È 12 00 06 ...

Страница 92: ...hold the MMS message to reply 1 Select Reply 2 3 Please to 4 3 for adding a new MMS Message Action Deleting MMS message Select and hold the MMS message to delete 1 Select Delete 2 3 Deleted messages are moved to Deleted Items CH04_ENG1024 indd 82 2006 11 10 U È 12 00 09 ...

Страница 93: ...1 Select Move 2 Select folder to move to Select again 3 For example Drafts Action Configure MMS message Option Select Menu Tools Option 1 Select MMS 2 Choose the MMS Options setting you wish to set up Note 1 Select and check MMS message op tions 3 CH04_ENG1024 indd 83 2006 11 10 U È 12 00 12 ...

Страница 94: ...notification Do not display roaming related notification Save sent Message Save the sent message in the device Reject all Message No MMS messages will be received Allow delivery report When message is sent to the recipient device system will automatically notify you Allow read report When message is sent to the recipient device system will automatically notify you Times to retry Before delivery st...

Страница 95: ...eSync scheduler to activate the Direct Push function For configuration of ActiveSync please refer to descriptions in Chapter 6 You can draft e mail to contacts You can also append files on the phone to the message You can also browse received e mail and files appended to e mails Read and unread e mail messages are indicated by the following icons Read mail with appended files Unread mail with appe...

Страница 96: ... send 7 Select Send 8 9 Append file Enter the text body For example FYI Please enter the mail body in the empty editing field During next execution of ActiveSync mail will be automatically sent For example dopod smartphone guide Continue Drafting and sending e mails CH04_ENG1024 indd 86 2006 11 10 U È 12 00 18 ...

Страница 97: ...Recieve 1 2 You must perform ActiveSync sync before receiving mail Received E mail Action Browse e mail Select E mail to browse 1 Select 2 3 You can also select and view the appended files Icon for read e mail becomes CH04_ENG1024 indd 87 2006 11 10 U È 12 00 21 ...

Страница 98: ...tents Select Obtain remaining parts of this message 1 2 E mail contents will be completely downloaded during next sync Action Download attached files Select File to download 1 2 File will be downloaded during next sync CH04_ENG1024 indd 88 2006 11 10 U È 12 00 24 ...

Страница 99: ...Select Storage 2 Select Store attachments on storage card 3 Action Reply to e mails Select and hold E mail to reply to 1 Select Reply 2 Select blank text body then enter Message to reply 3 Enter the mail body in the empty editing field for example Thanks CH04_ENG1024 indd 89 2006 11 10 U È 12 00 27 ...

Страница 100: ... e 4 Select Send 4 5 During next execution of ActiveSync mail will be automatically sent Action Reply all 2 Select Menu Reply All 1 All recipients will be automatically filled in CH04_ENG1024 indd 90 2006 11 10 U È 12 00 31 ...

Страница 101: ...91 4 Vi ew M e s sa ge 4 Action Forward mail 2 Select Menu Forward 1 Fill in the recipient and message to forward this mail CH04_ENG1024 indd 91 2006 11 10 U È 12 00 32 ...

Страница 102: ...P Mail Account Set up POP3 IMAP4 mail server account password and server information When you download e mail from a POP3 or IMAP4 account the mail is retained on the server When you configure a POP3 IMAP4 mail account you can specify to only download a limited number of days worth of e mail and expired mail will be removed from your device If you manually delete mail from a POP3 IMAP4 account mai...

Страница 103: ...ming mail Outgoing mail Domain 7 9 Please ask your mail server administrator for the server information Note After setup no modification is permitted Please ask your mail server administrator for the server information Whether to immediately download mail for this account Account setup complete CH04_ENG1024 indd 93 2006 11 10 U È 12 00 39 ...

Страница 104: ...the Messaging Center to download and send e mails When sending receiving you may be charged fees by the ISP for connecting to the Internet Action Send and receive e mail 2 Select Menu Send Receive 1 E mail downloaded CH04_ENG1024 indd 94 2006 11 10 U È 12 00 40 ...

Страница 105: ...Topic Managing Personal Information In this topic you will learn 1 Contacts 2 Calendar 3 Tasks 4 Notes 5 CH05_ENG1024 indd 95 2006 11 10 W È 11 57 44 ...

Страница 106: ... New Appointments 109 Close Reminder 113 View and Edit Appointments 113 Delay Reminder 113 Send Appointments Through MMS 114 Send Appointments Through Bluetooth 114 Opens the Tasks Application 115 Adding New Tasks 116 Adding New Tasks 116 Setting Tasks as Completed 117 Search Tasks 118 View and Edit Appointments 119 Open the Notes Application 120 Add New Notes 121 Adding a New Voice Note 123 View ...

Страница 107: ...3 to activate the Bluetooth function on the phone You can also use the SIM card manager to copy contact information from the SIM card to the phone s Contacts application It is also possible to add a new contact s name and phone information to the SIM card When you swap the SIM card to other phones you can access contacts saved on the SIM card Contacts saved to phone memory can be backed up using t...

Страница 108: ...obile number 3 The mobile number is the default calling number Note 1 Note 2 For example Bruce To use camera to capture pictures please select the camera Select select a picture 4 Select Picture 5 Select work address 6 Configure the contacts icon as default incoming call displayed picture You can also press Left Shortcut Button CH05_ENG1024 indd 98 2006 11 10 W È 11 57 47 ...

Страница 109: ...ng ring tone for example Dopod01 For adding new ring tones please refer to chapter 11 Enter the contacts e mail address Note 1 You can select the empty area to enter notes about the contact Return to contacts main screen You have added a new contact entry Finish editing contacts Continue Adding New Contacts to the Phone CH05_ENG1024 indd 99 2006 11 10 W È 11 57 49 ...

Страница 110: ... 2 Instant Message 3 E mail 2 E mail 3 Assistant Assistant tel Manager Government ID Account Customer ID Birthday Anniversary Spouse Children Note 1 Both phone number and e mail require half width character in put otherwise the system will not be able to correctly recognize them To switch between character number and half full width methods please refer to Chapter 2 Entering Characters Note 2 If y...

Страница 111: ...tacts to the Phone Select Programs SIM Manager 1 3 You have successfully copied SIM card contacts to the phone Action Add New SIM Card Contacts Select Menu SIM Manager 1 Select then Enter Name and Phone number 3 For example Enter the name Franky phone 0912000000 Contacts application main screen Select Add or press left shortcut button 2 CH05_ENG1024 indd 101 2006 11 10 W È 11 57 51 ...

Страница 112: ...lect Save to Contacts 2 Input Various information for the contact 3 Select call item for example 091 100 0000 Various information for the contact When you replace the phone s SIM card the SIM card contacts list will be updated with the contacts on the new SIM card Phone contacts will not be changed with replacement of the SIM card CH05_ENG1024 indd 102 2006 11 10 W È 11 57 53 ...

Страница 113: ...ct the contact to browse or edit for example Franky Contacts information browsing screen Edit contacts Action Deleting Contacts Select Contacts 1 Select Menu Deleting Contacts 2 3 Delete a single contact information entry Choose the Contact to delete For example Bruce Contact deleted CH05_ENG1024 indd 103 2006 11 10 W È 11 57 56 ...

Страница 114: ...y character or string from the name or number For example select fgh as Search Criteria Find the desired contact entry Action Grouping Contact Select Menu Edit 1 Select Categories 2 Check contact category then Select 3 Contacts information browsing screen You can also select New to add a new category CH05_ENG1024 indd 104 2006 11 10 W È 11 57 59 ...

Страница 115: ...heses procedures to send contacts to other people as a vCard Note 1 through MMS At the contacts main screen select contact For example David Select Menu Send as vCard At MMS Edit Screen enter recipient Subject body etc to edit MMS please refer to section 4 3 action descriptions Select Send and send the MMS Note 1 vCard Electronic Business Card Used to record you or your contacts business card info...

Страница 116: ...ough Bluetooth Select and hold Contacts 1 Select Send Contact Beam 2 Select device 3 Select the contact to send for example Bruce Select data exchange device is the Bluetooth device Select 4 After send is complete please select CH05_ENG1024 indd 106 2006 11 10 W È 11 58 03 ...

Страница 117: ...e most appropriate method to manage your appointments You can also use Bluetooth and MMS to send appointment information to other people When using Bluetooth sharing please first use Comm Manager please refer to section 9 3 to activate the Bluetooth function on the phone The calendar information is stored in the phone s memory you can use the Microsoft Office Outlook sync function to backup the ca...

Страница 118: ...ethod Agenda view After selection changes to Day view Day view After selection changes to Week view Week view After selection changes to Month view Select Year 4 Select Agenda 5 Month view After selection changes to Year view Year view After selection changes to Agendar view CH05_ENG1024 indd 108 2006 11 10 W È 11 58 06 ...

Страница 119: ...ct for example meeting Enter the appointment location for example Conference Room Select Starts then Enter Start time 4 Select End then Enter End time 5 Select All Day then Choose all day event or not 6 Enter the appointment start time for example 12 00PM Enter the appointment end time for example 1 00PM All day events only be shown at the top of calendar CH05_ENG1024 indd 109 2006 11 10 W È 11 58...

Страница 120: ...ointments Note 1 for example Once Select whether to remind you of your appointments Configure how long before the appoint to remind you Select Categories 10 Check Category name then select 11 Check mark the appointment category for example Business Categorize your appointment events Select Attendee 12 the phone will send out the requests to each attendee after syncing CH05_ENG1024 indd 110 2006 11...

Страница 121: ... choose Sensitivity 15 Select Notes And Enter Memo information 16 Select 17 18 Return to calendar main screen You can browse the added appointment You can enter a memo in the empty space Select the appointment confidentiality Note 3 for example Normal Finish adding a new appointment information Select the appointment status Note 2 for example Busy CH05_ENG1024 indd 111 2006 11 10 W È 11 58 14 ...

Страница 122: ...l not conflict with overlapping time slot types Tentative When you are not sure of this appointment select tentative status Out of office When you are not available during this time slot set as out of office status Note 3 Sensitivity description Normal When Outlook calendar provides other people access permission anyone will be able to see your appointment information in Outlook Private When Outlo...

Страница 123: ...in in 5 minutes Select Appointment 1 Select 2 Select Edit 3 Action View and Edit Appointments At the calendar inspection screen select the appointment to view Select to view more information for the appointment Appointment information screen After selecting edit appointments At the appointment reminder time the phone will show the reminder screen and sound the ring tone CH05_ENG1024 indd 113 2006 ...

Страница 124: ... MMS please refer to section 4 3 action descriptions Select Send and send the MMS Note 1 vCalendar an electronic calendarfor records of your personal appointment schedule You can send your own vCalendar to other phones or computers that have vCalendar compatibility At the contacts main screen select Menu Send vCalender Action Send Appointments Through Bluetooth Select Menu Beam 1 Select device 2 S...

Страница 125: ... All of your entered tasks are displayed in the application main screen Tasks List In the tasks application you can add new tasks view edit search delete and send task information When adding new task entry information you can set the task start and end date as well as reminder time etc Dued tasks will be listed in red Action Opens the Tasks Application Select Tasks 2 Select Programs 1 3 Tasks app...

Страница 126: ...the track wheel confirmation Enter the task subject for example Buy ticket You can select High Priority Low Priority or none selected Action Adding New Tasks Select and Enter Subject 2 Select Menu New Task 1 Select and Choose Priority 3 Enter the task subject for example Book hotel You can also press the Left sortcut button to add new tasks Choose the task priority for example High CH05_ENG1024 in...

Страница 127: ...t Select 6 Select the task start date for example 2006 10 17 Select the task expiration date for example 2006 10 18 Enter task notes in the empty space Select to finish adding Action Setting Tasks as Completed 2 Select 1 If task is completed you can check mark the task entry the check mark will be shown beside the task CH05_ENG1024 indd 117 2006 11 10 W È 11 58 24 ...

Страница 128: ... 2 Select Menu Sort By 1 Select Menu Filter 3 Select task sorting criteria for example Priority Tasks sorted according to priority 5 Select Filter Criteria 4 Search for in progress tasks Select the filter criteria for example Active Tasks CH05_ENG1024 indd 118 2006 11 10 W È 11 58 25 ...

Страница 129: ...Edit Appointments Select 2 Select Task 1 Select Edit 3 Select the task entry to view or edit for example Take ticket If there is more task information select to view more information Please refer to action New Task for edit CH05_ENG1024 indd 119 2006 11 10 W È 11 58 25 ...

Страница 130: ...name move and delete notes as well as record audio notes You can rename the note to another file name as well as move the note to internal phone memory or to a folder on the memory card A recording file of excessive length will take up a great deal of storage space and should be moved to the memory card to conserve main memory space on the phone You can also categorize data by moving it into diffe...

Страница 131: ...u can use the stylus to draw or write characters on the screen Enter Characters 5 6 Select Menu Then uncheck Draw 4 use normal input method Normal input mode Use virtual or hardware keyboard to enter text Exit drawing input mode use normal input method Notes application screen Draw mode CH05_ENG1024 indd 121 2006 11 10 W È 11 58 29 ...

Страница 132: ...u then check View Recording Toolbar 7 Start recording Stop recording 11 Select 10 Return to main screen You have added a new note entry Start recording toolbar to record audio notes Audio note contents are shown as in note documents CH05_ENG1024 indd 122 2006 11 10 W È 11 58 30 ...

Страница 133: ...r stop recording you will have a new voice note Open the recording tool bar to record audio notes Action View Notes Select 2 Select 3 Select Notes entry to view 1 At the Notes application main screen select the note to view Note viewing screen Press to listen to the audio note contents Stop playing audio contents CH05_ENG1024 indd 123 2006 11 10 W È 11 58 32 ...

Страница 134: ...le recording 1 Begin audio playback you can selectSelect to stop play Audio note play complete Action Rename Moving Notes Select Rename Move 2 Select Name then Enter New Name 3 Select and hold Note to rename 1 Select the note to rename or move for example Note1 For example rename file name to Note CH05_ENG1024 indd 124 2006 11 10 W È 11 58 34 ...

Страница 135: ...notes Action Delete Notes Select Yes 2 Select and hold Notes to delete Then Select Delete 1 Continue Rename Move Notes After Notes move to Storage card icon become or Confirms deletion of the notes Select the notes you wish to delete You can delete recordings by inadvertently pressing the record button Deleting the recording can effectively increase the storage space CH05_ENG1024 indd 125 2006 11 ...

Страница 136: ...Default Storage Location Select Save to then Select Save location 2 Select 3 Select Menu Options 1 Notes application main screen You can choose to save notes to Main memory or Storage Card Notes default storage location changed CH05_ENG1024 indd 126 2006 11 10 W È 11 58 36 ...

Страница 137: ...Connection 5 Using ActiveSync 6 Synchronizing with Multiple Computers 7 Synchronizing through Bluetooth 8 Synchronizing with an Exchange Server 9 Using ActiveSync to Transfer and Manage Files 10 Advanced PC Sync Settings 11 Syncing Music Video and Pictures 12 Installing Software 13 ActiveSync Troubleshooting 6 CH06_ENG1024 indd 127 2006 11 10 W È 11 36 06 ...

Страница 138: ...ynchronization 149 Use File Explorer to Browse Phone Folders 150 Use File Explorer to Sync and Transfer Files 151 Open Computer s Connection Settings 153 Set Sync Connection Serial Port on Computer 154 Open Computer Connection Settings Window 155 Set Sync Data Type on the Computer 157 Set Calendar Sync Options on the Computer 158 Set Multimedia Sync Data Type on the Computer 159 Sync Multimedia Fi...

Страница 139: ... as well as syncing Internet Explorer My Favorites pictures notes and recordings video and files on the phone in My Documents Sync phone with Exchange Server Sync with the remote server via Exchange Server to update personal information such as Outlook contacts task calendar appointments and e mail etc Directly exchange data between phone and computer without synchro nization Set sync options Sele...

Страница 140: ...ell follow the instructions on the User CD to install it If your ActiveSync installation program is downloaded from the Internet please execute the installation program from the folder it was downloaded to Action Install ActiveSync to the Computer Select Next 1 Select Next 2 Insert the User CD into the CD ROM drive to automatically execute this program Install Microsoft ActiveSync CH06_ENG1024 ind...

Страница 141: ...on folder then select Next 4 Enter your name and group information for example for the user name enter User for the organization enter Dopod Select the installation destination folder Select Next if no change is necessary Select Install 5 Select Finish 6 Begin installation ActiveSync installed successfully CH06_ENG1024 indd 131 2006 11 10 W È 11 36 09 ...

Страница 142: ... Key from the included User CD If you are installing using the User CD instructions please install Microsoft Office Outlook after Microsoft ActiveSync is installed If your computer already has Microsoft Office Outlook 2002 version or above installed you do not need to install it again Action Install Microsoft Office Outlook Select Repair or Install Necessary Programs 1 Select Microsoft Outlook The...

Страница 143: ...ext 3 Select Install Then select Next 4 Select Install 5 6 Select the installation type You can also modify the installation directory and type Confirm Install Microsoft Office Outlook Installing Microsoft Office Outlook CH06_ENG1024 indd 133 2006 11 10 W È 11 36 12 ...

Страница 144: ...Synchronizing Your Phone 6 134 Select OK 7 Successfully installed Microsoft Office Outlook CH06_ENG1024 indd 134 2006 11 10 W È 11 36 13 ...

Страница 145: ...combine or replace the device or data on the computer If you wish to keep the sync information on the phone please select combine items on device with items on computer Selecting replace items on device with items on computer will overwrite the original sync information on the phone Action Connect to the Phone for the First Time 1 Once connected ActiveSync will automatically run the sync wizard If...

Страница 146: ...lect Finish 5 6 You can set the sync options for the data types for example calendar Complete sync options settings Select Data type Then select Settings 3 Searching modified items on the phone computer CH06_ENG1024 indd 136 2006 11 10 W È 11 36 15 ...

Страница 147: ...ws PC status displays as Synchronizing Sync is now completed Computer such as Windows PC status displays as Synchronized Decide whether to keep the information on the phone Select Combine the items on my device with the item on this computer then select OK 7 CH06_ENG1024 indd 137 2006 11 10 W È 11 36 15 ...

Страница 148: ...sonal computer After the phone and computer are disconnected ActiveSync will automatically stop the sync operation You can inspect the sync connection status on a Windows operating system from the ActiveSync icon on the taskbar located on the lower right from the ActiveSync program on the phone or on the computer Select ActiveSync Action Activate ActiveSync on the Phone 3 2 Select Programs 1 Activ...

Страница 149: ...c configuration wizard will ask you to enter the other computer s name in order to differentiate it from the original computer When the phone syncs with multiple computers you will know clearly which computer is in synchronization with the phone Action Set the Phone to Sync with Multiple Computers Select Next 1 Plug in the USB cable to the other computer and the phone s USB socket ActiveSync will ...

Страница 150: ...Phone 6 140 Enter Computer Name Then select Next 3 If your phone is already synchronized with a computer please enter the other computer s name For example enter Windows PC 2 CH06_ENG1024 indd 140 2006 11 10 W È 11 36 17 ...

Страница 151: ...n on the computer ActiveSync will automatically activate Bluetooth function on the phone During the initial use of this function you must first set the Bluetooth connection with computer You must first sync the handset with a computer using the USB cable to be able to use Bluetooth to perform ActiveSync synchronization Action Configure Bluetooth connection synchronization Choose Start Control Pane...

Страница 152: ...t OK 5 Select OK 6 Records your open COM port number for example COM 16 Your port number must be less than 20 otherwise it will not be able to connect successfully Select Options then checkmark Launch Explore 3 Select COM Port then select Add New 4 CH06_ENG1024 indd 142 2006 11 10 W È 11 36 20 ...

Страница 153: ...rogram Files 9 Select Menu Use Bluetooth Connection 11 Select Files Connection Settings 7 Checkmark Allow connection to the following devices then select Bluetooth COM port number 8 Select ActiveSync 10 CH06_ENG1024 indd 143 2006 11 10 W È 11 36 22 ...

Страница 154: ... Your Phone 6 144 Select Yes 12 Select Add New Device 13 Select Computer Then select Next 14 Enter Password Then select Next 15 Select Messages 16 Enter the 4 digit key CH06_ENG1024 indd 144 2006 11 10 W È 11 36 22 ...

Страница 155: ...e 6 145 6 Enter Password 17 Select Finish 18 Synchronization complete you will only be required to perform synchronization settings once 19 Enter the same password as the handset CH06_ENG1024 indd 145 2006 11 10 W È 11 36 23 ...

Страница 156: ...Synchronizing Your Phone 6 146 Action Use Bluetooth connection Select Menu Use Bluetooth Connection 1 2 Begins to perform synchronization through Bluetooth CH06_ENG1024 indd 146 2006 11 10 W È 11 36 24 ...

Страница 157: ...ly To use Direct Push you must create a GPRS connection Note 1 Direct Push is a way making an instant connection to an Exchange Server When new mail reaches the Exchange Server the server will notify your mobile device to perform a sync This will reduce power consumption and transmission fees when doing periodic scheduling When you specify the as item arrives for sync scheduling it means to use th...

Страница 158: ...ddress Check with your system administrator before entering user name password If you wish to perform autosync in the future please check save password Select the data type you wish to sync with the computer eg contacts Note 1 Note 1 You can also select Settings on the screen to set the sync data type options To set the sync data type options please refer to section 6 10 3 CH06_ENG1024 indd 148 20...

Страница 159: ...edule settings screen Configure each synchronization interval eg as item arrives Direct Push function Select whether to use peak off peak time when using the mobile network roaming Select your custom peak dates eg Monday to Friday AM 8 00 to PM 6 00 Select Send outgoing items immediately then select Peak time 4 Select whether to immediately send outgoing information to the server Finish scheduler ...

Страница 160: ...h corresponds to the My Documents folder on the device or place them in the Storage Card folder which is a memory card location If you are placing ring tone files please place your MP3 WMA MIDI AMR or WAV format files in the My Device Application Data Sounds folder You cannot directly access the documents pictures or files on the mobile device from the computer If you wish to read documents or pic...

Страница 161: ... phone Select Storage Card to open the memory card folder Action Use File Explorer to Sync and Transfer Files Select Files on computer Then right click the mouse 1 Select Copy 2 Select the file to send to the phone in the folder on the PC for example New txt Then open the file operation options CH06_ENG1024 indd 151 2006 11 10 W È 11 36 29 ...

Страница 162: ...Right click the mouse Then select Paste 3 Select OK 4 5 The files on the computer are now sent to the My Documents folder on the phone Paste the files to the Mobile device phone directory CH06_ENG1024 indd 152 2006 11 10 W È 11 36 29 ...

Страница 163: ...g the ActiveSync sync connection method and serial port You can also manually obtain the connection and phone connection If you have set the phone s USB connection to serial mode or customized the Bluetooth serial port number from the computer Bluetooth driver program you may need to manually select the sync connection serial port Action Open Computer s Connection Settings Select File Connection S...

Страница 164: ...us icon in taskbar you can view the connection status from the Windows lower right screen taskbar For example Connection connecting syncing and disconnected Check Allow USB connections To connect with a USB cable please check this option Select This computer is connected to automatic workgroup Internet Check Open ActiveSync when my device connects when you connect the phone to the computer ActiveS...

Страница 165: ... computer s Replace items on the desktop computer the computer sync information contents will be replaced by the phone s Action Open Computer Connection Settings Window Enter Computer Name Then right click the mouse 1 Select Setting 2 The name of the computer you wish to configure while the phone is connected for example Windows PC 2 Opens Desktop Computer Settings win dow CH06_ENG1024 indd 155 20...

Страница 166: ...nchronizing Your Phone 6 156 Select If there is a conflict menu then select OK 3 Select the sync conflict processing option for example Replace Item on Device CH06_ENG1024 indd 156 2006 11 10 W È 11 36 31 ...

Страница 167: ...r etc You can establish the connection on the phone and then modify the sync option types You can also set the calendar sync time schedule and sync to the phone s My Favorite links t Check Sync data type 2 Opens the options Settings window Select the data type you wish to sync for example Contact Action Set Sync Data Type on the Computer Select Tools Option 1 CH06_ENG1024 indd 157 2006 11 10 W È 1...

Страница 168: ...mputer Select Calendar Then select Settings 1 Select Sync only the past option then select OK 2 Opens the option Calendar Synchronization Settings window The phone will only sync the past for example appointments and past 2 weeks CH06_ENG1024 indd 158 2006 11 10 W È 11 36 32 ...

Страница 169: ...section 7 3 Prior to performing multimedia data sync you must do the following Install Windows Media Player 10 version or above on the computer Use USB cable to establish connection between the phone and the computer for ActiveSync sync connection Please disconnect any active Bluetooth or IR connection while doing thisInsert 32 MB or above memory card into your phoneSet the memory card and Windows...

Страница 170: ...s to sync 3 Select Device to sync to 4 Windows Media Player Screen Select the playlist you wish to sync to the phone for example All Music Selects the multimedia files you wish to sync to the phone Select the sync device For example to send to memory card please select Storage Card CH06_ENG1024 indd 160 2006 11 10 W È 11 36 35 ...

Страница 171: ...c 1 Select and check Playlist to sync then select OK 2 Begin executing sync operation Sets the file sync device to the memory card folder For example Music Windows Media Player sync process tab screen Select the playlist to sync for example Music The playlist and media files in the list will be sent to the phone CH06_ENG1024 indd 161 2006 11 10 W È 11 36 38 ...

Страница 172: ...Synchronizing Your Phone 6 162 After sync is complete you can play back the playlist My Playlist in the Windows Media library on the phone CH06_ENG1024 indd 162 2006 11 10 W È 11 36 38 ...

Страница 173: ...tware will be copied to the phone automatically during the next ActiveSync sync operation between the phone and the computer You will then need to select the software installation location and complete the software installation process Installing software on the phone Action Install Software through ActiveSync Select Install location then select Install 1 2 Select 3 Please select the software inst...

Страница 174: ...nd the Windows XP firewall is activated we recommend that you set ActiveSync as an exception in the built in firewall You may also turn off the firewall function and then re establish the ActiveSync connection Anti virus software Some anti virus software may cause problems when establishing an ActiveSync connection between the phone and the computer If your phone cannot properly establish a connec...

Страница 175: ...s 3 Uncheck Don t allow exceptions 4 Select Exceptions tab 5 Check ActiveSync related items then select OK 6 Setup ActiveSync as an exception Windows firewall main screen Please cancel this option when the firewall is activated CH06_ENG1024 indd 165 2006 11 10 W È 11 36 41 ...

Страница 176: ...CH06_ENG1024 indd 166 2006 11 10 W È 11 36 41 ...

Страница 177: ... Multimedia Entertainment In this topic you will learn 1 Camera and Video Camera 2 Viewing Pictures and Movies 3 Windows Media Player 4 Today Screen Themes 5 Audio Manager 7 CH07_ENG1025 indd 167 2006 11 10 W È 11 55 55 ...

Страница 178: ... Card 176 Open Pictures 176 Open Movies 177 Full Screen Picture Playback 177 Delete Pictures Movies 178 Use Bluetooth to Share Picture or Movies 178 Send through MMS E mail 179 Open Pictures Movies Settings Option 180 Start Windows Media 181 Open Media Files on the Phone 182 Open Media Files on the Network 183 Use File Explorer to Open Media Files 183 Open Media Library 184 Select Windows Media Li...

Страница 179: ... Open Windows Media Settings Option 187 Windows Media Playback Options 188 Windows Media Video Options 188 Windows Media Network Options 189 Windows Media Library Options 189 Configure Windows Media Skins 189 Change Themes 190 Change Desktop Background 191 Use Pictures Movie to Change the Desktop 192 Configure Today Screen Item Setup 193 CH07_ENG1025 indd 169 2006 11 10 W È 11 55 55 ...

Страница 180: ...f the navigation software for more details 7 1 1 Photoshooting When taking a picture you can use the up down keys to change the capture mode Action Activate Camera Function Select Camera 2 Select Programs 1 You can also use the camera button on the phone Photo Capture single picture MMS video Capture video and use MMS to send to contacts Video Use the camera to record movies Sports Capture moving ...

Страница 181: ...e Trackball 1 Zoom in to the scenary being taken Zoom out to the scenary being taken Left slide the trackball 2 You can also turn clockwise the track wheel to zoom in the scenary to be taken or counterclockwise to zoom out the scenary to be taken Photo file sizes are larger To conserve phone memory space it is recommended to store the pictures in the memory card You can find the captured pictures ...

Страница 182: ...ite upload to send out Use picture and video to open picture Note 2 Camera icon descriptions Capture mode photo quality storage loca tion remaining available photos Metering Mode Center Area Average Open the Settings screen Open Pictures Videos Exposure setup White balance setup Timer setup After complete capture please select one of the 4 action hints Note 1 from the screen CH07_ENG1025 indd 172 ...

Страница 183: ...gin filming Switch as movie mode Note 1 After filming you can continue with the four following actions Action Turn off Camera 2 Select or press OK button 1 Turn off Camera Camera is turned off Resume filming Use e mail MMS to send out Delete video Playback with Windows Media Player CH07_ENG1025 indd 173 2006 11 10 W È 11 56 01 ...

Страница 184: ...t Night Use night white balance when insufficient lighting Incandescent Use when under light bulb environment Fluorescent Use when under fluorescent environment Effect settings None Camera automatically adjust for white balance according to the onsite light source Grayscale Black and white photo effect Sepia Yellow grain photo effect Cool Color adjustment as cold Negative Reverse colors with negat...

Страница 185: ...on the screen for fast browsing opening and sending Use the file explorer to open pictures or movies the program associated with pictures and movies will be activated You can use Bluetooth MMS or e mail to share pictures or movies with other people For using MMS to send files please refer to section 4 2 for using e mail to send files please refer to section 4 3 Sending E mail Select Pictures Video...

Страница 186: ... m en t 7 Action Open Pictures Movies on the Storage Card Select 1 Select Storage card 2 3 Action Open Pictures Select Picture to browse 1 2 Switch to the folders which listed on the Storage card Picture opened CH07_ENG1025 indd 176 2006 11 10 W È 11 56 03 ...

Страница 187: ...o browse 1 2 Action Full Screen Picture Playback Select Picture for full screen display 1 Select Menu Play Slide Show 2 Movie opened Select Yes 3 The picture display automatically switching to next during playback Select the Picture for full screen display CH07_ENG1025 indd 177 2006 11 10 W È 11 56 04 ...

Страница 188: ...ture move to send 1 Select Beam 2 Select device 3 Select data exchange device is the Bluetooth device Action Delete Pictures Movies Select Picture or movie you wish to delete 1 Select Menu Delete 2 Select Yes 3 Confirm delete Pictures Movies Select the picture or movie you wish to delete CH07_ENG1025 indd 178 2006 11 10 W È 11 56 05 ...

Страница 189: ...lect and hold Picture move to send 1 Select Send Method 3 You can select the send method for example Outlook E mail Wait for the data transmission to finish 5 Wait for the data transmission 4 Select 6 You may require other devices to accept your sent file Send completed CH07_ENG1025 indd 179 2006 11 10 W È 11 56 06 ...

Страница 190: ... 1 Note 1 Options settings descriptions Option Help Adjust size when sending by e mail Adjust file size to speed up sending time through mail Rotate picture Rotate picture to the left or right based on the preferred phone holding orientation Optimize viewing when playing slides Configure the browsing orientation when playing slides of pictures CH07_ENG1025 indd 180 2006 11 10 W È 11 56 07 ...

Страница 191: ...uter with the play list on the phone please refer the descriptions in Chapter 6 Windows Media media library will organize and categorize your multimedia files saved on the phone memory and storage cards based on the file contents information You can use the media library categorize function to find and select the media file you wish to playback according to the file type artist album name contents...

Страница 192: ...le Select Menu Open Files 1 Select Folder 2 Select Media File and press Play 3 Media Library screen Supported file File extension Video Windows Media Video WMV Audio Windows Media Audio MP3 WAVe Audio File Format MIDI Adaptive Mult Rate WMA MP3 WAV MID amr Windows Media supports the following me dia formats CH07_ENG1025 indd 182 2006 11 10 W È 11 56 08 ...

Страница 193: ...Address Then select 2 3 Select Menu Open URL 1 Action Use File Explorer to Open Media Files 2 Select Media File 1 Media Library screen Enter the address ex http 192 168 1 1 ding wmv Locating the URL file and play the media files Playback media file The File Explorer screen CH07_ENG1025 indd 183 2006 11 10 W È 11 56 09 ...

Страница 194: ...ibrary 2 Select Menu Library 1 Media Library screen Open Media Library Action Select Windows Media Library File Location Select Menu Library 1 Select File Location 2 Media Library screen Select the media files located on phone or memory card CH07_ENG1025 indd 184 2006 11 10 W È 11 56 10 ...

Страница 195: ...ary screen Automatically search media files located in media library Action Use Windows Media Library to Playback Media File Select File Type 1 Select Music Category 2 Select Artist then select Play 3 Select playback of all media files for an artist Select the file type to playback for example My Music Select file search criteria for example Artist CH07_ENG1025 indd 185 2006 11 10 W È 11 56 11 ...

Страница 196: ...se Volume Pause Playback Decrease Volume Go back to the previous file Activate Deactivate volume Playbakc next file Show available music and move website for playback Full screen playback Media rating Adjust playback progress Windows Media Playback buttons Action Save Play List Select Now Playing 1 Select Menu Save Playlist 2 Enter Playlist Name then select 3 Now Playlist saved Save now playing to...

Страница 197: ...ect Shuffle 2 Select Menu Shuffle Repeat 1 Activate shuffle playback option Windows Media playback screen Action Open Windows Media Settings Option 2 Select Menu Options 1 Configure Windows Media playback screen settings Configuration screen CH07_ENG1025 indd 187 2006 11 10 W È 11 56 13 ...

Страница 198: ...se playback when exiting Windows Media Resume playback after a phone call Checkmark this option to automatically resume music playback after a phone call Configure Windows Media Play r Windows Media Video Options You can configure Video tab Option Description Play video in full screen Configure when to automatically apply full screen playback Scale to fit window Configure whether to automatically ...

Страница 199: ...network Note 1 Use UDP please enter the UDP port for example 0 Configure Windows Media Network Options Windows Media Library Options You can configure Library tab Option Description Start Player on Library screen Choose whether to start player on the library screen Configure Windows Media Library Options Configure Windows Media Skins You can change the Windows Media playback skin a the Skins tab P...

Страница 200: ...sktop background You can download other legal shared themes to the phone from the web Use ActiveSync to send pictures themes files to the phone please refer to descriptions in Chapter 6 The Today screen includes date My Information appointments task and messages Pocket MSN and device lock etc You can customize these displayed information or adjust the item display ordering Action Change Themes Sel...

Страница 201: ...5 Note 1 Top Windows Mobile built in themes Windows default Guava Bubbles Action Change Desktop Background Select Today 2 Select Settings 1 Check Use this picture as the background 3 Use customized desktop background Theme changed CH07_ENG1025 indd 191 2006 11 10 W È 11 56 16 ...

Страница 202: ...Use Pictures Movie to Change the Desktop Select Set as desktop picture Select a picture as the desktop Select Transparency Then select Select Menu Set as Today Background You can adjust the desktop background transparency for example 50 3 1 2 Select picture file to be desktop CH07_ENG1025 indd 192 2006 11 10 W È 11 56 17 ...

Страница 203: ...ect Today 2 Select Settings 1 Select Items 3 Check Item and location to display then select 4 Select the display items Note 1 shown at the Today screen Switched to Items tab Note 1 You can select move up down to adjust the item displayed location in the Today screen CH07_ENG1025 indd 193 2006 11 10 W È 11 56 18 ...

Страница 204: ...194 Ex pe r ie nc ing M u l t i m e d i a E nt er t ai n me n t 7 CH07_ENG1025 indd 194 2006 11 10 W È 11 56 18 ...

Страница 205: ...Topic Experience Mobile Office Living In this topic you will learn 1 Word Mobile 2 Excel Mobile 3 PowerPoint Mobile 4 Adobe Reader LE 8 CH08_ENG1025 indd 195 2006 11 10 W È 11 54 32 ...

Страница 206: ...m 202 Select All Text in Word Documents 203 Find Text within Word Document 203 Configure Word Mobile Open Options 204 Start Excel Mobile 206 Open Excel Workbook 206 Add New Excel Workbook 207 Use Excel Built in Functions 207 Use Excel Built in Functions 208 Create Excel Charts 208 Full Screen Browsing of Excel Spreadsheet 210 Change Excel Mobile Zoom 210 Switch to Other Spreadsheets or Charts 211 ...

Страница 207: ... a Specific Slide Page 214 Change Slideshow Zoom 214 Setting Up Slideshow Orientation 215 Setting Up Slideshow Options 215 Start Adobe Reader LE 217 Zooming PDF Files 218 Viewing PDF Files 218 Text Search 219 Browse Bookmark Items 219 CH08_ENG1025 indd 197 2006 11 10 W È 11 54 33 ...

Страница 208: ...rmat Word Mobile does not support all Office Word functions When you save files on the phone you might lose some information or formatting Word Mobile does not support these functions Background Style and text boxl Art frames Smart tags Meta files Bi directional text even though Word Mobile can open bi directional character documents it may not be able to correctly display save or align them Passw...

Страница 209: ...creen you can choose to open or add a new file Open Word Mobile Select Programs 1 Select File to open 2 Action Open Word Document Select File located Folder 1 For example All Folders For example Dopod S300 guide Original document is automatically saved closed when open another 3 CH08_ENG1025 indd 199 2006 11 10 W È 11 54 34 ...

Страница 210: ...ve Select Menu Rename Move To rename documents select and enter Name To move documents to the memory card or folder on the phone select and choose Location first for example main memory Then select and choose folder Eg business Select to finish document rename move You can delete Word documents from the Word Mobile open file screen Use the Direction buttons to select document to delete Select Menu...

Страница 211: ... Default file name is first line of characters you entered Action Change Text as Bold Select Characters to change style Again press 1 2 Please first select the text to change to bold Eg Fashion lifestyle Dopod Selected text changed to Bold type Note 1 Note 1 Use following character styles Bold Italics Underline Left Align Center Align Right Align Numbering Bullets Decrease Indent Increase Indent C...

Страница 212: ...ange Word Mobile Zoom Select the Zoom for browsing screen for example 75 Screen Zoom changed Select View Wrap to window 1 Select and move scroll bar 2 Cancel Wrap to Window Action Wrap to window cancelled Please use the screen scrollbar to browse documents CH08_ENG1025 indd 202 2006 11 10 W È 11 54 37 ...

Страница 213: ...xt within Word Document Select Menu Edit Find Replace 1 Select then enter Find target Then select Search 2 3 Please enter your text find target for example smart Found You can also select Next to continue search for matching text All text has been selected you can use the menu to copy or cut text CH08_ENG1025 indd 203 2006 11 10 W È 11 54 38 ...

Страница 214: ...memo use this template Meeting Notes When you need to take notes for a conference use this template Phone Memo When you need to keep a record of phone communications use this template Action Configure Word Mobile Open Options Select Menu Options Select and choose Default template 2 Select and choose Save to 3 Select the default template to use for adding new files Note 1 eg Blank Doc Select the de...

Страница 215: ...isplayed as Number format Formulas and functions if an Excel file contains Excel Mobile unsupported functions then the function will be removed and only the values before the function calculation will be shown Protection settings cannot use most of the table and spreadsheet protection functions Password protection support has been removed and you will not be able to open password protected spreads...

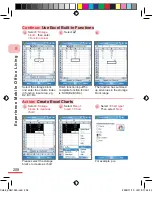
Страница 216: ...s 1 Action Open Excel Workbook Select File to open 2 3 Select File located folder 1 For example All Folders For example Book1 File opened When you open another one the original document will be automatically saved closed Excel Mobile open file screen you can choose to open or add a new file CH08_ENG1025 indd 206 2006 11 10 W È 11 54 40 ...

Страница 217: ...ect the storage block on the screen and enter data Close and save the file Default file name is Book number Action Use Excel Built in Functions Select Menu Insert Function 1 Select Function 2 Select the function to use for example ABS number Select OK 3 The value within the brackets is to be filled in use commas for separation CH08_ENG1025 indd 207 2006 11 10 W È 11 54 41 ...

Страница 218: ...nction inputThe complete function format is SUM B2 B3 B4 6 The function has summed up all values in the storage block range Action Create Excel Charts Select Menu Insert Chart 2 Select Storage blocks to create as chart 1 Select Chart type Then select Next 3 Please select the storage blocks to create as chart For example pie Continue Use Excel Built in Functions CH08_ENG1025 indd 208 2006 11 10 W È...

Страница 219: ...Then select Next 4 Select Column location for labels Then select Next 6 For example Labels in the first column For example Data in col umns 8 Select Insert chart as Then select Finish 7 Select the location to insert chart for example A new sheet Chart create finished CH08_ENG1025 indd 209 2006 11 10 W È 11 54 43 ...

Страница 220: ...l Screen 1 2 Action Full Screen Browsing of Excel Spreadsheet Use Full Screen Browsing Changed to full screen browsing Select View Zoom then select Zoom 1 2 For example 125 Screen Zoom changed Action Change Excel Mobile Zoom CH08_ENG1025 indd 210 2006 11 10 W È 11 54 43 ...

Страница 221: ...ample Chart1 Switched to chart1 Select Menu Options 1 Selectand choose Options Select again 2 Action Configure Excel Mobile Open Options Select the default template to use when adding new files Note 1 Excel Mobile open file screen Blank workbook Empty spreadsheet Vehicle Mileage Log Record your travel costs and destination Note 1 Default template types CH08_ENG1025 indd 211 2006 11 10 W È 11 54 44...

Страница 222: ...tion can be played back on the phone It also supports URL address linking PowerPoint Mobile unsupported functions Cannot display notes written on the slideshow Reordering or editing slideshows PowerPoint Mobile can only browse slides File format does not support ppt format files created by versions before PowerPoint 97 or htm and mht webpage HTML files Action Open PowerPoint Mobile Select Programs...

Страница 223: ...e L iv in g Select File to open 1 Select Any location on the screen 2 3 Tap anywhere on the screen to switch to next page Slide switched to next page Action Open Slides For example Windows Mobile 5 CH08_ENG1025 indd 213 2006 11 10 W È 11 54 46 ...

Страница 224: ...page 1 2 Action Browse a Specific Slide Page You can also browse a specific page for example 7 Jumped to specific page Select Zoom In Out 1 2 Action Change Slideshow Zoom You can view the zoom in out slideshow Slideshow contents zoom in CH08_ENG1025 indd 214 2006 11 10 W È 11 54 46 ...

Страница 225: ...w Options 1 Select Slideshow Orientation 2 Action Setting Up Slideshow Orientation Adjust slideshow orientation Note 1 Action Setting Up Slideshow Options Select Show Options 1 Select Playback 2 Switched to Playback tab CH08_ENG1025 indd 215 2006 11 10 W È 11 54 47 ...

Страница 226: ...right 90 degrees left hand stylus use Note 2 Playback options Override playback options for all files Apply playback options to any file Show without animation Turn off playback of embedded or other animations Show without slide transition Disable slideshow transitions Use timings if present Use time intervals in each section of slideshow presentation Loop continuously Automatically return to the ...

Страница 227: ...igth Shortcut Button Menu including regular document function such as Open PDF files Details about current viewing PDF and Adobe Reader LE application information Left Shortcut Button Tools provides Zoom Find text in current document View setting and Go to pages browsing Move Direction Buttons Move trackball or wheel to scroll the pages of the Press the Direction buttons to switch to the PDF page ...

Страница 228: ...he zooming Fit Screen Shrink one PDF pages to fit into the screen Fit Width Extends pages display to meet screen width You can also use the button on the tool bar to zoom the PDF files Zoom In Fit Screen Zoom Out Fit Width Options for viewing the documents Rotate Right Turn Page Clockwise for 90 de grees Rotate Left Turn Page Counterclockwise for 90 degrees Single Page Display one page a time in t...

Страница 229: ...r Text to be searched then select Find 2 Action Text Search 3 Search Result Select Note1 1 Enter Text to be searched then select Find 2 Action Browse Bookmark Items Note1 If there is not bookmark in the file the icon will not be displayed CH08_ENG1025 indd 219 2006 11 10 W È 11 54 51 ...

Страница 230: ...E xp er i e nce M o b il e Of f ic e L iv ing 8 CH08_ENG1025 indd 220 2006 11 10 W È 11 54 51 ...

Страница 231: ...ns In this topic you will learn about 1 Comm Manager 2 WiFi Wireless Networking 3 Bluetooth 4 Bluetooth Explorer 4 Configure Network Service Provider Settings 5 Internet Sharing 9 CH09_ENG1025 indd 221 2006 11 10 W È 11 52 54 ...

Страница 232: ...230 View WiFi Connection Information 230 Configure WiFi Power Saving Mode 231 Activate Deactivate Bluetooth 241 Add a new Bluetooth device 241 Using the Bluetooth Headset 243 Bluetooth Wireless Stereo Headset 245 Activate Discoverable by other Bluetooth Devices Option 245 Configure Bluetooth COM Port 246 Setting up File Sharing Folder 248 Using Network Wizard 249 Using Network Wizard 250 Using USB...

Страница 233: ...rking please refer to section 9 2 to activate deactivate Bluetooth wireless networking please refer to section 9 3 You must first configure data sync between the phone and a remote Exchange Server from the ActiveSync Menu Configure Server option to be able to use Microsoft Direct Push For information on this function please refer to section 6 8 Action Open the Comm Manager 2 Select Today screen Co...

Страница 234: ... Direct Push data sync Perform Microsoft Direct Push data sync Perform data instant sync Action Stop GPRS Data Transfer Service Select Stop data service 1 2 Note 1 You must first connect to a GPRS mobile network to use this function Stop GPRS Data Transfer Service Note 1 GPRS Data Transfer Ser vice stopped CH09_ENG1025 indd 224 2006 11 10 W È 11 52 57 ...

Страница 235: ...te 1 2 Switch to Vibrate Mode Phone volume is set to mute and vibration func tion is activated Select Vibrate 3 Return to ring tone mode Action Activate ActiveSync Select ActiveSync 1 2 Activate ActiveSync ActiveSync syncing application CH09_ENG1025 indd 225 2006 11 10 W È 11 52 58 ...

Страница 236: ...dcast its SSID then you must manually enter the new wireless network settings on the phone You can also modify the currently available WiFi wireless network settings If the connected wireless network access point or Ad hoc device does not support DHCP then the phone will not be able to obtain a valid IP address and connect to the Internet Please contact your wireless network administrator for an I...

Страница 237: ...onnect to for example WLAN Enter the connection key for network security features Note 2 Action Activate Deactivate WiFi Wireless Networking Select WiFi network 1 2 At the Comm Manager activate WiFi wireless networking WiFi wireless networking activated Select WiFi network 3 Turn off WiFi wireless networking Select the network connection settings Note 1 CH09_ENG1025 indd 227 2006 11 10 W È 11 53 0...

Страница 238: ...te 2 For the connection key please check the wireless network administrator If the network does not use security features this screen will not appear Note 3 WiFi connection icon shown on the taskbar at the top of screen Not detected WiFi wireless network Phone connecting to WiFi wireless network Connected to WiFi wireless network CH09_ENG1025 indd 228 2006 11 10 W È 11 53 01 ...

Страница 239: ...Screen display Connected above icon show as Activate wireless network settings page Comm Manager Screen Action Searching and connecting for nearby Wi Fi AP Select Wireless network name then select Connect 2 Start Settings then select Connections Wi Fi 1 Settings Connection location Then select Next 3 CH09_ENG1025 indd 229 2006 11 10 W È 11 53 03 ...

Страница 240: ...View WiFi Connection Information Select Settings WLan Network Setting 1 The Comm Manager Screen Select Advanced 2 3 Wireless network setting webpage Read network status MAC IP address and update IP here Note 1 Connectivity information icon descriptions Wireless access point name Signal strength This icon will be shown when Bluetooth is activated CH09_ENG1025 indd 230 2006 11 10 W È 11 53 05 ...

Страница 241: ...s 9 231 Action Configure WiFi Power Saving Mode Select Power mode 1 Wireless network setting webpage Select and move Power save mode slider 2 Adjust the wireless network power saving mode CH09_ENG1025 indd 231 2006 11 10 W È 11 53 06 ...

Страница 242: ... etc you must first create a connection between the phone and Bluetooth device Set up process as follows Activate the Bluetooth functions of the phone and the device Search for a nearby Bluetooth device Enter the verification password for the phone and Bluetooth device respectively Select the Bluetooth service to use You can use a Bluetooth headset as the default hands free device when making a ca...

Страница 243: ...he Comm Manager activate Bluetooth 3 Action Add a new Bluetooth device Switched to Playback tab Action Activate Deactivate Bluetooth Select 1 2 Bluetooth has been activated Bluetooth activated Select Bluetooth 3 Turn off the Bluetooth The Comm Manager Screen CH09_ENG1025 indd 241 2006 11 10 W È 11 53 08 ...

Страница 244: ...for example Laptop Enter your custom Bluetooth headset passkey for example 0000 Enter Bluetooth Passkey Then select OK 7 Check Service to use Then select OK 8 Enter the Bluetooth PIN Code for the phone on the computer for example 0000 This screen may differ depending on the Bluetooth driver Select service to use for the devices For example Dialup Networking CH09_ENG1025 indd 242 2006 11 10 W È 11 ...

Страница 245: ...ettings Bluetooth settings 1 Select device 2 Click Bluetooth headset talk button 3 Action Using the Bluetooth Headset Switched to Device tab Turn on the Bluetooth headset press the talk button to activate headset matching mode The Comm Manager Screen CH09_ENG1025 indd 243 2006 11 10 W È 11 53 11 ...

Страница 246: ...lect the Bluetooth headset to connect for example Dopod H1 Refer to the Bluetooth headset manual for passkey for example 1234 Confirm that Hands Free 7 Select 8 9 Using a new Bluetooth headset hands free service Complete adding a new Bluetooth device The calling screen out shows icon CH09_ENG1025 indd 244 2006 11 10 W È 11 53 14 ...

Страница 247: ...ices 2 Select 3 Setting Completed Comm Manager Screen If your Bluetooth headset support Stereo Audio A2DP profile please check Wireless Stereo when choosing the service to be used After finishing pairing select and hold the Bluetooth device then check Set as Wireless Stereo Bluetooth Wireless Stereo Headset Setting Bluetooth Handset CH09_ENG1025 indd 245 2006 11 10 W È 11 53 15 ...

Страница 248: ...n function Please follow below steps for setting up At Comm Manager select settings Bluetooth Settings Select COM Ports tab Tap New Outgoing Port Tap and select COM port eg COM6 To use secure connection plesae check Secure Connection Tap Finish to finish adding Bluetooth COM port Configure Bluetooth COM Port CH09_ENG1025 indd 246 2006 11 10 W È 11 53 16 ...

Страница 249: ...ld use the Bluetooth FTP on your C800 to upload or download files to other devices Similarly if you set your P800W to be discoverable other devices could also locate you and share files with the C800 Select Bluetooth Explorer 2 Select Programs 1 Select the device to exchange files 3 Searching nearby Bluetooth device with FTP support CH09_ENG1025 indd 247 2006 11 10 W È 11 53 17 ...

Страница 250: ...aste files to bluetooth device here Action Setting up File Sharing Folder 1 Select Start Setting Select Connections tab then select Bluetooth 2 Select 3 Configure Bluetooth FTP settings Eg folder location CH09_ENG1025 indd 248 2006 11 10 W È 11 53 19 ...

Страница 251: ...Therefore you do not need to manually set up a mobile network Nevertheless you can still use the Network Wizard to manually configure the GPRS and MMS connections Before using a GPRS connection please make sure you have activated the GPRS service from your telecom service provider Action Using Network Wizard Select Connections 2 Select Settings 1 Select Network Wizard 3 CH09_ENG1025 indd 249 2006 ...

Страница 252: ...lect the local telecom service provider network Select 6 Finish Setting Select Yes 7 Restart device to apply settings Select and choose Country 4 Select your current location for example Hong Kong Continue Using Network Wizard CH09_ENG1025 indd 250 2006 11 10 W È 11 53 23 ...

Страница 253: ...ns USB to PC to successful operate the Internet Sharing To use Bluetooth PAN for Internet Sharing please make sure the computer connected supporting Personal Area Network PAN service If your Bluetooth setting user interface is different from the manual please consult your computer euquipment vendor for further setting information Start Internet Sharing Please connect the devie to the computer with...

Страница 254: ...t Sharing Select Disconnect 5 Disconnect Internet Sharing Set your device as discoverable for other device Select YES 2 Select Bluetooth PAN then connect 1 Action Using Bluetooth Internet Sharing Using Bluetooth Internet Sharing CH09_ENG1025 indd 252 2006 11 10 W È 11 53 26 ...

Страница 255: ...i o n s 9 253 Select Start Control Panel 1 Select Network Connections 2 Select Network Connections 3 Select Bluetooth Network Connection 4 Action Add Computer to PAN over the Phone CH09_ENG1025 indd 253 2006 11 10 W È 11 53 28 ...

Страница 256: ...Wi r e l e ss C o n n e ct i o ns 9 254 Double click Bluetooth Network Connections 5 Select Add 6 Select C800 then select Connect 7 Click Next 8 CH09_ENG1025 indd 254 2006 11 10 W È 11 53 30 ...

Страница 257: ...n select Next 9 Select Yes 11 Enter Passkey then select Next 12 Enter Computer Name then select Finish 13 Enter the same pass key as computer Select Let me choose passkey then enter Passkey Then select Next 10 CH09_ENG1025 indd 255 2006 11 10 W È 11 53 32 ...

Страница 258: ...Wi r e l es s C o n n ec t io n s 9 256 14 Sharing Internet over Bluetooth CH09_ENG1025 indd 256 2006 11 10 W È 11 53 33 ...

Страница 259: ...In this topic you will learn 1 Internet Explorer 2 Pocket MSN Topic Experiencing Internet Entertainment 10 CH10_ENG1025 indd 257 2006 11 10 W È 11 51 26 ...

Страница 260: ...ing 262 Change View Type 263 Change Web Page Zoom 264 Opens the Settings Options 264 Delete Browse History 265 Delete Temporary Files 265 Delete Cookies 266 Logging onto MSN Messenger 267 Logging Out of MSN Messenger 268 View Incoming Messages from Contacts 270 Modify Your Status 271 Change Nickname 271 Add Contacts 272 Deleting Contacts 272 View Hotmail E mail 273 Read Hotmail E mail 274 CH10_ENG...

Страница 261: ...E xp e r ie n ci ng I n t er ne t Ente r ta in m en t 10 259 259 Compose Hotmail E mail 274 CH10_ENG1025 indd 259 2006 11 10 W È 11 51 27 ...

Страница 262: ...r to connect to the Internet To configure WiFi or GPRS please refer to Chapter 9 You can use Internet Explorer to browse web pages and add web pages to My Favorites You can also use My Favorites to quickly browse to a website at any time Internet Explorer will save its browsing history cookies and temporary files in memory to improve web page browsing speeds By deleting these data you can protect ...

Страница 263: ...e website opened Select My Favorite website to open eg dopodasia com Select Menu My Favorites 1 Action Enter the Web Address to Open a Website Select enter web address Select again 2 3 Select Address Bar 1 Connection page opened Action Use My Favorites to Open Website CH10_ENG1025 indd 261 2006 11 10 W È 11 51 30 ...

Страница 264: ...orites Select Menu Add to Favorites 1 You can customize the My Favorites name and saved directory Finish adding My Favorites entry Select 3 Select Full screen 2 Action Use Full Screen Browsing Select Menu View 1 To exit full screen select hold Blank space and then uncheck Full screen 3 CH10_ENG1025 indd 262 2006 11 10 W È 11 51 34 ...

Страница 265: ... you will not need to scroll horizontally to view the contents Default Display layout similar to desktop PC but you will not need to scroll horizontally to view most of the contents Desktop Desktop Use the same layout as the desktop PC you must both scroll vertically and horizontally to view all of the contents Select View type to use 2 Action Change View Type Select Menu View 1 3 Select the appro...

Страница 266: ...lect Menu Zoom 1 Select Zoom to use 2 3 Select your Zoom preference for example Medium Text font will in decrease according to zoom preference Action Opens the Settings Options Select Menu Tools 1 Select Options 2 3 Internet Explorer options screen CH10_ENG1025 indd 264 2006 11 10 W È 11 51 39 ...

Страница 267: ...Browse History Select Memory 1 Select Clear History 2 3 All browsed website history will be deleted Action Delete Temporary Files Select Memory 1 Select Delete Files 2 3 All temporary files gener ated by website browsing will be deleted CH10_ENG1025 indd 265 2006 11 10 W È 11 51 43 ...

Страница 268: ...ing I n t e r ne t E nt e rt ai n me n t 10 266 Action Delete Cookies Select Security 1 Select Clear Cookies 2 3 All website saved cookies are deleted cookies are deleted CH10_ENG1025 indd 266 2006 11 10 W È 11 51 45 ...

Страница 269: ... Before browsing web pages you must first use GPRS WiFi or create an ActiveSync connection on the computer to connect to the Internet Maintaining a MSN Messenger status of logged in will shorten the phone standby time logging out of MSN Messenger when not in use will effectively reduce the power consumption Action Logging onto MSN Messenger Open Pocket MSN Select Pocket MSN 2 Select Programs 1 Sel...

Страница 270: ...assword to sign in Action Logging Out of MSN Messenger 2 Select Menu Sign Out 1 Select Tap here to sign in 4 6 Logging in requires some time please wait You have successfully logged into MSN Messenger You have logged out of MSN Messenger 5 CH10_ENG1025 indd 268 2006 11 10 W È 11 51 47 ...

Страница 271: ... Use different input methods to enter message in bottom entry block Message sent to recipient Select Menu My Contact 1 2 Now you back to Contacts list but your dialog window has not been closed Select the contact you wish to chat with for example Antony Action Return to Contacts List when Chatting with Contacts CH10_ENG1025 indd 269 2006 11 10 W È 11 51 48 ...

Страница 272: ...t ai n me n t 10 270 Action View Incoming Messages from Contacts 4 You can now reply with messages Select 1 Select Menu Chat 2 Select Currently chatting contacts 3 Today screen For example Antony CH10_ENG1025 indd 270 2006 11 10 W È 11 51 48 ...

Страница 273: ...ter next login Select Your displayed name 1 Action Change Nickname Select and enter Your displayed name 2 Select 3 Select Menu Options 1 For example User Online Choose the status you wish to switch to for example Away Your current displayed status is away Enter your MSN nickname for example Dopod CH10_ENG1025 indd 271 2006 11 10 W È 11 51 49 ...

Страница 274: ...xt 2 Select Done 3 Select Menu Add Contacts 1 For example dopod_user2 hotmail com Action Deleting Contacts Select and hold Contacts to delete 1 Select Delete Contact 2 Select Yes 3 For example dopod_user2 hotmail com Confirm deletion of the contact This action cannot be undone CH10_ENG1025 indd 272 2006 11 10 W È 11 51 51 ...

Страница 275: ...t MSN you can view and download the latest Hotmail e mail as well as send reply move or delete Hotmail e mail Action View Hotmail E mail Select Pocket MSN 2 Select Programs 1 Select MSN Hotmail 3 Open Pocket MSN Open MSN Hotmail Browse Hotmail E mail CH10_ENG1025 indd 273 2006 11 10 W È 11 51 51 ...

Страница 276: ...274 Action Read Hotmail E mail 2 Select E mail to read 1 For example first e mail sent from Hotmail Mail opened Action Compose Hotmail E mail Enter Mail Body Then select Send 2 Select Compose Hotmail 1 3 Mail sent CH10_ENG1025 indd 274 2006 11 10 W È 11 51 52 ...

Страница 277: ... 7 Password Protection 8 Audio Notifications 9 Remove Programs 10 Local Area Settings 11 Memory 12 Power 13 Backlight 14 Clock and Alarm 15 Screen 16 Device Information 17 About 18 Microphone AGC 19 Exchange Data Beam 20 Wi Fi Advanced Settings 21 Connections 22 Task Manager 23 Keyboard sliding sound effect CH11_ENG1025 indd 275 2006 11 10 W È 11 48 09 ...

Страница 278: ...n Button 286 Configure the Function Button 287 Configure the up down control function button repeat speed 287 Configure Start Menu 288 Configure the Input 290 Configure the Phone Password 291 Activate Audio and Notification 293 Configure event and notification sounds 293 Configure Event and Notification audio reminder Sounds 293 Removing Programs 294 Removing programs 295 Open Local Area Settings ...

Страница 279: ...ion 304 Browse Operating System Information 305 Action Configure Device Name 305 Open the Microphone AutoVolume Control Settings Screen 306 Configure microphonevolume auto control 306 Allow Reception of 306 Bluetooth Incoming Data 306 Open the Network Cards Settings Screen 307 Set IP Address and Select the Connection Settings 308 Opens the Connection Settings Window 310 Select Connection Network 3...

Страница 280: ... application software by other publishers the name from My Information will be used for the registration At the same time your name will be the device name for the Bluetooth Action Setup My Information Select Owner Information 2 Enter Name Company Address Telephone E mail 3 You can enter the personal information at the fields in order for example name as Franky Select Settings 1 Your personal info...

Страница 281: ...ion when device starts up Identifi cation Display the personal information Notes Display the information notes Enter Notes then select Options 5 Check When the device is turned on display select OK 6 The item you checked will be automatically displayed Note 1 For example if you got this phone please contact me Select Notes 4 You can also enter other personal information notes Continue Setup My Inf...

Страница 282: ...g at the Phone tab At the Network tab you can configure the phone connection to the wireless mobile network from the telecom service provider Generally speaking you will not be required to configure the phone network The phone will automatically select the wireless mobile network from the telecom service provider SIM card You can also manually configure the wireless mobile network selection method...

Страница 283: ...e Do not ring the phone will vibrate instead Vibrate and ring Vibrate and ring at the same time Vibrate then ring If not answered vibrate and then ring None Only display incoming call on the screen no sounds and vibrate Ring tone Select ring tone You can select the custom ring tone Keypad Long tones If you need to use long tones please use this option Short tones Default is short tones Off No dial...

Страница 284: ...riction incoming calls Off Do not use Call Barring function When roaming Restrict all incoming calls when roaming All calls All incoming calls will be restricted Restriction outgoing calls All calls All outgoing calls will be restricted International calls Do not allow outgoing international calls International except to home country Do not allow device to dial out international calls except to ho...

Страница 285: ... and fixed dialing mode Call For warding Forward all incoming phone calls No matter who called to your number it will be forwarded to the number you set Forward when not answering When your phone has no reception or is off it will forward to the number you set Forward when unavailable When your phone is unavailable forward to the number you set Forward when busy Whey your call is busy forward to t...

Страница 286: ...ion Configure Incoming Auto Answer Select More 1 Check Answer incoming calls without pressing 2 Select Automatic answer a call 3 For example 3 The phone will automatically answer after three rings Switched to More tab CH11_ENG1025 indd 284 2006 11 10 W È 11 48 14 ...

Страница 287: ...e supports WMA MP3 and MIDI format ring tone files For methods on using ActiveSync to transfer ring tones to the phone please refer to descriptions in Chapter 6 If your ring tone file is too large it may cause delay in the ring Action Configure Ring Tone Save Ring tone file to phone 1 Select and choose Ring tone 2 At the phone configuration screen configure the ring tone Place the ring tone files ...

Страница 288: ...4 Function Button Configure the corresponding application to buttons on unit of phone the button repeat speed and hardware keyboard automatic light sensing function Please refer to button icon in the screen and the button icon on the device for more understanding of button assignment Function button configuration screen CH11_ENG1025 indd 286 2006 11 10 W È 11 48 15 ...

Страница 289: ...down control function button repeat speed At the function button configuration screen select Up Down Control tab Select and move the Delay before first re peat slider to set the delay time Select and move Repeat rate slider to set up Repeat Rate Configure the up down control function button repeat speed Continue Configure the Function Button Press Button 1 Messaging Center button 6 Press Function ...

Страница 290: ...tem then select OK 3 Select the items to show in the start menu 11 5 Start Menu You can customize the applications in the start menu Meanwhile you can at most check 7 applications to be placed in the start menu Uncheck items will be placed in the Programs Start Menu Select Settings 1 CH11_ENG1025 indd 288 2006 11 10 W È 11 48 16 ...

Страница 291: ...g type Select the screen display handwriting Handwriting boldness Change the displayed handwriting boldness Handwriting color Change the displayed handwriting color Change speed Configure the speed to display hand writing Select the input options this setting will be applied to the notes application Input option Description Recording format Select the recording sampling rate bitrate and channels D...

Страница 292: ...put mode settings 5 Switch to Options tab Select and configure each input mode option Action Configure the Input Select Input 2 Select and choose Input Mode then select Options 3 Select the input mode to configure the settings Select Settings 1 CH11_ENG1025 indd 290 2006 11 10 W È 11 48 17 ...

Страница 293: ...ep your privacy Also this could prevent other people from using your phone without permission If you activate the security principles of Exchange server the device is likely to 1 Erase the information remotely 2 Require password assigned to the device 3 Delete all the information on the device and execute the restore to factory default when enter wrong password for certain times Device lock screen...

Страница 294: ...oose Password Type 5 Enter Password 6A Use simple 4 digit number as the password For example 1234 Enter Password Con firm 6B Use Strong alphanumeric as the password Select Hint 7 Enter Password hint then select 8 For example Simple PIN Select the password type for example Simple PIN Configure the password hint CH11_ENG1025 indd 292 2006 11 10 W È 11 48 19 ...

Страница 295: ...ounds from hardware function button presses Configure event and notification sounds Configure Event and Notification audio reminder Sounds Configure volume options You can select the Notifications tab and configure the event and notification audio reminder sounds Options Description Events Select the event you wish to configure Play sound Select the sounds to play Repeat Whether to repeat the play...

Страница 296: ... applications to conserve storage space on the phone Select System tab then select Remove Programs 2 Select Program to remove then select Remove 3 Select the application to remove from the list Select Settings 1 Action Removing Programs Remove application screen CH11_ENG1025 indd 294 2006 11 10 W È 11 48 20 ...

Страница 297: ...11 Setting the Phone Information 295 Select Yes 4 Confirm removal of application 5 Program has been removed Continue Removing programs CH11_ENG1025 indd 295 2006 11 10 W È 11 48 21 ...

Страница 298: ...cal area number format currency time and date format from the local area settings tab Options Setting tab Options Setting Region Region Number Decimal symbol Currency Currency symbols No of decimal places Currency symbols position Digit grouping symbol Decimal Symbol No of digits in groups No of decimal places List Separators Digit grouping symbol Negative sign symbol No of digits in groups Displa...

Страница 299: ... In Task Manager settings check the options whether to close the programs entirely while tap hold the X at the upper right corner of the screen For more information on Task Manager please refer to section 11 23 Memory usage Select System tab Then select Memory 2 3 The phone main memory usage Note 1 Select Settings 1 Action Browse Memory Usage CH11_ENG1025 indd 297 2006 11 10 W È 11 48 22 ...

Страница 300: ... execution You can browse to total used and remaining space of these two memory space Note 2 You can browse the total used and remaining space on the memory card Action Close Running Programs Select choose Running Programs then select stop 2 3 You can also select Stop All to close all running programs Select Running Programs 1 Select the program to stop for example My Connect CH11_ENG1025 indd 298...

Страница 301: ...View power information Open Power Information Select Settings to enter the configuration screen Select System tab At the System tab select Power Note 1 On battery power On external power option automatically turnoff device if the standby time exceeds a time limit if the phone idle time exceeds your set time it will automatically turnoff and go into standby View battery information screen Configure...

Страница 302: ...slide the Brightness slider for On battery power On external power Backlight Settings When Using Battery Power Select Battery Power tab Check Turn off backlight if device is not used for then select standby time Note 1 Backlight Settings When Using External Power Select External Power tab Check Turn off backlight if device is not used for then select standby time Note 1 Use battery external power ...

Страница 303: ...guration screen Select System tab At the System tab select Clock Alarms Open the Clock and Alarm Settings Clock Alarms setting screen Action Configure the Time Select then enter Date time 2 Select Home or Visiting 1 Configure the home and visiting location time zone and date time Please enter the date and time information in the field to the right CH11_ENG1025 indd 301 2006 11 10 W È 11 48 24 ...

Страница 304: ...alarm settings description for example work Select Configure the alarm week and time then select 3 Configure the alarm week and time 5 Select the alarm to activate for example work 6 The alarm will automatically remind you when the time is up Check Alarm option settings then select 4 Configure alarm settings CH11_ENG1025 indd 302 2006 11 10 W È 11 48 25 ...

Страница 305: ... Settings Configure Screen Display Orientation At the General tab select screen display orientation Portrait or Landscape Select finish configuration Screen settings screen Align Screen At the General tab select Align Screen Select Crosshair on screen Please follow the crosshair on screen to align the screen Screen alignment screen Change Screen Display Text Size Select Text Size tab Slide Text si...

Страница 306: ...the System tab select Device Information Select Exit device information browsing You can select the version hardware identification and call duration tabs to browse each device information tab Viewable contents tab Viewable contents Version ROM Version Hardware CPU ROM Date Speed Radio Version Ram size Protocol Version Flash size Identity Model No Data bus Platform Storage Size IMEI Display resolu...

Страница 307: ...program on the computer as the data exchange device name Browse phone operating system information Select Settings to enter the configuration screen Select System tab At the System tab select About Select to exit browsing Browse Operating System Information Select then enter Device ID Then select 2 Select Device ID 1 Action Configure Device Name This screen includes the device name and description...

Страница 308: ... Microphone Auto Volume Control Settings Screen Configure microphone volume auto control Select Enable or disable to control this function Select finish configuration 11 19 Beam If you wish to use Bluetooth to receive data exchange from other devices for example name card file or appointments etc please check Receive all incoming data exchange option Allow Reception of Bluetooth Incoming Data Sele...

Страница 309: ...u can use the built in Wi Fil function to connect to the nearby AP and enable encryptions if necessary The device comes with Wi Fi wireless adapter called SDIO WLAN Wireless Adapter Open the Network Cards Settings Screen Select Settings to enter the configuration screen Select Connections tab At the connection tab tap Wi Fi Note1 CH11_ENG1025 indd 307 2006 11 10 W È 11 48 27 ...

Страница 310: ...IC to configure in the Network Adapters tab Enter IP address Subnet mask Default gateway 3 Please inquire network administrator and enter the local IP information Select then enter DNS WINS Then select 5 Select Name Servers 4 Enter the DNS WINS server IP address Note 2 Configure the DNS server WINS server IP address Note 1 Select and choose My network card connects to then select 6 Select connect ...

Страница 311: ... server the DNS server will be automatically obtained and will not need to be configured If there are no WINS services for the connected network then the IP address will not be required Note 2 You can enter the secondary DNS WINS secondary WINS server address CH11_ENG1025 indd 309 2006 11 10 W È 11 48 28 ...

Страница 312: ... to set the Proxy server then when you create the WiFi connection and select Connect to Internet the same Proxy server will be used This may prevent WiFi from normal functioning You can also configure the phone to connect to VPN To configure VPN you must obtain the host name IP address VPN type user name password domain information etc from the VPN network administrator Before using VPN your phone...

Страница 313: ...ng to the Internet Note 1 for example My Work Network Select and choose Automatically connect to private network then select 4 Select the connection settings when using private network for example My Work Network Note 1 If you do not wish to use GPRS auto connect to the Internet please do not select GPRS etc connection settings related to other telecom service providers CH11_ENG1025 indd 311 2006 ...

Страница 314: ...net 3 Use Proxy server connection Select WAP 5 Enter Proxy server then select Advanced 4 Configure WAP Proxy server Note 1 Please continue to step 7 if no setup is required Configure HTTP Proxy server socket connection for example proxy dopod com Enter server and port then select 6 Select the connection settings when connecting to the Internet Note 1 for example Internet settings CH11_ENG1025 indd...

Страница 315: ...ter Name and Server name IP 2 Select Add VPN server connection 1 Action Add VPN Connection Enter your custom connection name and enter the connection VPN server address Select VPN type 3 Please inquire the VPN network administrator and select the VPN type Note1 eg PPTP CH11_ENG1025 indd 313 2006 11 10 W È 11 48 31 ...

Страница 316: ...ter user information Select Exception 2 Select Advanced 1 Action Create Internal URL Exceptions Create internal URL exception screen Select Add URL 3 Create a new URL exception Note 1 If you select IPSec L2TP this might require the connection key or authorization please contact your VPN network administrator Continue Add VPN Connection CH11_ENG1025 indd 314 2006 11 10 W È 11 48 32 ...

Страница 317: ...te1 for example dopod com tw Select 5 Note 1 Intranet URL input format example Specific URL address for example intranet dopod com tw All URL address in the domain for example dopod com tw If the URL includes dopod com tw then it will be viewed as the internal address CH11_ENG1025 indd 315 2006 11 10 W È 11 48 32 ...

Страница 318: ...ct Task Manager 2 Select Settings 1 Action Configure Ending Programs Options Check option settings then select 3 Configure the way to close the programs Note1 If you leave the box unchecked tap X will not release the programs from the memory but continue as background running if checked the programs will be closed the system will need more time to Use Task Manager to Configure Ending Programs Opti...

Страница 319: ...tings screen At the Personal tab select keyboard slider sound You can select the keyboard slider sound Options Description Slider sound Checkmark to activate keyboard slider sound Ring tone Select the ring tone for example wind chimes Keyboard slider sound effect Keyboard slider sound effect Activate keyboard slider audio settings CH11_ENG1025 indd 317 2006 11 10 W È 11 48 34 ...

Страница 320: ...CH11_ENG1025 indd 318 2006 11 10 W È 11 48 34 ...

Страница 321: ...opic Using More Programs In this topic you will learn 1 Java MIDlet Manager 2 File Explorer 3 Voice Command 4 ZIP 5 Search 6 Calculator 7 Games 8 Recorder 12 CH12_ENG1025 indd 319 2006 11 10 W È 11 49 03 ...

Страница 322: ...7 Copy File Folder 328 Delete File Folder 328 Memory Card Folder 329 Use Bluetooth to Send Files 329 Use E mail to Send Files 330 Activate Voice Commander 331 Speak out the voice command 332 Setup Contacts Voice Tags 333 Digit Training 334 Voice Command Advanced Settings 335 Open ZIP Compression Program 336 Open ZIP Compression Program 337 Extract Files 337 Create New Compressed File 338 Add Files...

Страница 323: ...ion 340 Search for Files 340 Open Calculator 341 Accessing The Built in Games on the Phone 342 Solitaire 342 Bubble Breaker 343 Zio Golf 2 in Bonus CD 343 Launch recorder 344 Add new recording 345 Set as ring tone 345 CH12_ENG1025 indd 321 2006 11 10 W È 11 49 03 ...

Страница 324: ...ed on the Windows Mobile platform You can use File Explorer to access your Java program and use Java MIDlet Manager to execute To send Java files to the phone please refer to section 6 9 Sync Transmission and Manage Files Action Install Java Program from File Explorer Select Yes 2 Select Java program to install 1 Confirm Java application installation For example JAVA GAME jar Java application succ...

Страница 325: ...ly running program 2 Select Stop 3 List the Java application currently running Select then select Running 1 Action Execute Java Program 2 Select Installed Java program 1 Action Stop Java Program Java program executing CH12_ENG1025 indd 323 2006 11 10 W È 11 49 06 ...

Страница 326: ...les you must be close to the receiving end and both sides must activate the Bluetooth functions The device receiving files may require manual agreement to file transfers Through e mail you can send files to different locations but you need to connect to the Internet first If you wish to use C800 to receive files you must go to Start Settings Beam check Receive all incoming beams please refer to se...

Страница 327: ... are currently at My Pictures folder Action Return to Top Folder For example My Pictures Select 1 Select Top folder to return to 2 3 Text in upper left corner will differ with your current folder location For example My Device Return to Top Folder CH12_ENG1025 indd 325 2006 11 10 W È 11 49 08 ...

Страница 328: ...ed program will be automatically selected to open files For example Flower Action Move File Folder Select and hold File folder to move 1 Select Cut 2 Switch to Destination folder then select hold Blank space 3 For example move to My Documents CH12_ENG1025 indd 326 2006 11 10 W È 11 49 09 ...

Страница 329: ...tination folder then select hold Blank space Action Copy File Folder Select Paste 4 5 File folder moved to destination Select and hold File Folder to copy 1 Select Copy 2 For example move to My Documents 3 CH12_ENG1025 indd 327 2006 11 10 W È 11 49 09 ...

Страница 330: ...ction Delete File Folder 5 Select Paste 4 3 File folder will be permanently deleted Select Delete 2 Select and hold Files to delete 1 File copied to destination folder Continue Copy File Folder CH12_ENG1025 indd 328 2006 11 10 W È 11 49 10 ...

Страница 331: ...ter the memory card folder Memory Card Folder Select and hold Files to send then select Data exchange 1 Select device 2 Action Use Bluetooth to Send Files Select 3 Select data exchange device is the Bluetooth device Switch to memory card folder Send completed CH12_ENG1025 indd 329 2006 11 10 W È 11 49 12 ...

Страница 332: ... 12 330 Action Use E mail to Send Files Select Send 2 Select E mail account to send to 3 Select and hold Files to send 1 For example Dopod Mail Edit e mail please refer to section 4 4 CH12_ENG1025 indd 330 2006 11 10 W È 11 49 13 ...

Страница 333: ... The voice command can recognize Chinese English and numbers but you will still need to create the voice tags individually for each recognition item This will let you use your normal speaking voice to say the customized tag items to improve the success rate on recognition You can also use number model training and appropriate advanced settings to improve voice recognition success rate Voice comman...

Страница 334: ...usic playback Play Music File Play Let It Be Playback the specific song track Next Previous Previous Play the previous song track Start Application Open File Explorer Open applications Today s To morrow s This Week s appointments Today s conference Browse appointments of type Business in the calendar Read SMS E mail Call history Read SMS Open Messaging Center to browse messages or call history Wha...

Страница 335: ...Customized voice tags 4 Speak out Customized voice tags 3 5 Please speak out the voice tag to setup for example Franky Created voice tags Successfully Please repeatedly speak out the voice tag to setup for example Franky You can also select Application or Music tab to setup the specialized voice tags for applications or music CH12_ENG1025 indd 333 2006 11 10 W È 11 49 15 ...

Страница 336: ...ning Select 3 Select Digit Training 2 Select Menu Settings 1 Begin Digit Training Select Yes 5 Speak out Numbers indicated in the screen 4 6 You can continue to perform other digit training For example 110066 CH12_ENG1025 indd 334 2006 11 10 W È 11 49 16 ...

Страница 337: ...s more lax with sentences spoken by the user suitable for noisy environments such as in a vehicle or factory etc General Default value suitable for most environments Accuracy The system recognition is more demanding with sentences spoken by the user with less incorrect recognition results Length of phone number Configure the acceptable phone number length for when using number dialing this will im...

Страница 338: ...onserve the phone storage memory space You can also use the ZIP compression program to quickly uncompress and execute files you need from com pressed files Action Open ZIP Compression Program 3 Select Zip 2 Select Programs 1 First time use Zip program will automatically find all compressed files in device Open Zip Program CH12_ENG1025 indd 336 2006 11 10 W È 11 49 17 ...

Страница 339: ...e to open for example txt zip Compressed file opened Action Extract Files 3 Select Folder to ex tract to then select Extract 2 Select Action Extract 1 Select the Folder to uncompress to for example My Documents Successfully extract file You can use File Explorer to browse the extract file CH12_ENG1025 indd 337 2006 11 10 W È 11 49 18 ...

Страница 340: ...ew Archive 1 Please enter the compressed file name for example Files Select the folder to save compressed file to for example Personal 6 Select Save 5 Select and choose Location 4 Select save compressed file to phone or memory card for example Main memory Compressed file created CH12_ENG1025 indd 338 2006 11 10 W È 11 49 19 ...

Страница 341: ...1 Wait for the file compression Select the files to add to compressed file for example 1 txt Select File Close compressed file 5 Complete file compression Close compressed file If you do not close the compressed file this may prevent the Zip program from functioning properly 4 CH12_ENG1025 indd 339 2006 11 10 W È 11 49 20 ...

Страница 342: ...phone you can effectively release internal memory space on the phone Please select Programs Search to open the search application Action Search for Files 3 Select and choose Type then select Search 2 Select then enter Search name 1 Enter the text to search for example Franky Select the type to search for for example Contacts You can select the search results and open the found items Open the searc...

Страница 343: ...ddition subtraction multiplication and division using the calculator The calculator does not support engineering calculations or obey the multiplication priority rules Action Open Calculator 3 Select Calculator 2 Select Programs 1 Calculator screen CH12_ENG1025 indd 341 2006 11 10 W È 11 49 21 ...

Страница 344: ... a different colored pile please press Next Card to turn it overWhen the spare pile no cards in a cards column is empty you can move a King to the empty card column 12 7 Game There are two built in games on the phone Solitaire Bubble Breaker In additional to the built in games you can also install more games onto the phone You can access the four built in games on the phone from the games folder S...

Страница 345: ...us CD Game rules for Zio Golf 2 is the same as normal golf you must finish 18 holes of the course to accumulate shot ranking The following is instructions for this game Select the lower right club icon to change clubs Touch each points on the screen to adjust the shot direction Click and hold the C icon in center of the screen and a strength bar will appear The closer to the top line the greater t...

Страница 346: ...le name you want as well as moving the recording file to folders on the internal memory or the memory card A recording with excessive record length will take up storage space therefore it is recommended that you move it to the memory card to conserve main memory space You can also move the data to different directories to sort the data Action Launch recorder Recorder application screen 1 Select Pr...

Страница 347: ...ing tone has been set Action Add new recording Select 2 Recording complete 1 Select 3 Select Recording then select Menu Set as ringtone 1 2 Stop recording Begin recording Action Set as ring tone CH12_ENG1025 indd 345 2006 11 10 W È 11 49 24 ...

Страница 348: ...Us ing M o r e P ro g r am s 12 346 CH12_ENG1025 indd 346 2006 11 10 W È 11 49 25 ...

Страница 349: ...Topic Q A 13 CH13_ENG1025 indd 347 2006 11 10 W È 11 50 29 ...

Страница 350: ...egister your phone to receive more information and services Registering Your Phone 1 Open the Internet browser and connect to the Dopod website Click on the members from the home page 2 Select the Sign up as member link on the left side of the screen Then click on I agree CH13_ENG1025 indd 348 2006 11 10 W È 11 50 31 ...

Страница 351: ...elect I have already purchased again select Send 4 Enter Hardware S N please refer to the S N on the back of the device Name and Date of Birth Then press the Send button CH13_ENG1025 indd 349 2006 11 10 W È 11 50 32 ...

Страница 352: ...er 6 You can also use the Sprite Backup bundled with the device to perform the complete backup of your device For more information on Sprite Backup please refer to 12 13 2 What should I do when the computer freezes or cannot connect to the phone when using a USB cable connection Since Microsoft ActiveSync 4 utilizes the latest RNDIS transfer technology it may conflict with the firewall or anti vir...

Страница 353: ...Menu Connect via Bluetooth to activate ActiveSync Bluetooth Sync For detailed information please refer to section 6 7 Synchronize Through Bluetooth 4 Does the phone s built in MSN Messenger support voice chat MSN Messenger only supports text message communications 5 How do I use the Return to Default Hard Reset function You can use the Return to Default program or the hard reset button to return t...

Страница 354: ...nter the pass key then select Next 5 Make sure the hands free speakers item is selected then select Done 6 Select upper left screen corner to finish the configuration After setup is complete you may begin to use the Bluetooth headset for hands free operation For detailed configuration procedures please refer to section 9 3 3 Using the Bluetooth Headset 7 Where can I download the User s Manual prog...

Страница 355: ...Topic Appendix A A 1 Regulatory Notices A 2 PC Requirement to Run ActiveSync 4 x A 3 Product Specification A 4 Customer Service Information Appendix_ENG1014 indd 353 2006 11 10 U È 12 04 59 ...

Страница 356: ...ean Norms in parentheses are the equivalent international standards EN 60950 1 IEC 60950 1 Safety of informational technology equipments ETSI EN 300 328 Electromagnetic compatibility and Radio spectrum Matters ERM wideband transmission system data transmission equipment operating in the 2 4 GHz ISM band and using wide band modulation techniques ETSI EN 301 511 Global System for Mobile communicatio...

Страница 357: ...iginal manufacturer approved accessories may violate your local RF exposure guidelines and should be avoided Exposure to Radio Frequency RF Signals The wireless phone is a radio transmitter and receiver It is designed and manufactured not to exceed the emission limits for exposure to radio frequency RF energy The exposure standard for wireless mobile phones employs a unit of measurement known as t...

Страница 358: ...ence If you have any reason to suspect that interference is taking place turn the phone OFF immediately Hearing Aids Some digital wireless phones may interfere with some hearing aids In the event of such interference you may want to consult your service pro vider or call the customer service line to discuss alternatives Other Medical Devices If you use any other personal medical device consult the...

Страница 359: ... and electrical waste equipment will ensure safety of human health and environment For more information about electronic and electrical waste equipment disposal recovery and collection points please contact your local city center household waste disposal service shop from where you purchased the equipment or manufacturer of the equipment RoHS Compliance This product is in compliance with Directive...

Страница 360: ...acement may cause explosions To avoid fire hazards please do not disassemble compact pierce short circuit or contact with connectors expose to fire or water or expose battery set in environments of over 60 C 140 F Appendix_ENG1014 indd 358 2006 11 10 U È 12 05 01 ...

Страница 361: ...2003 x64 Edition Service Pack 1 Microsoft Windows XP Professional Service Packs 1 and 2 Microsoft Windows XP Home Service Packs 1 and 2 Microsoft Windows XP Tablet PC Edition 2005 Microsoft Windows XP Media Center Edition 2005 Microsoft Windows XP Professional x64 Edition Microsoft Outlook 98 Microsoft Outlook 2000 and Microsoft Outlook XP and Microsoft Outlook 2003 messaging and col laboration cl...

Страница 362: ...n is off 3 5 5 hours Media Playback Time WMV 8 hours WMA 12 hours AC Adapter AC input frequency 100 240 VAC 50 60Hz DC output 5V and 1A Display LCD Type 2 8 Semi reflection TFT LCD Backlight equipped LED Touch screen Resolution 240 x 320 65535 colors Supported orientation Horizontal Vertical GSM GPRS EDGE Module function 850 900 1800 and 1900 Mode Dual Band GSM Built in Antenna YES Physical Specif...

Страница 363: ...in mini USB and audio jack in one Car adapter Available Unable to connect Bluetooth 2 0 Wi Fi IEEE 802 11 b g Controls and Lights Navigation Buttons 5 way button 3 application keys voice command voice notes camera and Comm Manager 2 phone function keys Talk button activate call answer call Hang up button end call Start menu button OK button 2 hotkeys left right Power on off button Reset button App...

Страница 364: ...nnection blue Wi Fi and Bluetooth activated at the same time will flash blue and green interchanging Physical keyboard QWERTY physical keyboard and two hotkeys Audio Audio Controller AGC Microphone Speaker Built in Dual Hands free Earphone AAC AMR WMA WAV MP3 codec Expansion Slots SD Card Slot MicroSDTM SD 2 0 compatible Appendix_ENG1014 indd 362 2006 11 10 U È 12 05 01 ...

Страница 365: ...act with our customer service center We welcome you to immediately logon to the member website and to e mail us for any suggestions Taiwan Customer Service 0800 088 858 02 8761 5959 Website http www dopod com tw e mail service dopod com tw Hong Kong Customer Service 852 3520 1234 Website http www dopodasia com e mail enquiry dopod hk Appendix_ENG1014 indd 363 2006 11 10 U È 12 05 01 ...

Страница 366: ...site http www dopodasia com e mail SEAservice dopodasia com Thailand Customer Service 66 2640 3000 Website http www dopodasia com e mail SEAservice dopodasia com Indonesia Customer Service 62 21 380 7668 350 5668 Website http www dopodasia com e mail SEAservice dopodasia com Thank you and please enjoy our product Appendix_ENG1014 indd 364 2006 11 10 U È 12 05 01 ...

Страница 367: ...Appendix A 365 Appendix_ENG1014 indd 365 2006 11 10 U È 12 05 01 ...

Отзывы: