DoorKnox PhoneSEE WiFi Box
xVDP300
DoorKnox.com
© 2021 System Q Ltd
Страница 1: ...DoorKnox PhoneSEE WiFi Box xVDP300 DoorKnox com 2021 System Q Ltd...
Страница 2: ...rt 7 Network Setup 9 1 EZ Mode Setup 9 2 Cable Mode Setup 12 3 AP Mode Setup 15 Part 8 Using the App 19 1 Visitor Calls 19 2 AppControls 19 Part 9 SD Card 20 Part 10 Signal Setup 20 Part 11 DoorKnox W...
Страница 3: ...y control via the Tuya Smart application The VDP300 is installed between DoorKnox cameras and DoorKnox monitors to intercept the images to stream and connect with the Tuya Smart app via the WiFi or vi...
Страница 4: ...2 Connections 2 1 Overview The VDP300 is installed between DoorKnox cameras and DoorKnox monitors in order to intercept the images to stream and connect with the Tuya Smart app via the WiFi or an Ethe...
Страница 5: ...Connections 3 2021 System Q Ltd DoorKnox com 2 2 Input Connections...
Страница 6: ...VDP300 4 2021 System Q Ltd DoorKnox com 2 3 Output Connections...
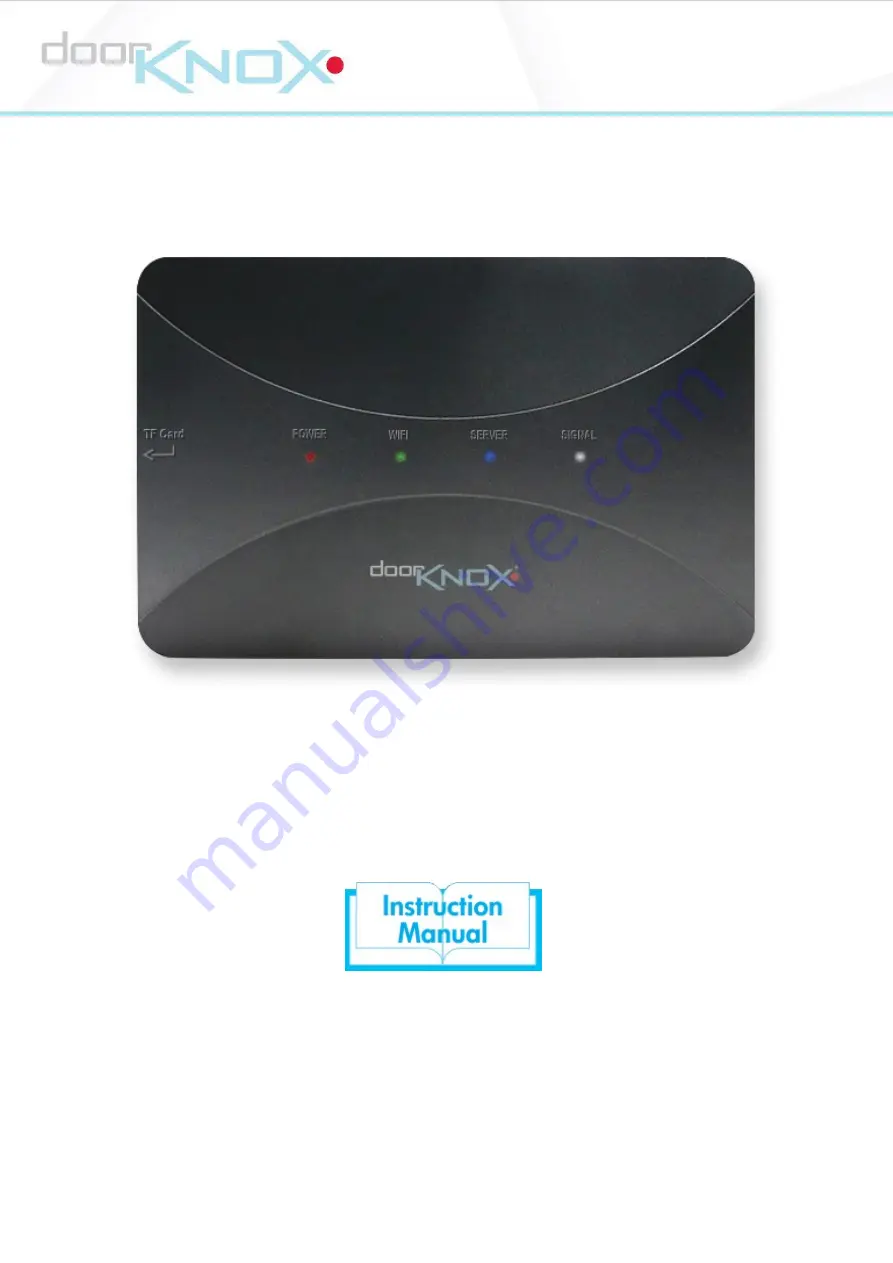
Страница 7: ...FI SERVER and SIGNAL LEDs will be ON Once boot up is complete the WIFI SERVER and SIGNAL LEDs will turn OFF WIFI LED ON Network ok OFF Network disconnected Fast flash Configuring network Slow flash EZ...
Страница 8: ...e if the SERVER light is not on solid Short Press 1s Restarts the VDP300 and starts EZ Mode the WIFI LED will flash slowly See EZ Mode Setup AP Only use if the SERVER light is not on solid See AP Mode...
Страница 9: ...Mounting 7 2021 System Q Ltd DoorKnox com 5 Mounting The VDP300 Hub can be mounted using the screws provided and the mounting holes on the rear...
Страница 10: ...VDP300 8 2021 System Q Ltd DoorKnox com 6 Smart App Tuya Smart App Terms and Conditions 1 Download Tuya Smart app via the Apple store or Google Play store 2 Open the app to and register an account 25...
Страница 11: ...can be paired up with a router wirelessly using the S link pairing button on the back of the VDP300 and the Tuya Smart app 1 Press the S link to start the EZ pairing The WiFi LED will flash slowly whe...
Страница 12: ...VDP300 10 2021 System Q Ltd DoorKnox com 4 At the top right select EZMode 5 Tick Next Step then select Next 6 Select the WiFi Hub Router or Access point and enter the WiFi password then select Next...
Страница 13: ...Network Setup 11 2021 System Q Ltd DoorKnox com 7 The WiFi LED will flash quickly once it starts pairing 8 Once paired the app will show the device is Added...
Страница 14: ...an Ethernet CAT5 5e 6 cable to the RJ45 port on the back of the VDP300 The network port LED indicators will light up once connected 2 Press the S link to start pairing The WiFi LED will flash slowly w...
Страница 15: ...1 System Q Ltd DoorKnox com 6 Tick to confirm LED is flashing then select Next 7 The app will search the device via the network Note Reset the device if the search fails see Controls to reset 8 Select...
Страница 16: ...VDP300 14 2021 System Q Ltd DoorKnox com 9 The app will then try to add the device via the network 10 The app will show the device is Added...
Страница 17: ...and the Tuya Smart app 1 Press the AP button to set the VDP300 to access point mode 2 On the mobile phone tablet navigate to the WiFi settings Search for SmartLife xxxxxx connect using the password 1...
Страница 18: ...VDP300 16 2021 System Q Ltd DoorKnox com 5 At the top right select AP Mode 6 Tick Next Step then select Next 7 Use the switch button to connect to the main WiFi Hub Router or Access point...
Страница 19: ...Setup 17 2021 System Q Ltd DoorKnox com 8 Go back to the Tuya Smart app and select Next 9 Click Go to Connect to connect the mobile phone back to the SmartLife xxxxxx WiFi Then go back to the Tuya Sm...
Страница 20: ...VDP300 18 2021 System Q Ltd DoorKnox com 10 The WiFi LED will flash quickly once it starts pairing 11 Once paired the app will show the device is Added...
Страница 21: ...to the device the image and control options will display Snapshot Captures an image and saves it locally on the phone Talkback Press and hold to talk to the door camera Record Captures live view and s...
Страница 22: ...n SD card must be installed Recording time will vary dependent upon SD card size The maximum size supported is 32G class 10TF card Remove power from the camera when inserting or removing the SD card i...
Страница 23: ...ameras auxiliary cameras and auxiliary monitors the 4 wires are colour co ordinated to match the 4 wires from the door camera The 2 wire y lead is terminated with a 2 pin plug and is used as the TV ou...
Страница 24: ...achievable It is recommended to use one of three types of cable PTZ combo cable sometimes known as RG59 4 CAT5 2 cable or 4 core cable with 0 3mm2 cores Below shows the maximum recommended cable run...
Страница 25: ...or complete signal loss Firstly check if this is the cause by testing the camera and screen on a short test cable If the problem disappears then both units are working correctly and the cable being us...
Страница 26: ...munication WiFi 2 4GHz Input Connections 2x Door Cameras 2x Auxiliary Cameras Outputs Connections 2x Door Cameras 2x Auxiliary Cameras Consumption 600mA Max SD Card Micro SD 2GB 32GB Class 10TD Input...
Страница 27: ...eatment recovery and recycling please return to your local designated WEE CG0783SS collection point as defined by your local council Copyright 2020 DoorKnox is a registered trademark of System Q Ltd C...
Страница 28: ...n 24 Control 6 Current 24 D Dimensions 24 Dipswitches 6 Disconnected 5 Distances 22 E Ethernet 6 12 EZ Mode 9 F Flashing 5 K Key Features 1 L LED Indicators 5 Lights 5 M Maintenance 23 Monitor Connect...
Страница 29: ...oorKnox com 2021 System Q Ltd Signal 6 Signal LED 5 Size 20 S Link 6 Snapshot 19 Specification 24 Switch 19 T Talk 19 Talkback 19 Tuya Smart 8 U Unlock 19 V Visitors 19 Voltage 24 W Wall 7 WiFi 9 15 W...