background image

Fuse box 

D760.H03E-001.H1907

129

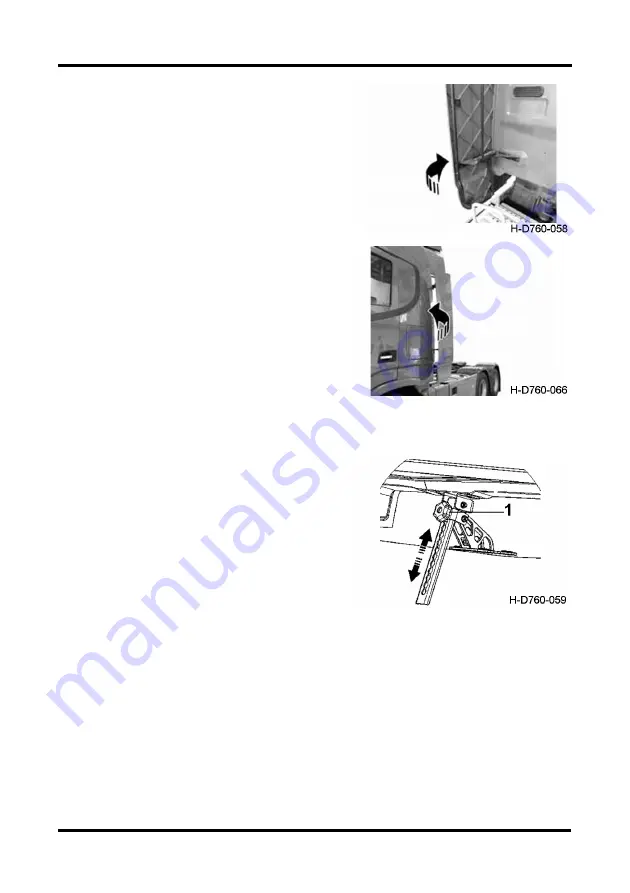
Opening of side spoiler 

Hold the rear inner pipe of the lower side 

spoiler to pull it outward in the heading direction, 
in this case, the lower side spoiler can be 
opened.

Closing of side spoiler 

Push the front edge of the lower side 

spoiler inward and rearward to close the lower 
side spoiler.

Roof spoiler 

The roof spoiler is equipped with a height 

adjusting mechanism which can meet require-
ments of different heights of the cargo body. 
Adjustment method: 
1. Release the adjusting knob and press it 

downward to disconnect the stop block from 
the long adjusting lever, in this case, the 
adjusting knob can slide upward and 
downward in the adjusting groove. 

2. Push the roof spoiler upward or downward, 

and after the height of the roof spoiler is 
determined, release the adjusting knob to 
complete adjustment.

1. Adjusting knob

Содержание DFH4180 Series

Страница 1: ...SEMI TRAILER TRACTOR User s Manual Dongfeng Commercial Vehicle Co Ltd July 2019 Dongfeng DFH4180 Series Vehicles ...

Страница 2: ......

Страница 3: ... ucts The company reserves the right to modify the product design and technical features at any time Therefore the figures and description in this manual are correct upon publication and no further notice will be made upon the subsequent modification The parameters concerning the bulletin shall refer to the national bulletin Thanks for your understanding This manual is applicable for DFH4180 serie...

Страница 4: ...maintenance work in strict accordance with the maintenance interval mileage specified in the regular maintenance schedule Symbols in the manual are specified as follows WARNING Failure to observe the requirement with a warning mark will result in serious personal injury or property loss CAUTION Failure to observe the requirement with a caution mark will result in personal injury or damage to compo...

Страница 5: ...ired in the Technical Service Station authorized by Dongfeng Commercial Vehicle Co Ltd 6 Malfunction caused by altering the original structure of the vehicle without authorization of our company such as retrofitting addition or parts modifica tion namely room extending frame strengthening leaf spring thickening or tyres layering or widening 7 Malfunction caused by the failure to use the genuine pa...

Страница 6: ...ear and aging 14 Delay loss caused by stopping or refusing the service station to perform regular inspection analysis and evaluation to the vehicle 15 Vehicles that are no longer in warranty period 16 Other repairs not associated with material design or manufacturing or unauthorized modification or conversion of vehicle design All rights reserved ...

Страница 7: ...recautions for Brake Pipeline Quick Joint 12 Structure and Operation 13 Arrangement of Instrument and Control Mechanism 13 Keys 13 Doors 14 Central locking 15 Seats 16 Seat Belts 22 Berth 23 Instrument Panel 24 Indicator and alarm light 27 Multi information display and adjustment 42 Master power switch 51 Rocker Switch 51 Combination switch steering wheel switch 57 Key switch 61 Instructions for A...

Страница 8: ...Warning Triangle 131 Triangular stop block 131 Reflective vest 131 Inverter instructions 132 Main auxiliary tank changeover valve operation 133 Cab Tilting 135 ECAS operation 136 Use of Differential lock 139 Post processing system 140 OBD diagnostic interface 142 Electrical Connection Between Semi trailer Tractor and Trailer 143 Semi trailer Tractor Coupling and Operation 144 Operating instruction...

Страница 9: ...ge of Power Steering Hydraulic Oil 187 Maintenance of Suspension 188 Inspection of Drive Axle Final Drive Oil Level 190 Use and Maintenance of Tire 191 Tire Rotation 193 Adjustment of Front Wheel Alignment 194 Tire Inflater 195 Maintenance of wheel hub bearing 195 Maintenance of maintenance free wheel hub 196 Removal and Refitting of Spare Wheel 198 Replacement of Tire 199 Inspection and Maintenan...

Страница 10: ...Mass Parameters 235 Dimension Parameters 235 Performance Parameters 236 Parts not included in the vehicle s overall dimensions 237 Assembly Structure 238 Engine 238 Clutch 238 Transmission 238 Propeller Shaft 238 Front Axle 238 Rear axle 239 Wheels and Tires 239 Frame 239 Suspension 239 Steering System 239 Brake System 240 Electrical System 240 Cab 240 Heater and A C 241 Traction pin 241 Driver s ...

Страница 11: ...nal center line of the right front wheel 500mm Read VIN The vehicle VIN code is stored in the electronic control unit ECU and the com munication baud rate is 500Kbps The vehicle VIN code can be read through the com munication protocol ISO27145 Detection Tool ScanTool Silver ScanTool software J2534 interface hardware such as ValueCan can read the VIN code of dongfeng commercial vehicle The Tool can...

Страница 12: ...Vehicle Identification 2 D760 H03E 001 H1907 Location of Engine Nameplate and Ex factory Code Cummins engine 1 Engine nameplate 1 Location of engine ex factory code ...

Страница 13: ...ressure common rail 5 pressure regulator 6 mixing plant 7 injector ignition system 8 spark plug 9 Ignition coil assembly Exhaust gas recirculation 10 EGR valve 11 EGR cooler Post processing plant 12 SCR 13 DOC 14 DPF 15 urea nozzle 16 Urea metering pump 17 urea quality sensor 18 hydrocarbon nozzle 19 hydrocarbon metering pump Crankcase 20 crankcase vent valve sensor 21 NOx sensor 22 temperature se...

Страница 14: ... quality diesel of different grades under different climate conditions do not use poor quality diesel e Always check the level of coolant and lubricating oil regularly and add if necessary f Check that the connecting pipes for supercharger intercooler and intake exhaust pipes are airproof g Before driving let the engine run idly for 3 5 min to lubricate sufficiently all its parts especially the su...

Страница 15: ...it is recommended to drain the water and deposits in the water separator of fuel primary filter after the shutdown each day 2 Drive in winter and cold areas or drive continuously from normal temperature areas to high altitude areas low temperature and cold areas in north China Before shut down every day please push the air storage cylinder pressure to the rated pressure 3 In winter and cold areas ...

Страница 16: ...to avoid overloading the engine 8 Often note the indication of the engine oil pressure check low oil pressure alarm lamp and the coolant temperature 9 Check the engine lubricating oil level and coolant level regularly 10 For the truck employing flexible cowl in cooling system check the clamp of flexible cowl for looseness and re tighten it if necessary 11 Drive the truck properly avoid abrupt brak...

Страница 17: ...es and brake linings 8 Avoid sharp turn at high speed 9 Never overload the truck since it may shorten its service life WARNING The user should operate the truck in strict accordance with the User s Manual and the nominal load capacity and gross mass specified in the manual shall never be exceeded Overload may result in vehicle malfunc tion and damage and even personal injury 10 When cleaning the t...

Страница 18: ... shown in Fig b c Turn on the master power switch d Perform welding e After the welding work is completed restore the connection of power cables of battery as shown in Fig a WARNING 1 Prevent power short circuit while disconnecting and connecting the power cables 2 Restore all wirings after the welding 3 Failure to perform welding in this way may result in irremediable defect of vehicle electronic...

Страница 19: ...ncy After that the fault must be eliminated and the parking brake shall be restored The truck without parking brake is dangerous and it may result in an accident 5 Adjusting the position of the steering wheel is strictly prohibited during driving 6 Always park the truck on a level ground before tilting the cab Check for sufficient space when tilting the cab inside Check that the manual valve contr...

Страница 20: ...ruck Always lock the door only with a key when you are outside the vehicle never lock the door by moving the lock knob forwards while pressing the outer unlocking button to close the door 3 The master power switch shall never be turned off when the engine is running Never turn the key to START position when the engine is running to avoid damaging the starter 4 Never use the washer without washer f...

Страница 21: ...ance 16 For the automatic regulating arm manual adjustment of brake clearance is prohibited except for special circumstances Check the wear situation of friction disc regularly to prevent braking failure caused by excessive wear of friction disc When adjusting the brake clearance manually it is strictly forbidden to change the stroke of the push rod by turning the brake air chamber push rod to con...

Страница 22: ...intenance interval mileage according to the actual operation condition to ensure more reasonable maintenance and higher reliability of the truck However the user should never prolong the maintenance interval mileage Safety Precautions for Brake Pipeline Quick Joint WARNING It is strictly prohibited to remove the brake pipeline without authoriza tion otherwise air leakage may be caused If necessary...

Страница 23: ...Keys are used to control the starter switch of the vehicle and to lock and unlock the door Remote Keys 1 Steering wheel 2 Brake pedal 3 Accelerator pedal 4 Cigarette lighter and ashtray 5 Middle storage box 6 Air conditioning outlet 7 Tray Table 8 Storage platform 9 Thermostatic air conditioning controller 10 Rocker switch set 11 Display panel assembly of on board information terminal 12 Instrumen...

Страница 24: ...m can lock and unlock the vehicle in 5 m When press unlock button doors from both sides will be unlocked at the same time and cor nering lamp will flicker twice Pull door handle to open the door To lock the door press lock button doors from both sides will be locked at the same time and cornering lamp will flicker twice CAUTION 1 Lock the door with mechanical key or remote control function and che...

Страница 25: ...er s door instead of the driver s door can be locked From the outside When unlocking the driver s door with a key the passenger s door will be also unlocked pressing the door outside unlocking button can open the driver s door and passenger s door separately If only the passenger s door is unlocked with a key pressing the outside unlocking button can open the passenger s door instead of the driver...

Страница 26: ... the road condition is bad the damping adjustment handle can be lowered to a comfortable position to meet the driving comfort under different road conditions 3 Pull the seat cushion tilt adjustment handle to adjust the seat cushion tilt angle When the seat cushion is adjusted to a comfortable position release the adjustment handle and keep it lock 4 After sit the user can adjust suspension height ...

Страница 27: ...irbag shockabsorbing seat for standard models 1 Lift the front and rear sliding handle of the seat adjust the seat back and forth to the comfortable driving position release the front and rear sliding handle of the seat and lock the seat 2 According to different driving conditions the adjustable damping handle can be adjusted When the road condition is good the damping adjustment handle can be rai...

Страница 28: ...cess all handles should be in place to ensure the locking of all parts is reliable 4 When encountering a particularly bumpy road surface please turn the seat damping adjustment wrench to the lowest end to keep the seat balanced Driver seat cushion depth 1 The seat slide rail is in the last position 2 On the basis of graphic method adjust backrest angle to 11 this is normal driving position 3 On th...

Страница 29: ...ear sliding handle of the seat adjust the seat back and forth to the comfortable driving position release the front and rear sliding handle of the seat and lock the seat CAUTION 1 Adjust the seat to ensure driving safety 2 Adjust the front and rear angles by pulling the handle in place to ensure complete separation of the mechanism before adjustment 3 After adjustment handle return shall be in pla...

Страница 30: ...ag suspension is used for vibration reduction 3 The passenger seat is equipped with a storage box Press the lock button on the lock latch of the box cover and the lock latch can be detached from the lock button to open the seat storage box CAUTION 1 Adjust the seat to ensure driving safety 2 Adjust the front and rear angles by pulling the handle in place to ensure complete separation of the mechan...

Страница 31: ...usting handle of the storage box open the storage box under the seat and store shoes tools and other items with the car 1 Turn the adjusting handle of the backrest 2 Seat rotation adjustment handle 3 Seat front and rear adjusting handle 4 Adjusting handle of seat storage box Seat rotates 90 degrees CAUTION 1 Adjust the seat while driving safely 2 Before using the rotation function please slide the...

Страница 32: ...nto the buckle until a click is heard and adjust the belt to your comfort 2 To unfasten the safety belt press the button on the buckle to release the latch plate and put the belt back slowly WARNING 1 Make sure that the belt is untwisted clear of hard edges and free from chemical pollution 2 The seat belt can be used by one person only Adult and kid are prohibited to share one belt 3 The whole sea...

Страница 33: ... the two knobs on the aluminum alloy rail to the required position and release the knob to lock the berth CAUTION After tilting the berth the berth shall be supported by two straps with button together otherwise the abnormal noise may be caused due to vibration Adjusting method press the rail at the tensioned strap lift up the rail where the strap is slack by the other hand till a click is heard A...

Страница 34: ...ch is in the ON position When the pointer is located at 0 the yellow alarm light near E in the dial is on it should be filled with clean qualified fuel as soon as possible 1 Fuel gauge urea gauge 2 Front axle barometer 3 Speedometer 4 Turn signal indicator lamp 5 Trailer turn signal indicator lamp 6 Muti information display screen 7 Engine tachometer 8 Rear axle barometer 9 Water thermometer 10 In...

Страница 35: ...o drive when coolant temperature is too high engine overheating damage will be caused Turn signal indicator lamp This indicator is used to indicate the work ing condition of the turn signal lamp of the trac tor Its normal flashing means all the turn signal lamps work normally fast flashing means that at least one turn signal lamp at the same side is in trouble Trailer turn signal indicator lamp Th...

Страница 36: ...ine tachometer The tachometer pointer indicates the revo lutions per minute of the engine The green area of the tachometer is the economic speed area and the red area is the alarm area for over speed Cummins Z14EVID520 engine economic speed is 1000 1600r min alarm speed is above 2300r min CAUTION Cummins ISZ series engine has the function of rapid warm up When the coolant temperature is low the en...

Страница 37: ...rm light 6 Parking brake indicator 7 The safety belt is not connected with the alarm indicator 8 No charge indicator 9 Transmission high half indicator light 10 Low half transmission indicator 11 DPF indicator light 12 Exhaust system high temperature indi cator 13 Position light indication 14 High beam indication 15 Low light indicator 16 Repair alarm lamp 17 Front fog lamp indication 18 Stop alar...

Страница 38: ...zzer sounds and the inter wheel differential lock is activated the indicator light is on CAUTION When the vehicle is running normally the differential lock indicator light should not be on Do not use differential lock for a long time otherwise it will damage the differential and cause excessive tire wear Air dryer heater indicator This indicator lamp will come on when the air dryer heater switch i...

Страница 39: ...ation of the purchased model The indicator light is on when the transmis sion is in the higher half gear zone Low gear indicator light of transmission Please refer to the specific configuration of the purchased model The indicator lights up when the transmis sion is in the lower half gear zone Engine over speed alarm light Please refer to the specific configuration of the purchased model At the ti...

Страница 40: ... of the engine causing the vehicle unable to continue running In this case the vehicle should be stopped for cleaning or replacement of the air filter until the lamp goes out CAUTION Make sure to clean and replace the air filter element according to the maintenance cycle if this lamp is not on Where this lamp is on do not perform maintenance according to the maintenance cycle but clean and replace...

Страница 41: ...indicator lamp After the clearance lamp is turned on this indicator lamp will be on when the front fog lamp is switched on The installation of this indicator lamp depends on the configurations of specific vehicle Rear fog lamp indicator lamp After either the front fog lamp or high beam or low beam is turned on this indicator lamp will be on when the rear fog lamp is switched on Water oil mixing in...

Страница 42: ...light will be ON when the key switch is in the ON position The light indicates that the engine is preheating The lower the ambient tempera ture the longer the light will remain on up to 30 seconds When the light is off the key switch will be placed in the START position to START the engine Parking brake indicator lamp When the driver pulls the manual valve control lever backwards to the brake lock...

Страница 43: ... the fuel tank is about to run out of fuel Urea level alarm indicator light The urea level is used to indicate the amount of urea in the urea tank This meter works when the key switch is in the ON position When the level of urea is low less than 12 the blue indicator lights up Low tire pressure alarm light The indicator lights up when the tire pres sure is too low CAUTION If the water temperature ...

Страница 44: ...is not serious When the red indicator light flashes indicating that the fault is serious Please contact the manufacturer for troubleshooting ESC fault indicator light When the indicator light is always on indi cating that the ESC system fails When the ESC function is activated the indicator light flashes Brake air pressure too low alarm lamp After starting the engine of the vehicle if the air pres...

Страница 45: ... light is on to remind the driver to fasten the safety belt Charging indicator lamp This indicator lamp will be on when the key switch is turned to ON position And it will go out when the engine is started and the alternator works normally When the alternator does not work due to a fault during driving this lamp will be on CAUTION Never drive the vehicle for a long time with this indicator lamp on...

Страница 46: ...ll be on for about 3 s and then go out If this indicator lamp stays on it indicates that the ABS is faulty In that case press and hold the ABS flashing code diagnostic switch for 1 3 s and the ABS fault flashing code indicator lamp will flash the fault code Please contact the Technical Service Center Station authorized by Dongfeng Commercial Vehicle Co Ltd for the truck inspection and maintenance ...

Страница 47: ...uise system Transmission fault indication The indicator lights up when the transmis sion fails MIL indicator lamp When the key switch turns to ON position the MIL light turns on After the engine starts if there is no OBD failure the MIL lamp will be off within 10 seconds If there is an OBD fault MIL will continue to light or blinking if found MIL light instrument of the LCD panel will display the ...

Страница 48: ...e center station of dongfeng commercial vehicle co LTD to inspect and repair the vehicle ACC system failure indicator If the indicator light is on the ACC system is out of order Please contact the authorized tech nical service center station of dongfeng com mercial vehicle co LTD to inspect and repair the vehicle LDWS system failure indicator If this indicator light is on it indicates that the LDW...

Страница 49: ...ppeared the DPF carbon load level had reached a certain level and needed to be regenerated At this point the driver is required to provide conditions conducive to active passive regenera tion such as a sustained speed greater than 70km h for 30 45min You can also choose to carry out parking regeneration or go to the ser vice station authorized by dongfeng commercial vehicle co LTD for processing C...

Страница 50: ...icle co LTD When the lamp appeared the DPF carbon load level had reached a certain level and needed to be regenerated At this point the driver dongfeng com mercial vehicle co LTD Authorized service station for processing CAUTION 1 During regeneration the turbocharger will make a slight tut sound which is a normal phenomenon 2 During regeneration the temperature is relatively high Please avoid gas ...

Страница 51: ...no major fault in the electric control system of the engine At this time the engine can still work but the electric control system will adjust the power speed and other operating parameters of the engine according to the influence of the fault If this indicator light continues to light up during the use of the vehicle please contact the technical service center station authorized by Dongfeng Comme...

Страница 52: ...cy is 0 01mpa 3 Total mileage display range 0 999999km 4 Automatic transmission gear A M E P mode 5 Instantaneous fuel consumption display range 0 60 0l 100Km over range display 6 Air pressure in the back loop ranging from 0 to 1 30mpa with a total of 10 light columns each 0 13mpa with a display accuracy of 0 01mpa 7 Speed display when the real time speed of the vehicle has a fault this position w...

Страница 53: ...switched 4 Total mileage and subtotal mileage short press return button 1s switch when releas ing display range of subtotal mileage is 0 9999 9km 5 Instantaneous fuel consumption and subtotal fuel consumption A The total mileage urea level is dis played on power and the return button can be cut to the total mileage instantaneous fuel con sumption subtotal mileage subtotal fuel con sumption B Autom...

Страница 54: ...Structure and Operation 44 D760 H03E 001 H1907 Interface switching 2 3 alarm interface popover ...

Страница 55: ...Display priority ordering the former icon is displayed and the latter icon appears c Four small ICONS can be displayed at the same time When there are more than one small icon it will be displayed in a 10s cycle d When the large icon appears the corresponding small icon appears simultaneously After 1 5s the large icon disappears and only the small icon is displayed 4 menu interface When stopping p...

Страница 56: ...e fuel consumption working hours average speed and date and time 2 1 total mileage and subtotal mileage can be inquired under mileage 2 2 average fuel consumption subtotal fuel consumption and total fuel con sumption can be inquired under fuel consumption 2 3 working hours search engine working hours and idle time ...

Страница 57: ...3E 001 H1907 47 2 4 average vehicle speed check the cumulative average vehicle speed and short range average vehicle speed 2 5 date and time the date and time can be checked and adjusted It is not avail able with the driving recorder ...

Страница 58: ...nder personalization you can query language unit of measurement dis play effect and time display mode 3 1 language switch between Chinese and English not yet implemented 3 2 units of measurement switch between distance speed fuel consump tion temperature and pressure ...

Страница 59: ... are optional 4 Instrument self diagnosis Under instrument self diagnosis you can choose to diagnose information including pointer alarm lamp buzzer LCD display and sensor 4 1 pointer pointer self test can be carried out zero full zero 4 2 alarm light LED self check all LED are bright 4 3 loudspeaker self check three times 4 4 LCD LCD self test ...

Страница 60: ...on 50 D760 H03E 001 H1907 4 5 sensor information sensor power supply and signal information query 5 Under driving assistance you can query or set mode record query subtotal mode mile age mode time mode and automatic record ...

Страница 61: ...l position open CAUTION 1 It is strictly prohibited to disconnect the master power switch when the engine is running 2 After switching the power supply please pay attention to pulling out the switch handle and receiving it Rocker Switch Please refer to the specific configuration of your vehicle Danger alarm light switch Press the danger alarm switch all the turn signals are flashing at the same ti...

Страница 62: ...of stops when the switch is released Automatic window closing function After the power of the whole vehicle is turned off the sunroof will automatically close after a delay of 5 seconds Air dryer heating switch This switch controls the heater of the dryer the freezing of dryer exhaust outlet will damage air compressor and other parts When the switch is in the on position the dryer heating indicato...

Страница 63: ... press the differential lock switch when the truck is running normally 2 Never use the differential lock for long time otherwise the differential may be damaged resulting in excessive wear of tire Inter wheel differential lock switch This switch is a differential lock operating switch for middle rear drive axle inter wheel dif ferential Press the switch to connect the differ ential lock When the i...

Страница 64: ...he instrument ASR light is on Press the ASR function 0 3 seconds again to close the switch then disconnect and the ASR function will be restored The ASR function will be automatically activated when the power supply is re energized after shut down This switch is recommended for use on dry and flat surfaces or differential locks Retarder disengage switch After using this switch the retarder functio...

Страница 65: ...ose whether to use the main tank or the auxiliary tank The amount of oil in the main and auxiliary fuel tanks is indicated by the fuel gauge By means of the switch the fuel gauge can display the amount of oil in the main and auxiliary fuel tanks respec tively CAUTION After switching from the main tank to the auxiliary tank switch from the auxiliary tank to the main tank at an interval of more than...

Страница 66: ...ight and press it again to turn on the rear fog light The button is pulled up to turn off the rear fog light and pulled up again to turn off the front fog light Electric adjustment of front headlights When the vehicle is empty adjust the light to the specified position and the switch gear is at 0 After loading the vehicle the light inclination angle will rise adjust the switch 1 2 and 3 gears down...

Страница 67: ...uise indicator light is always on After entering the cruise every time click ing R the speed will increase by 1km h Long press R the speed will continue to increase Click S every time the speed decreases by 1km h Long press S the speed will continue to decrease If the vehicle has entered cruise during operation if it exits press R to resume the last cruise 1 Wiper horn low and high beam switch 2 C...

Страница 68: ...eep the vehicle running at a constant speed 2 When the vehicle is driving in a bad traffic environment 3 When the vehicle is driving under the condition that it needs to change its speed frequently 4 When the vehicle is driving in a windy environment 5 When driving on curved roads or mountains 6 When the vehicle is on a smooth road surface rain snow ice etc Low idle speed adjustment Only applicabl...

Страница 69: ...ombination switch is operated to the middle position the high beam light will be lit Switch back to the original light state When the combination switch is operated to the up position the high beam light will be lit After the switch is back in position the light completes a switch Idle stop Cummins series engine has idling stop characteristics By idling the engine for a period of time without driv...

Страница 70: ...he specific configuration of purchased products In any case the combination switch is pushed forward to enter the auxiliary brake The combination switch is pushed forward as add gear when the gear is the highest gear then add gear operation is no response The combi nation switch is pushed backward to reduce gear When the gear position is the lowest the auxiliary brake will be closed if the gear re...

Страница 71: ...snow and ice 2 When the auxiliary brake works if the accelerator pedal is pressed or the ABS is activated the auxiliary brake will be closed When the above conditions disappear the auxiliary brake will return to the original working state Key switch 1 lock locking position the key can only be inserted and taken off at lock position 2 ACC accessory position when the key is turned clockwise to ACC p...

Страница 72: ... than 2 minutes 4 For the sake of safety always depress the clutch pedal when starting the engine 5 The main power must be shut off after 20s of engine stopped Instructions for ACC switch 1 ACC mode needs to be entered from cruise mode 2 After pressing the cruise CC button press either R or S to enter the cruise mode At this point the default speed is the actual speed when entering cruise 3 Under ...

Страница 73: ...just the direction of the rearview mirror Release the switch to stop adjustment Rearview mirror heated Click the switch to heat the rearview mirror and the rearview mirror will automati cally heat for 20 minutes before stopping When in the heating state press the switch again and the heating stops CAUTION Continuous or frequent operation of window regulator to a certain num ber of times may appear...

Страница 74: ... again and the glass stops until the switch is operated again Warning 1 During the operation of the window if contact occurs the window must be moved in the opposite direction 2 When the driver operates the electric window regulator switch on the passenger side he must ensure that there is no obstacle preventing the windows from closing properly 3 The driver must ensure that passengers use the ele...

Страница 75: ...ate and the wind speed is adjustable from 1 to 8 gears AC ECO button 1 On the premise that the air conditioning blower is turned on 2 Press the button and the air conditioning system compressor starts to operate The system operates in economic refrigeration mode Button work indicator light is on AC ECO is displayed on the screen And A C work indicator light is off screen A C display is off 3 Press...

Страница 76: ...ar blow face and feet at the same time 3 Feet blowing gear blow feet 4 Feet blowing defrosting and defogging gear blow feet meanwhile defrost and defog the glass 5 Defrost and defog gear defrost and defog the glass Set the temperature and press the button 1 Operate the button function only when it is turned on 2 Press the button once set temperature increased by 0 5ºC 3 Press the button for 2 seco...

Страница 77: ...following operations 6 Press the set temperature button to increase the setting temperature 7 Set the fan control button to gear other than AUTO If you want to increase the heating rate you can take the following measures 1 Set the temperature to the maximum heating position 2 Set the wind speed control button to higher wind speed 3 Press the internal and external circulation button make the indic...

Страница 78: ...f again CAUTION 1 When using the refrigeration function please start the fan first and then press the air conditioning switch otherwise the refrigeration function cannot be started the indicator light on the air conditioning switch is not on 2 When turning off the air conditioner please press the air conditioner switch first make the indicator light on the air conditioner switch in the off state a...

Страница 79: ...e in the area where the exhaust emission device is located during the operation of the heater If it is necessary to operate in the exhaust emission device the heater shall be turned off first until all parts are completely cooled and protective gloves are put on when necessary Inlet and outlet pipe shall not be blocked by dirt and snow 4 The fuel usage shall conform to the provisions on diesel fue...

Страница 80: ...ntroller will be locked 7 In case of failure shutdown should be checked as follows When the heater does not start up after operated shut down and then restart The heater is still not started so you should check whether there is fuel in the tank Whether the fuse is normal Whether the circuit connection and joint are in good con dition Whether the combustion air duct or exhaust pipe is safe if all a...

Страница 81: ...controlled spring air chamber acts on rear axle brakes as parking brake or emergency brake When the manual valve control lever is at Position 1 the parking brake will be in release status during transfer from Position 1 to Posi tion 2 the parking braking force of the tractor and the service braking force of the trailer will increase gradually when the lever is at Position 2 the parking brake of th...

Страница 82: ...er can apply the trailer brake and pushing it forwards can release the brake When driving the vehicle down a hill with small gradient the tractor can be braked through the engine brake while the trailer can be braked by pulling the trailer brake lever intermittently Warning To park it on a slope it is required to start the parking brake of the trailer and wedge the wheels with triangular blocks ...

Страница 83: ...air chamber spring cavity and rotate to a degree and confirm the tray is hooked 2 Install washer and nut rotate the nut with hand and rotate the nut till the screw is out by about 40mm with a wrench The spring braking is then released WARNING 1 Manual release of parking brake of spring brake air chamber is limited to emergency only Running the vehicle without parking brake is quite dangerous and m...

Страница 84: ...o the original position automatically At this moment you can pull it out to light the cigar Put it back in place after using it WARNING Never connect the cigar lighter for a long period It must be drawn out manually if it fails to pop out automatically 1 Spring brake release bolt WARNING 1 Manual release of parking brake of spring brake chamber is limited to emergency only Running the vehicle with...

Страница 85: ...n case any door is opened and it will turn off in case door on both sides are closed ON position the interior lamp will turn on once the switch is turned to ON position regard less of the position of the door OFF position the interior lamp will turn off once the switch is turned to OFF position regard less of the position of the door Side reading lamp Pressing the switch can turn on the side readi...

Страница 86: ...button for 40 60s to realize automatic learning and memorizing CAUTION 1 With respect to the sunroof the following circumstances may occur due to powerful electromagnetic interference or other factors 2 The sunroof moves for a short distance or does not move after the closing button has been pressed while the sunroof can make progressive movement if the closing button is pressed and held 3 The sun...

Страница 87: ... on when the switch is turned to OFF the berth reading lamp will turn off Step lamps They are installed on the inner sides of doors and used for step lighting The left and right step lamps are controlled by left and right door switches respectively When the door is open the step lamp at corresponding side will be turned on and when the door is closed the step lamp at corresponding side will go out...

Страница 88: ...s To open the left and right glove boxes press the buckles downwards and tilt the box covers upwards To close the glove boxes tilt the box covers downwards until the buckles are pressed into the central lock pins CAUTION 1 Please do not place too small fragile articles or the objects prone to shed dust into the glove box so as to avoid the serviceability of the glove box being affected 2 Please co...

Страница 89: ...ack to close it The refrigerator Please refer to the specific configuration of the purchased model The refrigerator is located at the bottom of the lower berth and is used to cool food etc On and off Open open the refrigerator button hand clockwise rotation knob refrigerator began to cool Close turn the knob to 0 to close Temperature setting MAX position about 2 c inside MIN position about 12 insi...

Страница 90: ...p for an angle in this case pull the cover along the lower edge of the side tool kit cover to open the tool kit CAUTION In case the lock is not completely unlocked and the side tool kit cover can not be opened as the ring is pulled please keep the operation of pulling the ring to open the side tool kit cover so as to open the side tool kit 2 Closing pull the cover downward along the lower edge of ...

Страница 91: ... driver s seat and passenger s seat can be pow ered on by pulling the handle and pressing the power switch until the green lamp turns on This socket used for supplying of external power is not controlled by the ignition switch but the master power switch of the complete vehicle The rated load of this socket is 220V 360W CAUTION When getting power via this socket the load is strictly prohibited to ...

Страница 92: ...steners at lower part of side rear curtain onto plastic buckles on the protection board 2 Upon collecting curtain first release the nylon buckle then evenly collect the curtain along the guide rail and bind it with the fastener Coat and hat hook The coat and hat hook is located in the rear quarter trim 1 Curtain 2 Buckle CAUTION Do not apply force to the lower end of the curtain when extending the...

Страница 93: ...enger s side The driver can adjust the main exterior rearview mirror wide angle mirror front under view mirror and close proximity rearview mirror to realize best rearview and down view effects Microwave window It is recommended to place it in the front area of the driver s side instrument panel without affecting the position of the driving vision 1 Close proximity rearview mirror 2 Exterior rearv...

Страница 94: ...MIC 2 Keyhole used to remove the recorder from the bracket 3 Scroll down to select functions or data column items 4 Menu switch between the default dis play interface and the menu interface and return the subdirectory to the root directory 5 Flip up and select to complete the selec tion of function or data column items 6 Confirmation to confirm the function or data column item press the button for...

Страница 95: ...tion D760 H03E 001 H1907 85 Display screen of on board information terminal Product introduction Video entertainment system assembly Front panel 1 Power standby button 2 Hatch cover with USB screen 3 MIC port 4 LCD panel ...

Страница 96: ...e 522kHZ 1620kHz FM band Frequency range 87 5MHz 108MHz Number of stations stored mannually FM18 AM6 Number of stations stored automatically FM6 AM6 Pre set radio browsing playback FM6 AM6 Signal to noise ratio FM 50dB Over AM 40dB Over MP3 Readable audio file format MP3 MP3pro WMA MP5 Video format supported RW V B R M MPEG 1 MPEG 2 MPEG4 ASF MOV and other common formats Resolution 1280 720P 1 Vid...

Страница 97: ...e at a non designated installation site or maintenance site is not covered by the product warranty 3 In order to avoid electromagnetic interference or configuration incompatibility please stop using the equipment at the place with notice as required 4 In order to avoid electromagnetic interference or configuration incompatibility please stop using the equipment at the place with notice as required...

Страница 98: ...n interface as shown in the figure After the self check of the display screen is successful it enters the main inter face If the self check of the display screen fails it cannot enter the main interface Please contact the after sales service center for maintenance Main interface Date year month day week display the current date subject to GPS positioning time Time hour minute displaying the curren...

Страница 99: ...ing the power standby button on the display 3s After entering the standby interface can be any point by clicking on the screen inserted U disk or wake up the screen steering wheel buttons normal work into the interface Icon Instructions highlighted The display screen is connected to the USB device successfully gray or none The display screen is not connected to the USB device Icon Instructions hig...

Страница 100: ...own in figure When the external mobile storage device is successful click menu list in the music interface When the song catalog in the current storage device is exported it is divided into all songs folders artists and albums Click enter the corresponding cate gory playlist and list Click the corresponding song name to select the song as shown in the picture 1 Return 2 Play mode 3 Last song 4 Fas...

Страница 101: ...ound Click music control again and enter the interface before returning 3 Supports MP3 ACC FLAC APE PCM and ADPCM music files in for mats Recorder Click recorder to enter the interface of the recorder This interface is mainly used for communication between the display screen and hd driving recorder Through this interface related functions such as vehicle information query and vehicle informa tion ...

Страница 102: ...nterface of the host com puter in which vehicle VIN terminal ID and license plate number can be inquired The license plate color provincial ID municipal ID and vehicle classification can be inquired and set Take the setting of license plate color as an example Click the color of license plate to enter the interface shown below Click the color of license plate to set to exit ...

Страница 103: ... to enter the user s mobile phone number query interface Under this function you can query and set the current termi nal number as shown in the figure below Terminal mobile phone number SOS number query changes refer to this server Click server Settings to enter the server selection interface Click the corre sponding server to query and set the APN port number domain name and IP of the server The ...

Страница 104: ...tigue driving query to enter the interface of fatigue driving query This function can query the driving license number and the corresponding starting and end ing time of fatigue driving according to the driving time Host state Click host state to enter the query interface of host state Under this function you can query the current host information The highlighted figure shows that the func tion mo...

Страница 105: ...icient The current vehicle pulse coefficient can be viewed under the function list of recorder Query of mileage information The current mileage information can be viewed under the recorder function list Picture Click picture on the main interface to enter the picture interface Under this func tion pictures can be played At present pictures stored in USB devices can be played As shown in figure CAU...

Страница 106: ...tored in USB devices As shown in figure CAUTION 1 In order to ensure the driving safety of drivers when the driving speed is more than 5km h and it lasts for more than 10s the video will not be able to be played If this function needs to be enabled it is necessary to enter the setting interface to set the safety mode 2 Supports video file playback in formats of H264 H263 MPEG2 MPEG4 AVI FLV ASF WM...

Страница 107: ...Structure and Operation D760 H03E 001 H1907 97 E books Click the e book icon to enter the e book reading interface as shown in the pic ture ...

Страница 108: ...tons on the steering wheel Click to play the corresponding channel in the selected storage area or press the channel area for more than 3 seconds to save the currently playing channel to the cor responding location Interface details Fine tuning button The same function can also be realized by pressing up and down buttons on the upper disk of the radio frequency band Radio mode Display the current ...

Страница 109: ...e same function picture video music Commonly used tools The calculator Click calculator to enter the calculator interface Under this function data opera tion and query can be carried out The query only supports the calculation history record with calculation results during the ignition and the number is less than or equal to 5 times Calendar Click the calendar icon to enter the calendar interface ...

Страница 110: ...ions as shown in the figure Bluetooth Dial up interface Click the bluetooth icon and enter the dial up interface Under this function you can make and receive calls between the display screen and the mobile phone At the same time you can also make and hang up calls through the bluetooth on the steering wheel to realize the bluetooth call function ...

Страница 111: ...erface you can query the current incoming call missed call outgoing call record and delete func tions as shown in the figure Contact person Click the contact icon to enter the contact interface and the contact person in the bluetooth device such as mobile phone connected to the real screen can be syn chronized as shown in the figure ...

Страница 112: ...lick Settings to enter the setting interface Under this function you can set brightness background key tone sound sound balance sound balance volume comfort language bluetooth WIFI system time safe driving mode system upgrade factory Settings and driving assistance As shown in figure Brightness setting Click brightness setting to enter the brightness setting interface Under this function the user ...

Страница 113: ...es stronger while other areas become weaker Volume comfort The volume comfort value is supported by 40 volume levels When the comfort switch is turned on such as the volume value of the current adjustment the comfort value the adjusted volume value will be played during the ignition But when the ACC OFF is restarted the system volume value will be changed to the set comfort value If the volume cur...

Страница 114: ...h picture to suspend play video click on the hint to exit the current function interface System upgrade The system supports U disk upgrade insert U disk with upgrade program auto matically enter the upgrade prompt interface after ACC ON click confirm and then the upgrade action can be carried out otherwise the upgrade action will not be carried out and the upgrade progress can be checked through t...

Страница 115: ...as an unconscious lane departure 1 When the vehicle speed is less than 50km h the LDW function is in standby state and will not send alarm When the vehicle speed is 50km h LDW function is activated to detect the cur rent visible lane line in real time 2 LDW alarm prompt includes sound alarm and indicator alarm icon flashing prompt 3 The color of lane line supported by LDW function includes white a...

Страница 116: ...d 3 Bright light ahead 4 The view of the camera is blocked by dirt water or other objects 5 Sharp changes in light such as in and out of a tunnel 6 Violent jolting and shaking 7 After the road surface is reflected by the light the abnormal status of the lane line or the road may also affect the LDW function The LDW func tion may not be able to identify the following abnormal lane lines or make wro...

Страница 117: ...the detection of tar get vehicles including cars suvs trucks buses etc FCW function is suitable for standard lanes with road radius 250m Warning This function only detects the target vehicle in the camera s field of view and may give a false alarm when there is no danger of collision In addi tion although there is a collision risk there may be no alarm The recog nition capability of the camera may...

Страница 118: ...4 There are vehicles moving rapidly from other lanes to the front of the vehicle System failure When the system is not calibrated or the internal controller camera and shielding wire are not in good contact or damaged the system will enter the failure alarm When the failure alarm is given the alarm icon of the instrument will be always on and there will be a fault code prompt System shut down When...

Страница 119: ...ted and reminded to the driver Warning The BSD function can only serve as a reminder not in all cases and can not replace the judgment of the driver who is always responsible for safe driving The BSD function is on by default and the control function on the vehicle is on or off After the function is off the indicator light on the instrument will be on and the BSDS system will be turned off When th...

Страница 120: ...ge can cover 1 5m in front of the camera and 18m behind the camera It can detect the target objects such as bicycles electric bicycles and vehicles that are close to each other within the detection range BSD function is suitable for roads with road radius 125m CAUTION In the following cases the BSD function may be interfered with in the presence of distractor on the right side which may cause the ...

Страница 121: ...system higher than 16V otherwise the camera may be damaged 3 If there is oil or mud stains attached to the surface of the camera lens use a soft cloth with detergent solution and wring to wipe and then dry with a dry soft cloth Do not use gasoline paint thinners or other chemicals to clean the lens 4 Do not rub the camera lens with bricks knives or keys Otherwise the camera lens may be worn result...

Страница 122: ...from the front of the vehicle 3 Ruler line can be manually clicked to enter the Settings menu to cancel 4 At this time the 270 circular view shows the distance of about 3 meters in front of the vehicle 5 When the vehicle turns right the right rear view 270 viewing Angle will be displayed by default At this time the 270 viewing Angle will display multiple right side areas and the single view will s...

Страница 123: ... The following figure shows the first level menu for video playback The first level menu shows the day month and year corresponding to the recorded video 3 Video playback of secondary menu icon instructions Video playback function button through this function menu you can set the channel of ringed image recording as well as video playback of recorded video Set menu button configure and disable aux...

Страница 124: ...cording video 5 Video recording and playing interface As shown in the figure below it is the recorded video screen video recording is conducted in the form of 6 grids by default and the single video screen can be touched to zoom in and out of the single video CAUTION The upper right corner of the recorded video shows the time speed and information Key functions are shown in the following table ico...

Страница 125: ... be configured for the display mode of straight line and steering and the channel of video recording 1 Set auxiliary line when going straight If shown as the auxiliary line is open if shown as the auxiliary line is closed 2 Display mode Settings when going straight Display mode Settings for straight lines can be set to forward view panorama default and forward view ...

Страница 126: ...for steering When turning the display mode can be set to left right rear view panorama view default setting left right front view panorama view left right front view left right rear view left right front view left right rear view right left rear view 4 Video channel setting ...

Страница 127: ...own in the figure below the video recorded by long press can pop up the operation screen and the user can set the corresponding video to be locked video The so called locked video means that the system will not automatically cover and delete the locked video when the SD card storage space is full ...

Страница 128: ...e normal use of the system may be affected under the following circumstances 1 Severe weather conditions lead to poor visibility such as fog haze rain snow etc 2 Insufficient light in the camera field such as no street lamp at night 3 The camera is blocked by snow ice dirt water or other objects 4 Sharp changes in light such as in and out of a tunnel 5 Violent jolting and shaking 6 There are stain...

Страница 129: ...D When there is an alarm or fault it will pop up in the main interface and disappear after 5s on the 4 tire pressure interface The fault will be displayed as a small icon until the fault disappears 1 When the tire pressure is too low too high or the temperature is too high the tire will show red and the fault data will also show red without flashing 2 When a wheel message timeout the value display...

Страница 130: ...ning outcomes After successful learning the newly replaced sensor ID will be recorded to the corresponding location of the TPMS control unit assembly If the learning fails please check the reason for the failure according to the corresponding text reminder then exit the sub menu of self learning sensor and re enter and re learn 2 Safety conditions for manual learning before manual learning drivers...

Страница 131: ... front wheel E If the interface display is successful the tire switching learning process is suc cessfully completed If the learning failure is displayed in the interface menu please check whether the safety of manual learning and precautions are met according to the reason of failure CAUTION 1 The single learning operation process can only learn a single position sensor ID If there are multiple s...

Страница 132: ...period Screw the valve nut hold the valve core with a tool and let off air for about 15s If the instrument has a long sound of 3 seconds it means that the learning is successful If not con tinue to deflate it is suggested that the tire that needs to learn the posi tion should be inflated to about 50Kpa above the nominal tire pressure after replacing the new sensor so that the tire pressure can jus...

Страница 133: ...ht and brake light When the lamps on both sides of the rear position light are damaged the filament detection indi cator light on the instrument will be lit This function is used to indicate the working sta tus of the driver s taillights Door open alarm function When the light is turned on and either door is open and the ignition lock is in OFF gear the buzzer alarms This function is used to remin...

Страница 134: ... to confirm the load of the fuse or relay used and find out the corresponding fuse or relay through the mark on the label of the central distribution box Fuse box When replacing a fuse or relay it is necessary to confirm the load of the fuse or relay used Find the corresponding fuse or relay according to the mark on the name plate of the central distribution box Please refer to the specific config...

Страница 135: ...07 125 CAUTION The fuse box label is located on the inside of the middle and lower guard on the passenger side Relay box label CAUTION The relay label is located on the inside of the middle and lower guard on the passenger side ...

Страница 136: ... as needed 4 Keep it at a proper position until locking exhausting sound is heard or press the upper lock button on pneumatic valve switch CAUTION Ensure that you can hear locking exhausting sound of pneumatic valve switch Ensure to adjust the steering wheel when the air pressure of the com plete vehicle is more than 0 4Mpa WARNING Adjusting the position of the steering wheel is strictly prohibite...

Страница 137: ...hooks must be used to ensure that the force of the double towing hooks is uniform 2 When using the front towing hook it is required that the tractor must remove the trailer Trucks and engineering vehicles shall be empty as much as possible or the weight shall not exceed the rated load mass Front Face Shield Opening of front face shield 1 Pull the primary lock handle under the driver s side instrum...

Страница 138: ...f the vehicle in this case the shield can be unlocked Closing of front face shield When the front face shield is in opening status hold the middle lower edge or rope of the shield to lock the shield Side Spoiler The left side spoiler can be opened and closed The spoiler shown in the top right figure is in the closing status but that shown in the opening status 1 Pull the front face shield forward ...

Страница 139: ...r Roof spoiler The roof spoiler is equipped with a height adjusting mechanism which can meet require ments of different heights of the cargo body Adjustment method 1 Release the adjusting knob and press it downward to disconnect the stop block from the long adjusting lever in this case the adjusting knob can slide upward and downward in the adjusting groove 2 Push the roof spoiler upward or downwa...

Страница 140: ... adjustment The lower adjusting lever should be pressed against the upper adjusting lever otherwise noise may be heard during driving causing damages to the parts Fire Extinguisher The fire extinguisher is located under the driver s seat For the detailed operations refer to the instructions on the fire extinguisher body Refueling Open the fuel tank cap and add clean fuel of the specified grade up ...

Страница 141: ... bag placed under the sleeper cab When the vehicle stops on the ramp below 18 the driver pulls up the handbrake and leaves the cab He inserts the two triangular stop blocks under the left and right drive wheels to observe that the vehicle does not move and slide before leaving Reflective vest Reflective vest is made of high visibility reflective material can be in the night or special weather cond...

Страница 142: ...ndicator light 1 The sleeper 2 Inverter socket 3 The seat CAUTION 1 Electrical appliances with power of 600W are prohibited 2 When the electric appliance is fin ished pull out the electric appliance in time 3 When using please pay attention to the safety of electricity do not allow children to contact the socket pay attention to the high voltage danger 4 Do not insert your finger or conduc tive ob...

Страница 143: ... a Under the condition that the vehicle is stopped the operation without flameout can be realized b If the user needs to stop the vehicle dur ing driving then manually operate the handle at the switch valve of the main and auxiliary fuel tank and rotate the handle to the fuel tank mark that needs to be used 2 When two tanks hold different grades of fuel if the ambient temperature is higher than 0 ...

Страница 144: ...arted normally If not rotate the handle to the fuel tank mark 3 Since there is no fuel heating device in the main fuel tank users should judge by themselves whether the fuel in the main fuel tank is waxed and whether the waxing degree meets the normal operation of the vehicle The user decides whether to switch to no 0 fuel in the main tank according to the judgment CAUTION 1 The valve body of this...

Страница 145: ... cab is not locked and in position the indicator light on the instrument will give warning WARNING 1 Before tilting the cab it is required to stop the vehicle shut the engine down and shift into neutral and it is prohibited to tilt the cab on a slope or do other operations before the cab it tilted in place 2 During tilting of the cab ensure that the shield is opened and there is no person or objec...

Страница 146: ... height when the load changes The air suspension has an outstanding feature that is it can ensure that the vehicle height keeps unchanged under no load and full load conditions Working principle of ECAS The working principle of ECAS is as shown in Fig H T01 026 Based on a constant comparison between reading provided by the height sensor and design index height H stored in ECU ECAS can identify the...

Страница 147: ...icating that the fault is serious The yellow indicator light is always on indicating that the vehicle is not running at the normal height The reset button of the remote control can be used for reset In the process of vehicle driving if the vehicle height is at the position of non driving height ECAS will automatically adjust the vehicle height to the driving height to ensure the safety of the vehi...

Страница 148: ...ehicle can reach the preset height H2 by pressing M2 The height memory switch plays an important role in connection or disconnection of tractor and trailer In case the trailer connected to the tractor keeps unchanged at the first try of connecting or disconnecting the tractor and trailer store the heights of two tractor frames by using the M1 and M2 height memory switch It will be very easy to car...

Страница 149: ...sure or has not been flameout Use of Differential lock Please refer to the specific configurations of your vehicle Differential lock should be used when the vehicle is stopped or runs at a speed equivalent to walking In case that the vehicle is running on the muddy and uneven road causing slipping of intermediate rear driving axle and vehicle stranding the vehicle can be driven out of the defectiv...

Страница 150: ...lled in the exhaust system of diesel vehicles oxidizing burning hydrocarbons diesel injected into DOC to provide a high temperature environment for DPF regeneration 2 Diesel particulate filter DPF for short refers to the device that filters in the exhaust system to reduce particulate matter PM in the exhaust 3 Selective catalytic reductor referred to as SCR it refers to the device that cat alyzes ...

Страница 151: ...e urea filling hole cover 4 Use special urea filling tools such as containers funnels urea filling guns etc Ensure that the filling tool is clean and cannot be mixed with other liquids such as fuel oil and oil The filling speed should be no more than 40 l min and the overflow of each filling should not exceed 30 ml 5 Close the filling hole cover 6 Close the lid as soon as the filling is finished W...

Страница 152: ...to emissions Once the automobile exhaust exceeds the standard the indicator light of the instrument MIL will be on and inform the driver In the event of serious failure the engine torque limiter will be activated The electronic control unit EECU of the engine records the fault infor mation and related codes and displays the rele vant fault on the LCD screen of the instrument so that the maintenanc...

Страница 153: ...nd the List of Trailer Light Distribution for functions of corresponding jacks For the semi trailer tractor with 7 core trailer cable assembly at delivery when connect ing it with the trailer it is only required to pull the plug at one end of the 7 core trailer cable assembly out of the socket on the semi trailer tractor and then insert it into the socket on the trailer If the semi trailer tractor...

Страница 154: ...ellow brake control spiral pipe for sending brake signal to the trailer is located on left side Jumper power Jumper cable is used for supplying power to trailer It is divided into ordinary power cable and ABS power cable When disconnected from the trailer the cable connector may be fixed onto the spare socket Terminal No Wire No Usage Maximum available power of trailer W 1 100 Ground wire 2 8239 C...

Страница 155: ... adjusting screw at least 5cm outward 3 Tap the handle lever inward to make the wedge inward until you feel that the handle cannot move inward that is the lock hook has been wedged stop hitting the handle 4 Rotate the adjusting screw inward by one person and hold the handle by another until he see or feels that the handle is moving outward that is the adjusting screw is in contact with the wedge a...

Страница 156: ...d Pull pin pushes the lock hook to rotate and when the handle lever returns to its original position the lock card is automatically reset and locked that is the attachment is completed 1 The position contacted with saddle during connection process 1 Pre hanging state the handle bar is stuck on the bayonet at the edge of the saddle shell and the lock car is in a horizontal state 1 Completion status...

Страница 157: ... the connector corresponding to the trailer CAUTION Never connect wrong hose connec tors h Make sure the trailer s gas path and circuit are working properly i Pull up the supporting pin of the trailer j Remove the parking brake of the trailer and remove the triangle plank 3 Hang off 1 Lower and support the supporting feet of the trailer 2 Remove jumper cables and hoses After the hose is removed th...

Страница 158: ... the fender may occur under certain limit conditions resulting in damage to the upper cover plate Operation instructions for removing the upper cover plate of fender 1 Clamp the outer end of the rubber band with pliers and stretch it towards the direction of arrow a 2 If the pliers are not loose then raise them along the direction of arrow b to the rubber band so that it is free from the fender cl...

Страница 159: ...he limit hole of the fender 3 Clamp the end of rubber band with pliers and stretch the rubber band along the direction of arrow a When the pliers are clamped and stretched press the rubber band down direction b into the fender clasp to tighten At this point the rubber band clamping operation is completed and other rubber band can be repeated 1 Upper cover plate 2 Rubber band ...

Страница 160: ... temperature the longer this indicator lamp stays on up to 30s After it goes out turn the ignition switch to START position to start the engine 6 If the vehicle is equipped with fuel primary filter with glow plug the electric heater of the fuel primary filter should be activated to help the engine cold start when the ambient temperature is below 7ºC Turn on the fuel preheater switch on the instrum...

Страница 161: ...ng time or frequently otherwise battery electricity loss or starter damage will be caused 3 For the sake of safety always depress the clutch pedal when starting the engine 4 Never run the engine at idle speed for long time Cummins engine can never run at idle speed for more than 10min or the engine will be damaged Starting with cab tilted 1 Move the manual valve control lever backward to brake loc...

Страница 162: ...our vehicle Operation of ZF12 AMT Gearshift knob N neutral D normal driving of vehicle DM slow driving of vehicle in a short dis tance R normal reversing of vehicle RM slow reversing of vehicle in a short distance 108 A M gearshift When the engine has not been started M mode is default mode When the engine has been started A mode is default mode Pressing the selector switch can select A M mode 1 E...

Страница 163: ...earshift mode 1 Auto selection of transmission system STRAT UPSHIFT and DOWNSHIFT and the clutch and gearshift can be completed automatically 2 Manual interference on gearshift can be realized and in A mode direct uplifting and downpressing of the gear lever can realize direct gearshift CAUTION 1 It is possible to turn the gear lever to N position from any position at any time 2 The engine is unde...

Страница 164: ...ccording to working conditions while the driver can pay all attention on determi nation of road conditions and keeping driving at a constant speed Starting instructions 1 Pull up the hand brake to ensure that the rotary switch is turned to N 2 Start the engine and do self inspection on transmission prºCedures afterwards N will be displayed 3 When the rotary switch is turned to D it will automatica...

Страница 165: ...uired to pay more attention on the gearshift points and schedule etc Overdrive switch In order to make use of engine power to the largest extent you can depress the acceler ator pedal to the end to trigger the kick down switch or signal of full throttle with CAN it is generally used in overdriving in this case delayed upshift or downshift can be realized Hill start assist function 1 The hill start...

Страница 166: ...t full power of the engine it is possible to depress the accelerator pedal to the end to activate kick down in this case the throttle is in full opening and the transmission will do downshift or delay upshift according to the program calculated load directive Kick down of the accelerator pedal can only be realized by depressing the pedal to the forced position in A mode but in M mode it cannot be ...

Страница 167: ...ed and low speed range 1 000 rpm 3 3 Before driving in creeping mode shift the transmission into N 2 1 or R direct shift into linkage mode is not allowed at other gears due to the protection function 4 In linkage mode manual operation of the gear lever by the driver will be ineffective that is no manual interference on gearshift is allowed 5 It is allowed to shift from DM to D but it is prohibited...

Страница 168: ...troubleshooting Electronically Controlled Brake System EBS Compared to the traditional brake system the electronically controlled brake sys tem EBS for short designed with an electronically controlled air brake can eliminate the defects such as slow response of mechanical brake poor braking comfort etc In case the electronically controlled return circuit of EBS is in failure the air pressure contr...

Страница 169: ...he expected parking position 3 Depress the brake pedal gently to stop the vehicle completely when approaching the parking position CAUTION 1 Normally never depress the brake pedal suddenly to the end and depress it all the time other than in emergency The sudden braking may result in personal injury or vehicle part damage 2 Avoid depressing the brake pedal repeatedly for times in a short period ot...

Страница 170: ...hicle runs under heavy load or at a high speed to prevent engine scuffing or turbºCharger damage 4 Turn off all switches especially the power switch after shut down of the engine Slope Driving Method 1 When driving down a slope you should apply the auxiliary brake effectively to keep the vehicle speed within the safe range 2 When the vehicle runs at low gear or runs down a slope make sure that the...

Страница 171: ...2 Open the cab front face shield 3 Tilt the cab front face shield and add the coolant from the filler of auxiliary water tank behind the cab until the level reaches the filler lower edge Never add the coolant too fast through unscrewing the filler cap the filler cap pressure valve and vacuum valve are integrated otherwise it will be difficult to drain out the air in the engine water jacket 4 After...
Страница 172: ...e 208 for the mainte nance period Or when the main filter is cleaned and maintained for more than four times the internal and external filter elements must be replaced simultaneously Replacement of air filter element 1 Pull the six clips and hold them by hands to pull the end cover 2 Gently shake the outer element leftward and rightward by hands to pull it out slowly 3 If it is necessary to replac...

Страница 173: ...2 Never clean the filter element with gasoline or water 3 When cleaning cyclone hood observe if it is damaged 4 Check the sealing rings during installation 5 Never remove the air filter while the vehicle is running 6 Tighten the filter element and end cap nut and install the sealing ring of the end cap properly Prevent the entry of rain water into the filter Draining of Fuel Tank If there is too m...

Страница 174: ... with a piece of clean rag and fit to its original position 2 Pull the oil dipstick out again and observe the oil level The oil level should be between the two scale lines Add clean lubricating oil if insufficient Drain the excessive oil from the oil drain plug Change of engine oil 1 Drain off the lubricating oil from the oil sump when the engine is hot If the engine is cold warm it up before chan...

Страница 175: ...il drainage pay attention to the oil temperature to avoid scalding 3 The oil pressure must be displayed on the instrument within 15 seconds of starting the engine If oil pressure is not shown within 15 seconds shut down the engine immediately to avoid damage Verify that the oil level in the oil sump is correct Oil filter Check the maintenance period refer to page 208 Replacement method 1 Select th...

Страница 176: ... Fuel prefilter oil water separator discharge Turn the ignition to LOCK and stop the engine When the engine stops working for more than 30 minutes release the drain plug and release the water from the drain plug After draining tighten the draining plug firmly CAUTION 1 When the water reaches the alarm height of the fuel filter water level sensor and the water in the oil alarm light is on do not co...

Страница 177: ... and clear fuel contamination at junction of base and water separator 4 Screw a new water separator housing to the base by hands till the seal ring contacts the base and then tighten the water separator for 270 according to print requirements for the water separator subject to the model with a special tool 5 Place a new seal ring into the water collector seal ring slot and lubricate the surface of...

Страница 178: ...nd normal start of the engine In winter or low temperature area after first use of the water separator it is required to press the hand pump frequently with more than 30 times for each pressing CAUTION 1 Do not tighten the fuel filter and water separator with the water separator spanner during installation otherwise the threads may deform and the filter may be damaged 2 Tighten the drain valve by ...

Страница 179: ...oreign matters that may be suspended in the vehicle urea from entering the injection system Debris may cause permanent damage and premature failure to the post treatment metering pump 3 The filter in the vehicle urea tank is located inside the vehicle urea tank below the liquid level temperature sensor CAUTION 1 Before using containers or funnel for distributing treating or storing vehicle urea ma...

Страница 180: ...rly check whether there is any leak age or white crystallite at the quick plug joint of the post treatment jet unit If there is any leakage or crystallite please replace the new joint in time 3 The metering pump filter is used to prevent foreign matters that may be suspended in vehicle urea from entering the injection sys tem Debris may cause permanent damage to urea pumps or urea nozzles and prem...

Страница 181: ...damage to paint film 4 Pay special attention to sealing and preservation 5 Never allow dirt or dust into the reservoir Check and replace transmission oil ZF12 AMT Replacement period of transmission fluid In order to ensure safe and reliable opera tion of the transmission it is required to replace the fluid within the specified period Normal replacement Every 240 000km or 24 months Filling volume T...

Страница 182: ...hecking the level Check and replace retarder oil ZF Check the oil level CAUTION Insufficient oil in the transmission will lead to transmission damage and accident risk WARNING Insufficient oil in the transmission will lead to the retarder failure brake torque weakening or failure Please use the auxiliary brake carefully when continuing to drive or maintain the transmission Operation method 1 When ...

Страница 183: ... engine 4 When oil draining loosen the oil draining plug of the transmission and the oil draining plug of the retarder 5 After oil draining the oil drain screw plug magnetic must be cleaned and replaced with a new gasket 6 Install new filter element 7 Finally tighten the drain screw plug 1 Oil drain plug of transmission 2 Oil drain plug of retarder 3 Oil absorption filter element 4 Install filter ...

Страница 184: ...otherwise the quantity of refueling is not accurate 3 Please use a new filter element every time after you change the oil 4 For oil grade and oil change cycle please consult ZF TE ML oil table according to the transmission nameplate information 5 The amount of fuel added is only a reference value which may vary with the type of transmission and installation angle 6 For refueling quantity and tight...

Страница 185: ...izontally the transmissions shall be placed horizontally before refueling otherwise the quantity of refueling is not accurate 3 For oil grade and oil change cycle please consult ZF TE ML oil table according to the transmission nameplate information 4 The amount of fuel added is only a reference value which may vary with the type of transmission and installation angle 5 For refueling quantity and t...

Страница 186: ...est run which is the correct refueling process so as to ensure the accurate refueling volume and the split heat exchanger Check after the test run for about 5 minutes to prevent the heat exchanger idling Drain the residual coolant WARNING Touch hot gearbox or engine coolant may cause burns please take precau tions Residual coolant can only be removed when the temperature sensor is removed 1 Loosen...

Страница 187: ...and then rotate the worm shaft in reverse direction by 1 2 turn The brake drum should rotate freely without contacting any part at this moment 2 Check that the push rod travel of the brake chamber is within 25 5 mm CAUTION 1 Check the brake clearance frequently and adjust it in time if the braking is weak Attention should be paid to the followings during adjustment 2 Never change the push rod trav...

Страница 188: ...rm shaft to keep the camshaft at the min imum opening position After the friction lining is replaced depress the brake pedal about 30 40 times with the complete vehicle air pressure no less than 300kPa to reduce the brake clearance When the vehicle is in service the shoe friction lining clearance will be adjusted automatically and continuously along with the prºCeeding of running in till it is kep...

Страница 189: ...s are chocked at the front and back and the parking brake is released 6 In case the automatic adjuster is abnormal make sure to stop the vehicle immediately to check the automatic adjuster and other components of the brake system and take necessary measures to eliminate the fault 7 Before tightening the fastening bolt of control arm rotate the control arm around camshaft in the direction of arrow ...

Страница 190: ...aking is frequently applied like on long downhill at mountain area the brake drum will expand with heat and the enlarged clearance brake drum expansion will be adjusted smaller by automatic adjuster and brake drag may ºCcur after the brake drum is cooled In such case users can adjust brake clearance larger manually after the brake is cooled Method for disabling automatic adjustment function If the...

Страница 191: ...ter pushes the inner brake pad to contact the brake disc such that the brake caliper moves horizontally along the sliding pin making outer brake pad contact the brake disc and realizing braking function Automatic adjuster ensures proper clearance between brake pad and brake disc Method for manual adjustment of disc brake clearance Park the vehicle safely remove the tires and pull the caliper body ...

Страница 192: ...ially 4 Push and pull the brake caliper with hand to check if it can slide smoothly 5 If the brake caliper can slide smoothly it works normally otherwise perform troubleshooting of the brake Inspection of sliding pin rubber sleeve Applicable to Haldex disc brake only Check protective sleeves and 6 silicon rub ber sleeves at both ends as well as the protec tive cover If any cracks or other damages ...

Страница 193: ...haft in reverse direc tion to the limit Check if the helical spring sleeve can return completely to ensure there is no fold interference or damage Inspection of sliding function of brake caliper 1 Park the vehicle safely remove the tires then push pull caliper with hand to check if it can slide smoothly 2 If the brake caliper can slide smoothly the sliding function is normal otherwise perform trou...

Страница 194: ...ng the brake pedal may accelerate wear of inner brake pad 2 While replacing the brake pad all brake pads of the two brakes at the same axle must be replaced together Inspection of brake disc Inspection of brake disc dimension A Thickness of a new brake disc B Thickness of brake disc worn to the limit the brake disc must be replaced at this moment Brake disc parameters Disc brake Haldex Thickness o...

Страница 195: ...lowed depth less than 1 5 mm D Radial through cracks continuous use is not allowed CAUTION While replacing the brake disc all brake discs of the two brakes at the same axle must be replaced together Inspection of friction lining wear As friction lining is worn to the limit or faulty the wear indicator will be on Please replace the friction lining at this moment Inspection of Brake Pedal Stroke 1 S...

Страница 196: ...r dryer assembly during inflation before vehicle start please check the exhaust valve If the exhaust outlet fails to be closed tightly due to foreign matters oil dirt or others please clean the exhaust valve the upper limit it is normal that the air dryer exhaust outlet will exhaust for pres sure relief Only when the air pressure is consumed down to the lower limit will the exhaust valve close and...

Страница 197: ...bserve oil level If the oil level is not between MAX and MIN marks of oil dipstick hydraulic oil of the same grade should be added Replacement method 1 Wedge the front and rear of the rear wheels with triangular blocks engage the transmission at neutral gear and jack the front axle to raise the tires of both sides off the ground or disengage the drag link from the pitman 2 Wipe the oil tank clean ...

Страница 198: ...right to facilitate bleeding air from the system 4 Always shut down the engine when checking the oil level 5 Never let the steering wheel stay at the extreme position for more than 15 s In such a case it is required to slightly rotate the steering wheel backwards so as to avoid any damage to the power steering pump 6 Before starting the vehicle for the first time at the ambient temperature below 1...

Страница 199: ...in air spring overstretching causing separation of upper lower connecting metal plate from the rubber bellows body 2 Rubber bellows body of air spring assembly may be corroded and damaged by hydraulic fluid lubricant and other chemical solvents While driving the complete vehicle never let the rubber bellows body of air spring contact corrosive liquids check and clean the air spring regularly and t...

Страница 200: ...ethod The oil level of intermediate axle should be flush with the lower edge of transition tank access hole and add the oil if insufficient The oil level of rear axle should be flush with the lower edge of the oil filler check and clean the breather plug Normal replacement Check the Maintenance period see Main tenance and replacement items The replacement cycle should be shortened when the vehicle...

Страница 201: ...idden Allowed Preferred Meridian tire Allowed Preferred Allowed Bias tire Preferred Not recommended Forbidden Model Dump truck Position Steering shaft Driving shaft National highway Longitudinal pattern Longitudinal pattern or dual purpose pattern General road conditions Longitudinal grooved pattern or dual purpose pattern Off road pattern or transverse pattern Poor road conditions Transverse patt...

Страница 202: ...016PR 259 1018 485 485 7 0 20 2900 2500 880 810 9 00 2014PR 259 1018 485 485 7 0 20 2575 2300 770 700 9 00 2012PR 259 1018 485 485 7 0 20 2360 2060 670 600 9 00 2010PR 259 1018 485 485 7 0 20 2120 1850 560 490 8 25 2014PR 236 974 464 464 6 5 20 2240 1950 810 740 Meridian tire 12 00R2018PR 315 1125 516 534 8 5 20 3750 3450 830 830 11 00R2018PR 293 1085 499 517 8 0 20 3550 3250 930 930 11 00R2016PR ...

Страница 203: ...quipped with tires of the same model with even and less wear Do the dynamic balance test on the newly assembled front tires or front tires whose positions have been changed newly where possible 3 After tire rotation the rotating direction of tire should be reverse to that before tire rotation The new tires must be used in pairs 4 The same axle must be equipped with tires of the same specification ...

Страница 204: ...ires due to adjustment of front wheel alignment without permission of Technical Service Centre Station authorized by Dongfeng Commercial Vehicle Co Ltd of should be taken by the user The adjustment of front axle toe in and tire parallelism with traditional measuring tape can lead to great error If any deformation damage and other defects ºCcur to tie rod and drag link Service Station will perform ...

Страница 205: ...e valve to inflate and measure the pressure with a manometer to ensure that the tire pressure reaches the specified value 4 Remove the inflation hose tighten the air inflation valve cap and then stop the engine Maintenance of wheel hub bearing Please refer to the specific configuration of the purchased model Check the maintenance period refer to page 208 Carry out wheel hub bearing maintenance Rem...

Страница 206: ...loosen it by 1 4 1 6 turn 3 At this moment the wheel should rotate freely without visible axial play or swing Fit lock plate and fastening screw CAUTION Align the lock plate screw with the adjusting nut to ensure the minimum looseness of adjusting nut Maintenance of maintenance free wheel hub Please refer to the specific configuration of the model purchased Conmet maintenance free wheel hub Check ...

Страница 207: ...ntinue to tighten the lock nut until it is aligned It is forbidden to loosen the lock nut back 6 Fill the wheel hub with gear oil through the filling holes on the wheel hub cover or the side wall of the wheel hub until the indicated scale of oil level fuel capacity of steering axle is about 0 5l single side and fuel capacity of drive axle is about 1L single side 7 There is no need to check the cle...

Страница 208: ...bly shall be pulled out straight from the axle shaft tube and placed in a dry place with good sanitation Never remove the clamps oil seals and other parts The O ring at the clip groove of the inner ring of the inner bearing shall not be lost during disassembly If it is accidentally dropped out it can be manually put into the clip groove after cleaning 2 After axle shaft tube is cleaned and wiped c...

Страница 209: ...t away with water or oil apply a little grease on the exposed threads and then remove the nuts This is to avoid thread loosening or locking in case of greater removal torque 2 To refit a nut apply grease or oil on it so as to guarantee screw thread pair s normal service and avoid loosening or locking Refitting of tire 1 Fit the wheel rim bolt hole over the wheel hub bolt by a pry bar 2 Adjust the ...

Страница 210: ...ng the fusible link If the new fusible link is very easy to be burnt out then find out the fault cause and eliminate it In case of troubleshooting failure contact the nearest Technical Service Centre Station authorized by Dongfeng Commercial Vehicle Company WARNING Never replace the fusible link with ordinary conducting wire or fusible link of other specifications Adding of Washer Fluid Washer flu...

Страница 211: ...o the right one including the front turn signal lamp front position lamp low high beam and daytime running lamp 3 Front end outline marker lamp two pieces with the left one symmetric to the right one 4 Side turn signal lamp two pieces with the left one symmetric to the right one 5 Side marker lamp four pieces with the left one symmetric to the right one 1 Front fog lamp 2 Front combination lamp 3 ...

Страница 212: ...ethod Front combination lamp Structure description reflector of front com bination lamp assembly is the low high beam combined reflector which is regulated through adjusting screw and light adjusting motor man ual adjusting section Lamplight adjustment should be done strictly in accordance with the figure 1 Rotate the adjusting screw clockwise and the reflector will move leftward rotate the adjust...

Страница 213: ...Excessive adjustment will cause reflector damage ball joint falling and other defects 3 It is recommended to perform light adjustment with manual screwdriver Preparations 1 The site for light adjustment should be flat and the screen used should be vertical to the site 2 The vehicle should be unloaded with one driver seated and tire pressure kept normal 3 The vehicle should be vertical to the scree...

Страница 214: ...no beam leak out and adjust the upward downward light adjusting mechanism to make the height of the high beam of the left lamp be 0 8 H 0 95 H adjust the leftward rightward light adjusting mecha nism to make the leftward horizontal deflection of the high beam within 170 mm and the rightward deflection within 350 mm The adjusting method for the single high beam of the left lamp is the same as that ...

Страница 215: ...ooster cables start the engine of the vehicle equipped with the dead battery 4 After the engine being started remove the cables in the prºCedures reverse to the wiring prºCedures CAUTION 1 This way can be used in emergency only because it is liable to cause fuse burning of charging circuit Under normal conditions dismount the battery to charge it when the battery is out of power 2 Prevent power sh...

Страница 216: ...truction road tilt the cab once a day at least Under severe working conditions it is required to clean the surface of electric pump assembly hand pump assembly and cylinder assembly every day especially the dirts at vent plug O ring to ensure that the vent hole of vent plug in oil pump assembly is unblockedMotor overheat ing will cause motor burnout Therefore after the electric pump has been used ...

Страница 217: ...d with torque wrench torque value 140 160Nm Check the Maintenance period see Main tenance and replacement items Saddle No 50 90 Inner surface wear limit of open end cover mm 34 5 35 5 36 5 37 5 Innerl surface wear limit dimension mm 51 55 89 93 1 lock hook 2 Open end cover 3 Surface of shell 4 Twist spring 5 wedge 1 Adjusting screw 2 Arc bearing plate 3 Split pin 1 Open end cover A wear on the inn...

Страница 218: ... user should carry out the maintenance according to the maintenance parts and inter val mileage or months strictly CAUTION When performing the vehicle maintenance in accordance with the speci fied maintenance items the user should shorten the maintenance inter val mileage and add the required maintenance items according to the vehicle functions and local operating conditions to ensure more reason ...

Страница 219: ... filter 5 6 Replace coolant 20 24 Replace the fuel prefilter oil water separator 5 6 Replace the filter screen at the inlet of the urea temperature level sen sor bottom of sensor and clean urea tank 10 12 Replace the main filter element assembly of urea pump 20 36 Replace the fuel prefilter oil water separator 5 6 Check and clean air filter element if nec essary Replace alarm light on cleaning fil...

Страница 220: ... air compressor exhaust pipe 40 48 Check and adjust engine overhead mechanism adjust or tighten as needed 5 6 Crankshaft pulley 10 12 Cold start auxiliary device 10 12 Check the axial clearance of belt driven fan hub bearing and adjust as needed 40 48 Check and clean cooling fan belt ten sioner 10 12 Check whether the assembly torque of important parts meets the require ments inlet manifold screw ...

Страница 221: ...or for sediment and water and discharge regularly 3 weekly Check whether the fan fan flange and mounting bolts are loose and retighten as required 5 12 The first and sub sequent users are retightened every 10 000 kilometers for a total of 3 times Every 6 Check monthly and retighten as needed Check and tighten the ring hoop of the flexible wind shield and retighten as required according to configur...

Страница 222: ... cycle above Maintenance and replacement items Running in mainte nance The first confirmed 10 000 km month Inbound maintenance interval 10 000 km month Check the working state of clutch as required including checking the clutch pedal for free travel 10 12 Check the clutch hydraulic sys tem main pump and booster for oil leakage 5 3 Check the level of hydraulic oil in clutch storage tank 5 3 Mainten...

Страница 223: ...o configuration 5 3 2 1 Check the front axle middle and rear axle drum brake automatic adjusting arm reverse adjusting torque 5 3 2 1 Check the wear of front axle mid dle and rear axle brake drum and friction disc drum brake 5 3 2 1 Check clearance self adjusting function of front axle middle and rear axle disc brakes according to configuration 5 3 2 1 Check front axle middle and rear axle disc br...

Страница 224: ...on condition of vari ous parts of the steering system the connection condition of each ball head of the steering bar the tightness condition of steering mechanism and bracket the tightness condition of the steering knuckle arm and the hanging arm 10 6 Check wheel bolt fastening and retighten as needed fastening 5 3 Retighten twice before the first holding station with an interval of 500 1000km and...

Страница 225: ...ing and spring clamp for loose ness and deformation tighten u bolt 5 3 Re tighten twice before the first guar anteed entry station with an interval of 500 1000km accord ing to the regulation Check and tighten the fixing balance shaft support air suspension bracket beam air suspension lower thrust rod support guide arm support fastening bolts 5 3 2 Check and tighten V push bracket plate spring brac...

Страница 226: ...3 2 Maintenance and replacement items Running in mainte nance The first confirmed 10 000 km month Inbound main tenance interval 10 000 km month User maintenance interval 10 000 km month Clean the drive axle vent plug or vent tube 5 3 Per month Check the rim of the process the wheel end of the middle and rear axle and the main reducer assembly for oil leakage 5 3 Per month Maintenance and replaceme...

Страница 227: ... Check whether the wiper can be scraped clean and replace the wiper if necessary and clean the foreign body on the glass surface 5 3 2 Check whether there is obvious friction between the lock and the lock body and adjust the lock position if necessary 5 3 2 Check whether the bridge sus pension joints are loose and tighten as required 5 3 Check for leakage and sealing of hydraulic system 10 12 Per ...

Страница 228: ...haust sound after the pedal is released Adjust or replace in case of abnormality 5 12 weekly Check whether the pedal return spring state is normal 10 12 Per month Check whether all switches in the pedal assembly are pressed properly 10 12 Per month Check the steering wheel up and down front and back adjustment and lock function is normal 10 12 Per month Whether the light adjustment of the front co...

Страница 229: ...nchronous replacement with the axle gear oil suit able for connecting the oil chamber and the rear axle gear oil chamber Maintainable hub bearing grease replacement 5 3 Per month Before and after the plate spring pin lifting lug pin balance bear ing hub if there is a nozzle grease 5 3 2 Grease if grease nozzle 5 3 2 Grease is added to the surface of the saddle shell the contact between the saddle ...

Страница 230: ...ertainly decrease over time and its performance cannot be predicted to ensure safe driving during general regular servicing and inspection Replacement interval years 1 2 3 Rubber hose of power steering hydraulic system Rubber hoses of brake system Rubber cup and sealing ring of brake chamber Rubber hose of air compressor Fuel nylon hose Gas metal hose All oil pipes of hydraulic lifting system Seal...

Страница 231: ...b bearing at the tire nut 25 55N Tensile force after adjustment of rear hub bearing at the tire nut 29 88N Differential bearing pre tightening load excluding the pre tightening load of driving bevel gear bearing At driven gear bolt 68 78N Pre tightening load of driving gear bearing at coupling flange bolt holes for rear axle Excluding oil seal resis tance 20 44N Including oil seal resistance 30 60...

Страница 232: ... parts of engine mounting Tightening torque of critical parts of cooling and inter cooling systems Bolted position Thread specification Reference tightening torque N m Remarks Front and rear suspension bracket and frame fastening bolt M14 190 15 Mounting bolts between engine front rear mounting cushion and auxiliary mounting cushion M14 170 15 M20 170 15 Engine and front mount bracket fly wheel ho...

Страница 233: ...ype Clutch Assem bly and Control System M10 grade 8 8 non flange bolt 40 60 Connecting stud bolts of clutch pressure plate cap assembly and engine flywheel M10 grade 10 9 non flange bolt 55 75 Connecting bolts of clutch housing and flywheel housing M10 grade 8 8 non flange bolt 40 60 Pre tighten them cross wise and then tighten them with torque spanner M10 grade 10 9 non flange bolt 55 75 M10 grad...

Страница 234: ...suspension 3 The tightening torque of M24 is different for single rear axle suspension and bal anced suspension M20 380 460 M22 400 480 M24 450 540 Balanced suspension M24 600 720 M27 860 1000 Connection of balance shaft support and vehicle frame fastening bolt assembly Balanced suspension M16X1 5 210 280 Adopt fine thread bolt of grade 10 9 nut of grade 10 M18X1 5 350 470 M20X1 5 430 550 Bolted p...

Страница 235: ...5 6 5 Alternator M6 5 5 6 5 M8 6 4 9 6 Starter power terminal M10 13 5 15 8 Starter control terminal M5 2 2 5 ECU fastening bolt M6 4 9 7 8 Auxiliary start switch M6 6 10 Air filter clog sensor M6 6 10 Fuel level sensor M5 2 2 5 Rear combination lamp M8 19 24 Battery cover strip M8 The double nuts are used for lock ing the tightening torque of the first nut is 7 9N m and that of the second nut is ...

Страница 236: ... N m Connecting bolts of steering gear and steering knuckle fork 30 50 Connecting stud bolts of steering upper arm and steering knuckle 280 350 Fastening nut of steering lower arm 350 450 Lock nut of steering stop bolt 80 100 Connecting nuts of steering knuckle arm and ball pin 250 310 Locking nut of steering kingpin thrust pin 24 40 Connecting nut of lower arm and ball pin 245 340 Clamp nut of ti...

Страница 237: ...fferential bearing cap 440 490 Fastening bolts of final drive driven gear and differential housing 600 700 Fixing bolts of final drive housing for rear axle 130 150 Locking nuts of drive gear flange yoke of final drive of rear axle 400 540 Fastening bolts of reducer housing of center axle 130 150 Cylindrical drive gear bearing seat 80 90 Bolts of cylindrical gear housing of center axle 80 90 Beari...

Страница 238: ...4X1 5 160 204 Bolts of inter wheel differential bearing cap of center axle M24X2 500 550 Large nuts of driving bevel gear of center axle M45X2 600 700 Large nut of through shaft of center axle M42X2 650 800 Bolts of bogie differential housing of center axle M14X1 5 160 204 Bolts of bogie differential housing of center axle M14X1 5 160 204 Filler and drain plugs of bogie differential housing of cen...

Страница 239: ...axle housing M16X1 5 6g 290 330 Connecting bolts of frame assembly and end cap assembly M10 6g 37 75 Connecting bolts of air chamber cam bracket M14X1 5 6g 200 235 Connecting bolts at both ends of upper thrust bar support M16X1 5 6g 290 330 Center connecting bolts of upper thrust bar support M20X1 5 6g 500 590 Oil seal seat at output end of center axle M114X1 5 6g 350 400 Hande wheel reduction axl...

Страница 240: ...igh beam H7 70W Low beam H7 70W Front turn signal lamp P21W Front position lamp W5W Auxiliary high beam H7 70W Front fog lamp H3 70W Side turn signal lamp P21W Step lamp W5W End outline marker lamp LED Marker lamp LED Cab dome lamp LED Front reading lamp C5W Side reading lamp R10W Berth reading lamp R10W Instrument cluster Alarm indicator lamp LED Instrument illuminating lamp LED Rear combination ...

Страница 241: ...nance hub Final drive 18 each 1 for two wheel sides 20 in total Conmet free maintenance hub Maintainable hub reference value the actual value shall be subject to the lower edge of the observation hole added to the oil sur face Power steering gear Dexron Ⅲ and above Automatic transmission oil 4 5 Clutch system DFCV B30 clutch system brake fluid QC T670 2000 standard 1 0 Cooling system ASTMD 6210 St...

Страница 242: ...sition Product brand Applicable ambient tempera ture Engine Cummins Engine API or CES20086 CK 4 Or ACEAE6 and E9 25 C 40 C Fuel tank 5 8 C 0 4 C 10 5 C 20 14 C 35 29 C 50 44 C Transmission ZF AMT ZF TE ML 02L 02E 20 C Drive axle SAE J2360API or GL 5 20 C Power steering Dexron Ⅲ Ⅴ Ⅵ Automatic transmission oil 30 C Clutch Brake fluid conforming to DOT 3 and above 30 C Chassis and wheel hub NLGI gc l...

Страница 243: ...icles Transmission lubricating oil Users can choose the transmission oil of different viscosity grades according to the local atmospheric temperature Designated products Genuine Dongfeng spare parts Dongfeng Commercial Vehicle Co Ltd Special oil for Dongfeng vehicles Fuel Only use the automobile diesel fuel conforming to national standards and the user can choose diesel fuel of different grades ac...

Страница 244: ...ing of brake fluids of different types from the same manufacturer is also prohibited strictly Retarder oil Shaanchi The recommended selection of retarder oil is as follows Engine coolant Cummins Always apply the DF 4 D organic acid type heavy duty coolant Change the fluid every 2 years or 200 000 km running time or mileage whichever comes first The engine cylinder liner will be cavitated seriously...

Страница 245: ...oad Curb weight 8270 Axle load 5200 3070 Full load Total mass 18000 Axle load 6500 1150 Saddle loading mass 9600 Allowable trailer towing mass 33600 Dimension parameters mm DFH4180 Total length 6360 Total width 2524 Total height 3960 Wheelbase 3800 Tread Front wheel 2010 Rear wheel 1880 Overhang Front overhang 1480 Rear overhang 1080 ...

Страница 246: ...learance mm 168 Min turning diameter m 16 Vehicle start pressure kPa 590 30 Rated working pressure of air storage cylinder kPa Front air storage cylinder 1250 Rear air storage cylinder 1250 Parking air storage cylinder 850 Step on the brake pedal to the most unfavorable brake air chamber response time A s 0 5 Response time B s at the end of the air pressure control pipe joint between the brake ped...

Страница 247: ...centers 5 The minimum ground clearance refers to the ground clearance of rear axle under full load 6 The total height is measured under no load from the compartment front bumper for complete vehicle and from the highest point of cab roof for chassis 7 Maximum climbing slope refers to the climbing ability of a bicycle or a full load 8 The vehicle can be equipped with a speed limit function When thi...

Страница 248: ...rt I shaped section Manufacturer Dongfeng Cummins Engine Co Ltd Type Liquid cooled in line six cylinder supercharged medium cooled diesel engines Type of fuel injection High pressure common rail Model Z14EVID520 Maximum net power speed kW r min 381 1800 Max torque speed N m r min 2470 1100 Cylinder bore stroke mm mm 135 157 Displacement L 13 48 Compression ratio 18 4 0 5 1 Ignition sequence 1 5 3 ...

Страница 249: ...m section size is 280mm 80mm 8 4mm The front width of the frame is 1080mm and the rear width is 850mm Suspension Front suspension few leaf spring leaf spring suspension 3 or 2 PCS of front spring in total Rear suspension complete air suspension or balanced suspension 4 PCS in total Steering System Power steering system integral power steering gear vane steering hydraulic pump Front wheel alignment...

Страница 250: ...and air pressure gauges Lamps front combination lamp front fog lamp rear combination lamp side turn signal lamp front end outline marker lamp etc Indoor lamps roof lamp front reading lamp side reading lamp sleeper reading lamp etc Indicator and warning lamp Refer to the specific configuration of cab Switches Refer to the specific configuration of cab Cab The high roof cab is of tiltable cab over e...

Страница 251: ...rror front lower view mirror close proximity exterior rearview mirror and wide angle lens outside the door Heater and A C The cab is equipped with heater and A C An environment friendly fluoride free A C system is used as the cab cooling system which applies R134a as refrigerant Traction pin Standard size 50 select 90 towing pin Driver s Tool Each vehicle is equipped with one set of driver s tools...

Отзывы: