background image

Downflo II, Models DFT 2-4 and DFT 3-6

27

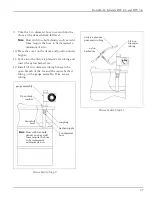
4. Thirty-five feet of plastic tubing is supplied and

must be cut in two sections. Connect one
section of tubing from the gauge

’

s high-pressure

port to the pressure fitting located in the dirty-
air plenum. Connect remaining tubing from the
gauge

’

s low-pressure port to the fitting in the

clean-air plenum. Additional tubing can be
ordered from your representative.

Photohelic Gauge Installation

5. Zero and maintain the gauge as directed in the

manufacturer

’

s Operating and Maintenance

Instructions provided.

6. To install the Photohelic Gauge mounted in a

NEMA 4 Weatherproof Enclosure, follow
Steps 4 and 5.

MR248\”QEPIIPFS[

GPIEREMVTPIRYQ

MRJPEX[EWLIV

MR248GSYTPMRK

QSYRXMRKFVEGOIX

\MR

QSYRXMRKWGVI[W

WYTTSVXWXVYGXYVI
QSYRXMRKWYVJEGI

4LSXSLIPMGKEYKI

LMKLTVIWWYVITSVX

PS[TVIWWYVITSVX

X[SMR248
EHETXIVW

TPEWXMGXYFMRK

MR248\”QEPIIPFS[

HMVX]EMVTPIRYQ

MRJPEX[EWLIV

MR248EHETXIV

MR248\”IPFS[

WXEXMGTVIWWYVIXII

Содержание Downflo II DFT 2-4

Страница 1: ...ailure are referenced in a Note Statements indicating potential hazards that could result in personal injury or property damage are referenced in a Caution box Installation Operation and Service Infor...

Страница 2: ...present consult with an installer of fire extinguishing systems familiar with these types of fire hazards and local fire codes for recommendations and installation of fire extinguishing and explosion...

Страница 3: ...___________________________________________ Contents Description 4 Purpose and Intended Use 4 Operation 5 Inspection on Arrival 6 Installation Codes and Procedures 6 Installation 6 Site Selection 6 Un...

Страница 4: ...and custom design modifications to the collector may be required Hygroscopic dust such as fertilizer salt and sugar should be handled under a controlled low relative humidity environment In addition...

Страница 5: ...um and discharges through the clean air outlet Filter cleaning is completed using pulse jet technology A solenoid and diaphragm valve aligned to each filter provides the pulse cleaning The cleaning se...

Страница 6: ...The unit can be located on a reinforced concrete foundation or rooftop 2 Wind seismic zone and other live load conditions must be considered when selecting the location for rooftop mounted units 3 Pr...

Страница 7: ...in power wiring and remote wiring Rigging Instructions Suggested Tools Equipment Crane or Forklift Pipe Wrenches Slings Spreader Bars Socket Wrenches and Clevis Pins End Wrenches Drift Pins Large Cres...

Страница 8: ...e top flange toward the inside edge of the bolt pattern 3 Lift the collector and position over the hopper and lower slowly 4 Use drift pins to align holes 5 Secure collector to hopper using 3 8 16 x 1...

Страница 9: ...and nuts as shown in Leg and Cross Brace Assembly Do not tighten hardware at this time 2 Recheck the position of the leg sets and cross braces 3 Using a crane lift the assembled unit onto the anchor b...

Страница 10: ...between the blower housing and the collector to provide the necessary clearance for the damper installation For top mount TBI with explosion vent install the spacer spool between the blower housing a...

Страница 11: ...last gate style damper and top mounted TRB with a blast gate style damper install a spacer ring between the blower housing and the collector to provide the necessary clearance for the damper installat...

Страница 12: ...the solid state timer on the unit Mechanical vibration can damage the control 3 Using the wiring diagram supplied wire the blower motor blower motor starter solid state timer and solenoid valves Use...

Страница 13: ...F JEGXSV The unit is equipped with 115 V solenoid valves that control the pulse cleaning valves which clean the filters One of three types of solenoid enclosures the weatherproof NEMA 4 with 3D2 solen...

Страница 14: ...ower is turned OFF Input 105 135V 50 60Hz 1Ph Output Solenoids The load is carried and turned ON and OFF by the 200 watt maximum load per output solid state switch Pulse ON Time Factory set at 100 mil...

Страница 15: ...he proper electrical and pneumatic connections to the collector and motor starter following the diagrams and instructions supplied with the Checker board 3 Verify proper blower rotation by pushing the...

Страница 16: ...xplosion proof NEMA 9 with 1 8 in solenoid valves is mounted near or on the unit s compressed air manifold Input Low Range 90 130V 50 60Hz 1Ph High Range 180 260V 50 60Hz 1Ph Output Relay Voltage and...

Страница 17: ...r software Contact your representative for assistance Operating Temperature Range Ambient 0 F to 140 F Relays There are twenty four relay positions twenty three on 24 Volt DC systems that can be used...

Страница 18: ...y OFF and bleed lines before performing service or maintenance work 1 Remove the plastic pipe plug from the unit s air manifold and connect the compressed air supply line Use thread sealing tape or pi...

Страница 19: ...EP TPIRYQ WMPIRGIV HMETLVEKQ ZEPZI WSPIRSMH IRGPSWYVI GSQTVIWWIH EMV QERMJSPH FPIIH X TI VIKYPEXSV WLYX SJJ ZEPZI GSEPIWGMRK JMPXIV EYXSQEXMG HVEMR XMQIV GSRXVSP FPS IV QSXSV WXEVXIV HMWGSRRIGX W MXGL...

Страница 20: ...mpressed air supply ON Adjust pressure regulator for 90 to 100 psig 8 Turn the fan motor ON then OFF to check for proper rotation by referencing the rotation arrow located on the motor s mounting plat...

Страница 21: ...ealant to the hopper flange or the pail cover mounting plate flange toward the inside edge of the bolt pattern 2 Fasten the pail pack to the hopper using the bolts washers and nuts supplied Pail Pac w...

Страница 22: ...s shown 2 Attach the drum pack and slide gate to the hopper flange using 3 8 16 bolts washers and hex nuts 3 Attach the drum cover to the 55 gallon drum 4 Use latches to secure the cover to the drum i...

Страница 23: ...he drum cover to the 55 gallon drum 4 Use latches to secure the cover to the drum if equipped 5 Connect the flexible hose between the drum cover and the adapter Secure with hose clamps 55 Gallon Drum...

Страница 24: ...clean air plenum panel Mount the pressure tap with the tee inside the dirty air plenum 5 Plug the pressure ports on the back of the gauge using two 1 8 in NPT pipe plugs supplied Install two 1 8 in NP...

Страница 25: ...MR 248 GSYTPMRK QSYRXMRK FVEGOIX MR QSYRXMRK WGVI W WYTTSVX WXVYGXYVI QSYRXMRK WYVJEGI 1EKRILIPMG KEYKI LMKL TVIWWYVI TSVX PS TVIWWYVI TSVX X S MR 248 EHETXIVW TPEWXMG XYFMRK X S MR 248 TMTI TPYKW X S...

Страница 26: ...IH JSV XLI ETTPMGEXMSR LSSWI E GSRZIRMIRX EGGIWWMFPI PSGEXMSR SR SV RIEV XLI YRMX JSV QSYRXMRK XLEX TVSZMHIW XLI FIWX ZMWYEP EHZERXEKI 1SYRX XLI KEYKI XS XLI VIQSXI TERIP SV HSSV YWMRK XLI QSYRXMRK VM...

Страница 27: ...m your representative Photohelic Gauge Installation 5 Zero and maintain the gauge as directed in the manufacturer s Operating and Maintenance Instructions provided 6 To install the Photohelic Gauge mo...

Страница 28: ...rop If possible mount the control indoors 2 Mount the control enclosure using four self drilling self tapping screws Note Use vibration isolators in high vibration areas 3 Install conduit between the...

Страница 29: ...am wire on the solid state timer board pin to match the number of solenoid valve connections used 8 Apply power to the control Set the high and low pressure setpoints to start and stop the cleaning pr...

Страница 30: ...l the jumper in the SLAVE mode position to operate the AUXILIARY relay in parallel with the HI LO CONTROL relay 2 The AUXILIARY relay will not function if no jumper is installed Note Disabling the ala...

Страница 31: ...on the spacer ring on the unit s clean air outlet and align bolt patterns 3 Apply silicone sealant supplied with blower around the blower outlet 4 Slide the damper collar over the blower outlet and se...

Страница 32: ...Apply 1 4 in diameter rope type sealant towards the outside edge of the bolt pattern on the silencer s mounting base 4 Install the blower housing align holes and secure using the supplied hardware 5 A...

Страница 33: ...to extend a minimum of 30 inches from the collector and mark the drill locations 5 Drill pilot holes with a 0 339 inch bit 6 Secure brackets using 3 8 in thread forming bolts 7 If a gap exists betwee...

Страница 34: ...10 6 Apply sealant to the inside perimeter of the mounting base Install the plenum to the mounting base using self threading bolts with washers 7 Install 1 2 in conduit using the holes on the back of...

Страница 35: ...vided 1 Install the power connection kit on the heat cable following the manufacturer s instructions 2 Start with the upper right hand valve wrap heat cable around the valve Pull heat cable tight Note...

Страница 36: ...licone sealant to the top threads of the close nipple and thread into the gauge assembly hand tight 3 Apply silicone sealant to the top of the drum cover around the 1 3 8 in diameter hole 4 Place a 1...

Страница 37: ...irty air plenum s air tubing and insert the nylon barbed tee 12 Install 3 16 in diameter tubing between the open branch of the tee and the center barbed fitting on the gauge assembly Trim excess tubin...

Страница 38: ...he leg structure to collapse Explosion Vents Sprinkler Installation Inside view of dirty air plenum Caution Personal injury death or property damage can result from material discharge during venting T...

Страница 39: ...ce 5 Slowly rotate the cartridge 1 2 turn to remove dust that may have accumulated on the top of the filter 6 Slide the filter out the access port along the suspension yoke 7 Dispose of properly 8 Cle...

Страница 40: ...rum attachment is used empty when drum is 2 3 full 3 If optional slide gate is used close gate before servicing drum 4 Reinstall drum and open gate Compressed Air Components 1 Periodically check the c...

Страница 41: ...S I K V E L G W M H V I T T S S X X R I Q I K R E V V E V I Z S G Q Y V H V S I X E K I H M P W P P E X W R R S R S M X E P P E X W R V I T T S I I 7 I K V E L G W M H V I T T S L I K E 4 P S V X R S...

Страница 42: ...V S X W X W Y H I K K Y P T V S P E W S T W M X W Y I I 7 E I V E I K E V S X W X W Y H X Y S R E I P I K E 4 R S K R M O E I P W I Z P E Z I W P Y 4 V M E H I W W I V T Q S G H R E X M R Y I L X S X...

Страница 43: ...Q M X H V E S F V I Q M X I X E X W H M P S W R S I V M V I T Q Y N I Z S Q I 6 P S V X R S G 4 E X P I I L X S X K R M V M I V S J I F I L X S X H I V M X S R L G X M W I V Y W W I V 4 P X G I V V S...

Страница 44: ...e h t k c e h C d r a o b r e m i t e h t o t e g a t l o v y r a s s e c e n f i e c a l p e R d r a o b r e m i t e h t e v i t c e f e d d r a o b r e m i T t u p t u o e h t e v r e s b o d e t a...

Страница 45: ...Downflo II Models DFT 2 4 and DFT 3 6 45 e t a D d e m r o f r e P e c i v r e S s e t o N Service Notes...

Страница 46: ......

Страница 47: ......

Страница 48: ...ldson also makes no warranty whatsoever as to any goods manufactured or supplied by others including electric motors fans and control components After Donaldson has been given adequate opportunity to...

Отзывы: