background image

8

OPERATING

INSTRUCTIONS

IMPORTANCE OF LEVELING A

REFRIGERATOR

In an absorption refrigerator system, ammonia is lique-

fied in the finned condenser coil at the top rear of the

refrigerator.  The  liquid  ammonia  then  flows  into  the

evaporator (inside the freezer section) and is exposed

to a circulating flow of hydrogen gas, which causes the

ammonia to evaporate, creating a cold condition in the

freezer.

When starting this refrigerator for the very first time, the

cooling cycle may require up to four hours of running

time before the cooling unit is fully operational.

The tubing in the evaporator section is specifically sloped

to provide a continuous movement of liquid ammonia,

flowing downward by gravity through this section. If the

refrigerator is operated when it is not level and the ve-

hicle is not moving, liquid ammonia will accumulate in

sections of the evaporator tubing. This will slow the cir-

culation  of  hydrogen  and  ammonia  gas,  or  in  severe

cases, completely block it, resulting in a loss of cooling.

Any time the vehicle is parked for several hours with the

refrigerator operating, the vehicle should be leveled to

prevent this loss of cooling.

The vehicle needs to be leveled only so it is comfortable

to live in (no noticeable sloping of floor or walls).

When the vehicle is moving, the leveling is not critical,

as the rolling and pitching movement of the vehicle will

pass to either side of level, keeping the liquid ammonia

from accumulating in the evaporator tubing.

OPERATION

Before starting the refrigerator, check that all the manual

gas valves are in the ON position. DO NOT forget the

manual shutoff valve on the rear of the refrigerator see

FIG. 1.

This refrigerator is equipped with a semi Automatic

Energy Selector (AMES) control system, which can be

set to automatically select either 120 volt AC or LP gas

operation (AUTO mode), or if desired LP gas only (GAS

mode). On 3-way model the control system can manu-

ally be set to DC operation (DC mode).

The refrigerator controls will work down to 9.6 volt DC.

Most LP gas appliances used in recreational ve-

hicles are vented to the outside of the vehicle.

When parked close to a gasoline pump, it is pos-

sible that the gasoline fumes could enter this

type  of  appliance  and  ignite  from  the  burner

flame, CAUSING A FIRE OR AN EXPLOSION.

FOR YOUR SAFETY, when refueling, shut off all

LP gas appliances which are vented to the out-

side.

! WARNING

Side view

View from above

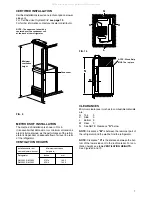
FIG. 11

D

H

W

D

C

B

A

Overall

Recess

Refrigerator

Dimensions

Dimensions

Model

Height

Width

Depth

Height

Width

Depth

A

B

C

H

W

D

RM 3662

inch

54-21/32

24-7/8

26-1/32

53-3/4

23-11/16

24

RM 3663

mm

1388

632

661

1365

602

610

RM 3862

inch

60-51/64

24-7/8

26-1/32 59-15/16 23-11/16

24

RM 3863

mm

1544

632

661

1522

602

610

This method of installation and these clearances will give you adequate space for service and proper installation.

All manuals and user guides at all-guides.com

Содержание RM3662

Страница 1: ...o this manual For assistance or additional information consult a qualified installer service agency or the gas supplier AVIS Cet appareil doit tre r par seulement par un r parateur autoris Modificatio...

Страница 2: ...All manuals and user guides at all guides com...

Страница 3: ...Control Switch H Low Ambient Switch LEGEND 3 WAY AMES Model 1 Main Power Button ON OFF 2 DC Mode Selector Button 3 AUTO GAS Mode Selector Button 4 Temperature Selector Button A DC Mode Indicator Lamp...

Страница 4: ...modification An opening toward the outside at floor level in the refrigerator compartment must be provided for ventilation of heavier than air fuel gases The lower vent of the recommended kits is prov...

Страница 5: ...he wood strip with screws See FIG 10 The refrigerator must be installed in a substantial enclo sure and must be level When installing the refrigerator in the enclosure all areas within the recess in w...

Страница 6: ...s supply To test the gas safety shutoff proceed as follows 1 Start the refrigerator and switch to GAS mode See start up instructions 2 Check that the gas flame is lit and the GAS mode indicator lamp C...

Страница 7: ...tilation height see table VENTILATION HEIGHTS See Figures 9 and 10 METHODS OF INSTALLATION The method of installation is shown in FIG 9 It is essential that all maximum or minimum dimensions are stric...

Страница 8: ...g movement of the vehicle will pass to either side of level keeping the liquid ammonia from accumulating in the evaporator tubing OPERATION Before starting the refrigerator check that all the manual g...

Страница 9: ...light START UP INSTRUCTIONS A A continuous 12 volt DC supply must be available for the electronic control to function B Press the main power ON OFF button 1 to the DOWN position C Press the TEMPERATUR...

Страница 10: ...mp is on it will function properly but the CHECK indicator lamp will not go off until the main power ON OFF button is pressed to the OFF then ON position DC MODE 3 way models only When operating in th...

Страница 11: ...if the thermostat is set at its highest position It is a good idea to do this a few hours before the antici pated need for ice but be sure to move back to normal setting usually about mid setting whe...

Страница 12: ...gas systems and refrigerators 1 REFRIGERATOR REMOVAL Before working on the refrigerator make sure the AC voltage and DC voltage leads are disconnected Shut off the gas supply at the LP tank Disconnect...

Страница 13: ...nance Service item 2 Periodic Maintenance Paragraph E item 1 14 WARNING DO NOT use a flame to check for gas leaks C Check the AMES control system by connecting dis connecting 120 volt AC power start s...

Страница 14: ...s of the door frame 3 C Push the panel downward so that the lower hori zontal edge of the panel 4 is fitted into the bottom grove 5 D Put the decoration strip across the door so that the gap is covere...

Страница 15: ...T NO RM 3662 4A Roof Base 3103633 XXX RM 3663 Roof Cover 3103634 XXX RM 3862 RM 3863 Lower Side Vent 3109350 XXX Fill in XXX with color code numbers For color codes contact your supplier For further i...

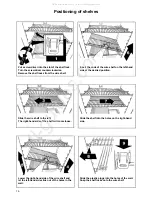
Страница 16: ...the wire shelf to the left The right hand side of the shelf will come loose Slide the shelf into the holes on the right hand side Lower the right hand side of the wire shelf and let the left hand side...

Страница 17: ...17 RM 3662 RM 3862 RM 3663 RM 3863 All manuals and user guides at all guides com...

Страница 18: ...18 All manuals and user guides at all guides com...

Страница 19: ...19 All manuals and user guides at all guides com...

Страница 20: ...20 MO FO 0233 All manuals and user guides at all guides com...

Отзывы: