background image

DLP Projector—User’s Manual 

— 

22 

— 

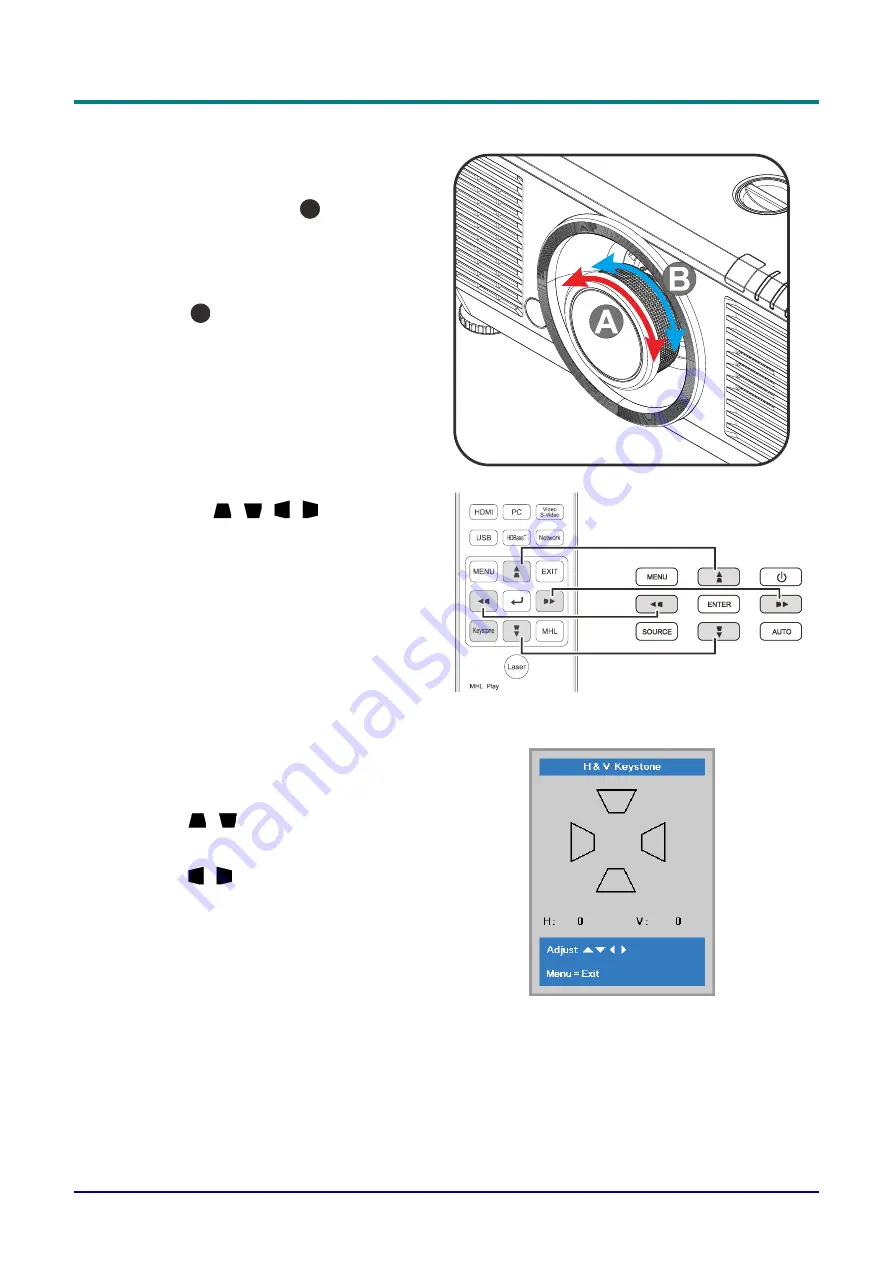
Adjusting the Zoom, Focus and Keystone 

1.  

Use the 

Image-zoom

 control (on the 

projector only) to resize the projected 
image and screen size.

B


2.  

Use the 

Image-focus

 control (on the 

projector only) to sharpen the projected 
image.

A


3.  

Press the 

 / 

 / 

 / 

 buttons (on the 

projector or the remote control) to correct 
vertical or horizontal image-trapezoid or 
press the 

Keystone

 button (on the 

remote) to selected V (Vertical) or H 
(Horizontal) keystone. 


Remote control and OSD panel 

4.  

The keystone control appears on the 
display. 

Press 

 / 

 for V Keystone correcting 

image. 

Press 

 / 

 for H Keystone correcting 

image. 


Содержание Vivitek DU70 Series

Страница 1: ......

Страница 2: ...ar purpose The manufacturer reserves the right to revise this publication and to make changes from time to time in the content hereof without obligation of the manufacturer to notify any person of such revision or changes Trademark Recognition Kensington is a U S registered trademark of ACCO Brand Corporation with issued registrations and pending applications in other countries throughout the worl...

Страница 3: ...to the beam RG2 IEC 62471 5 2015 Throughout this manual component parts and items in the OSD menus are denoted in bold font as in this example Push the Menu button on the remote control to open the Main menu General Safety Information Do not open the unit case There are no user serviceable parts in the unit For servicing contact qualified service personnel Follow all warnings and cautions in this ...

Страница 4: ...or reflective objects Direct or scattered light can be hazardous to eyes and skin There is a potential hazard of eye exposure to laser radiation if the included instructions are not followed Caution use of controls or adjustments or performance of procedures other than those specified herein may result in hazardous radiation exposure Laser Parameters Wavelength 449nm 461nm Blue Mode of operation P...

Страница 5: ...DLP Projector User s Manual iv Product labels DU70x Series Below drawing show the label s location 1 2 1 Hazard Warning Symbol and Aperture Label 2 Explanatory Label ...

Страница 6: ...see the light directly Laser aperture Interlock switches This machine has 2 Top cover x 1 Lens x 1 Interlock switches to protect the laser light Leakage 1 Will power off the system individually when the top cover is removed 2 Will power off the system individually when the lens is removed or not install correctly ...

Страница 7: ...does not exceed operation temperature while the projector is running and the air intake and exhaust vents are unobstructed All enclosures should pass a certified thermal evaluation to ensure that the projector does not recycle exhaust air as this may cause the device to shutdown even if the enclosure temperature is with the acceptable operation temperature range Minimum 500mm 19 69 inch Minimum 50...

Страница 8: ...uld be connected to the AUDIO IN port and CANNOT be connected to AUDIO OUT or other ports like BNC RCA otherwise it will lead to mute output and even DAMAGE the port Install the projector above 200cm to avoid damage The power cord and signal cable should be connected before power on the projector During the projector starting and operating process DO NOT insert or remove the signal cable or the po...

Страница 9: ... projector read the regulatory notices in the Regulatory Compliance on page 79 Symbol Explanations DISPOSAL Do not use household or municipal waste collection services for disposal of electrical and electronic equipment EU countries require the use of separate recycling collection services Special Care for Laser Beams Special care should be considered when DLP projectors and high power laser equip...

Страница 10: ...n and system administration via RJ45 Sealed engine to minimizing the impact of dust and smoke Anti theft security features include Kensington security slot security bar Built in HDBaseT receiver HDBaseT interface with support for distribution of HD video digital audio content RS232 RJ45 and IR function over standard CAT5e 6 LAN cable Advanced laser phosphor light engine for superior brightness and...

Страница 11: ... 20 Adjusting the vertical image position 20 Adjusting the horizontal image position 21 Shift Range Diagram 21 ADJUSTING THE ZOOM FOCUS AND KEYSTONE 22 ADJUSTING THE VOLUME 23 ON SCREEN DISPLAY OSD MENU SETTINGS 24 OSD MENU CONTROLS 24 Navigating the OSD 24 SETTING THE OSD LANGUAGE 25 OSD MENU OVERVIEW 26 IMAGE MENU 29 Computer Menu 30 Advanced Feature 31 White Balance 32 Color Manager 33 Dynamic ...

Страница 12: ...HAVING THE PROJECTOR SERVICED 68 HDMI Q A 69 SPECIFICATIONS 70 SPECIFICATIONS 70 PROJECTION DISTANCE VS PROJECTION SIZE 72 Projection Distance and Size Table 72 TIMING MODE TABLE 75 Table of Supported Frequency 75 Table of Supported Frequency For 3D mode 77 PROJECTOR DIMENSIONS 78 REGULATORY COMPLIANCE 79 FCC WARNING 79 CANADA 79 SAFETY CERTIFICATIONS 79 APPENDIX I 80 COMMUNICATION PARAMETER SETUP...

Страница 13: ...ol Batteries Included VGA Cable 1 8m Power Cord 1 8m Warranty Card Quick Start Guide Contact your dealer immediately if any items are missing appear damaged or if the unit does not work It is recommend that you keep the original packing material should you ever need to return the equipment for warranty service Caution Avoid using the projector in dusty environments ...

Страница 14: ...angle position 19 3 Lens Release Button For release Lens 14 4 Anti dust cap Anti dust cap 5 IR Receiver Receives IR signal from remote control 7 6 LEDs Displays the projector status 3 7 Lens Shift Adjusts the image position 20 Important Ventilation openings on the projector allow for good air circulation which keeps the projector light source cool Do not obstruct any of the ventilation openings ...

Страница 15: ... source LED Display the light source status 66 3 Temp LED Display the thermal status 66 4 Filter LED Display the filter replacing warning message 66 5 IR Receiver Receives IR signal from remote control 7 6 Vertical Lens Shift UP DOWN Adjusts the image position vertically 20 7 Horizontal Lens Shift LEFT RIGHT Adjusts the image position horizontally 21 ...

Страница 16: ... an enabled device 6 DVI D Connect the DVI CABLE to display 7 SERVICE For service personnel only 8 HDMI 1 Connect the HDMI cable from an HDMI device 9 HDMI 2 Connect the HDMI cable from an HDMI device 10 RS 232C IN Connects RS 232 serial port cable for remote control 11 RS 232C OUT Connects to another projector same model for RS 232 control 12 MENU Opens and exits OSD menus 24 13 Navigates and cha...

Страница 17: ... an AUDIO cable from the audio device 24 AUDIO OUT L R Connect an AUDIO cable for audio loop through 25 AUDIO IN L R Connect the audio cables from an audio device for VIDEO audio input 26 VIDEO Connect the composite cable from a video device 27 BNC Connect a BNC cable from a computer 28 AC IN Connect the POWER cable 29 RJ45 Connect a LAN cable from Ethernet 30 USB POWER 5V 1 5A Connect a USB cable...

Страница 18: ...tion 19 Note When installing ensure that you use only UL Listed ceiling mounts For ceiling installations use approved mounting hardware and M6 screws with a maximum screw depth of 12mm 0 47 inch The construction of the ceiling mount must be of a suitable shape and strength The ceiling mount load capacity must exceed the weight of the installed equipment and as an additional precaution be capable o...

Страница 19: ...the projector to secure it to the stand Screw hole center dimension 300 350 pitch 175 mm Screw hole dimension on the projector M6 with the maximum depth 12 mm Horizontal adjustment mechanism for example bolts and nuts in 4 places Please design the stand so that it does not easily topple over The drawing showing the dimensional requirements is not an actual stand design drawing Side View Front View...

Страница 20: ...tructed you can bounce the signal off certain reflective surfaces such as projector screens 3 The buttons and keys on the projector have the same functions as the corresponding buttons on the remote control This user s manual describes the functions based on the remote control Note Complies with FDA performance standards for laser products except for deviations pursuant to Laser Notice No 50 dated...

Страница 21: ...urce ID Alternate input source Combo key function for Remote Control customer code settings Press ID button Number for 3 seconds 24 17 Auto 0 Auto adjustment for frequency phase and position Number for Remote ID setting used 24 18 Brightness Displays the brightness setting bar 19 Lamp Displays the light source selections 20 Freeze Freezes unfreezes the on screen picture 21 Blank 6 Makes the screen...

Страница 22: ... Number for Remote ID setting used 22 37 3D 5 Open the OSD 3D Setting menu Number for Remote ID setting used 38 Status 7 Opens the OSD Status menu the menu only opens when an input device is detected Number for Remote ID setting used 39 Wired Jack Connect wire remote to the projector Note Remote Combo Key Settings ID 0 Reset Remote Control customer code to default settings ID 1 Set Remote Control ...

Страница 23: ...he rear of the projector the remote will function well within a radius of about 7 meters 23 feet and 15 degrees above or below the projector level If the projector does not respond to the remote control move a little closer Projector and Remote Control Buttons The projector can be operated using the remote control or the buttons on the top of the projector All operations can be carried out with th...

Страница 24: ... sliding the cover in the direction of the arrow 2 Insert the battery with the positive side facing up 3 Replace the cover Caution 1 Only use AAA batteries Alkaline batteries are recommended 2 Dispose of used batteries according to local ordinance regulations 3 Remove the batteries when not using the projector for prolonged periods ...

Страница 25: ...urface when removing or installing the lens Keep fingerprints dust or oil off the lens surface Do not scratch the lens surface Work on a level surface with a soft cloth under it to avoid scratching If you remove and store the lens attach the lens cap to the projector to keep off dust and dirt Installing the New Lens Remove both end caps from the lens Removal of the Anti dust cap before inserting a...

Страница 26: ... 14 Removing the Existing Lens From the Projector 1 Push the LENS RELEASE button to the unlock position 2 Grasp the lens 3 Rotate the lens counterclockwise The existing lens will be disengaged 4 Pull out the existing lens slowly ...

Страница 27: ...urce by pressing button on the projector or on the remote control The PWR LED will now flash green The startup screen will display in approximately 30 seconds The first time you use the projector you can select your preferred language from quick menu after the startup screen display See Setting the OSD Language on page 25 See Setting an Access Password Security Lock on page 17 if security lock is ...

Страница 28: ...te Video Traditional composite video HDBaseT Digital Video trough the HDBaseT transmitter Note It is recommended to use a certified TX box VIDEO EXTENDER Rextron EVBMN 110L38 for the HDBaseT function and there is no guarantee of full response when other brands of TX box are used Using a single HDBaseT CAT5e 6 cable the projector supports an HDBaseT connection distances to 100m 328ft 4 When the Pow...

Страница 29: ...tant Keep the password in a safe place Without the password you will not be able to use the projector If you lose the password contact your reseller for information on clearing the password 1 Press the MENU button to open the OSD menu 2 Press the cursor button to move to the Settings 1 menu press the cursor button to select Advanced 1 3 Press Enter to enter the Advanced 1 sub menu Press the cursor...

Страница 30: ...five Press the cursor buttons in any order to set the password Push the MENU button to exit the dialog box 6 The password confirm menu appears when user presses the power on key in case the Security Lock is enabled Enter the password in the order you set it at step 5 In case you forget the password please contact the service center The service center will validate the owner and help reset the pass...

Страница 31: ...le or stand should be level and sturdy Position the projector so that it is perpendicular to the screen Ensure the cables are in a safe location You could trip over them 1 To raise the level of the projector twist the adjusters counter clockwise 2 To lower the level of the projector lift the projector and twist the adjusters clockwise ...

Страница 32: ...s Note Do not rotate lens shift knob further under click sound and lightly press the knob to rotate back Adjusting the vertical image position The vertical image height can be adjusted between 55 and 15 of offset position Note that the maximum vertical image height adjustment can be limited by the horizontal image position For example it is not possible to achieve the maximum vertical image positi...

Страница 33: ...adjustment can be limited by the vertical image position For example it is not possible to achieve the maximum horizontal image position if the vertical image position is at maximum Please consult the Shift Range diagram below for further clarification Wx5 Wx5 Shift Range Diagram When W and H at 0 offset position The max H up shift Hx55 The max H down shift Hx15 The max W shift Wx5 When max W shif...

Страница 34: ...the projector only to sharpen the projected image A 3 Press the buttons on the projector or the remote control to correct vertical or horizontal image trapezoid or press the Keystone button on the remote to selected V Vertical or H Horizontal keystone Remote control and OSD panel 4 The keystone control appears on the display Press for V Keystone correcting image Press for H Keystone correcting ima...

Страница 35: ...he Volume 1 Press the Volume buttons on the remote control The volume control appears on the display 2 Press the buttons on the keypad to adjust Volume 3 Press the MUTE button to turn off the volume This feature is available only on the remote ...

Страница 36: ...enter the OSD press the MENU button 2 There are three menus Press the cursor buttons to move through the menus 3 Press the cursor buttons to move up and down in a menu 4 Press the cursor buttons to change values for settings 5 Press the MENU button to close the OSD or leave a submenu Press the EXIT button to return to the previous menu Note Depending on the video source not all items in the OSD ar...

Страница 37: ...button Press the cursor button to navigate to Settings 1 Press the cursor button to move to the Advanced 1 menu 2 Press Enter to enter the Advanced 1 sub menu Press the cursor button until Language is highlighted 3 Press the cursor button until the language you want is highlighted 4 Press the MENU button four times to close the OSD ...

Страница 38: ...Advanced Brilliant Color 0 10 Sharpness 0 31 Gamma 1 8 2 0 2 2 2 4 B W Linear Color Temperature Warm Normal Cold Video AGC Off On Video Saturation 0 100 Video Tint 0 100 White Balance R Gain 0 200 G Gain 0 200 B Gain 0 200 R Offset 100 100 G Offset 100 100 B Offset 100 100 Color Manager Red Hue Saturation Gain Green Hue Saturation Gain Blue Hue Saturation Gain Cyan Hue Saturation Gain Magenta Hue ...

Страница 39: ...na العربية Türkçe Việt 日本語 ไทย فارسی עברית Dansk Fran Can Security Lock Off On Blank Screen Blank Red Green Blue White Splash Logo Std Black Blue Closed Captioning Off On Keypad Lock Off On 3D Setting 3D Off DLP Link IR 3D Sync Invert Off On 3D Format Frame Packing Top Bottom Side By Side Frame Sequential Auto 3D Sync Out delay 0 359 3D Sync Input Internal External 3D Sync Output Internal By pass ...

Страница 40: ...High Light Info Normal Eco Eco Plus Dimming Extreme Dimming Custom Light Projector ID 0 98 Remote ID Default 1 2 3 4 5 6 7 Network Network State Connect Disconnect DHCP On Off IP Address 0 255 0 255 0 255 0 255 Subnet Mask 0 255 0 255 0 255 0 255 Gateway 0 255 0 255 0 255 0 255 DNS 0 255 0 255 0 255 0 255 Apply Ok Cancel HDBaseT IR RS232 HDBaseT IR RS232 Off On Front IR On Off Rear IR On Off Advan...

Страница 41: ...y brightness Contrast Press the cursor button to enter and adjust the display contrast Computer Press Enter to enter the Computer menu See Computer Menu on page 30 Auto Image Press Enter to automatically adjustment for phase tracking size and position Advanced Press Enter to enter the Advanced menu See Advanced Feature on page 31 Color Manager Press Enter to enter the color manager menu See page 3...

Страница 42: ...ON Horizontal Position Press the cursor button to enter and adjust the display position to left or right Vertical Position Press the cursor button to enter and adjust the display position to up or down Frequency Press the cursor button to enter and adjust the A D sampling clock Tracking Press the cursor button to enter and adjust the A D sampling dot Auto Sync Press the cursor button to enter and ...

Страница 43: ...ter and adjust the display sharpness Gamma Press the cursor button to enter and adjust the gamma correction of the display Color Temperature Press the cursor button to enter and adjust the color temperature Video AGC Press the cursor button to enter and enable or disable the Automatic Gain Control for video source Video Saturation Press the cursor button to enter and adjust the video saturation Vi...

Страница 44: ...CRIPTION R Gain Press the buttons to adjust the Red Gain G Gain Press the buttons to adjust the Green Gain B Gain Press the buttons to adjust the Blue Gain R Offset Press the buttons to adjust the Red Offset G Offset Press the buttons to adjust the Green Offset B Offset Press the buttons to adjust the Blue Offset ...

Страница 45: ...een Color Manager Press the buttons to adjust the Hue Saturation and Gain Blue Select to enter the Blue Color Manager Press the buttons to adjust the Hue Saturation and Gain Cyan Select to enter the Cyan Color Manager Press the buttons to adjust the Hue Saturation and Gain Magenta Select to enter the Magenta Color Manager Press the buttons to adjust the Hue Saturation and Gain Yellow Select to ent...

Страница 46: ... Black Settings menu and then press Enter or Press to move up and down in the Dynamic Black Settings menu ITEM DESCRIPTION Dynamic Black Select to enter the Dynamic Black under Normal mode and Eco mode Press the buttons to adjust On or Off Light Off Timer Select to enter the Light Off Timer Press the buttons to adjust Disable 0 5 Sec 1 Sec 2 Sec 3 Sec 4 Sec ...

Страница 47: ... press Enter or Press to move up and down in the HDR Settings menu ITEM DESCRIPTION HDR Control Select to enter the HDR Settings Press the buttons to adjust Off Auto and On HDR Mode Select to enter the Light Off Timer Press the buttons to adjust PQ L300 PQ L400 PQ L500 PQ L600 Note If you want to enter HDR Settings please make sure HDMI source is with HDR 10 or HLG ...

Страница 48: ...choose from four projection methods Aspect Ratio Press the cursor button to enter and adjust the video aspect ratio Keystone Press Enter to enter the keystone menu See Keystone on page 37 Digital Zoom Press the cursor button to enter and adjust the Digital Zoom menu Audio Press Enter to enter the Audio menu See Audio on page 37 Advanced 1 Press Enter to enter the Advanced 1 menu See Advanced 1 Fea...

Страница 49: ...tal values from 25 to 25 Audio Press the Menu button to open the OSD menu Press to move to the Settings 1 menu Press to move to the Audio menu and then press Enter or Press to move up and down in the Audio menu ITEM DESCRIPTION Volume Press the cursor button to enter and adjust the audio volume Mute Press the cursor button to enter and turn on or off the speaker Internal Speaker Press the cursor b...

Страница 50: ...curity lock function Blank Screen Press the cursor button to enter and select different color to blank the screen Splash Logo Press the cursor button to enter and enable or disable Splash Logo Closed Captioning Press the cursor button to enter and enable or disable Closed Captioning Keypad Lock Press the cursor button to enter and enable or disable keys can be work on keypad Note Hold the cursor b...

Страница 51: ...D OSD menu item is enabled for selection 3 Use 3D glasses to view a 3D image 4 You need 3D content from a 3D DVD or 3D media file 5 You need to enable the 3D source some 3D DVD content may have a 3D on off selection feature 6 You need DLP link 3D or IR 3D shutter glasses With IR 3D shutter glasses you need to install a driver on your PC and connect a USB emitter 7 The 3D mode of the OSD needs to m...

Страница 52: ...d 2 menu and then press Enter or Press to move up and down in the Advanced 2 menu Press to enter and change values for setting ITEM DESCRIPTION Test Pattern Press the cursor button to enter and select internal test pattern H Image Shift Press the cursor button to enter and set H Image Shift V Image Shift Press the cursor button to enter and set V Image Shift ...

Страница 53: ...ress Enter to enter the 4 Corner sub menu 1 Press the cursor buttons to select a corner and press ENTER 2 Press the cursor buttons to adjust vertical and press the cursor buttons to adjust horizontal 3 Press MENU to save and Exit the settings ...

Страница 54: ...urce when no signal Auto Power On Press the cursor button to enter and enable or disable automatic power On when AC power is supplied Light Setting Press the cursor button to enter and select the Light mode Custom Light or Constant Brightness See page 43 for more information on Light Setting Reset All Press Enter to reset all settings to default values Status Press Enter to enter the Status menu S...

Страница 55: ...ress the cursor button to select Normal Eco Eco Plus Dimming Extreme Dimming Custom Light Press the cursor button to enter and set Custom Light Constant Brightness Press the cursor button to enter and enable or disable Constant Brightness Note Extreme Dimming Saving 50 light source power consumption by blank screen press BLANK button When Light Mode set to Custom Light Custom Light function Enable...

Страница 56: ...ay the activated source Video Information Displays resolution video information for RGB source and color standard for Video source Light Hour Light hour used information is displayed Software Version Showing system software version Remote ID Showing Remote Controller ID Serial Number Showing serial number of product Air Filter Hour Displays the number of hours the air filter has been in use ...

Страница 57: ... light mode Projector ID Press the cursor button to enter and adjust a two digit projector ID from 00 through 98 Remote ID Press the cursor buttons to select remote ID to fit the current remote ID settings Network Press Enter to enter the Network menu See page 46 for more information on Network HDBaseT IR RS232 Press Enter to enter the HDBaseT Setting menu See page 57 for more information on HDBas...

Страница 58: ...e If you select DHCP Off complete the IP Address Subnet Mask Gateway and DNS fields IP Address Enter a valid IP address if DHCP is turned off Subnet Mask Enter a valid Subnet Mask if DHCP is turned off Gateway Enter a valid Gateway address if DHCP is turned off DNS Enter a valid DNS name if DHCP is turned off Apply Press Enter to confirm settings ...

Страница 59: ...trademark and logo registration in Japan the United States of America and other countries by JBMIA Supported External Devices This projector is supported by the specified commands of the Crestron Electronics controller and related software ex RoomView http www crestron com This projector is supported by AMX Device Discovery http www amx com This projector is compliant to support Extron device s fo...

Страница 60: ...DLP Projector User s Manual 48 LAN_RJ45 1 Connect an RJ45 cable to RJ45 ports on the projector and the PC Laptop 2 On the PC Laptop select Start Control Panel Network and Internet ...

Страница 61: ...n Local Area Connection and select Properties 4 In the Properties window select the Networking tab and select Internet Protocol TCP IP 5 Click Properties 6 Click Use the following IP address and fill in the IP address and Subnet mask then click OK ...

Страница 62: ... Address 10 10 10 10 Subnet Mask 255 255 255 0 Gateway 0 0 0 0 DNS Server 0 0 0 0 10 Press Enter to confirm settings Open a web browser for example Microsoft Internet Explorer with Adobe Flash Player 9 0 or higher 11 In the Address bar input the IP address 10 10 10 10 12 Press Enter The projector is setup for remote management The LAN RJ45 function displays as follows ...

Страница 63: ...tor Projector Name 10 Location 10 Assigned To 10 Network Configuration DHCP Enabled N A IP Address 15 Subnet Mask 15 Default Gateway 15 DNS Server 15 User Password Enabled N A New Password 10 Confirm 10 Admin Password Enabled N A New Password 10 Confirm 10 For more information please visit http www crestron com ...

Страница 64: ...erts 1 Make sure that user can access the homepage of LAN RJ45 function by web browser for ex ample Microsoft Internet Explorer v6 01 v8 0 2 From the Homepage of LAN RJ45 click Alert Settings 3 By default these input boxes in Alert Settings are blank ...

Страница 65: ...arbon copy of the alert to the specified email address This is an optional field for example the projector administrator s assistant The From field is the sender s email address for example the projector administrator This is a required field Select the alert conditions by checking the desired boxes Note Fill in all fields as specified User can click Send Test Mail to test what setting is correct ...

Страница 66: ...ive RS232 command control way so called RS232 by TELNET for LAN RJ45 interface Quick Start Guide for RS232 by TELNET Check and get the IP Address on OSD of the projector Make sure that laptop PC can access the web page of the projector Make sure that Windows Firewall setting to be disabled in case of TELNET function filtering out by laptop PC Start All Programs Accessories Command Prompt ...

Страница 67: ...tor If Telnet Connection ready and user can have RS232 command input then Enter key pressed the RS232 command will be workable How to have TELNET enabled in Windows By default installation for Windows TELNET function is not included But end user can have it by way of Turn Windows features On or Off to be enabled Open Control Panel in Windows Open Programs ...

Страница 68: ...for RS232 by Telnet control normally Close Windows Telnet utility directly after TELNET connection ready 5 Limitation 1 for Telnet Control there is less than 50 bytes for successive network payload for Telnet Control application Limitation 2 for Telnet Control there is less than 26 bytes for one complete RS232 command for Telnet Control Limitation 3 for Telnet Control Minimum delay for next RS232 ...

Страница 69: ...control function table 2 When HDBaseT enable Low Power Mode will auto set to On by HDBaseT 3 HDBaseT control is disabled when the HDBaseT TX box signal is cutoff HDBaseT control function table Control Side Function Projector Mode Remark Low Power Mode On 0 5W Low Power Mode On by lan 3W HDBaseT control Enable Low Power Mode On by HDBaseT 6W Projector Front IR wireless O O O Can disable by OSD Rear...

Страница 70: ...ess the cursor button to enter and set Sleep timer The projector automatically turns off after the preset period of time Source Filter Press Enter to enter the Source Filter menu See page 59 for more information on Source Filter Air Filter Timer Reset Press Enter to reset air filter timer Color Space Press the cursor button to enter and set the Color Space Quantization Range Press the cursor butto...

Страница 71: ...and enable or disable the HDMI2 source DVI Press the cursor button to enter and enable or disable the DVI source VGA Press the cursor button to enter and enable or disable the VGA source BNC Press the cursor button to enter and enable or disable the BNC source Composite Video Press the cursor button to enter and enable or disable the Composite Video source HDBaseT Press the cursor button to enter ...

Страница 72: ...ng have the projector serviced Cleaning the Lens You can purchase optic lens cleaner from most camera stores Refer to the following to clean the projector lens 1 Apply a little optic lens cleaner to a clean soft cloth Do not apply the cleaner directly to the lens 2 Lightly wipe the lens in a circular motion Caution 1 Do not use abrasive cleaners or solvents 2 To prevent discoloration or fading avo...

Страница 73: ...he projected image quality 1 Turn off the projector and unplug the AC power cord from the AC outlet 2 Cleaning the filter with a vacuum cleaner Caution Recommend avoiding dusty or smoky environments when you operate the projector it may cause poor image quality If the filter is heavily clogged and unable to clean replace a new filter Note Using a ladder is recommended to access the filter Do not r...

Страница 74: ...1 Turn off the projector and unplug the AC power cord from the AC outlet Clean up the dust on the projector and around the air vents Remove the screws from the filter module Loosen Screws on the filter module 2 Remove the filter module from the projector ...

Страница 75: ...ctor and reset the Air Filter Timer after the Air Filter is replaced Air Filter Timer Reset Press MENU Select Settings 2 Advanced 2 and select Air Filter Timer Reset Press Enter to reset timer Warning Do not wash the filter with the water or other liquid matter Important The Filter LED lights when the filter service time is on If the filter is broken please use a new one ...

Страница 76: ... on purchasing a suitable Kensington security cable The security lock corresponds to Kensington s MicroSaver Security System If you have any comment contact Kensington 2853 Campus Drive San Mateo CA 94403 U S A Tel 800 535 4242 http www Kensington com Using the Security Bar Lock In addition to the password protection function and the Kensington lock the Security Bar Opening helps protect the proje...

Страница 77: ...s are securely attached Ensure the attached device is turned on Ensure a connected PC is not in suspending mode Ensure a connected notebook computer is configured for an external display This is usually done by pressing an Fn key combination on the notebook Tips for Troubleshooting In each problem specific section try the steps in the order suggested This may help you to solve the problem more qui...

Страница 78: ... blinks OFF OFF OFF Case Open 7 blinks OFF OFF OFF Lens Open 7 blinks 1 blinks OFF OFF DMD error 8 blinks OFF OFF OFF Color wheel error 9 blinks 1 blinks OFF OFF Phosphor wheel error 9 blinks OFF OFF OFF Air Filter replace warning ON OFF OFF ON G794 error 4 blinks 1 blinks OFF OFF Laser Driver board Color wheel speed too low 4 blinks 2 blinks OFF OFF Laser Driver board Phosphor wheel speed too low...

Страница 79: ...the OSD Problem The color of the projected image does not match the source image Adjust the Color Temperature and Gamma settings on the Image Advanced menu of the OSD Light Source Problems Problem There is no light from the projector 1 Check that the power cable is securely connected 2 Ensure the power source is good by testing with another electrical device 3 Restart the projector in the correct ...

Страница 80: ...ced Having the Projector Serviced If you are unable to solve the problem you should have the projector serviced Pack the projector in the original carton Include a description of the problem and a checklist of the steps you took when trying to fix the problem The information may be useful to service personnel For servicing return the projector to the place you purchased it ...

Страница 81: ...0 Q How do I run HDMI cables longer than 10 meters There are many HDMI Adopters working on HDMI solutions that extend a cable s effective distance from the typical 10 meter range to much longer lengths These companies manufacture a variety of solutions that include active cables active electronics built into cables that boost and extend the cable s signal repeaters amplifiers as well as CAT5 6 and...

Страница 82: ...Sync 24 30Hz 47 120 Hz Safety Certification FCC B cUL UL CB CE CCC KC CU BSMI China CECP RCM Environmental Operation Condition 0 40 C 10 85 No condensing Environmental Storage Condition 20 60 C 5 to 95 No condensation Dimensions 517mm W x 470mm D x 202mm H AC Input AC Universal 100 240 Typical 110VAC 100 240 10 Power Consumption 650W Normal 530W Eco 0 5W Standby 3W on by Lan Light Source Laser Pho...

Страница 83: ...o Image Size Diagonal Projection Distance Short Throw VL904G LNS 5FX2 0 778 N A 47 8 298 3 0 8m 5 0m Semi Short Throw VL907G LNS 5STZ 1 1 1 3 1 18 35 8 379 8 1m 9m STD Lens VL906G LNS 5SZ2 1 54 1 93 1 25 36 1 211 1 5m 7m Long Throw VL908G LNS 5LZ3 1 93 2 9 1 5 32 1 481 2 0m 20m Super Long Throw VL909G LNS 5LZ2 3 5 1 67 27 9 309 5 3m 20m Short Throw VL911G LNS 5WZ2 0 77 1 1 1 42 42 3 300 1m 4 98m S...

Страница 84: ...4 3231 Image Height mm 538 1077 1346 2019 h mm 269 538 673 1010 O mm 296 592 740 1111 A mm 27 54 67 101 Short throw zoom projection lens TR 0 77 1 1 offset 55 Tele Wide Distance m 1 18 2 37 3 55 4 98 1 00 1 66 3 32 4 98 Diagonal 50 100 150 210 60 100 200 300 Image Width mm 1077 2154 3231 4523 1292 2154 4308 6462 Image Height mm 673 1346 2019 2827 808 1346 2692 4039 h mm 337 673 1010 1414 404 673 1...

Страница 85: ... 38 3 45 5 17 7 93 1 35 2 69 5 38 8 08 Diagonal 40 100 150 230 50 100 200 300 Image Width mm 862 2154 3231 4954 1077 2154 4308 6462 Image Height mm 538 1346 2019 3096 673 1346 2692 4039 h mm 269 673 1010 1548 337 673 1346 2019 O mm 296 740 1111 1703 370 740 1481 2221 A mm 27 67 101 155 34 67 135 202 Semi throw projection lens TR 1 54 1 93 offset 55 Note Overdrive TELE WIDE Distance m 1 66 3 33 4 1...

Страница 86: ... 337 1010 2020 3029 O mm 296 740 1481 2221 370 1111 2222 3332 A mm 27 67 135 202 34 101 202 303 Super Long throw projection lens TR 3 5 offset 55 TELE WIDE Distance m 3 23 10 77 16 15 19 92 3 23 6 46 12 92 20 03 Diagonal 30 100 150 185 50 100 200 310 Image Width mm 646 2154 3231 3985 1077 2154 4308 6677 Image Height mm 404 1346 2019 2490 673 1346 2692 4173 h mm 202 673 1010 1245 337 673 1346 2087 ...

Страница 87: ...7 5 75 0 640 x 480 43 3 85 0 800 x 600 35 2 56 3 800 x 600 37 9 60 3 800 x 600 46 9 75 0 800 x 600 48 1 72 2 800 x 600 53 7 85 1 800 x 600 76 3 120 0 1024 x 576 35 8 60 0 1024 x 600 37 3 60 0 1024 x 600 41 5 65 0 1024 x 768 48 4 60 0 1024 x 768 56 5 70 1 1024 x 768 60 0 75 0 1024 x 768 68 7 85 0 1024 x 768 97 6 120 0 1024 x 768 99 0 120 0 1152 x 864 67 5 75 0 1280 x 720 45 0 60 0 1280 x 720 90 0 1...

Страница 88: ... w o DVI 3840 x 2160 135 0 60 0 w o DVI Apple Macintosh 640 x 480 35 0 66 7 832 x 624 49 7 74 5 1024 x 768 60 2 74 9 1152 x 870 68 7 75 1 SDTV 480i 15 734 60 0 576i 15 625 50 0 EDTV 576p 31 3 50 0 480p 31 5 60 0 HDTV 720p 37 5 50 0 720p 45 0 60 0 1080i 33 8 60 0 1080i 28 1 50 0 1080p 27 24 0 1080p 28 25 0 1080p 33 7 30 0 1080p 56 3 50 0 1080p 67 5 60 0 O Frequency supported Frequency not supported...

Страница 89: ...esolutions HDMI 1 4a 3D Input Input timing 1280 X 720P 50Hz Top and Bottom 1280 X 720P 60Hz Top and Bottom 1280 X 720P 50Hz Frame packing 1280 X 720P 60Hz Frame packing 1920 X 1080i 50 Hz Side by Side Half 1920 X 1080i 60 Hz Side by Side Half 1920 X 1080P 24 Hz Top and Bottom 1920 X 1080P 24 Hz Frame packing HDMI 1 3 1920 x 1080i 50Hz 1920 x1080i 60Hz 1280 x 720P 50Hz 1280 x 720P 60Hz Side by Side...

Страница 90: ...DLP Projector User s Manual 78 Projector Dimensions 470mm 18 50 517mm 20 35 525mm 20 67 ...

Страница 91: ... energy and if not installed and used in accordance with the instruction manual may cause harmful interference to radio communications Operation of this equipment in a residential area is likely to cause harmful interference in which case the user will be required to correct the interference at his her own expense Changes or modifications not expressly approved by the parties responsible for compl...

Страница 92: ...tup settings Syntax Symbol suffixed with setup val ues Increase setup order of adjustment items Some settings are changed in steps Sym bol indicates changing one step up Decrease setup order of adjust ment items Some settings are changed in steps Sym bol indicates changing one step down Execute operation command None Certain operation commands execute after input without further setting or regulat...

Страница 93: ...uto Sync Off Phase phase V V V V 0 31 clock clock V V V V 5 5 Auto Sync auto sync V V 0 Off 1 On HDBaseT Control hdbaset V V 0 Off 1 On 3D threed V V 0 Off 1 DLP Link 2 IR 3D Sync Invert threed syncinvert V V 0 Off 1 On 3D Format threed format V V 0 Frame Sequential 1 Top Bottom 2 Side by side 3 Frame Packing 4 Auto 3D Sync Out Delay threed syncdelay V V 0 359 3D Sync Input threed syncinput V 0 In...

Страница 94: ...b sat V V V V 0 100 HSG Cyan Saturation hsg c sat V V V V 0 100 HSG Magenta Saturation hsg m sat V V V V 0 100 HSG Yellow Saturation Hsg y sat V V V V 0 100 HSG Red Hue hsg r hue V V V V 0 100 HSG Green Hue hsg g hue V V V V 0 100 HSG Blue Hue Hsg b hue V V V V 0 100 HSG Cyan Hue hsg c hue V V V V 0 100 HSG Magenta Hue hsg m hue V V V V 0 100 HSG Yellow Hue Hsg y hue V V V V 0 100 HSG White Red Ga...

Страница 95: ... Rear Ceiling Direct Power On direct poweron V V 0 Off 1 On Light Mode light mode V V 0 Normal 100 1 Eco 80 2 Eco Plus 3 Dimming 4 Extre Diming 5 Custom Light Custom Light custom light V V 50 200 Fan Speed fanspeed V V 0 Normal 1 High IR Control ir control V 0 Both IR On 1 Front IR On 2 Rear IR On Remote ID remote id V V 0 Default ID0 1 ID1 2 ID2 3 ID3 4 ID4 5 ID5 6 ID6 7 ID7 NetWork Status net st...

Страница 96: ...osition V V 0 Left 1 Right 2 Center 3 Down 4 Up MENU Translucent menu trans V V 0 Off 1 25 2 50 3 75 4 100 Keypad Lock keypad lock V V 0 Off 1 On Language lang V V 0 English 1 French 2 German 3 Spanish 4 Portuguese 5 Simplified Chinese 6 Traditional Chinese 7 Italian 8 Norwegian 9 Swedish 10 Dutch 11 Russian 12 Polish 13 Finnish 14 Greek 15 Korean 16 Hungarian 17 Czech 18 Arabic 19 Turkish 20 Viet...

Страница 97: ...lock V string H Refresh Rate h refresh V string V Refresh Rate v refresh V string Blank blank V V 0 Off 1 On Power On power on V Power Off power off V Projector Status status V 0 Reset 1 Standby 2 Active 3 cooling 4 Warming 5 Power Up Mute mute V V 0 Off 1 On Freeze freeze V V 0 Off 1 On Internal Speaker speaker V V 0 Off 1 On Input Select input sel V V 1 RGB 3 DVI 4 Video 6 HDMI 1 7 BNC 9 HDMI 2 ...

Отзывы: