background image

15

T

R
A
C

T

0

R

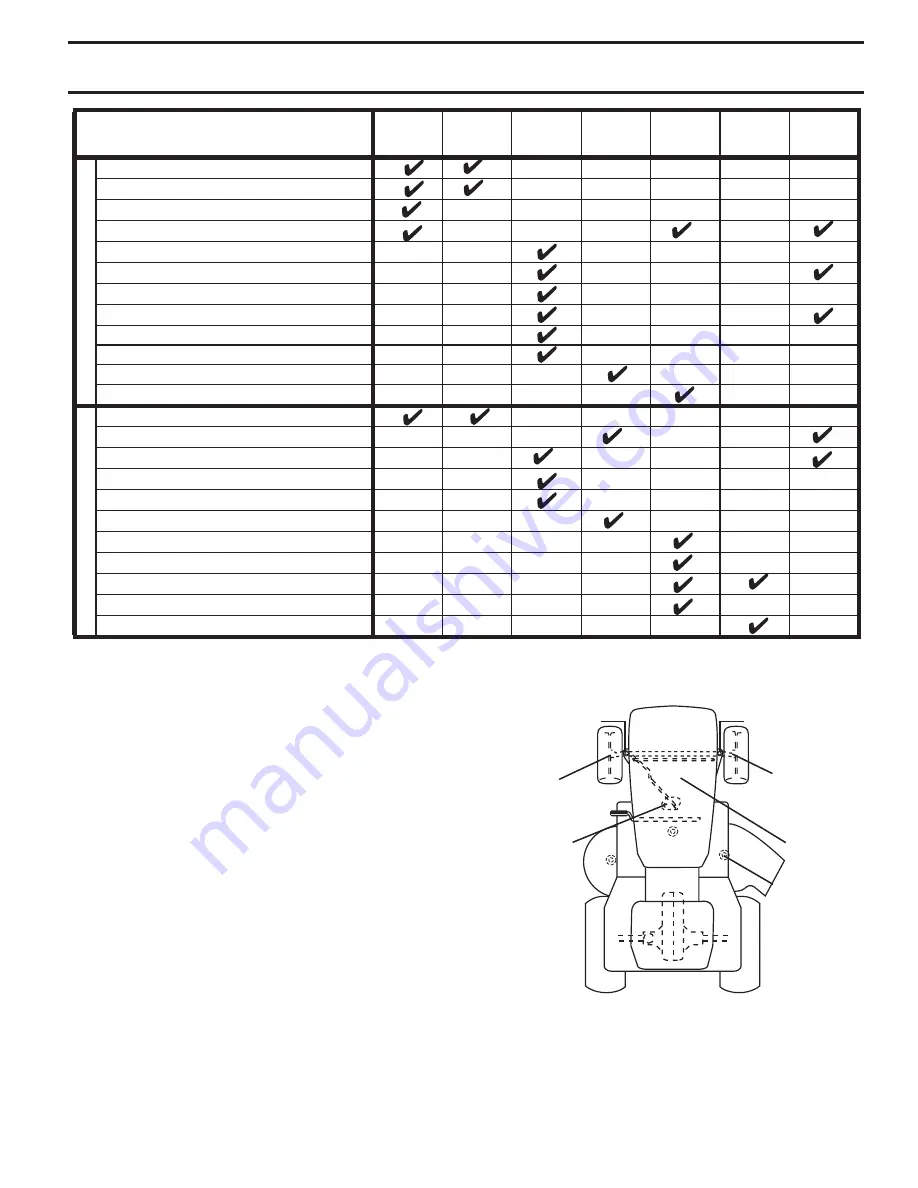
1 - Change more often when operating under a heavy load or in high ambient temperatures.

2 - Service more often when operating in dirty or dusty conditions.

E

N

G

I

N

E

3

2

2

2

2

3 - Replace blades more often when mowing in sandy soil.

4 - Not required if equipped with maintenance-free battery.

5 - See Cleaning in Maintenance Section.

1

,

1,2

2

4

5

1,2

BEFORE

EACH

USE

EVERY

8

HOURS

EVERY

25

HOURS

EVERY

50

HOURS

EVERY

100

HOURS

EVERY

SEASON

BEFORE

STORAGE

Inspect Muffler/Spark Arrester

Clean Air Filter

Change Engine Oil (with oil filter)

Replace Air Filter Paper Cartridge

Replace Spark Plug

Check Engine Oil Level

Clean Engine Cooling Fins

Clean Air Screen

Replace Oil Filter (If equipped)

Replace Fuel Filter

Change Engine Oil (without oil filter)

Lubrication Chart

Check Brake Operation

Check Battery Level

Check Tire Pressure

Clean Battery and Terminals

MAINTENANCE 

SCHEDULE

Check for Loose Fasteners

Check/Replace Mower Blades

Che

Clean Debris Off Steering Plate

ck Transaxle Cooling

Che

Check Operator Presence & ROS Systems

ck V-Belts

Check Mower Levelness

LUBRICATION CHART

GENERAL RECOMMENDATIONS

The warranty on this tractor does not cover items that have 

been subjected to operator abuse or negligence.  To receive 

full value from the warranty, operator must main tain tractor 

as instructed in this manual.
Some adjustments will need to be made periodically to 

properly maintain your tractor.
At least once a season, check to see if you should make 

any of the adjustments described in the Service and 

Adjustments section of this manual.
• 

At least once a year you should replace the spark plug, 

clean or replace air filter, and check blades and belts 

for wear.  A new spark plug and clean air filter assure 

proper air-fuel mixture and help your engine run better 

and last longer.

BEFORE EACH USE

•  Check engine oil level.
•  Check brake operation.
•  Check tire pressure.
• 

Check operator presence and ROS systems for proper 

operation.

•  Check for loose fasteners.

IMPORTANT:

  DO NOT OIL OR GREASE THE PIVOT POINTS 

WHICH HAVE SPECIAL NYLON BEARINGS.  VISCOUS 

LU BRI CANTS WILL ATTRACT DUST AND DIRT THAT WILL 

SHORT EN THE LIFE OF THE SELF-LU BRI CAT ING BEARINGS.  

IF YOU FEEL THEY MUST BE LU BRI CAT ED, USE ONLY A DRY, 

POW DERED GRAPHITE TYPE LU BRI CANT SPARINGLY.


General Purpose Grease

  Refer to Maintenance “ENGINE” Section

02501


MANDREL 

ZERKS

➁ 

ENGINE


FRONT 

WHEEL 

BEARING 

ZERK


STEERING 

SECTOR 

GEAR 

TEETH


FRONT 

WHEEL 

BEARING 

ZERK


SPINDLE ZERK


SPINDLE ZERK

MAINTENANCE

Содержание D26BH54

Страница 1: ...Operator s Manual D26BH54 434722 Rev 1...

Страница 2: ...p engine and remove keys before dismounting Disengage blades when not mowing Shut off engine and wait for all parts to come to a complete stop before cleaning the machine removing the grass catcher or...

Страница 3: ...h towed equipment except at the hitch point Follow the manufacturer s recommendation for weight limits for towed equipment and towing on slopes Never allow children or others in or on towed equipment...

Страница 4: ...cians and the proper tools to service or repair this tractor Please read and retain this manual The instructions will enable you to assemble and maintain your tractor properly Always observe the SAFET...

Страница 5: ...5 UNASSEMBLED PARTS Keys 2 Keys Slope Sheet...

Страница 6: ...eration section for location and function of controls Raise attachment lift lever to its highest position Release parking brake by depressing clutch brake pedal Place freewheel control in transmission...

Страница 7: ...tions are still secure and wires are properly clamped Before driving tractor be sure freewheel control is in transmission engaged position see TO TRANS PORT in the Operation section of this manual WHI...

Страница 8: ...ty inform ation about hazards which can result in death serious injury and or property damage DANGER indicates a hazard which if not avoided will result in death or serious injury WARNING indicates a...

Страница 9: ...NITION SWITCH Used for starting and stopping the engine G REVERSE OPERATION SYSTEM ROS ON POSITION Allows operation of mower or other powered attachment while in reverse H LIGHT SWITCH Turns the headl...

Страница 10: ...nd full speed fast position before stopping may cause engine to backfire Turnignitionkey F to STOP positionandremovekey Always remove key when leaving tractor to prevent unauthorized use Never use the...

Страница 11: ...k has reached the minimum or maximum position may result in damagetotheelectricliftmechanism Theelec tric lift mechanism is equipped with a thermal protection system If the system overheats or fails t...

Страница 12: ...g Make all turns slowly TO TRANSPORT See Fig 13 When pushing or towing your tractor be sure to disengage transmission by placing freewheel control in freewheeling position Free wheel control is locate...

Страница 13: ...cleaner products in the fuel tank or permanent damage may occur OPERATION TO START ENGINE See Fig 3 When starting the engine for the first time or if the engine has run out of fuel it will take extra...

Страница 14: ...AUTION Never engage or disengage freewheelleverwhiletheengineisrunning To ensure proper operation and performance it is recom mended that the transmission be purged before operating tractor for the fi...

Страница 15: ...e warranty on this tractor does not cover items that have beensubjectedtooperatorabuseornegligence Toreceive full value from the warranty operator must maintain tractor as instructed in this manual So...

Страница 16: ...witch in the ROS ON position and the attachment clutch engaged any attempt by the operator to shift into reverse should NOT shut off the engine BLADE CARE Forbestresultsmowerbladesmustbekeptsharp Repl...

Страница 17: ...ousing and other cooling shrouds Clean the cooling fins and external surfaces as necessary Ensure the cooling shrouds are reinstalled NOTE Operating the engine with a blocked grass screen dirtyorplugg...

Страница 18: ...the tractor to a dry area preferably a concrete or paved area Place the attachment clutch control in the ENGAGED position to remove excess water and to help dry before putting the tractor away WARNING...

Страница 19: ...and pull mower toward you until the bar falls from the hole in bracket Turn tractor steering wheel to the left as far as it will go Slide mower out from under right side of tractor TO INSTALL MOWER AN...

Страница 20: ...l go and position mower on right side of tractor with deflector shield Q to the right 2 ASSEMBLEFRONTGAUGEWHEEL W TOFRONT OF MOWER See Fig 23 NOTE Depending on model bracket T may be differ ent than s...

Страница 21: ...LIFT LINKS C See Fig 30 Insert rod end of rear lift link C into hole U in tractor lift shaft suspension arm and pivot link down to mower Lift rear corner of mower and position slot in link as sembly o...

Страница 22: ...ppearance Readjust if necessary until you are satisfied with the results A Turn nut left to lower mower Turn nut right to raise mower Fig 33 Fig 34 PRECISION SIDE TO SIDE ADJUSTMENT See Fig 34 With al...

Страница 23: ...ment lift to highest position Fig 37 V Q P M K L R P Q R P R BELT REMOVAL 1 Remove mower See TO REMOVE MOWER section in this manual NOTE Observe entire motion drive belt and position of all belt guide...

Страница 24: ...the tractor forward If the rear wheels rotate then the brake needs to be serviced Contact a qualified service center TO REMOVE WHEEL See Fig 39 Block up axle securely Remove axle cover retaining ring...

Страница 25: ...tractor To replace reverse above procedure ENGINE TO ADJUST THROTTLE CONTROL CABLE The throttle control has been preset at the factory and adjustment should not be necessary If adjustment is nec essar...

Страница 26: ...UELSYSTEMPARTSSUCH AS CARBURETOR FUEL FILTER FUEL HOSE OR TANK DURING STORAGE ALSO EXPERIENCE INDICATES THAT ALCOHOL BLENDED FUELS CALLED GASOHOL OR USING ETHANOLORMETHANOL CANATTRACTMOISTUREWHICH LEA...

Страница 27: ...ng 7 Faulty ignition switch 7 Check replace ignition switch 8 Faulty solenoid or starter 8 Check replace solenoid or starter 9 Faulty operator presence switch es 9 Contact an authorized service center...

Страница 28: ...ed 9 Reinstall blades sharp edge down 10 Improper blades used 10 Replace with blades listed in parts manual 11 Cloggedmowerdeckventholesfrombuildup of grass leaves trash around mandrels 11 Clean aroun...

Страница 29: ...never across the face Do not mow slopes greater than 15 degrees Make turns gradually to prevent tipping or loss of control Exercise extreme caution when changing direction on slopes 1 Fold this page a...

Страница 30: ...l or commercial purposes is limited to 90 days from the date of original purchase 5 This Warranty applies only to products which have been properly assembled adjusted operated and maintained in accor...

Отзывы: