background image

GB-4

INSTALLATION

CONNECTING THE LINE CORD

Insert one end of the AC line cord into the AC power jack on the rear of the unit and the 
other end into a conveniently lacted AC outlet 230 V ~ Hz. 
The batteries are automatically disconnected when the AC adapter is used.

INSERTING BATTERIES

The battery compartment is located on the bot-
tom of the unit.
Remove the battery compartment door by  
pressing the tab and lift the battery door off.
Insert 6 x 1,5 V R14/LR* 14 C size cell batte-
ries (not included), observing the battery pola-
rity indicated inside the compartment in the 
figure.

Close the battery compartment before taking the unit into operation.

* We recommend to use alkaline batteries for durability.

HEADPHONE JACK

Insert headphones (not included) into the Headphones jack for private listening. The spea-
kers will be disconnected when listening with headphones.
Turn the volume down before you put on the headphone.

BATTERY PRECAUTIONS!

• Do not mix different types of batteries or old batteries with fresh ones.
• If the device is not to be used for a long period of time, remove the batteries. They may 

leak. 

Disney CD-Radio MD 80349 ML.book  Seite 4  Montag, 12. Dezember 2005  1:28 13

Содержание MD80349

Страница 1: ...Foldout_ClockRadio_MD80349 FH11 Sat Apr 09 15 39 01 2005 Seite 1 ÜBERSICHT OVERVIEW VUE D ENSEMBLE ...

Страница 2: ...repeat 9 CD door open close area 10 AC power jack rear of unit 11 CD compartment Transparent cover and exchangeable faceplate 12 PHONES jack 14 Volume control 15 CD skip fast search 16 CD program 17 POWER button 18 CD play pause 19 Handle rear of unit 20 Battery compartment bottom of unit Disney CD Radio MD 80349 ML book Seite 2 Montag 12 Dezember 2005 1 28 13 ...

Страница 3: ...c packaging away from children There is danger of suffocation Make sure that the unit is not exposed to humidity or moisture direct sunlight or other direct heat e g from radiators or other stereo equipment constant vibration strong dust or places without ventilation Do not repair the unit yourself Under no circumstances attempt to open or repair the unit yourself There is dan ger of electric shoc...

Страница 4: ...ot included observing the battery pola rity indicated inside the compartment in the figure Close the battery compartment before taking the unit into operation We recommend to use alkaline batteries for durability HEADPHONE JACK Insert headphones not included into the Headphones jack for private listening The spea kers will be disconnected when listening with headphones Turn the volume down before ...

Страница 5: ... top of the CD door To insert another Disney faceplate make sure the faceplate s notches are inserted into the CD door s pegs When inserted correctly it will look like the above illustration Insert the lid back onto the CD door making sure the tabs on the lid are inserted correctly into the slots on the CD door Rotate it clockwise until it is locked in place Disney CD Radio MD 80349 ML book Seite ...

Страница 6: ...e the set frequency in the display Adjust the volume using the volume control Antennas FM The FM Rod Antenna is for FM reception only If reception is weak adjust the length orientate the antenna AM This unit has a built in ferrite rod antenna which provides adequate reception in most areas If reception is weak turn the unit to improve reception Disney CD Radio MD 80349 ML book Seite 6 Montag 12 De...

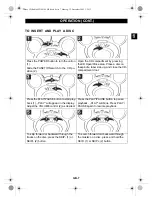
Страница 7: ...e PLAY PAUSE button to start play back 1 PLAY will appear in the display Adjust the VOLUME control 2 as desired Press the PLAY PAUSE button to pause playback PLAY will blink Press PLAY PAUSE again to resume playback To skip forward or backward through the tracks on the disc press the SKIP 1 or SKIP 2 button To search forward ord backward through the musikc on a disc press and hold the SKIP 1 or SK...

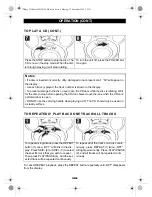
Страница 8: ...d the sel ected track will be repeated continuously To repeat all of the tracks on a disc conti nuously press REPEAT 1 twice RPT will light permanently Press PLAY PAUSE 2 and all tracks will be repeated conti nuously Notes If a disc is inserted incorrectly dirty damaged or not present at all 00 will appear in the display As each track is played the track number is shown in the display To prevent d...

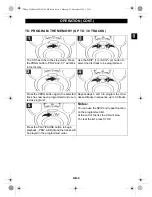
Страница 9: ...d track has now been programmed and coun ted as program 1 Repeat steps 2 and 3 to program the other desired tracks in sequence up to 30 tracks Notes You can use the SKIP and repeat function on the programmed list At the end of the list the CD will stop To clear the list press STOP Press the PLAY PAUSE button to begin playback PRG will light and the tracks will be played in the programmed order Dis...

Страница 10: ...CD RWs Therefore reading mistakes or delays may occur in rare cases This is no malfunction of the device Subject to technical modifications DISPOSAL Packagin All packaging and packaging materials that are no longer required can and should be recycled Device At the end of its life the appliance must not be disposed of in household rubbish Enquire about the options for environmentally friendly dispo...

Отзывы: