background image

NOTE

, image is for reference only and the final product may differ slightly in color and design.

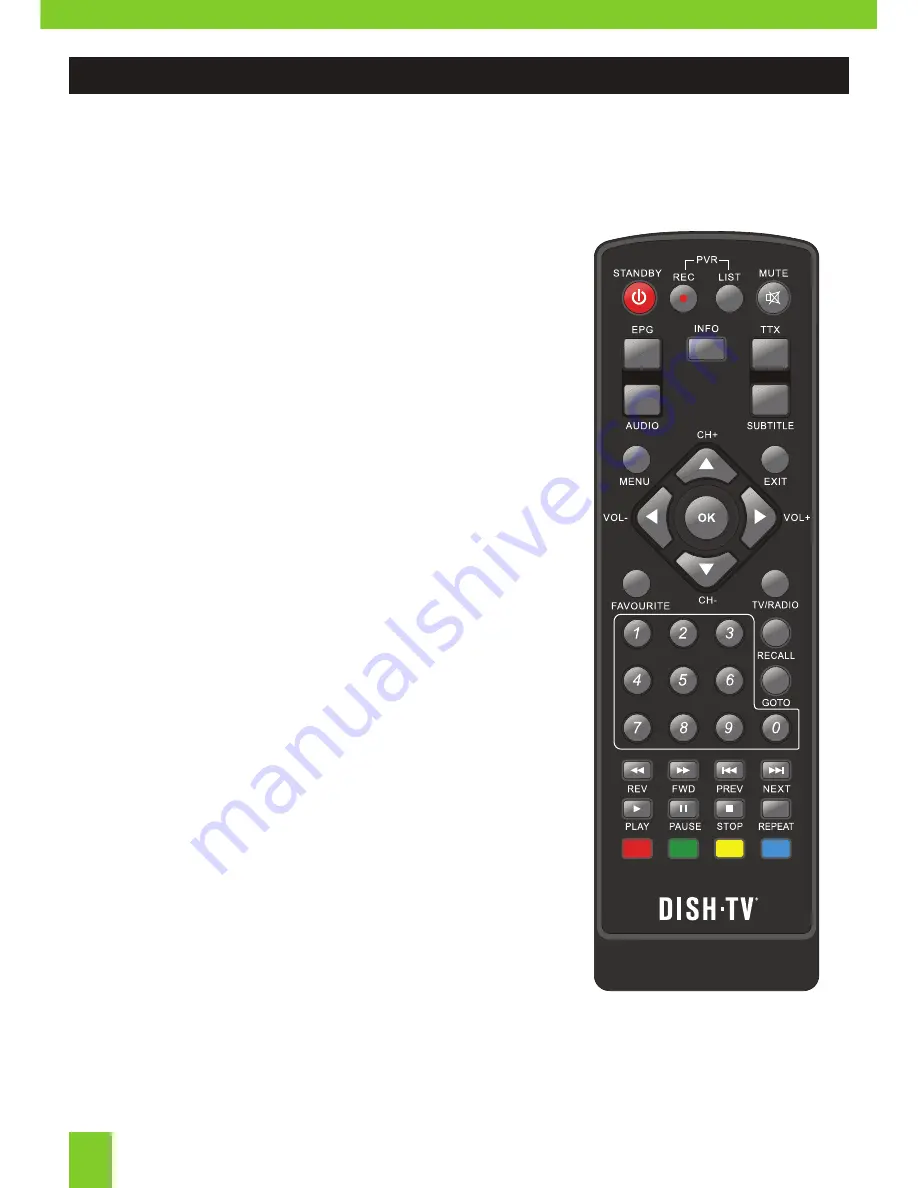
Remote Control

Product Overview

06


PRODUCT OVERVIEW:

POWER:

 Standby ON/OFF.

REC:

 No functionality with the T1000n-VM.

LIST:

 No functionality with the T1000n-VM.

MUTE:

 Toggle sound ON/OFF.

EPG:

 Call up the Freeview EPG (Electronic 

Program Guide).

INFO:

 Show information on selected channel

or event.

TTX:

 No functionality with the T1000n-VM.

AUDIO:

 Change Audio, when available.

SUB:

 Turn Subtitles ON/OFF, when available.

MENU:

 Bring up main menu, becomes back 

in select sub-menus.

EXIT:

 Exits on screen displays and menus.

NAVIGATION:

 Move through menus to select.

OK:

 Confirm current selection.

VOL UP/DOWN:

 Adjust volume up and down.

CH UP/DOWN:

 Navigate through Channels.

FAV: 

No functionality with the T1000n-VM.

TV/RADIO:

 Switch between TV/Radio modes.

NUMERIC KEYS:

 Enter Numbers. Enter PIN.

Select Channels. 

RECALL: 

Bring up Recall List.

GOTO: 

No functionality with the T1000n-VM.

REWIND: 

No functionality with the T1000n-VM.

FF: 

No functionality with the T1000n-VM.

PREV: 

No functionality with the T1000n-VM.

NEXT: 

No functionality with the T1000n-VM.

PLAY: 

No functionality with the T1000n-VM.

PAUSE: 

No functionality with the T1000n-VM.

STOP: 

No functionality with the T1000n-VM.

REPEAT:

 Bring up User Options.

COLOUR KEYS:

 Interactive use, functionality 

differs with each menu.

Содержание T1000n-VM

Страница 1: ...T1000n VM USER MANUAL...

Страница 2: ...icing is required when the receiver has been damaged in anyway such as when the power supply or plug is damaged liquid has been spilled into the unit objects have fallen into the unit the unit has bee...

Страница 3: ...sing the Dish TV T1000n Vm Digital Terrestrial Receiver You will be able to receive all the Freeview High Definition and Standard Definition digital TV channels along with the Radio channels This Manu...

Страница 4: ...t your Set Top Box Welcome What s in the Box Product Overview Front and Back View Remote Control Main Menu Channel Organiser User Preference System Settings Manual Timer Admin EPG Weekly EPG System In...

Страница 5: ...Output 04 HDMI OUT High Definition Output for HDTV 05 VIDEO RCA Video Output 06 AUDIO L R RCA Audio L R Output 07 DC IN 5V Connect Power Supply 5V Only Front Panel Side Panel 01 LED INDICATOR GREEN P...

Страница 6: ...ts on screen displays and menus NAVIGATION Move through menus to select OK Confirm current selection VOL UP DOWN Adjust volume up and down CH UP DOWN Navigate through Channels FAV No functionality wit...

Страница 7: ...V It s best to check that your UHF Aerial is aligned correctly and that the UHF Aerial can withstand any strong weather Connecting using an AV Cable If your TV doesn t have HD compatibility you can co...

Страница 8: ...take some time to boot up as part of the initial installation 2 Welcome Screen The Welcome Screen should appear on your TV when the receiver is first turned on Before pressing OK to continue the init...

Страница 9: ...menu if you wish to alter the Settings Preferences or if you experience an issue with the receiver and need to reset it You can bring up the Main Menu by pressing the MENU button on the Remote Control...

Страница 10: ...e locked channel you will need to enter your PIN GREEN Skip Channel Will skip the channel when pressing the CH and CH key to browse channels YELLOW Move Channel Will move the channel to another positi...

Страница 11: ...rental Rating Change Password 1 Enter your Password Default is 0000 2 Adjust the Parental Rating by pressing either the YELLOW or BLUE button 3 You can change the password here for more security pleas...

Страница 12: ...can set how the output video image fits to your TV screen 16 9 Suits most newer LCD LED and Plasma TVs 4 3 Suits older conventional square TVs HDMI Output SPDIF Mode You can either have Compressed or...

Страница 13: ...e only Wakeup Mode that is available 3 Set the channel you want the receiver to power on to or switch over to at the set date and time 4 Set the Date option to a desired date on which the digital rece...

Страница 14: ...ww dishtv co nz ensure you download the correct software and follow instructions included with the software download 2 Insert USB Device with software into the USB Port on the receiver 3 Press MENU an...

Страница 15: ...can find out what s happening during the week by simply pressing the GREEN and YELLOW buttons on the remote To close the EPG press EXIT 15 System Info Main Menu Provides relevant information in regard...

Страница 16: ...to locate the language that features the small icon then press OK You will then be able to hear audio descriptions Audio Selection can also be selected by pressing the AUDIO button on the remote Subt...

Страница 17: ...button on your remote control and wait a few seconds for the guide to load You can navigate around the guide using the buttons indicated on screen Use the buttons to scroll up and down the programme l...

Страница 18: ...l automatically update the time from the broadcast Q I get pixelation on some channels A We recommend you consult a local satellite installer as this is most likely signal related Q What is the Defaul...

Страница 19: ...he units ANT IN connection You may be located in an area which has limited or no Freeview Terrestrial coverage You might need a higher aerial but please consult your retailer or local installer about...

Страница 20: ...ur team during our Office Hours on 0800 DISH TV 0800 347 488 this is only available to Landlines When using a Cell Phone call 07 929 4123 0800 347 488 Email Us Email our team at any time at support di...

Страница 21: ...l and installation of the product or any other costs directly or indirectly related to its repair are not covered by warranty All repairs performed by non authorized repair shops will not be reimburse...

Страница 22: ...www dishtv co nz 0800 DISH TV 347488 Version 1 1 April 2017...

Отзывы: