


PRODUCT SAFETY & DISCLAIMER
READ ALL INSTRUCTIONS CAREFULLY BEFORE INSTALLING, FAILURE TO DO SO MAY CAUSE
PERSONAL INJURY OR DAMAGE TO PRODUCT AND/OR PROPERTY
•
This installation guide is provided as a GENERAL installation guide, some vehicles vary and
may require additional steps. We do not accept responsibility for third party labor charges
or modifications. Exercise due-diligence when installing this product.
•
We do not accept any responsibility for vehicle damage or personal injury resulting from
the installation of this product.
•
Careless installation and operation can result in equipment damage
.
Requirements:
cd changer controlling radio
Introduction
Many older car owners looking for a simple way to play audio devices without
replacing the radio will be pleased to find this module. The BLU-CHRY adapter
provides a
streaming
solution for any Smartphone, Kindle, Tablet with A2DP
profile. A wireless connection means no wires, clutter or complicated setup.
The BLU-CHRY plug-n-play solution connects to factory radio 8-pin CD changer
port which guarantees to best possible sound and replaces the CD changer (if
present).
For this module to work, the 1995-02 square face radio pictures on page 1 with
the following buttons:
a. "Disk ^" printed on preset # 1, and
CD changer port. (See
Fig. 2
)
b. "Mode/Eject" button, 6 radio presets, Bass and Treble slider controls, "DIRECT
DISC SELECT 1-6" above radio presets. (
See image on pg. 1
)
c. European (Export) radio models:
P04704345, P05269484, P04671088
See Frequently Asked question
at the end of this guide for details.
Installation
Radio removal required to gain access to the connector. Vehicle specific radio
removal is not part of this guide but available upon request.
1.
Connect adapter 8-pin plug (See
Fig. 1
) to 8-
pin “CD”
connector on
radio (See
Fig. 2
)
Fig. 1
8-pin plug
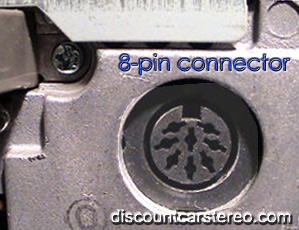
Fig. 2
Radio connector
2.
Secure adapter box and proceed to next step.