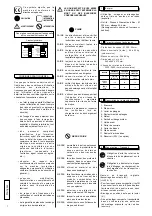
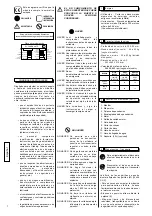
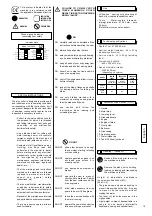
Dimas FS 300 C Скачать руководство пользователя страница 13

11

Note  the  direction  of  rotation
indicated  by  an  arrow  on  one
side  of  the  disc  (direction  of
rotation shown on the outside of
the guard housing).
Check the state of cleanliness of
the  disc  support  faces  of  the
adaptor  plates  (B  and  C)  and  of
the spindle.

The holding screw (D) of the disc
has a right-hand thread.

8

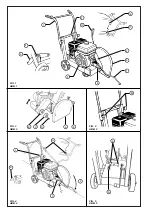
Stopping the machine

• Raise the lever (K) and pull it towards

you to free the disk from the groove [

SEE

FIG. 

4].

• Lock the saw up by releasing the lever

(K).

• Turn off the water supply (G).

• Allow the motor to run idle.

• Switch off the motor (refere to the motor

maintenance manual).

6

Fitting the blade 

• Place the machine in an high position.

• Disconnect the water hose connection

from the guard housing.

• Unscrew the nut (E) from the guard

housing [

SEE FIG.

3].

• Remove the guard housing (A).

• Fit the diamond impregnated disc.

• Firmly tighten the screw (D) with the

spanner provided with the machine,
holding the disc steady by hand.

• Replace the protective guard (if this is not

replaced the casing safety switch will
prevent the saw being started).

• Reconnect the water hose (mains with

valve or tank).

• Tighten the nut (E).

Motor off

• Turn off the water tap (G) (from the mains

or from the tank in order to fill it) [

SEE

FIG.

x

4].

• Mark out a line on the ground where a cut

has to be made.

• Position the machine so that the lowered

front guide (F) and the disc are aligned
with the line marked out (disc visble on
the belt side of the housing).

• Start up the motor : refer to the motor

manufacturer’s instructions in the service
manual.

• Allow the motor to warm up.

• Turn on the water supply tap (G) (from

the mains or the water tank).

• Increase the motor speed to full.

• Hold the saw, raise the lever (K) with

your foot and position the disk in contact
with the floor.

• Lower to the depth of cut required (until

there is a click), bearing in mind that each
notch of the lever corresponds to a depth
of 3 cm. Lower slowly to prevent the
engine stalling.

• Gently move the machine forward

ensuring that the front guide and the disc
are always aligned with the line marked
out.

• After use, clean the machine.

• Lubrication : apply a moderate amount of

bearing lubricant to the nipples in the
depth adjustment chassis (depending on
the frequency of use).

• Model with petrol motor (refer to the

motor maintenance manual).

Make sure the fuel is topped up.

Check the oil level; as the motor often
works at an angle, check it frequently in
the horizontal position that the oil level
is never below the second line on the
gauge.

To start up, refer to the motor
instructions.

Take  into  account  the  working
conditions  from  health  and  safety
point of wiew.

Use  only  blades  marked  with  a
maximum  operating  speed
greater than blade shaft speed

"Engine  Maintenance"  :  refer  to
the engine maintenance booklet.

Dispose  of  the  old  oil  as  laid
down by the regulations in force.
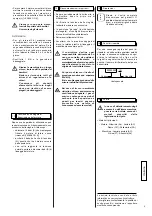
Motor off

Emergency stop
Operate the switch ( J ) on the
machine's control panel.

Entrust  repairs  to  authorised
dealer only

7

Starting up

Always  pay  extreme  care  and
attention  to  the  preparation  of
the machine before starting up

Remove all adjustment tools and
wrenches  from  floor  and
machine

Always  keep  blade  guard  in
place

Ensure that the water supply is

abundant, when cutting wet.

• There may be several causes responsible

for arresting the disc in the sawing groove
or stopping the machine: 

Belt tension.

Lack of fuel.

Advance or lowering too fast, etc.

• In  all  case, disengage the disc from the

groove and give the machine a complete
check-over.

9

Incidents during sawing

The  working  area  must  be
completely  cleared,  well  lit  and
all  safety  hazards  removed  (no
water  or  dangerous  objects  in
the vicinity)

The  operator  must  wear
protective 

clothing

appropriate to the work he
is  doing. We  recommend
that this includes both eye
and ear protection

Any  persons  not  involved  in  the
work  should  leave  the  working
area

The  use  of  ear  protection  is
mandatory.

5

Check before starting

Please  read  the  instructions  for
use  prior  to  operating  the
machine for the first time.

Motor off.

• Check the engine oil everyday. Refer to

the engine manual for oil change
schedule. Use :

SAE 10W30 motor oil with API class
MS, SD, SE or better for PETROL
engines.

API class CD or CE for Hatz diesel.

OIL

English

10

Maintenance (with the
engine stopped)

Содержание FS 300 C

Страница 1: ...tretien Scie de sol Manuale di istruzioni Sega da suolo Manual de instrucciones Cortadora de junta Operating instructions Floor Saw Betriebs und Wartungsanleitung Fugenschneider Gebruiksaanwijzing Vlo...

Страница 2: ...ISO 3744 is conform de bepalingen van de gewijzigde richtlijn MACHINES 89 392 CEE de richtlijn LAAGSPANNING 73 23 CEE en de richtlijn CEM 89 336 CEE volgens de Europese normen EN 50081 1 en EN 55022...

Страница 3: ...arriv e d eau 12 R servoir 30 L en option 4 Manutention Transport Hauteur du brancard r glable desserrage des volants M VOIR FIG 2 Pour la mise en place sur chantier il suffit de pousser la scie sols...

Страница 4: ...s chaque usage nettoyer la machine Graissage alimenter mod r ment les graisseurs du ch ssis de r glage de profondeur avec de la graisse roulement suivant la fr quence d utilisation Machine moteur esse...

Страница 5: ...lonnerie et tout sp cialement apr s les premi res heures de fonctionnement V rifier la tension des courroies les tendre sans exag ration En position garage il est recommand d enlever le disque et de l...

Страница 6: ...di cinghie 19 Carter disco 10 Chiave di servizio 11 Rubinetto presa d acqua 12 Serbatoio 30 L opzione 4 Movimentazione Trasporto Altezza regolabile dei bracci di supporto mediante gli appositi volant...

Страница 7: ...Ingrassaggio alimentare moderatamente gli ingrassatori dello ch ssis di regolazione di profondit con grasso da scorrimento secondo la frequenza di utilizzo Macchina equipaggiata con motore a benzina r...

Страница 8: ...si consiglia di smontare il disco e di custodirlo accuratamente Serrare correttamente il disco Accertarsi che le aree di serraggio del disco le relative piastre di fissaggio e il mandrino siano sempr...

Страница 9: ...12 Dep sito 30L opcional 4 Manutenci n Transporte La altura de las angarillas se puede ajustar aflojando las perillas M VEASE FIG 2 S lo es necesario empujar la m quina para posicionarla en la obra A...

Страница 10: ...n un limpiado de la m quina despu s de cada uso Engrase alimentar con moderaci n los engrasadores del chasis de ajuste de profundidad con grasa para rodamientos seg n la frecuencia de utilizaci n M qu...

Страница 11: ...nte las tuercas y los tornillos especialmente despu s de las primeras horas de servicio Comprobar la tensi n de las correas y de ser necesario tensarlas de forma moderada En posici n de inmovilizaci n...

Страница 12: ...ide 18 Belt cover 19 Disk casing 10 Service spanner 11 Water intake tap 12 Tank 30 litres optional 4 Handling Transport Height of adjustable handlebars unscrew knurled knobs M SEE FIG 2 The ground saw...

Страница 13: ...line marked out After use clean the machine Lubrication apply a moderate amount of bearing lubricant to the nipples in the depth adjustment chassis depending on the frequency of use Model with petrol...

Страница 14: ...ten the nuts and bolts and particularly after the first few hours of use Check belt tensions tighten them without overdoing it When garaged it is recommended the disc be removed and suitably stored Ma...

Страница 15: ...1 Wasserzufuhrhahn 12 Berieselungstank 30 L Option 4 Handhabung Transport Verstellbare H he des F hrungsgest nges L sen der Stellr der M SIEHE ABB 2 Zum Aufstellen auf der Baustelle gen gt es die S ge...

Страница 16: ...er und die Scheibe mit der Markierung bereinstimmen Nach jedem Einsatz die Maschine gr ndlich reinigen Schmierung Schnittiefenchassis Schmiernippel m ig mit Lagerfett abschmieren gem Nutzungsh ufigkei...

Страница 17: ...stdrehen 11 Nachstellen der Riemen Motor Die Schrauben regelm ig nachziehen insbesondere nach den ersten Betriebsstunden Die Spannung der Riemen pr fen m ig nachspannen Bei Au erbetriebnahme empfiehlt...

Страница 18: ...11 Watertoevoerkraan 12 Tank 30 L extra leverbaar 4 Verlading Transport Hoogte van de houder instelbaar de wieltjes M loszetten ZIE FIG 2 Om de machine op de werf te verplaatsen volstaat het de vloerz...

Страница 19: ...elke gebruiksbeurt Smering de smaarpunten van de diepteafstelas matig voeden met kogelsmeer afnankelijk van gebrulksfrequentle Machine met benzinemotor zie de onderhoudshandleiding van de motor Zorg...

Страница 20: ...rkuren Controleer de spanning van de riemen span de riemen aan zonder overdrijven In parkeerstand verdient het aanbeveling het zaagblad te verwijderen en hem zorgvuldig weg te bergen Breng het zaagbla...

Страница 21: ...eira de chegada de gua 12 Tanque 30 litros op o 4 Manuten o Transporte Altura do ber o regul vel desaperto dos volantes M VIDE FIG 2 Para a instala o no local de trabalho basta empurrar a serra Ela de...

Страница 22: ...oderadamente os lubrificadores do chassi de regula o de profundidade com massa de rolamento segundo a frequ ncia de utiliza o M quina com motor a gasolina consultar o manual de conserva o do motor Cer...

Страница 23: ...pecialmente depois das primeiras horas de funcionamento Verificar a tens o das correias estic las sem exagerar Em posi o de garagem recomendado desmontar o disco e de o arrumar correctamente Efectuar...

Страница 24: ...FIG 1 ABB 1 FIG 3 ABB 3 FIG 5 ABB 5 1 3 10 2 12 11 7 M 6 9 8 5 4 B C D N S A J G E FIG 4 ABB 4 K L F FIG 2 ABB 2...

Страница 25: ...5520 1 543044763 1 543044700 1 731232001 1 543042490 1 543044708 1 543044603 1 732211801 1 543044708 1 543042512 1 543042471 1 728744300 2 543042502 2 543046683 2 732212601 2 543046692 1 543044602 1 7...

Страница 26: ...3046046 4 543046647 1 543042906 1 543042514 1 732211801 2 543046186 1 543044602 1 543040217 2 543045456 2 732212201 2 543044719 2 543045943 2 543042476 1 543042488 1 543046068 1 543044863 1 543044857...

Страница 27: ...4 543044750 4 543047841 1 543047388 1 543047852 1 735213601 1 543045294 1 543045292 1 543045099 1 543042504 1 543045085 5 543045293 1 543045100 2 543044747 1 543044992 3 SPZX 600 543042475 1 728744900...

Страница 28: ...o inadeguato Noi prevediamo l utilizzo di utensili Dimas La merce viaggia a spese rischio e pericolo dell acquirente che ha il diritto di presentare ricorso contro il trasportatore nelle forme e nei...

Страница 29: ...of toebehoren reparaties die uitgevoerd zijn door een werkplaats die niet door Dimas erkend is het gebruik van beschadigd of verkeerd gekozen diamantgereedschap wij bevelen het gebruik van Dimas geree...

Страница 30: ...KINGDOM PARTNER DIMAS UK Oldends Lane Ind Estate Stonedale road Stonehouse Gloucestershire GB GL 10 3SY GREAT BRITAIN SWEDEN DIMAS AB Sverige Industrigatan 8 SE 55002 JONKOPING SWEDEN DENMARK DIMAS De...

Страница 31: ...od tta dagar efter k pet ins nda det bifogade derendede zakelijk om binnen de 8 dagen na aankoop garanticertifikatet vederb rligen ifyllt Place here sticker or serial Nr Placez ici l autocollant ou le...

Отзывы: