background image

-56- 

11.1.3 Remote Wakeup 


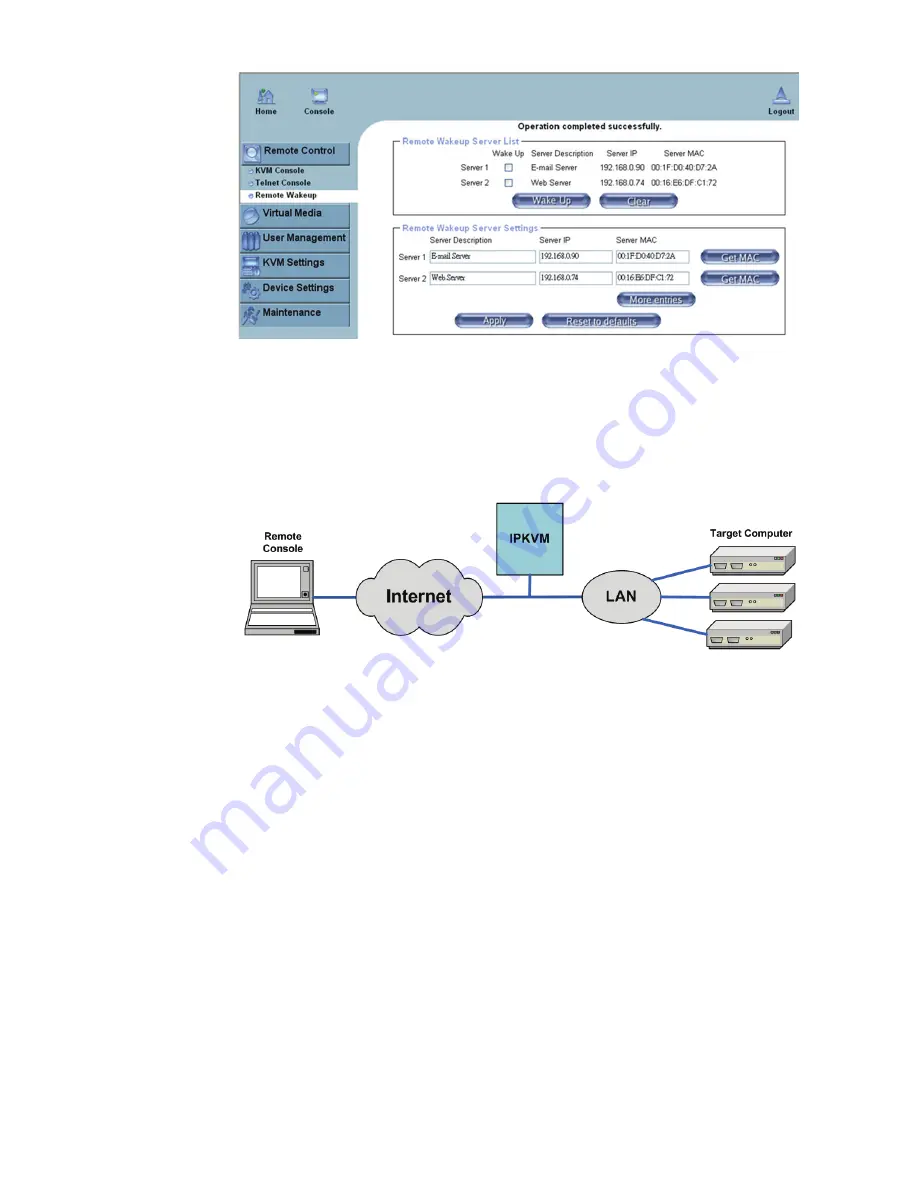
The IP-KVM provides the remote power wakeup function, which can 
remotely wake up the sleeping computer. With this feature, the 
computers that are not in use for now can be shut down and remotely 
wake up the computer when want to use it, and thus save the power 
energy. 


Settings


on target computer:


In order to be waked up, some settings have to be done on the target 
computer: 

1.     BIOS  setting: 


Have the wake up function in BIOS 

Enabled


Note: the naming in BIOS varies depending on the BIOS type, it may 
be 

Wake On LAN/PME

PME Event Wake Up

, or 

Power On By PCI 

Device

Содержание DS-23200

Страница 1: ... 1 8 PORT 16 PORT COMBO KVM SWITCH OVER IP User Manual ...

Страница 2: ...1 OSD MAIN MENU 18 7 1 1 KVM layer number 18 7 1 2 Channel name 18 7 1 3 Computer KVM status 19 7 1 4 Current active channel number 19 7 1 5 Cascade parent channel number 19 7 1 6 Page down up indicator 19 7 1 7 Function Control Menu 20 7 2 CHANNEL SELECTION IN OSD 20 7 2 1 Channel select to computer 20 7 2 2 Channel select to cascade port 20 7 2 3 Return from cascade port 20 7 3 SETUP IN OSD F1 2...

Страница 3: ...CONTROL 51 11 1 1 KVM CONSOLE 51 11 1 2 TELNET CONSOLE SSH CONSOLE 52 11 1 3 REMOTE WAKEUP 56 11 2 VIRTUAL MEDIA 59 11 2 1 DRIVE REDIRECTION 60 11 2 2 VIRTUAL DRIVE 61 11 2 3 CD DVD IMAGE 62 11 2 4 FLOPPY DISK 67 11 2 5 CREATING AN IMAGE 69 11 2 5 1 CREATING A FLOPPY IMAGE 69 11 2 5 2 CREATING A CD DVD ISO IMAGE 70 11 2 6 MAKING A DRIVE REDIRECTION 71 11 3 USER MANAGEMENT 74 11 3 1 CHANGE PASSWORD...

Страница 4: ...ing equipment and accessories 1 x 8 Port or 16 Port Combo KVM Switch Over IP 1 x RS232 cable Null modem type 1 x Power adaptor DC 5V 1 x Rack Mount Bracket Kit 1 x CD ROM software utilities and user manual 1 x QIG Quick Installation Guide Features KVM Transmission 1 Transmission of video signals with up to resolution 1600x1200 60 Hz with16 8 4 2 1 Bit video encoding manual and automatic adjustment...

Страница 5: ...f keyboard Menu driven OSD On Screen Display 12 Supports Auto Scan function to switch video inputs automatically among computers in present intervals sequentially by OSD menu driven 13 Supports LED display for PC and or server status monitoring 14 Supports Beeper during Switching enabled 15 Fully compliant with the USB 1 1 2 0 specification 16 Rack Mountable in 19 system tack 1U 17 Remote power wa...

Страница 6: ...male Keyboard 1 x USB A type female Mouse 1 x USB A type female Firmware upgrade connector 1 x Mini USB female Serial port 1 x RS232 male Ethernet port 1 x RJ45 Virtual Media port 1 x Mini USB female Remote console screen resolution Up to 1600 x 1200 60Hz DDC DDC2 monitor Supports DDC2B max resolution up to 2048x1536 60Hz Operating system supported Win 98 98SE ME 2000 XP Vista 7 2003 Mac OS9 X Lin...

Страница 7: ...bles To purchase the specific cable sets please contact your dealer Remote Console side 1 Java Runtime Environment version 1 5 or above 2 Browser Microsoft Internet Explorer version 6 0 or above or Netscape or Mozilla or Safari 4 Installation 4 1 Front View 8 Port Figure 1 8 port IP KVM front view 16 Port Figure 2 16 port IP KVM front view LED Indicators Selected BLUE LED indicates that the IP KVM...

Страница 8: ... Otherwise the switch might not work properly If your computeres work under Windows 98 please connect KVM switch to computers via PS 2 ports because Windows 98 does not support installation at first time as through USB HID installation driver Some kind of old computers must enable USB setting in BIOS in advance to make USB interface work This KVM switch does not guarantee to fully support USB keyb...

Страница 9: ...igure 5 Figure 5 Console connection 4 3 3 System connection Please use Custom combo cable to connect your computers Please refer to the figures and instruction shown below for System connection Note Please contact your dealer to purchase the custom combo 4 1 cables if you need Figure 6 Custom combo 4 in 1 cable ...

Страница 10: ...rs We recommand users to connect computers in this way Figure 7 Figure 7 USB PS 2 Keyboard Mouse and VGA connected B Connect only PS 2 keyboard mouse and VGA connectors to computers Figure 8 Figure 8 PS 2 Keyboard Mouse and VGA connected C Connect only USB and VGA connectors to computers Figure 9 Figure 9 USB and VGA video connected ...

Страница 11: ... turn off computers and devices when you start to install KVM Switch B Uses the custom combo 4 in 1 cable set See Figure 6 to connect one or more Slave KVM Switches to any PC port of Master KVM Switch The connection between KVM to KVM must be connected through PS 2 connection Please refer to Figure 7 Figure 8 C You can do console Master KVM Switch via either USB and or PS 2 keyboard and mouse at w...

Страница 12: ...turning on any other devices like montior or computers Hot plug and Hot Swap Combo 8 port 16 port KVM switch support Hot plug and Hot swap function Figure 10 Cascade chaining 4 5 Firmware download connector The min USB female connector on the rear of KVM switch is for firmware upgrade function To update your KVM firmware please contact with your dealer ...

Страница 13: ...a 8 Port or 16 Port Combo KVM Switch Over IP by push button hot key and OSD Push button operation Press the front panel push button to select the PC and operate it Hot Key operation Please refer section 6 Hot Key Operation OSD operation Please refer section 7 OSD Operation 6 Hot Key Operation 6 1 Call OSD Menu Press Scroll Lock twice and Enter then the OSD Main Menu will be displayed on the monito...

Страница 14: ...ou can also change leading hot key by pressing F1 in OSD main menu Please refer section 7 3 5 Setup in OSD Hot Key 6 3 Channel Select Single KVM 6 3 1 Specific channel selection You can select the connected computers by using the two step Hot Key sequence Press Scroll Lock key twice Step 1 then press key 1 to 16 and Enter step 2 to select the computer you want to control Figure 12 Specific channel...

Страница 15: ...t function is enabled Enable Disable ALT channel shift function Scroll Lock Scroll Lock ALT Enter Switch to left one channel Left ALT Left ALT Switch to right one channel Right ALT Right ALT 6 4 Channel Select Cascade Chain Layer You can select the active channel directly under cascade chain connection The following hot key sequence is used for quick channel selection Press Scroll Lock twice D the...

Страница 16: ... The buzzer sound default setting is ON Scroll Lock Scroll Lock B Enter Note You can also enable disable buzzer sound by pressing F1 in OSD main menu Please refer section 7 3 6 Setup in OSD Sound Figure 13 Buzzer setup hot key 6 6 Auto Scan Function When you enable Auto Scan function by pressing Scroll Lock twice then S and Enter The KVM Switch will shift through all the ports and display them on ...

Страница 17: ...ton on KVM front panel to select active port can stop the auto scan function too 6 6 3 Auto scan mode There are two auto scan modes please refer section 7 3 1 Setup in OSD Scan Mode to setup the auto scan mode Scan all working computers Scan all computers which are marked for auto scan 6 6 4 Auto scan time interval The auto scan time interval can be adjustable by pressing F1 in OSD main menu Pleas...

Страница 18: ... by pressing F3 in OSD main menu Please refer section 7 5 Console Lock in OSD 7 OSD Operation 7 1 OSD Main Menu Press Scroll Lock twice and Enter then you will enter to OSD On Screen Display main menu The channel number names and the status will be displayed on the monitor screen Please refer fig 8 Fig 16 OSD main menu 7 1 1 KVM layer number 1st 2nd or 3rd indicates the current cascade level 7 1 2...

Страница 19: ...hannel number The channel of the currently selected computer is displayed in the right upper corner If the active channel is in 2nd or 3rd cascade layer the display string is like XX YY ZZ For example 02 05 07 means the active channel is layer 1 channel 2 links to layer 2 channel 5 and layer 3 channel 7 is selected as active channel 7 1 5 Cascade parent channel number Indicate the parent channel o...

Страница 20: ...ghlight a computer and then ENTER to select it and leave OSD menu A banner with the channel name will be shown on left upper corner of the screen Channel Name Channel Number Fig 17 Channel Banner Single Layer 7 2 2 Channel select to cascade port A plus mark showing in the left of channel name indicates that the port is under cascade channing Pressing ENTER in this channel will enter one level down...

Страница 21: ... powered on PC channels 7 3 2 Scan Time The default scan time is 5 seconds It can be changed up to 90 seconds by stepping 5 seconds 7 3 3 Banner Time The default banner time is 5 seconds It can be changed to 10 seconds 15 seconds or always on 7 3 4 Position Menu Use four arrow keys to move the OSD main menu to the desired position Press ESC to save the changed menu position Figure 20 Menu Position...

Страница 22: ...enabled OFF Buzzer sound disabled Note You can also enable disable buzzer sound via hot key by using Scroll Lock Scroll Lock B Enter outside the OSD mode Please refer section 6 5 Buzzer sound Disable Enable 7 3 7 Language English En Deutsch De Francais Fr 3 languages are available 7 4 Auto Scan in OSD F2 7 4 1 Start to auto scan in OSD Press F2 in OSD main menu The auto scan banner will be shown t...

Страница 23: ...ode is enabled in OSD mode by pressing F5 in OSD mode please refer section 7 7 Security Setup in OSD You can logout to lock console by pressing F3 In OSD mode The Console Lock Banner will be shown on the screen Figure 23 Console Lock Banner The KVM will be locked until an authorized user login Figure 24 Unlock window Note You can also logout to lock console via hot key by using Scroll Lock Scroll ...

Страница 24: ...7 1 Security mode login Press F5 in OSD main menu to enter security setup mode the administrator login is required before entering into the security mode Figure 26 Security mode login window The default administrator account is User Name admin Password 123456 After login the security setup main window will be shown on the screen Please select the security item to setup via up arrow and down arrow ...

Страница 25: ... key The administrator password setup window will be shown on the screen Input the new password twice and press ENTER to confirm or press ESC to exit Figure 28 Administrator password setup window 7 7 4 Authorized user setup 3 authorized users are admitted to manage the KVM switch To change the user name and password please move the highlight bar to the user for editing Press left arrow or right ar...

Страница 26: ...o setup the channel access authority for all or certain user You don t have to setup the authority of administrator since the administrator has all channel access authorized right Please refer section 7 2 2 and 7 2 3 to operate OSD menu properly Figure 30 User authority setup window 7 8 Lock Port F6 7 8 1 Lock Port Only administrator can lock port Please move the highlight bar to the channel to lo...

Страница 27: ...ns on the Sun Microsystems keyboard Combo KVM Switch can emulate these function keys via PS 2 and or USB keyboard Please refer to the table shown below for Sun Microsystems keyboard special functions operation To active these emulation on the PS 2 and or USB keyboard you have to press the LEFT Window key first this key usually is located between the LEFT CTRL and LEFT ALT Then press the second key...

Страница 28: ...ng the network settings of the unit In this case you can view or change the settings via this utility IP KVM Setup Tool If this initial configuration does not meet your local requirements use the setup tool to change the configurations to your needs The setup tool PSetup can be found on the CD ROM delivered with this package You can follow the procedures described below DHCP If you have installed ...

Страница 29: ... as None setup IP address and Subnet mask b Enter Super user login and password for Authentication default super pass c Click Setup Device If super login was authenticated it ll show Successfully configured device Otherwise it ll show Permission Denied ...

Страница 30: ...ia Serial Console For using serial terminal the IP KVM has a serial line interface host side This connector is compliant with the RS 232 serial line standard The serial line has to be configured with the parameters given in Table below Parameter Value Bits second 115200 Data bits 8 Parity No Stop bits 1 Flow Control None When configuring with a serial terminal e g Hyper Terminal reset the IP KVM a...

Страница 31: ... 3 Keyboard Mouse and Video configuration Between the IP KVM and the host there are two interfaces available for transmitting keyboard and mouse data USB and PS 2 The correct operation of the remote mouse depends on several settings which will be discussed in the following subsections 9 3 1 IP KVM keyboard settings The IP KVM settings for the host s keyboard type have to be corrected in order to m...

Страница 32: ...ttings have been changed on the host system use the intelligent resynchronization This method takes more time than the fast one and can be accessed with the appropriate item in the Remote Console option menu The intelligent synchronization requires a correctly adjusted picture Use the auto adjustment function to setup the picture and make sure that there are no window at the top left corner of the...

Страница 33: ...cceleration and repeat the procedure 9 3 5 Single and Double Mouse Mode The information above applies to the Double Mouse Mode where remote and local mouse pointers are visible and need to be synchronized The IP KVM also features another mode the Single Mouse Mode where only the remote mouse pointer is visible Activate this mode in the open Remote Console and click into the window area The local m...

Страница 34: ...he encrypted HTTPS protocol Whenever possible use HTTPS Telnet A standard Telnet client can be used to access an arbitrary device connected to the IP KVM s serial port via a terminal mode The primary interface of the IP KVM is the HTTP interface This is covered extensively in this chapter Other interfaces are addressed in subtopics In order to use the Remote Console window of your managed host sys...

Страница 35: ...access administrator user define Has partial rights to change configuration of critical parts user user define Has permission to access basic function of open Remote Console The super user can add or remove a user easily via the web pages of User Management Users Please refer to Addendum C for detailed permission items for each user level Launch your web browser Direct it to the address of your IP...

Страница 36: ... IP KVM for the first time Unchanging of the password for the super user is a severe secrurity risk and might result in unauthorized access to the IP KVM and to the host system including all possible consequences Warning Your web browser hast o accept cookies or else login is not possible Navigation Having logged into the IP KVM successfully the main page of the IP KVM appears This page consists o...

Страница 37: ...t automatically A click on one of the links will bring you back to the login screen Remote Console Preview Click on Click to open to start the remote console redirection Click on Refresh to refresh the picture 10 2 2 Log out from the IP KVM This link logs out the current user and presents a new login screen Please note that an automatic logout will be performed in case there is no activity for 30 ...

Страница 38: ...nal network your NAT Network Address Translation settings have to be configured accordingly In case the IP KVM is connected to your local network environment and your connection to the Internet is available using a proxy server only without NAT being configured the Remote Console is very unlikely to be able to establish the desired connection This is because today s web proxies are not capable of ...

Страница 39: ...ou can circumvent such problems by adjusting the keyboard of your remote system to the same mapping as your local one The Remote Console window always tries to show the remote screen with its optimal size That means it will adapt its size to the size of the remote screen initially and after the screen resolution of the remote screen has been changed However you can always resize the Remote Console...

Страница 40: ... local with the remote mouse cursor This is especially necessary when using accelerated mouse settings on the host system In general there is no need to change mouse settings on the host Single Double mouse mode Switches between the Single Mouse Mode where only the remote mouse pointer is visible and the Double Mouse Mode where remote and local mouse pointers are visible and need to be synchronize...

Страница 41: ...s Mouse Handling Intelligent Sync A short description of the options as follows Monitor Only Toggles the Monitor only filter on or off If the filter is switched on no remote console interaction is possible and monitoring is possible Exclusive Access If a user has the appropriate permission he or she can force the Remote Consoles of all other users to close No one can open the Remote Console at the...

Страница 42: ... according to the remote host video setting with scaling algorithm execution When you designate Scale to fit the remote video displaying is scaled to fit the size of Remote Console window See page 41 top Figure 36 Remote Console Options Menu Scaling Mouse Handling The submenu for mouse handling offers two options for synchronizing the local and the remote mouse cursors Fast Sync The fast synchroni...

Страница 43: ...ved for the current user and activated the next time this user opens the Remote Console The number of available shapes depends on the Java Virtual Machine a version of 1 5 or above offers the full list Figure 37 Remote Console Options Menu Cursor Video Settings Opens a panel for changing the IP KVM video settings IP KVM features two different dialogs which for adjusting the video settings Video Se...

Страница 44: ...for most situations Video Settings through the remote console Figure 38 Video Settings Panel Brightness Controls the brightness of the picture Contrast Controls the contrast of the picture Clock Defines the horizontal frequency for a video line and depends on the video mode Different video card types may require different values here The default settings in conjunction with the auto adjustment pro...

Страница 45: ...ideo again from the controlled host and displayed on Remote Console In normal situation only changed parts of video will be packed and sent from IP KVM for saving network bandwidth This function is mainly used for troubleshooting purpose where some old video fragments are displayed as not updated in time for some reason for example noise filter for VGA is setting too large Soft Keyboard Figure 39 ...

Страница 46: ...our browser settings this is not always possible A typical example is a German localized system that uses an US English keyboard mapping In this case you have to change the Local Keyboard setting to the right language manually Hotkeys Opens a list of hotkeys defined before Choose one entry the command will be sent to the host system A confirmation dialog can be added that will be displayed before ...

Страница 47: ...seen as a compromise between the network bandwidth that is available on your video picture to be transferred and on the number of changes between two single video pictures We recommend to use a higher compression level if the network bandwidth is low The higher the compression level the more time is needed to pack and unpack the video data on either side of the connection The compression quality d...

Страница 48: ...Therefore a high amount of bandwidth is required to ensure the quality of the video picture Figure 42 Encoding Compression The next two options allow you to set the compression level to a predefined level OR to set a level for lossy compression This compresses well but leads to degradation in image quality level for lossy compression This compresses well but leads to degradation in image quality F...

Страница 49: ...be captured and to be transferred Figure 45 Encoding Color depth Note If displaying motion pictures on a connection with low speed you may achieve an improvement regarding the video transfer rate by lowering the color depth and disabling the option Video Optimized As a general result the data rate is reduced less bits per color Furthermore the IP KVM will not have to do any video compression In to...

Страница 50: ...es the connection to the Remote Console Norm means a standard connection without encryption SSL means a secure connection Figure 46 Status line Furthermore both the incoming In and the outgoing Out network traffic are visible in kb s If compressed encoding is enabled a value in brackets displays the compressed transfer rate Figure 47 Status line transfer rate For more information about Monitor Onl...

Страница 51: ...ote Console opens a new window displays screen movement of host system with its size automatically adjusted to optimum Keyboard and mouse are redirected to control the host system simultaneously A slight delay may present depending on the bandwidth of network 11 1 1 KVM Console Figure 48 KVM Console To open the KVM console either click on the icon Console or Remote Control KVM Console of the menu ...

Страница 52: ...s are redirected to the device on serial port and its answers are displayed on the Telnet interface In order to log in with Telnet or SSH you have to enable the access settings from Device Settings Network Telnet Console The IP KVM firmware features a Telnet server that enables a user to connect via a standard Telnet client In case the Telnet program is using a VT 100 VT 102 or VT 220 terminal or ...

Страница 53: ...the IP address by the one that is actually assigned to the IP KVM This will prompt for username and password in order to log into the device The credentials that need to be entered for authentication are identical to those of the web interface That means the user management of the Telnet interface is entirely controlled with the according functions of the web interface Once you have successfully l...

Страница 54: ...minal Starts the terminal passthrough mode for RS 232 serial port This mode provides Serial over IP functin The key sequence ESC exit switches back to the command mode vscaa Auto adjustment of the Remote Console vscreset modes allmodes all Reset the video modes like in the remote console under option Video Settings vscreset modes reset settings for the current video mode vscreset allmodes reset se...

Страница 55: ...ll encryption the transferred data so as to keep the data communication secured Basically the SSH s configuration interface is the same as Telnet console s except that SSH is data encrypted and secured Please run the SSH supported terminal emulation program such as PuTTY ...

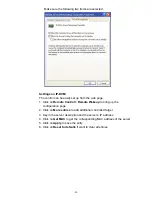
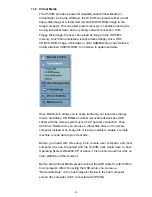
Страница 56: ...an be shut down and remotely wake up the computer when want to use it and thus save the power energy Settings on target computer In order to be waked up some settings have to be done on the target computer 1 BIOS setting Have the wake up function in BIOS Enabled Note the naming in BIOS varies depending on the BIOS type it may be Wake On LAN PME PME Event Wake Up or Power On By PCI Device ...

Страница 57: ... 57 2 Windows Settings Enter the Properties of Local Area Connection Make sure Wake on Magic packet is Enable ...

Страница 58: ... Control Remote Wakeup to bring up the configuration page 2 Click on More entries to add additional controlled target 3 Key in the server description and the server s IP address 4 Click on Get MAC to get the corresponding MAC address of the server 5 Click on Apply to save the entry 6 Click on Reset to defaults if want to clear all entries ...

Страница 59: ... you to share redirect your local drive floppy drives hard disks CD ROMs and other removable devices like USB sticks with the remote system over a TCP network connection Thus with Drive Redirection you can use a virtual disk drive on the remote computer instead of an image file It is also possible to enable a remote machine to write data to your local disc Before go ahead with this setup both remo...

Страница 60: ...ossible to enable a write support so that for the remote machine it is possible to write data to your local disc Figure 50 Options of Drive Redirection Please note that Drive Redirection works on a level which is far below the operating system That means that neither the local nor the remote operating system is aware that the drive is currently redirected actually This may lead to inconsistent dat...

Страница 61: ...on is switched off It is not possible to write on a redirected device Click Apply to submit your changes 11 2 2 Virtual Drive Figure 51 USB mass storage option Set this option to disable the mass storage emulation and hide the virtual drive if not mounting a image file or drive to the host system To set this option press the button Apply Note If unset and no file image will be found it may happen ...

Страница 62: ... On Windows 95 98 and Windows ME do not specify the IP address but the server name NetBIOS Name Share folder name The name of the share to be used Image file name The image file name on the share folder User optional If necessary specify the user name for the share named before If unspecified and a guest account is activated this guest account information will be used as your login Password option...

Страница 63: ...e has to be given from the point of view of the IP KVM It is important to specify correct IP addresses and device names Otherwise IP KVM may not be able to access the referenced image file properly leave the given file unmounted and will display an according error message instead So we recommend to state correct values and repeat this step if necessary 5 Furthermore the specified share has to be c...

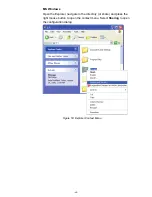
Страница 64: ...4 MS Windows Open the Explorer navigate to the directory or share and press the right mouse button to open the context menu Select Sharing to open the configuration dialog Figure 53 Explorer Context Menu ...

Страница 65: ...der input field Comment If necessary adjust the permissions Permissions button Click OK to set the options for this share UNIX and UNIX like OS UNIX Solaris Linux If you like to access the share via SAMBA SAMBA has to be set up properly You may either edit the SAMBA configuration file etc samba smb conf or use the Samba Web Administration Tool SWAT or WebMin to set the correct parameters Also look...

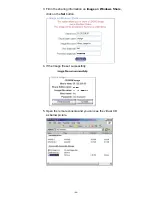
Страница 66: ... 66 3 Fill in the sharing information on Image on Windows Share click on the Set button 4 If the Image file set successfully 5 Open the remote console and you can see the virtual CD as below picture ...

Страница 67: ...fer to the section Creating a floppy image For this example we use RawWrite software or any other image creator software to create floppy image Please use licensed software for this purpose 2 You can find an image file saved at desire destination after you created it with RawWrite 3 Open the browser to log into the IP KVM Click Virtual Media Floppy Disk Click the Browse button to choose the image ...

Страница 68: ... and would not allow you to write any information on this drive but copying only This drive would be bootable under DOS mode if the motherboard BIOS on the host computer supporting USB BOOTABLE function Notes 1 If using other image creator software the output image extension file name has to be img e g floppy_vir img 2 The uploaded image file will be kept in the onboard memory of the IP KVM until ...

Страница 69: ...ppy content Click on the button Copy to initiate the image creation process UNIX and UNIX like OS To create an image file make use of dd This is one of the original UNIX utilities and is included in every UNIX like OS UNIX Sun Solaris and Linux To create a floppy image file copy the contents of a floppy to a file You can use the following command dd if dev fd0 of tmp floppy image dd reads the enti...

Страница 70: ...f the image and save the CD ROM content in that file Figure 57 Nero selection dialog UNIX and UNIX like OS To create an image file make use of dd This is one of the original UNIX utilities and is included in every UNIX like OS UNIX Sun Solaris and Linux To create a CD ROM image file copy the contents of the CD ROM to a file You can use the following command dd if dev cdrom of tmp cdrom image dd re...

Страница 71: ...irection The operation procedures to make a drive redirection are as follows 1 Run Remote Control KVM Console 2 Click on the Floppy icon You will see the Driver Redirection window as below Figure 58 Built in Java Drive Redirection ...

Страница 72: ...r local drive As you can imagine this is very dangerous If both the remote and the local system try to write data on the same device this will certainly destroy the file system on the drive Please use this only when you exactly know what you are doing Device Authentication The factory default Username is super and the default Password is pass Click Connect to redirect drive Warning Please be cauti...

Страница 73: ...If click on Connect ISO Select the ISO image file and click Open 4 Finally the established Drive Redirection connection will be displayed Open My Computer The virtual drive appears on the remote host PC window ...

Страница 74: ...se note that Virtual Drive creation is by Device manner not by Partition Which means it looks for I O in BIOS and sends the corresponding signal to host computer This way you are sending the entire hard drive may consist of X numbers of partitions and emulate whatever number of partitions on host computer You may also emulate a DVD Drive with the same procedure However this DVD Drive Does NOT supp...

Страница 75: ...nfigure the device Administrator Has partial rights to change configuration apart from critical settings User Has permission to access basic function of open Remote Console You can choose the desired level from the selection box role The IP KVM comes with 1 pre configured user account that has fixed permissions The account super has all possible rights to configure the device and to use all functi...

Страница 76: ...ose from super administrator or an regular user To create an user press the button Create The Modify button changes the displayed user settings To delete an user press the button Delete Note The IP KVM is equipped with an host independent processor and memory unit which both have a limitation in terms of the processing instructions and memory space To guarantee an acceptable response time we recom...

Страница 77: ...llowing settings are user specific That means the super user can customize these settings for every users separately Changing the settings for one user does not affect the settings for the other users Figure 60 User Console Setting ...

Страница 78: ... the best result because of optimized adjustment of compression and color depth for the indicated network speed Manually Allows to adjust both compression rate and the color depth individually Depending on the selected compression rate the data stream between the IP KVM and the Remote Console will be compressed in order to save bandwidth Since high compression rates consume more computing power of...

Страница 79: ...e is around 11 Mbytes The advantage of downloading Sun s JVM lays in providing a stable and identical Java Virtual Machine across different platforms The Remote Console software is optimized for this JVM versions and offers wider range of functionality when run in SUN s JVM Please make sure that you are installing Sun JVM 1 5 or above to your client system Miscellaneous Remote Console Settings Sta...

Страница 80: ...yntax to define a new Button Key is as follows confirm keycode keycode confirm requests confirmation by a dialog box before the key strokes will be sent to the remote host keycode is the key to be sent Multiple key codes can be concatenated with a plus or a minus sign The plus sign builds key combinations all keys will be pressed until a minus sign or the end of the combination is encountered In t...

Страница 81: ...the local mouse Mouse Speed Auto mouse speed Use this option if the mouse settings on host use an additional acceleration setting The IP KVM tries to detect the acceleration and speed of the mouse during the mouse sync process Fixed mouse speed Use a direct translation of mouse movements between the local and the remote pointer You may also set a fixed scaling which determines the pixel amount of ...

Страница 82: ...y A small filter displays all change instantly but may lead to a constant amount of network traffic even if the display content is not really changing depending on the quality of the video input signal All in all the default setting should be suitable for most situations Force Composite Sync Required for Sun Computers When connecting the device directly to legacy Sun computer with composite sync a...

Страница 83: ...er will be explained below Once applied the new network settings will immediately come into effect Warning Changing the network settings of the IP KVM might result in losing connection to it In case you change the settings remotely make sure that all the values are correct and you still have an option to access the IP KVM ...

Страница 84: ...OTP server For DHCP select dhcp and for BOOTP select bootp accordingly If you choose none then IP auto configuration is disabled Preferred host name Preferred host name to request from DHCP server Whether the DHCP server takes the IP KVM suggestion into account or not depends on the server configuration IP address IP address in the usual dot notation ...

Страница 85: ...acted Remote Console And HTTPS port Port number at which the IP KVM s Remote Console server and HTTPS server are listening If left empty the default value will be used HTTP port Port number at which the IP KVM s HTTP server is listening If left empty the default value will be used Telnet port Port number at which the IP KVM s Telnet server is listening If left empty the default value will be used ...

Страница 86: ...ork related settings to IP KVM LAN Interface Settings The Autodetect will set the Ethernet speed to the fastest possible value supported by both endpoints of the link For example if you use a 10M half duplex HUB this speed will be auto selected If this option does not work with some network device HUB switches and routers you can set the Ethernet interface speed of IP KVM manually to the values as...

Страница 87: ...e Dynamic DNS Server and assign a certain hostname to it He will get a nickname and a password in return to the registration process This account information together with the hostname is needed in order to determine the IP address of the registered IP KVM You have to perform the following steps in order to enable Dynamic DNS Make sure that the LAN interface of the IP KVM is properly configured En...

Страница 88: ...lowed in the Nickname Password You have used this password during your manual registration with the Dynamic DNS Server Check time The IP KVM registers itself for initiating the IP address of IP KVM stored in the Dynamic DNS server at this time Check interval This is the interval for reporting again to the Dynamic DNS server for updating the IP address associated with the Domain Name of the IP KVM ...

Страница 89: ...et tries to make an encrypted connection with certificate An error will be reported in case connection establishment fails Group based System Access Control This is the IP filtering function it keeps unauthorized hosts from accessing to the IP KVM by specifying IP filtering rules It is important to fully understand what an IP filter is If you don t fully understand this you will get unexpected res...

Страница 90: ... 90 Figure 67 Chain Rules of IP Filtering Check the Enable Group based System Access Control to edit the rules ...

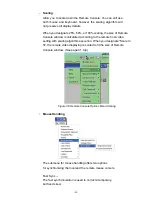
Страница 91: ... 91 Users can add a new IP filtering rule by setting the properties at adding line by Append or Insert User can remove a rule by Remove or Delete Figure 68 IP Filter Settings ...

Страница 92: ...testing purpose only System administrator should not rely on this default certificate as the secured global access mechanism through Internet However it is possible to generate and install a new base64 X 509 certificate that is unique for a particular IP KVM In order to do that the IP KVM is able to generate a new cryptographic key and the associated Certificate Signing Request CSR that needs to b...

Страница 93: ...e which will initiate the Certificate Signing Request generation The CSR can be downloaded to your administration machine with the Download CSR button Send the saved CSR string to a CA for certification You will get the new certificate from the CA after a more or less complicated traditional authentication process depending on the CA Upload the certificate to the IP KVM using the Upload button as ...

Страница 94: ...ch the IP KVM belongs Locality City The city where the organization is located State Province The state or province where the organization is located Country ISO code The country where the organization is located This is the two letter ISO code e g DE for Germany or US for the USA Note the country code has to be entered in CAPITAL LETTERS Challenge Password Some certification authorities require a...

Страница 95: ...ial Port The IP KVM Serial Settings allows you to specify what device is connected to the serial port and how to use it Configuration or console login Do not use the serial port for any special function use it only for the initial configuration Modem The IP KVM offers remote access using a telephone line in addition to the standard access over the built in Ethernet adapter The modem needs to be co...

Страница 96: ...ems try to lower this speed Modem Init String The initialization string used by the IP KVM to initialize the modem The default value will work with all modern standard modems directly connected to a telephone line In case you have a special modem or the modem is connected to a local telephone switch that requires a special dial sequence in order to establish a connection to the public telephone ne...

Страница 97: ... set up You have the possibility to adjust the clock manually or to use a NTP timeserver Without a timeserver your time setting will not be persistent so you have to adjust it again after IP KVM loses power for more than a few minutes To avoid this you can use a NTP timeserver which sets up the internal clock automatically to the current UTC time Because NTP server time is always UTC there is a se...

Страница 98: ...ly The common way to log events is to use the internal log list of the IP KVM To show the log list click on Event Log on the Maintenance page In the Event Log Settings you can choose how many log entries are shown on each page Furthermore you can clear the log file here List logging enabled The common way to log events is to use the internal log list of the IP KVM To show the log list click on Eve...

Страница 99: ...ely That means the NFS share and the NFS server must be filled with valid sources or you will get an error message SMTP Logging enabled With this option the IP KVM is able to send Emails to an address given by the Email address text field in the Event Log Settings These mails contain the same description strings as the internal log file and the mail subject is filled with the event group of the oc...

Страница 100: ... user device Internal log file cleared by user device Security Violation security Host Power host Host Reset host Connection to Remote Console failed reason console several Connection to client established console Connection to client closed console Login failed auth Login succeed auth Warning In contrast to the internal log file on the IP KVM the size of the NFS log file is not limited Every log ...

Страница 101: ...e certain privileges It is usually far easier and simpler to refer to already existing groups rather than having to re enter everything into the IP KVM Note Whatever you configure you can always login over the network as the superuser super The superuser is always authenticated and authorized locally so you always have a back door to the IP KVM LDAP Access The IP KVM uses LDAP only for authenticat...

Страница 102: ...DAP server type Name of user entry object class This is the object class that identifies a user in the LDAP directory To use the default leave this field empty The default depends on the selected LDAP server type User search subfilter Here you can refine the search for users that should be known to the IP KVM Active Directory Domain This option represents the active directory domain that is config...

Страница 103: ... a RADIUS client A shared secret is used to verify that RADIUS messages are sent by a RADIUS enabled device that is configured with the same shared secret and to verify that the RADIUS message has not been modified in transit message integrity For the shared secret you can use any standard alphanumeric and special characters A shared secret may consist of up to 128 characters in length and may con...

Страница 104: ...1 11 5 10 Config File With this function the configuration settings can be saved Backup in a file config gz or reloaded Restore from a previously saved configuration file 11 6 Maintenance The administrator performs various maintenance activities on the IP KVM These include viewing its status update firmware view the event log and reset the unit ...

Страница 105: ...ith a support request It will help us to locate and solve your reported problem Figure 76 Connected Users Figure above displays the IP KVM activity From left to right the connected user s its IP address from which host the user comes from and its activity status is displayed RC means that t he Remote Console is open If the Remote Console is opened in exclusive mode the term exclusive mode is added...

Страница 106: ...w displays the log list including the events that are logged by the IP KVM Figure 77 Event Log List 11 6 3 Update Firmware Firmware can be easily upgraded via web page This section describes the upgrade procedures Figure 78 Update Firmware ...

Страница 107: ...the browser will redirect user to the login homepage Users shall refer to Maintenance Device Information page to check the firmware version and confirm the operation Warning IP KVM will verify firmware checksum before proceed upgrade procedure The mechanism help to prevent false firmware file to damage IP KVM It is crucial to keep a steady power supply during the procedure otherwise the power off ...

Страница 108: ...firmware and the version number of the uploaded firmware Pressing Update will store the new version and substitute the old one completely 3 After the firmware updated successfully the device will be rebooted and redirected to the login web page automatically Check out the device information to see the updated firmware is running ...

Страница 109: ...ngine will take few seconds only and does not result in closing connections Note Only the super user is allowed to reset the IP KVM 11 6 5 Reset Factory Defaults This function may be used when you forgot the password to log in the IP KVM Note The unit will reboot after this command All current settings will be lost The following procedures will revert to factory default settings 1 Connect a RS232 ...

Страница 110: ...indow will display as below 3 Key in defaults command and then Enter The unit will automatically set to factory default settings and reboot the system 4 The following window displays if reverting to factory default is complete ...

Страница 111: ...ari Firefox Avant World Opera and others 4 What Java version shall we install We need to install Java Runtime Environment version 1 5 or above on the remote console PC 5 Does the IP KVM work with other brand s KVM switch Yes the IP KVM can work with most of standard KVM 6 How many letters the username and password can be set on IP KVM The IP KVM accepts 32 letters of username and password 7 How ma...

Страница 112: ...proper slave connection procedure Fail connection Remove any possible power supplies to the Slave unplug all cables before connecting it to the Master Make sure cable is connected well Slave console link to Master port OSD menu is not at the proper position OSD menu has fixed resolution and its size varies due to the changes of computer VGA resolution Use F1 Set Position to move OSD menu and banne...

Страница 113: ...Runtime Environment v1 5 or above When trying to open the Remote Console the icon will appear on the upper right corner if no Java Runtime Environment Notes 1 In order to run this function the system need support JRE Java Runtime Environment version 5 0 v1 5 or above You can get the Java Software from the website http www java com en download 2 It s recommended to install newer Java version e g ve...

Страница 114: ...not in sync please check whether the Enhance pointer precision is disable in the mouse settings of host target computer OS see the next item 9 In Double mouse mode the local and remote mouse pointers are not in sync even after clicking the Sync button If your IP KVM connects to PS 2 host computer and select Double mouse mode please disable the Enhance pointer precision and Automatically move mouse...

Страница 115: ...omputer startup it will try to obtain the information of the connected monitor resolution from its VGA port So before computer startup the monitor and KVM switch should be already ON and running Please follow the power up procedures power on monitor power on IP KVM wait for IP KVM startup complete about 60 seconds and then power on the Host Target computer 13 The video quality is bad or the pictur...

Страница 116: ... a Windows XP problem Try not to move the mouse while XP goes in standby mode 19 Can t upload the signed certificate in MacOS X If an internal error occurs while uploading the signed certificate either change the extension of the file to txt or add a file helper using the Internet Explorer preferences for this type of file Make sure that the encoding is plain text and the checkbox use for outgoing...

Страница 117: ... programs are on an identical position no matter what language mapping you are using Some of the keys have aliases also means they can be named by 2 key codes separated by comma in the table Key and aliases 0 9 A Z TILDE MINUS EQUALS LESS SLASH BACK SPACE TAB ENTER CAPS LOCK BACK SLASH LSHIFT SHIFT RCTRL RSHIFT LCTRL CTRL LALT ALT SPACE ALTGR ESCAPE ESC F1 F2 F3 F4 F5 F6 F7 F8 F9 F10 F11 F12 PRINT...

Страница 118: ...1200 60 2048 x 1536 local console 85 C User Role Permissions Table below lists the user role permissions granted for three user role groups Superuser Administrator and User Function User Administrator Super Remote Control KVM x x x Remote Power Wakeup x x Remote Control Telnet Console x x x Virtual Media x x x User Management Change Password x x x User Management Users x KVM Settings User Console ...

Страница 119: ...omment Video Optimized Video Optimized 8 bit 3 0 3 3 MB s uncompressed synchronized video data most bandwidth needed Video Optimized high color Video Optimized 16 bit 4 3 5 0 MB s uncompressed synchronized video data most bandwidth needed LAN high color 0 no compression 16 bit 1 0 1 3 MB s uncompressed video data LAN 0 no compression 8 bit 500 700 kb s uncompressed video data DSL 2 8 bit 110 140 k...

Страница 120: ...es or by programs executed by privileged users Table below shows some of the well known port numbers For more details please visit the IANA website http www iana org assignments port numbers Port Number Protocol TCP UDP 21 FTP File Transfer Protocol TCP 22 SSH Secure Shell TCP 23 Telnet TCP 25 SMTP Simple Mail Transfer Protocol TCP 37 Time TCP UCP 39 RLP Resource Location Protocol UDP 49 TACACS TA...

Страница 121: ...T Network Address Translation An Internet standard that enables a LAN to use one set of IP addresses for internal traffic and a second set of addresses for external traffic This enables a company to shield internal addresses from the public Internet NFS Network File System A protocol that allows file sharing across a network Users can view store and update files on a remote computer You can use NF...

Страница 122: ...l TCP IP protocol for sending email between servers SSL Secure Sockets Layer A protocol that provides authentication and encryption services between a web server and a web browser SSH Secure Shell A secure transport protocol based on public key cryptography Telnet A terminal protocol that provides an easy to use method of creating terminal connections to a network host 15 Firmware Upgrade Procedur...

Страница 123: ...all the keyboard and mouse plugged on KVM 3 Disconnect the VGA cable between KVM and monitor 4 Apply 5V adapter to the KVM Figure 80 5 Execute the firmware update utility Prog182S EXE Figure 81 6 Use the mini USB cable to connect KVM firmware update port and the USB port of computer which runs the firmware update utility ...

Страница 124: ... the KVM programmer automatically Figure 83 8 Select target by enabling the check box for example USB Console and click the file browsing button to select the firmware file to update Figure 84 9 Select the firmware file to update Figure 85 ...

Страница 125: ...25 10 Click the Program button to start firmware programming Figure 86 11 A status bar is shown under the panel to indicate the update progress Figure 87 12 The firmware is updated successfully Figure 88 ...

Страница 126: ...nerates and uses radio frequency and may cause interference to radio and television reception if not installed and used properly This has been tested and found to comply with the limits of a Class B computing device in accordance with the specifications in Part 15 of the FCC Rules These specifications are designed to provide reasonable protection against such interference in a residential installa...

Отзывы: