background image

Chapter 11:  DigiBase

203

Relinking Catalog Items

If files are ever missing from a Catalog, use the 
Relink window to locate, copy, and relink files. 
For more information, see “Linking and Relink-
ing Files” on page 187. 

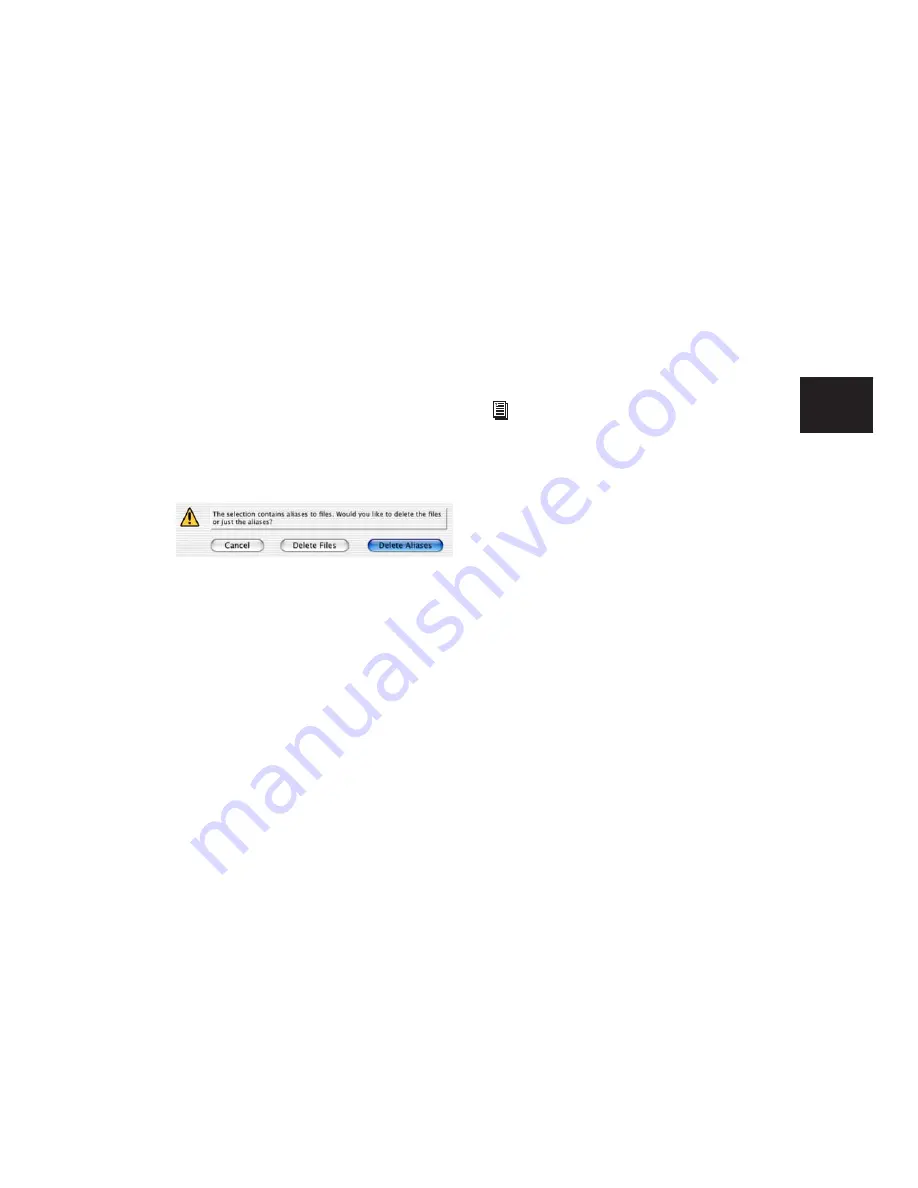
Deleting Catalogs

To delete a Catalog:

1  

Select one or more Catalogs in the Workspace 

browser. 

2  

Press the Delete key, or choose Delete Selected 

from the Browser menu. A warning dialog ap-
pears.

3  

In the warning dialog, do one of the follow-

ing:

• Click Cancel to cancel the delete operation.

• Click Delete Files to delete aliases and asso-

ciated files from disk.

• Click Delete Aliases to delete only the 

aliases and not the associated files.

This operation cannot be undone. 

Importing Catalog Items

You can import online and offline items from 
Catalogs into the current session. 

Importing Online Items from a Catalog

Dragging and dropping audio files to the 
Pro Tools Region List and Timeline is identical 
to dragging and dropping from Volume brows-
ers. 

Importing Offline Items from a Catalog

With Catalogs, it is possible to search and im-
port files that are offline. For example, if you 
have a music cue that you know you want to 
use, but it resides on a CD-ROM or other un-
mounted volume, you can spot the file from a 
Catalog to the session timeline, and it is auto-
matically imported into the session when the 
volume is mounted. 

The first step is to add files to a Catalog (files 
must be online to be added to a Catalog). Once 
added to a Catalog, if the items are taken offline 
they are listed in italicized text. 

Offline files can be dropped from a Catalog to 
the timeline just like online files. When you 
drop the files, a dialog appears asking if you 
want to relink the files or skip relinking. Click 
Skip All to load all the items as offline files (in 
the timeline, their regions appear in light blue). 
In the Project browser, these items are listed in 
the Render Sources folder, to ensure that 
Pro Tools remembers that these items need to be 
relinked. 

Delete Catalog warning dialog

For more information, see “Importing Items 
with Drag and Drop” on page 225. 

Содержание Pro Tools

Страница 1: ...Pro Tools Reference Guide Version 7 3 ...

Страница 2: ...O AudioSuite Avid AVoption Digi 002 Digi 002 Rack DigiDelivery Digidesign DigiTranslator DINR DV Toolkit M Audio Mbox Mbox 2 Mbox 2 Pro Mbox 2 Mini Pro Tools M Powered Pro Tools Pro Tools HD Pro Tools LE RTAS Smack SoundReplacer and TL Space Native are trademarks or registered trademarks of Digidesign and or Avid Technology Inc All other trademarks are the property of their respective owners Produ...

Страница 3: ...gn Audio Engine 5 Pro Tools Sessions 6 System Resources 10 MIDI 12 DigiBase 14 Chapter 3 Keyboard and Right Click Mouse Shortcuts 15 Right Click Mouse Shortcuts 15 Global Key Commands 15 Keyboard Focus 16 Numeric Keypad Modes 17 Part II System Configuration Chapter 4 Pro Tools Systems 21 Pro Tools HD Systems 21 Pro Tools LE Systems 25 Pro Tools M Powered 27 Pro Tools Academic 27 DV Toolkit 2 and M...

Страница 4: ...62 Chapter 7 Preferences 63 Display Preferences 63 Operation Preferences 66 Editing Preferences 71 Mixing Preferences 73 Processing Preferences 76 MIDI Preferences 77 Synchronization Preferences 78 Part III Sessions Tracks Chapter 8 Sessions 83 Creating a New Session 83 Session Files and Folders 84 Opening a Session 85 Opening Recent Sessions 87 Saving a Session 87 Creating Custom Session Template...

Страница 5: ...ping Tracks 149 Group Controls 150 Working with Groups 154 Setting Group Attributes 159 Enabling Groups 161 Grouped Control Offsets 162 Chapter 11 DigiBase 163 DigiBase Elements 163 Performance and Transfer Volumes 167 Digidesign Databases 167 Browser Windows and Tools 168 Indexing DigiBase Databases 172 The Browser Menu 174 Browser Panes and Display 175 Column Data 177 Waveforms and Auditioning 1...

Страница 6: ...241 Audio File Management 241 WAV File Compatibility 244 Sharing Sessions Created on Different Computer Platforms 244 Sharing Sessions Created on Different Pro Tools Systems 248 Sharing Sessions Created on Different Pro Tools Software Versions 250 Multilingual Application Support for Pro Tools Systems 254 Part IV Recording Chapter 14 Record Setup 257 Input Connections and Audio Levels 257 Record E...

Страница 7: ...er 16 MIDI Recording 297 Recording from MIDI Devices 297 Enabling Input Devices 298 MIDI Thru 299 MIDI Input Filter 299 Input Quantize 300 Wait for Note 300 MIDI Merge Replace 301 Configuring MIDI or Instrument Tracks for Recording 301 Recording MIDI and Instrument Tracks 303 Punch Recording MIDI 305 Loop Recording MIDI 307 MIDI Step Input 310 Recording System Exclusive Data 310 Recording Audio fr...

Страница 8: ...Tools 367 Using the Trim Tools 374 Using the Selector Tool 380 Using the Grabber Tools 380 Using the Smart Tool 381 Using the Scrubber Tool 383 Using the Pencil Tool 386 The Universe Window 386 Chapter 19 Playing and Selecting Track Material 389 Playing Tracks 389 Auto Scrolling Tracks in the Mix and Edit Windows 394 Scrolling Options 395 Linking or Unlinking Timeline and Edit Selections 396 Linki...

Страница 9: ... Plug ins 451 Waveform Repair with the Pencil Tool 451 Region Groups 452 Region Looping 461 Chapter 21 Fades and Crossfades 465 Using Fades 465 Fades Dialog 467 Creating Fades at the Beginnings and Ends of Regions 472 Creating a Crossfade 474 Using AutoFades 475 Creating Fades and Crossfades in Batches 476 Moving and Nudging Fades and Crossfades 477 Separating Regions That Include Fades or Crossfa...

Страница 10: ...Memory Locations and Markers 524 Memory Locations Window 531 Chapter 24 Beat Detective 535 Beat Detective Requirements 536 The Beat Detective Window 537 Beat Detective Modes 537 Defining a Beat Detective Selection 538 Calculating Tempo with Beat Detective 539 Generating Beat Triggers 540 Generating Bar Beat Markers with Beat Detective 545 DigiGroove Templates 546 Separating Regions with Beat Detec...

Страница 11: ...tem Exclusive Events 578 Note and Controller Chasing 578 Offsetting MIDI Tracks 580 Stuck Notes 581 Remove Duplicate Notes 581 Chapter 26 MIDI Operations 583 MIDI Operations Window 583 Grid Groove Quantize 584 Restore Performance 594 Flatten Performance 595 Change Velocity 596 Change Duration 598 Transpose 600 Select Split Notes 601 Input Quantize 604 Step Input 604 MIDI Real Time Properties 607 C...

Страница 12: ...rdware Inserts 672 The Plug in Window 672 Using the Librarian 675 Editing Plug in Controls 681 Instrument Plug ins 684 Using Hardware Inserts 684 Connecting and Integrating External Devices 685 Chapter 30 Automation 689 Automation QuickStart 689 Automation Playlists 690 Automation Modes 692 Automation Preferences 696 Viewing Automation 698 Writing Automation 700 Enabling and Suspending Automation ...

Страница 13: ...annel Sessions 760 Default I O Selectors in I O Setup 763 5 1 Track Layouts Routing and Metering 764 Chapter 33 Multichannel Tracks and Signal Routing Pro Tools HD Only 765 Multichannel QuickStart 765 Multichannel Audio Tracks 766 Multichannel Signal Routing 769 Paths in Surround Mixes 772 Example Paths and Signal Routing for a Surround Mix 774 Chapter 34 Surround Panning and Mixing Pro Tools HD O...

Страница 14: ...eshooting Synchronization 817 Chapter 36 Working with Video in Pro Tools 819 Introduction 819 About QuickTime 820 Before Starting Your Project 820 Video Tracks 821 Video Track Controls and Indicators 822 Locking Video Tracks 824 Setting the Video Engine Rate 825 Importing Video into Pro Tools 826 Extracting Audio from QuickTime Compatible Video 829 Video Regions 830 General Video Editing 831 Renam...

Страница 15: ...1 Part I Introduction ...

Страница 16: ...2 ...

Страница 17: ...hat list key board and Right click shortcuts including those shown in Pro Tools menus DigiRack Plug ins Guide Electronic PDF guide with instructions for using the DigiRack plug ins included with Pro Tools for both real time and file based audio processing in Pro Tools Digidesign Plug ins Guide Electronic PDF guide with instructions for using optional Digidesign plug ins for both real time and file...

Страница 18: ... require ments search the online Answerbase or join the worldwide Pro Tools community on the Digi design User Conference Training and Education Study on your own using courses available online or find out how you can learn in a classroom setting at a certified Pro Tools training center Products and Developers Learn about Digidesign products download demo software or learn about our Development Par...

Страница 19: ... not altered Pro Tools is a nonlinear recording system that lets you rearrange and mix recorded material nondestructively The Digidesign Audio Engine DAE or Digidesign Audio Engine is Digi design s real time operating system for digital audio recording playback and processing When you install Pro Tools DAE is automati cally installed on your system In the same way that a computer s operating syste...

Страница 20: ...in this section Session File A session file is the document that Pro Tools cre ates when you choose File New Session and configure a new session Pro Tools can open only one session file at a time The session file is named with a ptf Pro Tools file extension Ses sion files contain maps of all elements associ ated with a project including audio files MIDI data and all your edit and mix information I...

Страница 21: ...er tracks provide controls for physical audio output channels including the volume level of your mix panning and plug in inserts VCA Master tracks Pro Tools HD only provide control of tracks in a Mix Group that has been assigned to the VCA Master Video tracks support both QuickTime movies and Avid video but an individual video track can play back only one of these types of video at a time Audio Au...

Страница 22: ...le region or many separate regions It can be made up of similar elements such as regions from several different takes of a solo or dissimilar elements such as several sound effects You can create any number of alternate edit playlists for a track This lets you assemble dif ferent versions of performances or edits on a sin gle track and choose between them from a pop up menu on the track Each track...

Страница 23: ...window A common signal routing task is to submix mul tiple tracks to a single channel strip such as an Auxiliary Input for shared processing and level control The following example shows three au dio tracks submixed to a stereo Auxiliary Input Channel strip in the Mix window audio track The term MIDI channel also describes a separate aspect of MIDI operation See MIDI on page 12 Submixing to an Aux...

Страница 24: ... Tools lets you name these paths and these path names appear in the Audio Input and Output Path selectors and other menus See Chapter 6 I O Setup for more information Mixing Formats Sessions can include combina tions of mono stereo and greater than stereo multichannel format tracks busses inputs out puts and inserts Greater than stereo multi channel formats are supported on Pro Tools HD systems on...

Страница 25: ...rocessing Plug in assignments can be made in active manually or automatically see Auto matic and Manual Inactive Mode on page 12 Paths and Path Assignments When a path or path assignment is inactive its mixer resources are made available for other signal routing pur poses in the session Paths and assignments can be made inactive manually or automatically see Automatic and Manual Inactive Mode on p...

Страница 26: ...basic instructions for manu ally making items inactive Throughout the Pro Tools Reference Guide instructions are pro vided whenever an item can be made inactive To toggle an item active or inactive Control Start click Windows or Command Control click Mac the item You can apply Active or Inactive modes to all or all selected tracks using standard Pro Tools mod ifiers Alt and Alt Shift in Windows Op...

Страница 27: ...I device capable of playing back MIDI trig gered sound Sound sources receive MIDI from their MIDI IN ports and output audio from their audio outputs Multitimbral The ability of one MIDI device to play several different instrument sounds such as piano bass and drums simultaneously on separate MIDI channels This makes it possible for a single multi timbral MIDI instrument to play back entire arrange...

Страница 28: ...puts of your Pro Tools audio interface Just as each Pro Tools system has unique hard ware features each MIDI device has its own fea tures and limitations as to the number of voices and instruments it can play at one time Consult the device s documentation for infor mation on its capabilities Virtual MIDI Nodes When using MIDI with instrument plug ins in Pro Tools virtual MIDI nodes are created The...

Страница 29: ...des keyboard shortcuts for the following track functions Changing Automation mode Enabling playlists Adding plug ins Record enabling soloing and muting tracks Record safing and solo safing tracks Assigning inputs outputs and sends Toggling volume peak delay display Clearing meters Changing track heights A PDF listing of all shortcuts is available in Pro Tools Choose Help Keyboard Short cuts For a ...

Страница 30: ...yboard Focus When selected this provides a wide range of single key shortcuts from the QWERTY keyboard for editing and playing With Commands Keyboard Focus disabled you can still access any of its key shortcuts by press ing the Start key Windows or Control Mac along with the key Region List Keyboard Focus When selected au dio regions MIDI regions and Region Groups can be located and selected in th...

Страница 31: ... speeds 5 is normal speed 6 9 provide increasingly faster fast forward speeds 1 4 provide progressively faster rewind speeds 4 is the slowest rewind Shuttle Lock speed 1 is the fastest Press 0 to stop Shuttle Lock then press the number to resume Shuttle Lock speed Press Escape or Spacebar to exit Shuttle Lock mode Custom Shuttle Lock Speed Pro Tools HD and Pro Tools LE with DV Toolkit 2 Only The h...

Страница 32: ...With the Numeric Keypad mode set to Shuttle playback of the current Edit selection is trig gered by pressing and holding the keys on the numeric keypad playback stops once the keys are released Various playback speeds are avail able in both forward and reverse In this mode pre and post roll are ignored With the Numeric Keypad mode set to Shuttle you can also Recall Memory Locations by typing Perio...

Страница 33: ...19 Part II System Configuration ...

Страница 34: ...20 ...

Страница 35: ... Pro Tools LE or M Powered systems that have been upgraded with the Music Production Toolkit software option Pro Tools HD Systems Pro Tools HD systems are available in the con figurations shown on page 22 Each system re quires at least one Digidesign audio interface sold separately Pro Tools HD systems can be expanded by adding Pro Tools HD system cards to increase track count add to the amount of...

Страница 36: ...D Process or HD Accel cards For more information see the Expanded Systems Guide Supported Audio Interfaces Pro Tools HD Systems Only The following audio interfaces are compatible with Pro Tools HD systems 192 I O 192 Digital I O 96 I O 96i I O The following Legacy Digidesign audio inter faces are supported with Pro Tools HD systems 888 24 I O and 882 20 I O 1622 I O 24 bit ADAT Bridge I O HD Accel...

Страница 37: ...acks beyond that system s voiceable track limit will be automatically set to Voice Off Pro Tools HD systems provide up to 160 Auxiliary Input tracks and a total of 128 internal mix busses These systems also provide up to 5 inserts and 10 sends per track depending on the DSP capacity of your system Pro Tools HD systems also support up to 128 Instrument tracks 256 MIDI tracks 128 VCA tracks and mult...

Страница 38: ...able 6 Pro Tools HD system audio interface channel capabilities Interface Type Number of I O Channels Sample Rates kHz A D Conversion D A Conversion Digital I O 192 I O 16 in 16 out 44 1 48 88 2 96 176 4 192 24 bit 24 bit 24 bit 192 Digital I O 16 in 16 out 44 1 48 88 2 96 176 4 192 None None 24 bit 96 I O 16 in 16 out 44 1 48 88 2 96 24 bit 24 bit 24 bit 96i I O 16 in 2 out 44 1 48 88 2 96 24 bit...

Страница 39: ...s Pro Tools LE software Mbox 2 Pro audio and MIDI interface Mbox 2 An Mbox 2 system includes Pro Tools LE software Mbox 2 audio and MIDI interface Mbox 2 Mini An Mbox 2 system includes Pro Tools LE software Mbox 2 Mini audio interface Mbox An Mbox system includes Pro Tools LE software Mbox audio interface Processing Capacity The total processing capacity of a Pro Tools LE system depends on the pro...

Страница 40: ...tal of 32 internal mix busses and up to 5 inserts and 10 sends per track depending on your computer s processing capacity In addi tion Pro Tools LE systems support up to 32 Instrument tracks and 256 MIDI tracks Pro Tools LE also supports a single QuickTime video track For details on transferring session material between Pro Tools HD and Pro Tools LE systems see Sharing Sessions Created on Differen...

Страница 41: ...no tracks These higher track counts may require additional drives and faster Digidesign qualified computers Support for Up to 24 QuickPunch Tracks With DV Toolkit 2 or Music Production Toolkit up to 24 mono or stereo audio tracks can be si multaneously recorded with QuickPunch References to Pro Tools LE in this guide are usually interchangeable with Pro Tools M Powered except as noted in the Pro T...

Страница 42: ...nd Selection of alternate field recorder audio channels in the Pro Tools timeline Expanding alternate field recorder audio channels to new tracks Mixing and Automation features Snapshot automation for writing or trim ming automation data Glide Automation commands Time code and synchronization features Timebase rulers Time Code and Feet Frames Time Code Rate selector Feet Frame Rate selector Curren...

Страница 43: ...y Beat Detective across mul tiple tracks Collection Mode Additional Software Music Production Toolkit includes the follow ing additional software for working with Pro Tools LE and M Powered DINR Digidesign Intelligent Noise Reduction LE Plug in For reducing noise in audio Hybrid RTAS Synthesizer Plug in For use as a vir tual instrument in your Pro Tools sessions Smack LE Compressor Plug in For app...

Страница 44: ...Pro Tools Reference Guide 30 ...

Страница 45: ...rdware to initialize For Pro Tools LE M Powered and Aca demic systems that use hardware requiring external power such as the Digi 002 turn on the hardware 6 Turn on your computer 7 Launch Pro Tools or any third party audio or MIDI applications Shut down your Pro Tools system in this order 1 Quit Pro Tools and any other running applica tions 2 Turn off or lower the volume of all output de vices in ...

Страница 46: ...his setting lets you enable multi pro cessor support for RTAS plug ins Used in com bination with the CPU Usage Limit setting the RTAS Processors setting lets you control the way RTAS processing and other Pro Tools tasks are handled by the system For example For sessions with large numbers of RTAS plug ins you can allocate 2 or more processors to RTAS processing and set a high CPU Usage Limit For s...

Страница 47: ...PU Usage Limit controls the percentage of CPU resources allocated to Pro Tools host pro cessing tasks Used in combination with the RTAS Processors setting the CPU Usage Limit setting lets you control the way Pro Tools tasks are carried out by the system Lower CPU Usage Limit settings limit the ef fect of Pro Tools processing on other CPU inten sive tasks such as screen redraws and are useful when ...

Страница 48: ...sion if you are experiencing frequent RTAS errors that are interrupting your creative workflow When RTAS error suppression is enabled you can experience a degradation of audio quality However this may be acceptable in order to avoid interrupting playback and recording when working with instrument plug ins Be sure to disable RTAS error suppression when you need to ensure the highest possible audio ...

Страница 49: ...g for RTAS error suppression as follows Windows XP Mbox 2 Pro Digidesign qualified M Audio interfaces with Pro Tools M Powered or Academic Mac OS X Mbox Mbox 2 Mbox 2 Mini Mbox 2 Pro Digi 002 and 002 Rack All Pro Tools M Powered systems All Pro Tools Academic systems Number of Voices Pro Tools HD Only On Pro Tools HD systems the Number of Voices setting lets you control the number of available voi...

Страница 50: ...ple Rate 1 Choose Setup Playback Engine 2 Select the sample rate from the Sample Rate pop up menu 3 Click OK Delay Compensation Engine Pro Tools HD Only The Delay Compensation Engine lets you man age DSP delays in the Pro Tools mixer There are three settings in the Playback Engine dialog for dedicating DSP resources for Delay Compensation None Allocates no DSP resources for Delay Com pensation Sho...

Страница 51: ...ives DAE Playback Buffer Size settings higher than Level 2 will allow for a higher density of edits in a session or a higher track count when using slower hard drives However a higher setting can also cause a time lag to occur when starting playback or recording and result in a longer au dible time lag while editing during playback To change the DAE Playback Buffer Size 1 Choose Setup Playback Eng...

Страница 52: ... configure the signal routing digital I O format default sample rate clock source and other hardware based settings depending on your system configuration The following section outlines the configura tion of a Pro Tools HD system with one or more Pro Tools HD interfaces with one or more Leg acy interfaces attached Configuring Pro Tools HD Hardware On Pro Tools HD systems you configure Hard ware se...

Страница 53: ...ock output to send to de vices attached to your audio interface 6 Select which digital I O port on your audio in terface enclosure is active under Digital Format Choices include AES EBU S PDIF and Optical S PDIF Selecting Optical S PDIF resets the Optical I O port which is by default eight channels of ADAT I O to two channels of S PDIF Optical I O 7 For S PDIF compatibility with Tascam DA 30 DAT r...

Страница 54: ...Legacy Peripherals on a Pro Tools HD System Before you can configure a Legacy I O it must first be initialized in Hardware Setup To initialize a Legacy I O on a Pro Tools HD system 1 Start up your Pro Tools system See Starting Up or Shutting Down Your System on page 31 2 Make sure to lower the volume of your output devices Very loud digital noise may be emitted before the Legacy I O is initialized...

Страница 55: ...that sig nal will be routed simultaneously to both pairs of output ports on your audio interface This lets you send the same signal such as a ste reo pair a stem mix or a multichannel mix to multiple destinations such as multiple master ing devices To select multiple output ports for a Pro Tools output channel pair 1 Choose Setup Hardware 2 From the Peripherals list select an interface 3 Click the...

Страница 56: ...f resources during a Pro Tools session Choose Window System Usage To reduce processing load try one of the following Reduce the density of automation in places where it shows the most activity For details see Thinning Automation on page 711 Turn off meters in Sends View if enabled by disabling Show Meters in Sends View in the Dis play Preferences page For details see Individ ual Send Views and Met...

Страница 57: ... Setup configuration determined by Whether it is a Pro Tools HD Pro Tools LE Pro Tools M Powered or Pro Tools Aca demic system On Pro Tools HD systems the number and types of audio interfaces On Pro Tools HD systems the installed Mixer plug in Stereo or Surround Each Pro Tools session retains its path configu rations as I O Settings The I O Settings saved with the session are loaded automatically ...

Страница 58: ...e inputs and outputs internal busses and other Pro Tools signal paths Paths comprise the lists of available signal rout ing choices in track Input Output Insert and Send selectors Paths and I O Setup The signal routing choices available in a session are defined in the I O Setup dialog Input Path selector and paths Output Path selector and paths I O Setup dialog Output paths Pro Tools HD ...

Страница 59: ...surround mix ing See Configuring Pro Tools for Multichan nel Sessions on page 760 Default Path Names Default names for input output and insert paths are based on the type of system such as specific Pro Tools LE systems or type and num ber of interfaces Pro Tools HD systems you are using Stems and Stem Mixes The use of stems and stem mixes originated in the post production industry as a method to o...

Страница 60: ... Click the corresponding tab at the top of the I O Setup dialog Closing the I O Setup Dialog You can click Cancel at any time to close the I O Setup dialog without saving any changes When you click OK Pro Tools checks several set tings for routing validity to prevent feedback loops If there are any overlapping or invalid settings you will be required to correct them be fore the I O Setup dialog wi...

Страница 61: ...hows or hides the sub paths associated with a main path Active Inactive Status Shows and changes the active inactive status of each path Path Format Selector Shows and selects the type format such as Mono Stereo Quad or 5 1 of each defined path greater than stereo multichannel formats are supported with Pro Tools HD systems only Channel Grid Maps paths to specific interfaces and channels Compensat...

Страница 62: ...channel pairs 6 Click OK Routing a Pro Tools Output Pair to Multiple Destinations Pro Tools channel pairs can be routed to multi ple outputs on an audio interface through the I O Setup dialog For example if you assign both Analog 1 2 and Analog 3 4 interface outputs to Pro Tools Output pair 1 2 when you send a sig nal to Pro Tools Outputs 1 2 that signal will be routed simultaneously to both pairs...

Страница 63: ...cated by a check mark 6 Repeat the above steps to select additional output destinations 7 Click OK Creating and Editing Paths The I O Setup dialog lets you create and custom ize signal path definitions Paths can be Renamed for easier identification after changing or renaming audio interfaces Remapped to or from different sources or destinations Deactivated or reactivated to manage un available or ...

Страница 64: ... track In put Output Insert and Bus selectors To create a new path 1 Choose Setup I O 2 Click the Input Output Insert or Bus tab to display the corresponding path type 3 Do one of the following Click New Path or press Control N Win dows or Command N Mac or Select a main path and click New Sub Path 4 Double click in the Name field and enter a name for the path 5 Press Tab to set the new path name a...

Страница 65: ...e name 3 Press Enter Windows or Return Mac Selecting and Arranging Paths Individual and multiple paths can be selected in the I O Setup dialog Path Name column Se lected paths and sub paths can be moved higher or lower in the Path Name column to change their menu order in track Input Output Insert and Bus selectors Paths can also be deleted Sub paths follow their main paths when they are moved in ...

Страница 66: ... system you can use the Default switch to update your I O Setup definitions with the new hardware configuration To reset path names Click Default If there are matching paths available with the new system configuration existing paths will be updated to include new audio interfaces Pro Tools HD systems Resetting Mix Busses Pro Tools HD Only Pro Tools HD supports up to 128 mix busses Pro Tools HD 7 x...

Страница 67: ...the path type if any fill to the right For example when mapping a new stereo path clicking in the path row under output channel 1 fills both channel 1 and 2 left to 1 right to 2 Channel Mapping and Surround Mixer Pro Tools HD Only When mapping multichannel paths the left channel L is mapped first to the clicked Grid box and remaining channels fill immediately to the right according to the default ...

Страница 68: ...ding over lapping paths There can be no partial or complete over laps between any two main Output paths any two Insert paths or any two main Bus paths A newly created Output or Bus path must either be completely independent of other maps not mapped to any other available I O interface channels or it must be a sub path completely contained within a larger path for example an LCR sub path within a l...

Страница 69: ...e explicitly toggling Toggling Multiple Paths If a track has only one main output assignment Control Start click Windows or Command Control click Mac the track s Output Path se lector to toggle the main output to inactive When there are multiple assignments the track selector will be displayed for you to specify the input output insert or bus path If a Send A J has multiple output assignments and ...

Страница 70: ...nnel inter faces The session is taken to a second Pro Tools system that has a 96 I O audio interface a 16 channel I O unit and a 1622 I O with its 16 an alog inputs connected to its Legacy Port When the session is first opened on the second system Pro Tools will map the 32 input paths to the in puts of the two interfaces When hardware is unavailable to a session being opened assignments can either...

Страница 71: ... choose default Stereo Mix or Surround Mix set tings depending on your system and installa tion choices See Factory I O Settings Files on page 58 Importing and Exporting I O Settings Files You can export and import I O Setup configura tions as I O Settings files This lets you save set tings for different projects import settings for reconfiguring I O Setup and manage path defi nitions and signal r...

Страница 72: ...e as a choice when creating or opening sessions in addition to the factory presets described below Factory I O Settings Files Pro Tools provides I O Settings files for Stereo and Surround mixing These files provide ge neric main and sub path definitions for either mixing format Stereo Mix Settings File The Stereo Mix preset consists of all possible ste reo and mono paths for your session Specifica...

Страница 73: ...igiBase browsers Using the Default Audition Path When you audition a file or region in the Region List Pro Tools routes the audio output through the Audition Path Pro Tools assigns a default Audition Path to the first available main Output path of the corresponding format You can also select a different Audition Path in the I O Setup dialog Configuring Audition Paths You can specify the monitoring...

Страница 74: ... of the main audition path Shift Alt click Windows or Shift Option click Mac on the signal in the Region List New Track Default Output Path You can specify the default output path assign ment for new tracks in each available format To specify a default output for new tracks in the I O Setup dialog Click the New Track Default Output selector and select a format and Output AFL PFL Path Pro Tools HD ...

Страница 75: ...output path is muted when tracks are soloed in AFL or PFL Solo mode 1 Choose Setup I O 2 Click the Output tab to display the Output page 3 Select a path from the AFL PFL Mutes Output Path selector 4 Click OK to close the I O Setup dialog Default Path Order Pro Tools HD Only The Default Path Order selector lets you select the default track layout you want Pro Tools to follow when creating and mappi...

Страница 76: ... in milliseconds for each external device These times will be used by the Delay Compensation Engine to time align input paths when the hardware insert is in use and De lay Comp is enabled To set an insert delay offset Enter a value in milliseconds in the field cor responding with the input where the hardware insert is connected Insert offset delay field Insert delay offsets only have an effect whe...

Страница 77: ...Adds grid lines to the Edit window Grid line resolution is based on the zoom level of the Edit window Draw Waveforms Rectified Displays audio wave form data in rectified view In this view audio waveforms are displayed so that their positive and negative waveform excursions the portions that fall above and below the center line are summed together and viewed as a single posi tive value signal This ...

Страница 78: ...E with DV Toolkit 2 only This is useful if you want to assemble a session of a particular length or leave extra room to expand the Edit window s work area in your session The maximum length is 12 hours and 25 seconds at 48 kHz and proportionally less at higher sampling rates Organize Plug in Menus By Options These option customize how plug in menus are organized in the Insert selector or Plug in s...

Страница 79: ...s displaying individual send controls you can select this option to show send level meters Deselecting this option can help speed up screen redraws and process ing Color Coding Always Display Marker Colors Lets you choose to view Marker colors in the Markers ruler regard less of the settings you choose for Default Re gion Color Coding Default Track Color Coding Options These color coding options d...

Страница 80: ...assigned to the track Marker Locations Assigns a color to data across all tracks based on the nearest preceding marker Region List Color Assigns a color to each region based on its color in the Region List Operation Preferences Transport Section Timeline Insertion Play Start Marker Follows Playback When selected the Timeline Insertion and the Play Start Marker both move to the point in the Timelin...

Страница 81: ...he Numeric Keypad mode set to Transport you can play up to two tracks of audio in Shuttle Lock mode Press the Start key Windows or Control Mac followed by 0 9 for different play speeds Press Plus or Minus to reverse direction Recall Memory Loca tions by typing Period the Memory Location number and Period again Shuttle Pro Tools HD Only Selects a type of shuttling different from that of Shuttle Loc...

Страница 82: ...o Tools HD with Avid Video Engine Only When selected Pro Tools automatically stops playback of audio and video if a single frame of video is dropped When not selected Pro Tools continues play back of audio even if frames are dropped In most cases video playback will recover within a few frames and continue playing audio and video in sync Avid Video NTSC Has Setup NTSC J Pro Tools HD with Avid Vide...

Страница 83: ... in Input Only mode until explicitly switched to Auto In put monitoring or a typical music tracking workflow in which leaving a track in Input Only monitoring mode after recording can re sult in accidental double monitoring When selected taking an audio track out of record enable any mode takes it out of In put Only mode regardless of the global monitor mode and switches it to monitor audio from d...

Страница 84: ...estructivePunch File Length Pro Tools HD Only This preference sets the duration of consoli dated audio files when preparing tracks for De structivePunch mode The default value for this setting is 25 minutes Misc Miscellaneous Section Pro Tools HD Only Auto Region Fade In Out Length Sets a default length for fade ins and fade outs automatically applied to region boundaries Using automatic fade ins ...

Страница 85: ... Region Names That Match Track Names When selected only regions that share the same root name with the track and playlist appear in the Matches Right click submenu or the Alternates pop up menu Includes Take Region Lengths That Match When selected only regions that match the length of the current selection appear in the Matches Right click submenu or the Alternates pop up menu Separate Region Oper...

Страница 86: ...ithin im ported REX and ACID files to minimize clicks or pops during playback If there is overlap be tween slices a crossfade is applied If there is a gap between slices a fade out is applied to the end of the first region The fade shapes applied to REX ACID files follow the Default Fade Set tings for REX ACID Zoom Toggle Vertical Zoom Select Selection or Last Used for the Zoom Toggle Vertical Zoo...

Страница 87: ...an controls do not maintain relative offsets when any of the grouped pan controls is adjusted All grouped pan controls snap to the absolute value of the adjusted control When not selected grouped pan controls maintain relative offsets when any of the linked controls is adjusted Default EQ This preference lets you choose any installed EQ plug in as the default which makes it available for quick ass...

Страница 88: ...uch Timeout value After the Touch Timeout period writing of au tomation stops and the automation data returns to its previous automation value at the rate spec ified in the AutoMatch Time setting Automation Section Smooth and Thin Data After Pass When se lected Pro Tools automatically smooths and then applies the specified amount of thinning to the automation data created in an automa tion pass De...

Страница 89: ...cord Enable and Input Monitoring controls follow the VCA Master but also re main available for independent linking with groups Include Sends in Trim Mode Pro Tools HD Only This option determines the Trim status of Send faders when a track is put in Trim mode When selected Send faders go into Trim mode along with the Main Volume fader When deselected the Main Volume fader goes into Trim mode but th...

Страница 90: ...omposite Playlist can be viewed before committing Trim moves Manually Trim Automation can be coalesced only with the Coalesce Trim Automation com mand A Composite Playlist can be viewed be fore committing Trim moves Processing Preferences AudioSuite Section Buffer Size AudioSuite Buffer Size sets the size of the mem ory buffer used for audio processing and pre viewing with AudioSuite plug ins If A...

Страница 91: ...conversion quality Sam ple rate conversion is used in a variety of Pro Tools processes including converting and importing audio files of different formats into a session and bouncing and saving tracks to a dif ferent sample rate or bit depth The higher the quality of sample rate conversion you choose the longer Pro Tools will take to process the au dio file MIDI Preferences Basics Section Play MID...

Страница 92: ...erated MIDI Time Code or MIDI Beat Clock Generally this delay should be applied when the external MIDI instrument is mixed externally and when the external MIDI instrument is mixed through Pro Tools These options are only available when a Delay Compensation Engine is chosen in the Playback Engine dialog and Delay Compensation is en abled in Pro Tools These options are distinct from the hardware of...

Страница 93: ...device to control Pro Tools track arming or punching Punch In Frame Offset Sets an offset in frames to compensate for punch in timing advances or delays Punch Out Frame Offset Sets an offset in frames to compensate for punch out timing advances or delays Delay After Play Command Sets the amount of time in frames for Pro Tools to wait after re ceiving a Play command before starting the au dio engin...

Страница 94: ...Pro Tools Reference Guide 80 ...

Страница 95: ...81 Part III Sessions Tracks ...

Страница 96: ...82 ...

Страница 97: ...gured I O Settings are included with your system or you can select a custom I O Setting For more information see Chapter 6 I O Setup 6 Name the Session 7 Click Save Selecting Bit Depth and Sample Rate When selecting a bit depth or sample rate for your session consider fidelity any compatibil ity issues with others systems and storage space Bit depth and sample rate also have an effect on the amoun...

Страница 98: ... generated by the session Region Groups Folder The Region Groups folder is the default direc tory for any region groups that you export from your Pro Tools session WaveCache File The WaveCache wfm file stores all of the wave form display data for the session If you delete the WaveCache wfm file Pro Tools creates a new one the next time you open the session By storing waveform data in the WaveCache...

Страница 99: ... Open Session 2 Locate the session you want to open and click Open Opening a Session that Contains Unavailable Files DigiBase notifies you if files are located but re side on Transfer volumes such as CD or DVD discs or if any required files cannot be found For more information see Locating Audio Files on page 241 Opening a Session from a Transfer Volume When opening a session from a Transfer volum...

Страница 100: ...of available voices on the current system are set to voice off Opening a Session with Audio File Names that Contain Illegal Characters Pro Tools 7 x does not support audio file names that contain the following ASCII characters Forward Slash Backslash Colon Asterisk Question mark Quotation marks Less than symbol Greater than symbol vertical line or pipe Any high order ASCII character created with a...

Страница 101: ...not be undone To save a session Choose File Save Revert to Saved Command If you have made changes to a session since you last saved it you can discard those changes and revert to its previously saved state To revert to the last saved version of a session Choose File Revert to Saved Saving the Session File with a New Name To save a copy of the current session with a new name or to a different hard ...

Страница 102: ... session Any audio that was recorded or imported and then later removed from the ses sion but not deleted from disk is not included in the new session copy Using the Save Copy In command is the only way to change the sample rate of a session The sample rate of each of the session s copied audio files is converted to the selected sample rate When you save a copy of the session to a lower bit depth ...

Страница 103: ...it Session p24 Pro Tools 4 16 Bit Session pt4 Mac Latest supports Pro Tools 7 x Pro Tools 5 1 6 9 Session Pro Tools 5 0 Session Pro Tools 4 24 Bit Session Pro Tools 4 16 Bit Session Pro Tools 3 2 Session Session Parameters Audio File Type You can save the session to reference BWF WAV or AIFF audio files On the Mac you can also save the session to reference SD II audio files at sample rates up to 4...

Страница 104: ...n this option is selected all audio files are copied to the new location This setting is automatically selected if you change the bit depth or sample rate of the ses sion All Non Native Audio Files The name of this option varies depending on the audio file type you select If you change the audio file type of the session this option ensures that all files in the copied session are converted to the ...

Страница 105: ...e original session and the destination subfolders will use the same names as the source drives and folders When this option is not selected the Save Copy In command copies all files of the same type re gardless of their location into a single destina tion folder Creating Custom Session Templates You can create custom session documents that are pre configured to the track setups mixer set ups windo...

Страница 106: ... a session template by saving a session file as a Stationery Pad document Once a session is saved as a Stationery Pad it acts as a template that you can open and then resave as a normal Pro Tools session To create a custom session template on the Mac 1 Create a session and arrange its elements as you want them to appear in the template In ad dition to track setup you can also define ele ments such...

Страница 107: ...ur session template and Audio and Fades folders Closing a Session Pro Tools only lets you work on just one session at a time The Close Session command closes your current Pro Tools session but leaves the Pro Tools application running Pro Tools prompts you to save a session when closing it but it is recommended that you save your work using the Save or Save As command before clos ing a session rega...

Страница 108: ...Pro Tools Reference Guide 94 ...

Страница 109: ...o Tools HD only To display the Mix window Choose Window Mix To display all Mix window view options Select View Mix Window All Edit Window The Edit window provides a timeline display of audio as well as MIDI data and mixer automa tion for recording editing and arranging tracks As in the Mix window each track has controls for record enable solo mute and automation mode To display the Edit window Cho...

Страница 110: ...Send with Send controls page 639 Track Path Selectors and Controls page 98 Output Window button page 645 Mono Audio Track page 118 MIDI Track page 12 MIDI Track Patch Select button page 574 Sends View page 635 Automation Mode selector page 692 Track Comments View page 635 Voice selector page 137 Track Name page 126 Mix Group List page 149 Group ID indicator page 152 Track Color Coding page 146 Ins...

Страница 111: ...ty View page 567 Selected Region page 399 Track View selector page 335 Edit Group List page 352 Commands Keyboard Focus page 16 Timeline Selections page 410 Tab to Transients page 407 Timeline Transport controls page 99 Audio Waveform View page 341 Volume Automation View page 698 MIDI Track page 118 Audio Track page 117 Timebase selector page 351 Graphic Tempo Editor page 496 Region Group page 452...

Страница 112: ...trols for stereo audio track medium track height Edit tools in Edit window Automation Mode selector page 692 Record Enable button page 258 TrackInput Monitor button page 261 Pro Tools HD only Solo button page 142 Mute Button page 145 Audio Input Path selector page 122 Audio Output Path selector page 122 Automation Mode selector page 692 Mute button page 145 Voice selector page 137 Track Height sel...

Страница 113: ... up menus in the Edit Window bar Ruler View selector page 634 Edit window View selector page 634 Linearity Display Mode page 502 Tab to Transients page 407 Commands Keyboard Focus page 16 Mirrored MIDI Editing page 559 Link Track and Edit Selection page 398 Link Timeline and Edit Selection page 396 Grid Value indicator page 433 Grid Value pop up menu page 433 Nudge Value indicator page 435 Nudge V...

Страница 114: ...d Start click Play Windows or Control click Play Mac to toggle Loop Playback mode When enabled a loop symbol appears in the Play button and Pro Tools plays continuously from the beginning of the selection to the end Press Enter Windows or Return Mac to Return to Zero Rewind Increments Main Time Scale Format Increment Amount Min Sec 1 second Time Code Pro Tools HD or Pro Tools LE with DV Toolkit 2 ...

Страница 115: ...en lit green indicates that at least one audio track is cur rently set to Input Only monitoring regardless of record enable status When off grey all tracks are in Auto Input monitoring Pre Roll During playback or record specifies the amount of audio that plays before the Play Timeline Cursor or Play Start Marker location or beginning of the Timeline selection Pre roll is particularly useful with p...

Страница 116: ...ou can set the end point by entering a location in this field or by dragging the corresponding Timeline Selection Marker in the Main Time base ruler For more information see Timeline Selection Markers on page 289 Length Specifies the length for the play or record range You can set the length by entering a loca tion in this field or by selecting a range in any Timebase ruler Transport Master Select...

Страница 117: ...or recording begins Double click the Countoff button to open the Click Countoff Options dialog MIDI Merge When selected Merge mode re corded MIDI data is merged with existing track material When deselected Replace mode re corded MIDI data replaces existing track mate rial Tempo Ruler Enable Conductor When selected Pro Tools uses the tempo map defined in the Tempo ruler When deselected Pro Tools sw...

Страница 118: ...signed for Pro Tools workflow Multiple browsers can be displayed simultaneously and arranged independently with custom display settings for each Browsers let you search and sort audio files video files and sessions These files are dis played in browsers and can be dragged directly into the current Pro Tools session When offline items are needed Pro Tools lets you find the correct matching files th...

Страница 119: ...they contain Using the Workspace browser you can Access all mounted volumes Access all Catalogs Search across multiple volumes and Cata logs simultaneously Designate volumes for Record and Play back Playback Only or Transfer Unmount volumes View manage audition and import indi vidual items in any catalog or mounted volume Update databases for entire volumes Figure 4 Main elements of a DigiBase bro...

Страница 120: ... make it easy to orga nize files from multiple sources into libraries of favorite files Catalogs can be sorted and searched even when the files they reference are offline Catalogs can also be shared Using Catalogs you can Collect and organize files from any combi nation of volumes Create catalogs of complete volumes to view and search even if a volume is offline View manage audition and import ind...

Страница 121: ...Plug in windows Panner windows Mic Pre windows All floating windows listed in the Window menu Task Manager window Transport window Big Counter window Automation window Memory Locations window Machine Track Arming window Universe window Video window Color Palette window Undo History window Disk Space window System Usage window A Window Configuration can also store the Window Display Settings for th...

Страница 122: ...gs When enabled stores all window dis play settings for the Edit Mix and Transport windows with the Window Configuration such as whether or not the Region List is shown in the Edit window Edit Window Display Settings Stores only the window display settings for the Edit window Width of the Tracks List and Group List Height of the Tracks List Width of the Region List What rulers are shown the main r...

Страница 123: ...ation List View Filter Lets you show or hide Window Con figuration filter icons in the Window Configura tion List as well as show or hide Window Con figurations with Window Layout Edit Window Settings Mix Window Settings or Transport Window Settings Show Comments Lets you show or hide Com ments in the Window Configuration List New Configuration Creates a new Window Con figuration This command is a...

Страница 124: ...layed in the Win dow menu Only Window Configurations that include Window Layout can be made active Window Configurations that do not include Window Layout can be selected and update the Window Display Settings in the active Window Layout Creating a New Window Configuration To create a new Window Configuration 1 Open the windows you want to include in the Window Configuration and position them wher...

Страница 125: ...iguration Undoing a Window Configuration Pro Tools lets you revert to the previous Win dow Layout and Window Settings with a single level of undo This is useful for example if you recall a Window Configuration but then decide you want to revert to the previous screen state To undo a Window Configuration On the numeric keypad press Period 0 and then Asterisk To redo a Window Configuration On the nu...

Страница 126: ...ery change to the Window Layout and Window Display Settings Window Configurations that do not include Window Layout and only store Window Display Settings cannot be made active and thus won t automatically update If you want to update a Window Configuration with changes to the Window Display Settings such as the width of the Region List in the Edit window use the Up date command in the Window Conf...

Страница 127: ... menus File Provides commands that are used to create and maintain Pro Tools sessions Edit Provides commands that are used to edit and manipulate the current selection and affect data in the timeline or the clipboard View Provides options and commands to cus tomize what is shown in various windows Track Provides commands that are used to cre ate manage and edit tracks Region Provides commands that...

Страница 128: ... or re gions as follows Track Name Right Click Pop Up Menu Right clicking a track name in the Edit window Mix window or the Track List provides access to var ious track commands such as show hide make active inactive rename duplicate and delete tracks Region Name Right Click Pop Up Menu Edit Window Only Right clicking a region name in the Region List provides commands to clear re name time stamp o...

Страница 129: ...ool Tips for Pro Tools 1 Choose Setup Preferences and click the Dis play tab 2 In the Basics section enable the Tool Tips op tions you want displayed Function Shows the functional name of different Pro Tools items such as specific buttons indica tors modes selectors and Edit tools Details Shows abbreviated or hidden Pro Tools names or values for different Pro Tools items such as insert names gain ...

Страница 130: ...Pro Tools Reference Guide 116 ...

Страница 131: ...udio files Auxiliary Input Tracks Auxiliary Input tracks can be used as effects sends destinations for submixes as a bounce destination as inputs to monitor or process au dio such as audio from external MIDI instru ments and for many other audio routing tasks Master Fader Tracks Master Fader tracks control the overall level of audio paths that are routed to physical output paths For example you co...

Страница 132: ... instruments to record and monitor MIDI instruments Track Formats Mono Tracks A mono audio Auxiliary Input Master Fader or Instrument track controls volume and in some cases panning for a single channel of audio A mono audio track uses a single voice A mono track can also be routed to a multichannel out put Stereo Tracks A stereo audio Auxiliary Input Master Fader or Instrument track is a single c...

Страница 133: ...nserts Sends only A E shown Audio Input Output Path selectors Solo Mute buttons Automation Mode selector Track Name button Pan slider Level meter Volume fader Group ID Output Window button Track Comments Track Type indicator Voice selector Track Record Enable button Volume Peak Delay indicator Pan indicator Delay Compensation View Pro Tools HD only TrackInput Monitor button Pro Tools HD only Track...

Страница 134: ...itoring automation mode solo and mute VCA Master tracks also have a Com ments View to enter and display comments Stereo Master Fader track channel strip Inserts Audio Output Path selectors Automation Mode selector Track Name button Level meters Volume fader Group ID Track Comments Track Type indicator Volume Peak Delay indicator Delay Compensation View Pro Tools HD only Track Color Coding Output W...

Страница 135: ...ent tracks also have a Comments View to enter and display comments MIDI channel strip MIDI Input selector MIDI Volume fader MIDI Pan slider Track Name button MIDI Velocity meter Automation Mode selector MIDI Output selector Record Enable Patch Select MIDI Pan indicator MIDI Volume indicator Track Type indicator Group ID Track Comments Solo Mute buttons Track Color Coding Stereo Instrument track ch...

Страница 136: ...anywhere in the meter Values range from no signal to 0 dB Channel Delay Indicator Shows the total delay in samples incurred on the track from the use of any TDM plug ins on that channel Pan Indicator The Pan indicator displays the current pan set ting of a track Pan values range from 100 full left to 100 full right Pan controls are only available for stereo tracks or for mono tracks routed to a st...

Страница 137: ...rough the channel output Green indicates nominal levels Yellow indicates pre clipping 6 dB be low full scale and Red indicates clipping When an audio track is record enabled these meters indicate record levels On MIDI tracks the level meter shows the MIDI velocity of the most recent MIDI event Pre and Post Fader Metering You can globally set audio track level meters to indicate pre or post fader l...

Страница 138: ...both the Mix and Edit windows to make the track level meters easier to read Wide Meters View are also available Nar row Mix View To toggle Wide Meters View on or off Control Alt Start click Windows or Com mand Option Control click Mac any track level meter in the Mix or Edit window Adjusting Track Width Mix Window The Narrow Mix command lets you view all tracks channels in the Mix window at a redu...

Страница 139: ...e timebase samples or ticks from the Track Timebase pop up menu 5 Enter the number of new tracks 6 Do the following if desired To add more tracks click the Add Row but ton or To remove the previous track click the Re move Row button 7 To reorder tracks click a Move Row icon and drag it up or down 8 Click Create You can also add tracks to your session by importing them from preexisting sessions See...

Страница 140: ...he Comments area type any comments for the track and press Enter Windows or Return Mac or In the Edit or Mix window double click the Track Name button for a track Then click di rectly in the Comments area type any com ments for the track and press Enter Windows or Return Mac Track Numbering With Track Number View enabled each track is assigned a number corresponding to its position in the Mix and ...

Страница 141: ...k selected and the additional track will also be selected To select or deselect noncontiguous tracks do one of the following Control click Windows or Command click Mac Track Name buttons that are unhigh lighted to select them or Control click Windows or Command click Mac Track Name buttons that are highlighted to deselect them To select all tracks Alt click Windows or Option click Mac any Track Na...

Страница 142: ...ing Choose Track Delete or In the Track List or Mix or Edit window Right click the track name and select Du plicate 3 Click OK to remove the selected tracks from the session Duplicating Tracks The Duplicate Track command lets you dupli cate one or more tracks including their audio or MIDI data playlists automation and other at tributes To duplicate one or more tracks 1 Select the tracks you want t...

Страница 143: ...licate Tracks dialog Click Cancel to close the dialog and not create dupli cate tracks In the Mix window each duplicate track is cre ated to the right of its original track In the Edit window each duplicate track is created below its original track When duplicating multiple tracks you can also choose to have the new tracks follow the last selected track or have each new track follow its source tra...

Страница 144: ...Name Type Edit Group Mix Group or Voice The sort order will be reflected in the Track List in the Mix or Edit Window When a track that is a member of an active group is hidden from view editing operations performed on other members of the group in the Edit window will not affect the hidden track In the Mix window however all operations other than record enable will affect a hidden track that is a ...

Страница 145: ...ks in the Track List with the Marquee 1 Press and hold Control Windows or Com mand Mac 2 Move the cursor to the left of a track name un til the Marquee with a small symbol ap pears To show tracks the Marquee should be to the left of an unhighlighted track name To hide tracks the Marquee should be to the left of a highlighted track name 3 Click on the track name and drag up or down to show or hide ...

Страница 146: ...umbers even when hidden when Track Position Numbers Stay With Hidden Tracks is enabled in the Display Preferences page Track Name Right Click Pop Up Menus Edit Window Mix Window or Track List When you Right click a track name in the Edit window Mix window or the Track List a pop up menu provides access to the following com mands Hide Show Hides or shows the track or se lected tracks if any Hide an...

Страница 147: ...r as stereo pairs and mul tichannel groups The available inputs outputs and busses are defined as paths in the I O Setup dialog see Chapter 6 I O Setup Automatic Input and Output Assignments When adding tracks to a new session inputs are automatically assigned in ascending order For example if you have an audio interface with eight inputs creating four new mono audio tracks will automatically add ...

Страница 148: ...nstrument Tracks Master Faders To assign an audio track output 1 In order to assign audio track outputs in the Edit window select View Edit Window I O 2 In the Mix or Edit window click the track s Output Path selector and choose from the avail able audio interface channels and busses Stereo and multichannel surround tracks have outputs available as pairs and multichannel paths The Output Path sele...

Страница 149: ...ack Inputs and Outputs Inactive from the Edit or Mix Window Inputs and outputs can be made inactive Mak ing a track input or output inactive silences the input or output while retaining all automation and playlist data Inactive inputs and outputs do not consume resources for TDM mixer connec tions but any assigned plug ins on the track continue to use their required DSP resources RTAS plug ins req...

Страница 150: ...ns priorities to tracks that com pete for the available voices Because there can be more tracks than available voices Pro Tools provides multiple ways of adjusting the play back priority of audio tracks See Changing a Track s Playback Priority on page 136 and Freeing up Voices on a Track on page 137 With Pro Tools HD systems you can assign spe cific voices to multiple tracks such that those voices...

Страница 151: ...n the background assigning voices not in use by other tracks With Pro Tools HD tracks assigned to a specific voice number take priority over dynamically al located tracks and support voice borrowing see Voice Borrowing on page 139 To ensure a track is heard or that it is available for Quick Punch TrackPunch or DestructivePunch re cording assign a voice number to that track For stereo and multichan...

Страница 152: ...will change to Off If the original track 49 or higher had its voice assignment set to Off it automatically resets to DYN when you do any of the above steps Automatic Assignment of Ascending Voices Pro Tools HD Only You can automatically assign all tracks or all se lected tracks to successive voices For example you may want to select eight audio tracks and reassign them to voices 9 16 To assign all...

Страница 153: ...ys By experimenting with track priority voice as signment and arranging regions so that they are positioned to pop through holes in higher pri ority tracks you can find many useful ways to maximize voiceable tracks with Pro Tools HD Setting MIDI Input and Output MIDI recording and playback is supported with MIDI tracks and Instrument tracks Assigning MIDI Track Input Pro Tools lets you assign spec...

Страница 154: ...put selector and select additional channels from any device Assigning MIDI Input and Output for Instrument Tracks Instrument tracks have a specific view for MIDI controls including MIDI Input and Output se lectors To view Instrument track MIDI controls do one of the following Select View Mix Window Instruments or Select View Edit Window Instruments MIDI tracks in Pro Tools cannot contain multiple ...

Страница 155: ...nd channel for output Channels in use by another track input appear as bold in the MIDI Input Selector pop up menu To assign an Instrument track MIDI output Click the track s MIDI Output selector and as sign a port and channel for MIDI output Chan nels already assigned to another track appear in bold Inserting Instrument Plug ins on Instrument Tracks To insert an instrument plug in on an Instrumen...

Страница 156: ...fter Fader Listen The Solo button routes the track s post fader post pan signal to the AFL PFL Path output The AFL PFL Path is con figured in the Output page of the I O Setup dia log see AFL PFL Path on page 60 With AFL the level you hear is dependent on the fader level for that track Additionally there is a separate master level setting for AFL that af fects the output of any or all tracks you so...

Страница 157: ...our regular Pro Tools output path is not necessarily muted when you send a signal to the AFL PFL Path If you need the main signal to automatically mute when an AFL PFL signal is invoked you need to do the following 1 Configure the output path for AFL or PFL so loed tracks 2 Select the main output path that will mute when you solo a track in AFL or PFL mode see AFL PFL Mutes Output Path Selector on...

Страница 158: ...e still holding the first Solo button press additional Solo buttons Solo buttons will re main soloed as long as one Solo button is held Solo Safe Mode Pro Tools lets you solo safe a track This prevents the track from being muted even if you solo other tracks This feature is useful for tracks such as Auxiliary Inputs that are being used as a sub mix of audio tracks or effects returns allowing the a...

Страница 159: ...ly and Instrument tracks can be made inactive Inactive tracks use no DSP or voices Plug ins sends voices and automa tion on inactive tracks are all disabled Tracks may also be automatically made inactive if a ses sion is opened on a system with less DSP power than the system that it was created on To toggle a track active inactive Control Start click Windows or Command Control click Mac the Track ...

Страница 160: ...re automatically assigned to tracks but you can override those colors by choosing from a color palette of 96 possible col ors For more information see Color Palette on page 147 Display Page Preferences for Color Coding Color Coding options determine how colors are assigned to the display of tracks and regions To change Color Coding options 1 Choose Setup Preferences 2 Click Display 3 Select a Defa...

Страница 161: ...region according to the Group ID of its track If groups are sus pended using the Suspend Groups command all regions display black waveforms or MIDI notes on a light gray background Track Color Assigns a region color based on the color assigned to the track See Color Palette on page 147 Marker Locations Assigns a color to data across all tracks based on the nearest preceding marker Region List Colo...

Страница 162: ... signed color if any of items as you select them By default the Hold button is off When off the Color Palette automatically highlights the as signed color if any of items as you select them When the Hold button is enabled the assigned color selected in the Color Palette persists and does not change when a different track or region is selected To use the Hold button to assign the same color to mult...

Страница 163: ...ouping functions of the Mix Group and the Edit Group Edit Groups Edit Groups affect the following items in the Edit window Track View Track Height Track Timebase Audio and MIDI editing functions Automation editing functions Mix Groups in Pro Tools HD Mix Groups in Pro Tools HD can be set to affect the following items Main Mute Solo Send Level Send Mute Main Volume Main Pan Main LFE Level Record En...

Страница 164: ...ks within a smaller group You could disable the Link Mix and Edit Group Enables preference This would allow you to work with different groups in the two windows To unlink Mix and Edit Groups 1 Choose Setup Preferences and click the Mix ing tab 2 Deselect the Link Mix and Edit Group En ables option and click OK Mix Groups and VCA Masters Pro Tools HD Only An existing Mix Group can be assigned to a ...

Страница 165: ...selected and no members from outside the group are selected Hollow Circle Indicates that only some members of the group are currently selected Circle with a Dot Indicates that all members of the group are currently selected plus additional members outside the group Group List Pop Up Menu The pop up menu at the top of the Group List provides the following commands New Group Executes Track Group com...

Страница 166: ...up dialog for duplicated group Delete Deletes a single group Select Tracks in Group Selects tracks in the group Show Hide Tracks in Group Shows or hides tracks in the current group Show Only Tracks in Group Shows only the tracks in the group and hides all other tracks Show All Tracks Shows all tracks in the session Group Dialog Whether you are creating or modifying groups with the Group List a tra...

Страница 167: ...oup Attributes Lets you select which parameters are linked for the current Mix or Mix Edit Group Globals Lets you select parameters to use as a template that can be applied to individual groups by selecting Follow Globals Group Dialog in Pro Tools LE In Pro Tools LE the Group dialog has only a sin gle page Group dialog Pro Tools HD Group dialog Pro Tools LE ...

Страница 168: ...lable a z 2a z 3a z 4a z If you do not choose a Group ID Pro Tools automatically assigns the next avail able ID to a new group 6 Click Tracks in the Group dialog and do any of the following To add the tracks that are currently selected in the session to the group click the Add button at the bottom of the Group dialog To add tracks to the group select the track names in the Available track list and...

Страница 169: ... add tracks later 2 Do one of the following Choose Track Group or Choose New Group from the Group List pop up menu 3 Enter a name for the group 4 Select the type of group to create Edit Group Mix Group or Mix Edit Group 5 Choose a Group ID from the ID pop up menu Four banks of 26 are available a z 2a z 3a z 4a z If you do not choose a Group ID Pro Tools automatically assigns the next avail able ID...

Страница 170: ... selected in the ses sion click the Replace button at the bot tom of the Group dialog 7 Select the items to be Linked within Groups Mutes Solos Send Mute Send Levels 8 Click OK Modifying Groups To modify a group 1 Do one of the following Choose Modify Groups from the Group List pop up menu In the Mix window click the Group ID in dicator on a track and choose Modify from the pop up menu Right click...

Страница 171: ... select Edit Mix or Mix Edit to change the settings for the ALL group If you select Edit only or Mix only the ALL group will apply only to that Group type 3 For Mix or Mix Edit Groups you can change any of the following Follows Global status Attributes 4 Click OK To modify the settings for the All group in Pro Tools LE 1 Right click the All group name in the Group List and choose Modify from the p...

Страница 172: ...tive Groups from the Group List pop up menu Duplicating Groups You can duplicate a group and modify its set tings in order to quickly set up a mix To duplicate a group 1 Do one of the following Click the Group ID indicator on a track and choose Duplicate from the pop up menu or Right click the Group name in the Group List and choose Duplicate from the pop up menu 2 Change any of the following for ...

Страница 173: ...t of attributes for groups in your session 3 Click OK to save the group and the new Glo bals settings To select attributes for an individual group 1 While creating or modifying a Mix Group or a Mix Edit Group do one of the following Click Attributes in the Group dialog and select the attributes you want to link or Click Follow Globals to follow the base set of attributes The Attributes page greys ...

Страница 174: ...select attributes for a single con trol across all Sends all Inserts or for the four track controls down a column Alt click Win dows or Option click Mac any attribute in that column Saving Group Attribute Presets You can define six Group presets that can be re called on either the Attributes or Globals page whenever you are creating or modifying a Mix or Mix Edit Group To save the current attribut...

Страница 175: ...t when faders are moved the fader will follow the topmost or parent group that it belongs to To disable a group In the Group List click the name of the group you want to disable The Group Name is un highlighted to indicate that it is not enabled Keyboard Selection of Groups The Group List Keyboard Focus allows you to type a Group ID letter to automatically toggle that group s enable status In the ...

Страница 176: ...el Send Pan For example when a grouped Volume fader is moved to its maximum value any other faders in that group that had higher values will re member their relative offset whenever the first fader is pulled down again In Automation views this overflow is indi cated on the automation playlist by blue auto mation breakpoints at the extremes of the auto mation playlist Setting Group Pan Controls to ...

Страница 177: ...f and session files Multiple browsers can be displayed and arranged with custom dis play settings provided to optimize your work environment DigiBase Elements Figure 5 shows the various elements of DigiBase Arrows show how files can be moved between the elements For information on dragging and dropping files from DigiBase browsers to your Pro Tools session see Importing Items with Drag and Drop on...

Страница 178: ...agged directly into the current Pro Tools session When offline items are needed Pro Tools lets you find the correct matching files then relink to online media The main elements of a DigiBase browser see Figure 6 include the following Title Bar Shows the browser type Work space Volume Project or Catalog and the name of its associated volume session or catalog Toolbar Provides the Browser menu Searc...

Страница 179: ...ain Using the Workspace browser you can Access all mounted volumes Access all Catalogs Search across multiple volumes and Cata logs simultaneously Designate volumes for Record and Play back Playback Only or Transfer Unmount volumes View manage audition and import indi vidual items in any catalog or mounted volume Update databases for entire volumes Figure 6 Main elements of a DigiBase browser Volu...

Страница 180: ...ake it easy to orga nize files from multiple sources into libraries of favorite files Catalogs can be sorted and searched even when the files they reference are offline Catalogs can also be shared Using Catalogs you can Collect and organize files from any combi nation of volumes Create catalogs of complete volumes to view and search even if a volume is offline View manage audition and import indi ...

Страница 181: ...Tools creates these databases automatically for all mounted vol umes including Transfer volumes Digidesign databases use three file types volume ddb Stores media and session file meta data for a particular volume catalog ddb DigiBase Pro Only Storesmediaand session file metadata for a user defined Catalog Cataloged media and session files are can reside on multiple volumes including Transfer vol u...

Страница 182: ... or all of the shared volume just once then email the database files to other users Database files can be added by placing them within each user s Volumes folder Periodic manual indexing then keeps all databases current Sharing Catalogs DigiBase Pro Only Catalogs can be created for a particular project and then shared among multiple systems to help facilitate more efficient workflow DigiBase Pro C...

Страница 183: ...lume folder session or Catalog database Columns Display metadata such as file name and format for volumes folders and files in the Items List Each row of data in a browser represents an Item such as a file or folder Data about each item is displayed in columns Columns can be arranged and placed in either the Fixed pane or the Scroll ing pane Figure 7 Basic browser tools panes and columns Workspace...

Страница 184: ...ol double click Windows or Com mand double click Mac the Volume or Cata log Viewing the Contents of a Volume Folder or Catalog To expand or collapse the currently selected folder do one of the following Click the Expand Collapse icon next to the folder or Select a volume folder or Catalog and press the Right Arrow key to expand or the left Arrow key to collapse To move up one browser level Click t...

Страница 185: ...rom browsers into the current session To open an AAF or OMF sequence from a DigiBase browser 1 Do one of the following With no Pro Tools session currently open double click the AAF or OMF sequence in a browser or Drag the AAF or OMF sequence from a browser to the Timeline in an open session 2 Configure the Import Session Data dialog 3 Click OK Creating and Opening Folders Browsers let you create a...

Страница 186: ...only or T Transfer Separate columns are provided for audio desig nation A and video V For detailed information on volume designa tion see Audio and Video Volume Designa tors on page 196 Indexing DigiBase Databases Indexing is the process of reading media files extracting just the metadata for each file then storing that data in an associated database so that it may be displayed in the columns of a...

Страница 187: ...oot level If you open a folder Pro Tools indexes just the items in that folder As a result a database is only indexed for the parts of the volume that you have browsed However searches are faster and more complete when a volume is already completely indexed Manual Indexing Manual indexing fills in all missing data and updates changed data for selected folders and all of their sub folders To update...

Страница 188: ... Transfer Files Selects all files identified as Transfer files files found on media that do not support playback Select Online Files Selects all files that are on line Invert Selection Reverses inverts the current se lection Copy and Relink Copies items currently selected in the Project browser to a chosen location and relinks the session to the copies instead of the originals Use this to easily m...

Страница 189: ...opies an item s File Comments to its Clip Name Browser Panes and Display Browsers display an Items List consisting of var ious columns such as file name size creation date and sample rate The Items List is split into two panes Individual columns can be placed in either pane and all columns can be shown or hidden resized reordered and sorted Moving Columns Between Panes Columns in browser can be pl...

Страница 190: ... header and choose DE FAULT from the pop up menu View Presets Pro Tools lets you save up to five preset views for each type of browser and the Relink window Presets can be recalled by clicking a View Preset button View Presets are specific to each type of browser To store a View Preset 1 Open a browser or the Relink window 2 Arrange columns and views 3 Control click Windows or Command click Mac on...

Страница 191: ... audio file video file or other This field cannot be edited Size Displays the size of a file in kilobytes For folders the total size of all files in the folder is displayed This field cannot be edited Date Indexed Displays the last indexed date for the item This field cannot be edited Capacity Displays the total capacity of a volume This field cannot be edited Free Displays the unused space on vol...

Страница 192: ...plays the user time stamp if any of audio files only Path Displays the directory path to the item Unique ID Displays the unique ID for a Pro Tools file Tape DigiTranslator 2 0 Only This column dis plays the original Avid tape name if the item is an OMF file audio or video If an audio file was originally recorded in Pro Tools this field dis plays the name of the original session Video files origina...

Страница 193: ...omments to Clip Name commands in the Browser menu see Additional DigiBase Pro Commands on page 175 Comments Fields Comments about individual files can be stored in the database and embedded with the file s metadata wrapper There are two types of comments fields File Comments and Database Comments File Comments File Comments are stored with the metadata of the file itself Not all file types support...

Страница 194: ... not have a waveform the waveform must be calculated to be visible in a browser Waveform display To calculate waveforms in a browser 1 Select online audio files or folders containing audio files in a browser 2 Choose Calculate Waveform from the Browser menu Auditioning Audio Files Audio items can be auditioned from within Di giBase browsers to preview items before import ing copying or deleting th...

Страница 195: ... selected in the Browser menu press the Spacebar To stop loop audition do one of the following Click the Browser Preview button again If Spacebar Toggles File Preview is selected in the Browser menu press the Spacebar again To audition from a specific location within the file Click in the waveform display at the desired location Press the Spacebar to stop playback To automatically audition files w...

Страница 196: ...g copying duplicating and deleting items in browsers follow the same rules and be havior as in the operating system For example moving a file to another volume copies the file and Pro Tools warns you if an items is about to be overwritten or replaced Dragging an item from a Catalog to a Volume browser always makes a new copy of the item Moving Items To move items Select one or more items and drag ...

Страница 197: ...the Catalog click Aliases or To delete the selected items from disk and remove their aliases from the Catalog click Files Deleting Folders in Catalogs Deleting a folder from a Catalog does not delete the folder on disk even if you choose to delete all files from disk Because Catalogs are snap shots of items their aliases only include files that resided in the corresponding folder at the time the C...

Страница 198: ... as Com ments fields sample rate format and tempo Save the results of a search as a new Catalog Starting a Search To search the current browser 1 Click the Search icon to display the Search pane 2 Do one of the following On all systems enter text into the File Name field to search by name or enter a date or select a kind from the Kind pop up menu See Entering Data for Searches on page 185 for more...

Страница 199: ... the Bit Depth pull down provides choices for Any 16 bit or 24 bit Date and Time Accepts date and time entries in a variety of formats Time Code Uses standard Pro Tools time code entry shortcuts in hh min sec frames Search Modifiers Certain fields have small pull down menus con taining modifiers which limit the search criteria entered in the field Modifiers include Equal to Not Equal to Less Than ...

Страница 200: ...d Quotations Marks for Text Strings Text enclosed in quotation marks is searched as one text string For example if you type Dog Bark with quotes only items with Dog Bark anywhere in the File Name are considered a match Search Modes DigiBase provides two different text searching environments Quick Search Mode Applies wildcards before and after each text string For example a Quick search for Dog fin...

Страница 201: ...tored on suitable Performance volumes and be properly linked in order to be playable in the session The following types of files are not playable Transfer Files Files that are stored on volumes not suitable for playback such as network vol umes or CD ROMs Missing Files Files that cannot be found where the session expects them either because they have been moved or because they are stored on volume...

Страница 202: ...s appear as Trans fer volumes in the Workspace browser Opening a Session with Transfer Files If a session finds files on a volume unsuitable for playback a dialog appears prompting you to copy them to a suitable volume Do one of the following Click Yes to open the Copy and Relink dialog or Click No to open the session with all Transfer files offline When opened the session s Project browser indica...

Страница 203: ...files are on a volume that is not currently mounted Opening a Session with Missing Files To open a session with missing files 1 When you open a session Pro Tools opens the session with all available media then shows you how many files are missing if any and asks how you want to proceed If told that files are unsuitable for playback see Transfer Files on page 188 2 Select one of the following Skip ...

Страница 204: ...s in the Paused Tasks pane Double click the Task icon to open the Relink window and manually find and relink files Regenerate Missing Fades Enable this option to exclude fades from the relinking process fades are recalculated in stead This option is available when Automati cally Find and Relink or Manually Find and Relink is enabled Missing Files in an Open Session You can open the Project browser...

Страница 205: ... Link icon next to the candidate can be toggled on or off to link or unlink the proposed candidate to the selected missing file The Relink window controls each phase of the relinking process The following sections explain how to Open the Relink window Select volumes and folders to search and not search Search compare and link individual files to one or more candidates Quickly match and link missin...

Страница 206: ... to toggle it to be included or excluded in the search A check next to an item indicates it will be included in the search All folders within items are also checked Single and Multi File Relinking The Relink window can be used to relink one missing file at a time or to relink missing files in batches Relinking Individual Missing Files In some situations individual files must be relinked one at a t...

Страница 207: ...e to Catalogs If Match Duration is enabled Pro Tools only selects files of the same length or greater 5 Click OK to continue or click Cancel to re turn to the Relink window Pro Tools begins to search for an acceptable can didate for the first missing file the first item se lected in the Files to Relink list A link icon ap pears next to each file as Pro Tools finds and links the first acceptable ca...

Страница 208: ... list 4 Navigate in the Areas to Search pane to locate the file you want to relink 5 Drag the file to the Candidates pane in the Relink window 6 Click the Link icon next to the file you dragged to the Candidates pane 7 Click the Commit Links button Committing Links There is no Undo for relinking Once a file has been relinked and the session saved the session always remembers the new link the origi...

Страница 209: ...signate volumes as Performance vol umes Playback or Record volumes or as Transfer volumes View and access all available volumes Unmount volumes Create view and access Catalogs Search multiple volumes and Catalogs si multaneously The Workspace browser is similar to your com puter s desktop in that it shows all of the mounted local and network volumes The Workspace browser has all the common browser...

Страница 210: ...Audio and or Video designator for the volume Mounting and Unmounting Volumes The Workspace browser lets you unmount vol umes while Pro Tools is running and shows newly mounted volumes as they come online To unmount a volume from within the Workspace browser 1 Select a volume in the Workspace browser 2 Choose Unmount Volumes from the Browser menu The Workspace browser closes the database file for t...

Страница 211: ... also provides a separate Search Results pane to view select and manage the results of searches The Search Results pane lets you maintain the results of searches while still viewing and con figuring options for additional searches To search from the Workspace 1 Choose Window Workspace to open the Workspace browser 2 Click the Search icon to display the Work space Search pane 3 Configure search cri...

Страница 212: ...Project browser 1 Launch Pro Tools and open a session 2 Choose Window Project The Project browser displays the following Audio Files Folder Contains all of the audio files currently referenced by the session regardless of where they are located Fade Files Folder Contains all of the fade files referenced by the session regardless of where they are located Render Sources Folder Contains all files th...

Страница 213: ...mand in the Browser menu cannot be used on session files or on offline audio files Use the Relink window to first bring items on line In addition the Relink Selected command cannot be used on session files Updating the Project Browser The Project browser is automatically updated whenever a file is added to or deleted from the session so it is always fully indexed and up to date DigiBase Pro Catalo...

Страница 214: ...nts in the Workspace or Double click the Catalog name to open it in its own browser window Clip Names in Catalogs Clip Names are the names that appear in the timeline and Region List when a file is imported into a session For most files the Clip name is the same as the file name For OMF Files the Clip Name is the name that appears in the Avid bin Figure 11 Catalog browser Catalog name Menu and too...

Страница 215: ...Workspace as new empty Catalogs or you can select items first and then save a Catalog of all selected items To create a new empty Catalog 1 Open the Workspace browser 2 Choose New Catalog from the browser menu 3 Enter a unique name and click OK To catalog a selection of items 1 Open any browser including an existing Cat alog 2 Select the items you want to include in the new Catalog 3 Choose Create...

Страница 216: ... are excellent tools for consolidating files from a variety of sources For example create a Catalog named Thumps and fill it with sound effects from three different volumes You can then drag the Catalog from the Workspace browser to another volume and a folder named Thumps is created on that vol ume All of the files referenced by the Catalog are automatically copied to the volume Folders and sub f...

Страница 217: ...dropping from Volume brows ers Importing Offline Items from a Catalog With Catalogs it is possible to search and im port files that are offline For example if you have a music cue that you know you want to use but it resides on a CD ROM or other un mounted volume you can spot the file from a Catalog to the session timeline and it is auto matically imported into the session when the volume is mount...

Страница 218: ...File management with Pro Tools involves nearly constant creating copying converting search ing and indexing files These tasks occur in the background letting you continue recording ed iting and mixing without delay The Task window lets you monitor pause and cancel ongoing tasks including file copying fade creation and indexing Opening the Task Window To open the Task Window In Pro Tools choose Win...

Страница 219: ...g taken for example Copy ing Processing Indexing and so on Progress Indicates the progress of the task or its sub tasks which include assessing the size of the items and the estimated amount of time neces sary to complete the task Progress Indicator Indicates processing is ongo ing Quantification Shows percentage of progress of the current task Active Tasks Pane The upper Active Tasks pane shows t...

Страница 220: ...ghlight any task in either pane of the Task window 2 Press Delete to remove it from the Task win dow To cancel all tasks 1 Select any single task in either pane 2 Press Control A Windows or Command A Mac to select all the tasks in that pane 3 Press Delete This command cannot be undone About Cancelling Tasks Some tasks involve one or more sub tasks Delet ing a task cannot undo sub tasks already com...

Страница 221: ...t ting is especially useful when working on slower CPUs or whenever you want to minimize sys tem load for maximum playback and recording performance This Preference maintains its set ting until the next time it is changed Stored Tasks Any task that imports files into a session is stored with a session when it is closed and re sumes when the session is re opened For example if you Import Tracks wit...

Страница 222: ...V Toolkit Only 3 From the Browser menu select New Catalog 4 Name the Catalog Aviary 5 Click OK A new folder named Aviary appears under the Catalog icon in the Workspace browser Find and Select Audio for the Project 6 You need to use the sound of footsteps for this project and you already have some footsteps re corded into the session on a local hard drive To view them return to the Workspace brows...

Страница 223: ...indexed perform a search on Mouse Several files are found and listed in the browser 15 Audition each item by clicking the Speaker icon next to the waveform 16 Select the three best files and drag them to the Aviary Catalog browser They now appear there next to the footsteps we found in the pre vious step 17 Close the browser for the CD ROM Search on Multiple Criteria 18 Next you need a car crash t...

Страница 224: ...nd Spot the desired car crash from the Catalog the crash found on one of the offline CD ROMs Even though the disc is not mounted the car crash file appears in the Timeline and the Region List as an offline audio file When you are ready to listen to and work with the offline car crash ef fects mount the CD ROM with the car crashes Because the CD ROM is not a qual ified playback drive the file still...

Страница 225: ... 218 Importing Audio Audio files and regions can be imported to new tracks or they can be imported into the Region List where they can be dragged to existing tracks Pro Tools can automatically convert files that don t match the session s audio file type sample rate or bit depth Audio files that don t match the session audio file type sample rate and bit depth must be converted on import Pro Tools ...

Страница 226: ...t are of the same file type and bit depth as a session can be added directly to the session When you add an audio file the session references the original audio file in its original location Use this option when you do not want to use extra hard drive space for audio files that are already of the same bit depth and sample rate as your session Pro Tools does allow audio files that are not the sessi...

Страница 227: ...ength In Windows or in Mac PC Com patibility mode these files will have a 3 letter file extension appended after the L or R channel identifier Pro Tools also lets you import multichannel in terleaved files of any supported file type Automatic Fades for Imported REX and ACID Files Pro Tools can automatically apply real time crossfades to the regions or slices in imported REX and ACID format files T...

Страница 228: ...mmands to import audio files or regions To import audio files or regions into a session from the Pro Tools File menu 1 Choose File Import Audio 2 In the Import Audio dialog select an audio file to display its properties and associated regions You can choose to display only a certain file type such as AIFF by selecting the type from the Show pop up menu To display all sup ported file types select A...

Страница 229: ...enu This set ting overrides the Sample Rate Conversion Quality setting in the Processing Prefer ences page 6 Click Done 7 If you are copying or converting files choose a location for the new files Choose a folder on a valid audio drive such as the Audio Files folder for the current session 8 In the Audio Import Options dialog choose where the imported files will go in the session New Track Each au...

Страница 230: ...he files onto the Region List of the cur rent session To import audio into an existing track 1 Select audio files in a DigiBase browser or Windows Explorer or Mac Finder 2 Drag the files onto an existing track in the Edit window of the current session To import audio into new tracks 1 Select audio files in a DigiBase browser or Windows Explorer or Mac Finder 2 Do one of the following Shift click t...

Страница 231: ...o a track in your session Importing Multichannel Audio Files from a Field Recorder Pro Tools lets you use any of the import meth ods to import monophonic and polyphonic au dio files recorded by a field recorder When you import these types of files they must be con verted to an audio format compatible with Pro Tools Importing Monophonic Audio Files A monophonic audio file contains one mono channel ...

Страница 232: ...browser Windows Explorer or Mac Finder into the track playlist area in the current session s Edit window or to the Track List 3 If the Fader Gain of the sessions are different you will be prompted to keep or change Fader Gain before the Session Data dialog opens 4 In the Source Tracks section select tracks to import by clicking the pop up menu to the right of each track name and selecting Import A...

Страница 233: ...ssions You can import tracks that use Grouped Playlists from another Pro Tools session and the playlist grouping function will remain intact for those imported tracks There is however a restriction for importing from pre Pro Tools 6 1 sessions After importing a partial set of grouped playlists such as tracks 1 7 of a 10 track group you can not subsequently import tracks 8 10 and have them rejoin t...

Страница 234: ...n copies and converts consolidated audio to the current session s au dio file format bit depth and sample rate if nec essary When you choose this option you can also choose the size of the handle in milliseconds applied to consolidated audio Handle is the amount of the original audio file that is pre served before and after each region in case you need to make any edits to the new regions Force to...

Страница 235: ...he dialog is unavailable Source Sample Rate For audio files created in any session no matter what the session sample rate is you can have the sample rate conversion process treat the files in several ways to compen sate for pull up pull down and NTSC or PAL frame rates This setting allows you to choose the sample rate from which you want the sam ple rate conversion process to start Destination Sam...

Страница 236: ...ding attribute in the destination track If you choose not to im port an attribute of the source track the corre sponding attribute in the destination track is re tained Replacing Track Path Names When you import a track s input output send output or hardware insert assignments any cus tom path names and I O configurations from the source session are not imported You can im port path names and I O ...

Страница 237: ...is made inactive Plug in Settings and Automation When the source track s plug in assignments are imported this option imports the track s plug in settings and any automation data associated with the plug ins If no plug in assignments are im ported this option has no effect Hardware Insert Assignments Imports the source track s hardware Insert assignments Any Insert assignments in the destination t...

Страница 238: ...nation track in the current session Import Main Playlists Replacing Destination Main Playlists Imports the main playlist from the source track When you import the playlist into an existing track the main playlist in the destination track is deleted and replaced with the imported playlist If you select the above option and import all of the source track s attributes this is equivalent to importing ...

Страница 239: ... 228 for details Importing using drag and drop does not nec essarily bring the Edit window to the fore ground For example dragging and drop ping a file from a browser into a track leaves the source browser in the foreground not the Edit window Always verify the active foreground window or browser before con tinuing Figure 14 Importing from browsers by drag and drop Volumes Catalogs Workspace Drop ...

Страница 240: ... To import and spot an audio file by its Waveform 1 Control click Windows or Command click Mac in an item Waveform display at the ap proximate reference point you want to use for placement in a track 2 While continuing to press Control Win dows or Command Mac drag the waveform onto an existing audio track the source audio file and the destination audio track must have the same number of channels S...

Страница 241: ...imeline To import tracks and other session data by drag and drop 1 Open a browser 2 Drag a Pro Tools session file or an AAF or OMF sequence requires DigiTranslator 2 0 into the current session as follows Drag onto an existing track to overlay or overwrite data on the target tracks Hold the Shift key while dragging if you intend to replace the current track playlists with those being imported the S...

Страница 242: ...nces dialog Using Undo after Importing Using Undo after importing removes any af fected files from the Timeline However im ported items remain in the session in the Re gion List and Project browser and are off line If you do not remove or delete the files from the session manually Pro Tools will report them as missing files the next time the session is opened Exporting Audio Pro Tools supports exp...

Страница 243: ... the file name such as file_01 Replacing with New Files Replaces files with the same name with the new files 5 Once the Export Options are configured click Export to export the new audio files Exporting Stereo or Multichannel Interleaved Files You can use the Export Regions as Files com mand to export audio regions to stereo or mul tichannel interleaved files for use in other appli cations Pro Too...

Страница 244: ...s as audio files unlike the Ex port Regions as Files command Instead it stores pointers to the regions within the parent source file To export region definitions for an audio file 1 In the Region List select any regions or region groups for which you want to export defini tions You do not have to select the parent file audio region 2 Choose Export Region Definitions from the Region List pop up men...

Страница 245: ...sion When exporting track EDLs the following op tions are available Show Subframes This option allows you to ex port subframe time information with track EDLs if used in your session Include User Timestamps You can include user timestamps with track EDLs User timestamps indicate a user defined session location for the region or the original location of the region when recorded Fade Handling For tr...

Страница 246: ...me field if you select this option To export a session as text 1 Choose File Export Session Info as Text 2 Select whether to include the File List Region List and track EDLs 3 If you choose to include track EDLs select whether to show subframes and whether to in clude user timestamps Also select an option for crossfade handling 4 If you choose to include track EDLs select the Time Format for the e...

Страница 247: ... is not needed To send a session from Pro Tools using DigiDelivery 1 Choose File Send via DigiDelivery 2 Do one of the following If the DigiDelivery client is not installed on your system Pro Tools will launch your Web browser and connect to the DigiDe livery site where you can download the current DigiDelivery client or If the DigiDelivery client is installed on your system the Send to DigiDelive...

Страница 248: ...aces each track s data in separate regions and tracks Type 1 MIDI files sometimes referred to as multitrack MIDI files contain multiple tracks of MIDI data When importing these files each track s data is placed on its own new MIDI track in the Pro Tools session Importing MIDI Files Using Pro Tools Menu Commands Pro Tools provides menu commands to import MIDI files To import Standard MIDI files int...

Страница 249: ...isting MIDI and Instrument tracks in place 5 Click OK The MIDI file will be imported according to the settings in the Import MIDI Settings dialog 6 In the Mix window click the MIDI Output se lector for each new track and assign a MIDI in strument and channel Importing MIDI Files with Drag Drop You can drag and drop MIDI files from a DigiBase browser Windows Explorer or Mac Finder to the Timeline a...

Страница 250: ...7 Specify a folder destination and name for the MIDI file 8 Click Save Pro Tools exports all unmuted MIDI and Instru ment tracks in the current session to a Standard MIDI File and writes it to your hard drive Ex ported MIDI information includes notes con troller events program changes and System Ex clusive data as well as events for tempo meter and markers The SMPTE start time for the session or t...

Страница 251: ...ted Pro Tools Instrument or MIDI tracks as a MIDI file 1 Select the tracks you want to export to a MIDI file 2 Right click the Track name of one of the se lected tracks in the Edit or Mix window or in the Track List 3 From the Right click pop up menu select Ex port MIDI 4 Set the Export MIDI Settings as desired 5 Click OK 6 In the Save dialog type a name for the MIDI file specify where you want to...

Страница 252: ...tracks to Sibelius 1 Select the tracks you want to send to Sibelius 2 Right click the Track name of one of the se lected tracks in the Edit or Mix window or in the Track List 3 From the Right click pop up menu select Send To Sibelius All selected tracks are sent to Sibelius Importing and Exporting Region Group Files Pro Tools can export and import the region group file format rgrp This lets you do...

Страница 253: ...on Aligns the beginning of the group to the edit cursor or to the beginning of a selection in the timeline Spot Displays the Spot dialog which lets you spot the group to a precise location based on any of the Time Scales 4 Select any of the following import options Import Tempo Map from Region Group File When selected replaces the session tempo map with the tempo map of the region group This optio...

Страница 254: ... default location 4 Enable one of the following options for resolv ing duplicate region group file names Prompting for Each Duplicate default Auto Renaming Replacing with New Files 5 Click OK Exporting Region Groups to Another Hard Drive Generally if you are exporting region groups to another hard drive you should copy any refer enced audio files This way you can move region groups not only from o...

Страница 255: ... www digide sign com On Pro Tools LE systems data files such as session files audio files and fade files can be lo cated on any compatible hard drive connected to your computer s internal or external ATA IDE FireWire or SCSI busses Audio File Management Unique File IDs Pro Tools tags each audio file in a session with a unique identifier that allows it to distinguish a particular file even if its n...

Страница 256: ... files on a valid Performance volume 6 Click OK Missing Files A file is missing if it is not found in the same lo cation as when the session was last saved To open a session with missing files 1 Open the Pro Tools session If any files are missing Pro Tools posts a Missing Files warning 2 Choose one of the following options Skip All Ignores all missing files and fades The missing files are offline ...

Страница 257: ... detailed report of the renamed files and their original file names to a Notes text file By default the Notes text file is saved to the Session folder Saving a Copy of a Session that Contains Long Audio File Names When saving files to Pro Tools 6 9 x and lower using Save Copy In audio files with file names that exceed the limits of the destination format are truncated and located in the Session fo...

Страница 258: ...tforms This section includes the following Working with Mac Based HFS Drives on Windows Computers on page 244 Saving Copies of Mac Sessions to be Com patible with Windows on page 246 Working with Mac Based HFS Drives on Windows Computers Either the Digidesign HFS Disk Support option or the MacDrive Utility is required to mount HFS drives on an NTFS system for use with Pro Tools Digidesign HFS Driv...

Страница 259: ...ring files from Mac based HFS drives to Windows based NTFS drives To transfer Pro Tools Mac sessions from HFS drives to NTFS drives 1 Set the Digidesign HFS Disk Support option or the MacDrive Options to Normal Use Mac systems can read but not write to ses sions located on Windows based Fat 32 formatted drives To save or create Mac sessions to be com patible on Windows systems see Saving Copies of...

Страница 260: ...ording and playback of a session from a mixture of Windows and Mac formatted drives is not supported To record or play back from HFS drives with Windows using MacDrive 1 In Windows go to the MacDrive Control Panel 2 Choose Options File Names and select the International Use option 3 Delete all options listed under File Name Maps 4 In Pro Tools choose Window Workspace and make sure that all Mac for...

Страница 261: ...le name Pro Tools 5 1 to 6 9 x session files have the extension pts and Pro Tools 5 sessions have the extension pt5 Wave files have the wav file extension and AIFF files have the aif file extension Incompatible ASCII Characters Region names track names file names and plug in settings cannot use ASCII characters that are incompatible with either system When importing files into a session incompati ...

Страница 262: ...Computer Platforms on page 244 For details on transferring sessions between Windows and Mac systems see Sharing Sessions Created on Different Computer Platforms on page 244 Differences between Pro Tools systems Feature Pro Tools HD Systems Pro Tools LE Systems Pro Tools LE Systems with DV Toolkit 2 Pro Tools LE Systems with Music Production Toolkit Maximum number of audio tracks up to 256 tracks u...

Страница 263: ...mation is dropped Groups In Pro Tools LE 7 1 or lower only all groups beyond the first 26 Bank 1 Groups a z are dropped Mix Groups keep only Main Volume informa tion Mix Edit Groups keep only Main Volume and Automation Mode information Automation overflow information for grouped controls is be preserved Group behavior of Solos Mutes Send Levels Send Mutes is be preserved Solo Mode and Solo Latch s...

Страница 264: ...esced Trim automation is dropped Groups All groups beyond the first 26 Bank 1 Groups a z are dropped Mix Groups keep only Main Volume informa tion Mix Edit Groups keep only Main Volume and Automation Mode information Automation overflow information for grouped controls is not preserved Group behavior of Solos LFEs Mutes Send Levels Send Mutes is not preserved Solo Mode and Solo Latch settings are ...

Страница 265: ...to 31 characters The following attributes are dropped Region groups Region loops Sample based MIDI regions Sample based MIDI tracks Sends F J and any associated automation Marker Memory Locations 201 999 Groups All groups beyond the first 26 Bank 1 Groups a z are dropped Mix Groups keep only Main Volume informa tion Mix Edit Groups keep only Main Volume and Automation Mode information Automation o...

Страница 266: ...ng to even odd channels such as 2 3 are routed to Busses 31 and 32 Multi mono plug in instances are dropped Sharing Pro Tools LE 7 3 Sessions with Lower Versions of Pro Tools LE Opening Pro Tools LE 7 3 Sessions with Pro Tools LE 7 1 or 7 0 A Pro Tools LE 7 3 session that does not contain video tracks can be opened with Pro Tools LE 7 1 or 7 0 but certain session components open differently or not...

Страница 267: ...laylists are not available Video regions and video region groups are not shown or saved Fader Gain levels and automation breakpoints higher than 6 dB are changed to 6 dB Long names are shortened to 31 characters Instrument tracks are split into separate Aux iliary Input and MIDI tracks The following attributes are dropped Region groups Region loops Sample based MIDI regions Sample based MIDI track...

Страница 268: ...m Preferences 3 Click International the flag icon 4 Click the Language tab if the Language page is not the current page 5 In the Languages column click the language you want and drag it to the top of the list 6 Close the International window 7 Do one of the following If you are changing from a localized lan guage to English launch Pro Tools or If you are changing from one localized lan guage to an...

Страница 269: ...255 Part IV Recording ...

Страница 270: ...256 ...

Страница 271: ... gain Mbox 2 Mbox 2 Pro Mbox 2 Mini and Mbox each have two inputs with preamps to which you can connect low level signals For input information on Digidesign qualified M Audio units refer to your M Audio documen tation For all systems volume and pan controls for tracks in Pro Tools only affect monitoring lev els not the recording input gain The LED meters on Digidesign audio interfaces indicate bo...

Страница 272: ...ol lowing audio interfaces 192 Digital I O 96 I O 96i I O 882 20 I O 1622 I O and 24 bit ADAT Bridge I O Some Digidesign I Os that do not have output trims such as the 96i I O offer software controllable input levels adjustable from Setup Hardware refer to the guide for your particular I O Record Enabling Tracks To record to a track you must first enable the track s Record Enable button To record ...

Страница 273: ...ess the Up Down Arrows to record enable the previous or next MIDI or In strument track The previous or next record track is no longer record enabled To record enable all audio or all MIDI and Instrument tracks Alt click Windows or Option click Mac the Record Enable button to toggle record enable on or off for all audio or Instrument and MIDI tracks For record enable Pro Tools treats MIDI and In st...

Страница 274: ...at prevents tracks from being record enabled Use Record Safe mode to protect important track recordings To put an audio or MIDI track in Record Safe mode Control click Windows or Command click Mac the track s Record Enable button The Record Enable button is greyed out Control click Windows or Command click Mac again to take the track out of Record Safe mode To put all tracks in Record Safe mode Co...

Страница 275: ...green when one or more tracks have TrackInput en abled Selecting a Record Monitor Mode in Pro Tools LE For record enabled tracks to use Auto Input Monitoring Select Track Auto Input Monitoring For record enabled tracks to use Input Only Monitoring Select Tracks Input Only Monitoring Selecting Record Monitor Modes with TrackInput Monitoring Pro Tools HD Only TrackInput monitoring lets you toggle in...

Страница 276: ...lows such as when you are recording on a series of tracks one at a time Disabling this option allows TrackInput buttons to remain enabled when deselecting the track s Record Enable button Monitor Levels for Record and Playback Pro Tools remembers two different fader levels for monitoring each audio track one for when the track is record enabled and one for when it is not record enabled Pro Tools k...

Страница 277: ... 2 Mini and Mbox Only Mbox 2 Mbox Mini and Mbox give you the ability to monitor your analog input signals while recording without hearing any latency This zero latency analog monitoring is con trolled by the front panel Mix knob which you can use to blend and adjust the ratio between the interface s analog input and Pro Tools play back For more information refer to your sys tem s Getting Started G...

Страница 278: ...utively For example when you create two new audio tracks their default names are Audio 1 and Audio 2 You can rename tracks and also log comments for each track Track names define new file and region names when recording to a track See Naming Tracks on page 126 Default Names for Audio Files and Regions When recording to an audio track the resulting file and region names are based on the name of the...

Страница 279: ...ecords audio files to the Audio Files folder inside the session folder You can use the Disk Allocation window to specify other locations for your audio files for each au dio track Hard drives that are full do not appear in the Disk Allocation window To increase system performance Pro Tools can record and play each track from a different hard drive You can also automatically distribute any newly cr...

Страница 280: ... Track column to extend the selection to include already se lected tracks without including tracks in between 3 To save recorded audio files to an existing folder without creating another session folder select Customize Allocation Options then click the Change button and choose the folder To create subfolders in this folder select Create Subfolders for audio video and fade files 4 To automatically...

Страница 281: ...making it read only Play Only or Transfer check the Disk Al location window for any tracks formerly allo cated to that drive For more information see Audio and Video Volume Designators on page 196 Recording to the System Volume Pro Tools lets you record to your system vol ume however this is generally not recom mended Performance for audio recording and playback on system drives is not as good as ...

Страница 282: ...Limit To and enter the number of minutes to be allocated The number of minutes specified is allocated for each record enabled track 3 When you are finished click OK Monitoring Drive Space To monitor available space on your drive during a Pro Tools session Choose Window Disk Space To display available drive space in different view formats Choose View Disk Space and select a format Text View or Gas ...

Страница 283: ...nd end points which is useful when punch recording see Punch Recording Audio on page 283 Destructive Record Mode In Destructive Record mode recording over ex isting regions replaces the original audio perma nently which allows you to keep disk use to a minimum However if you have sufficient drive space it is usually best to use Pro Tools in Non destructive Record mode to avoid losing any previousl...

Страница 284: ...that file at each punch in out point These regions appear in the track s playlist and the complete audio file ap pears in the Region List along with the Quick Punch created regions Up to 200 of these run ning punches can be performed in a single pass Though you can punch record in the other record modes by manually specifying the record range only QuickPunch provides instantaneous monitor switchin...

Страница 285: ...Loop Record mode is enabled in this mode existing track regions are replaced with new regions when new material is recorded The old regions remain intact and available from the Region List and from the Matches pop up menu In Loop Record mode MIDI Merge has no effect so its button is dimmed Recording with a Click If you intend to work with MIDI or Instrument tracks in your session or if the audio y...

Страница 286: ... plug in on the track such as Digidesign s Xpand 3 Configure the Click Countoff options and be sure to select the port for the MIDI device or in strument plug in from the Output pop up menu see Click Options on page 272 4 Enable Click see Enabling Click on page 273 Click Options Pro Tools provides options and controls for driving a click The following steps are for con figuring and enabling a clic...

Страница 287: ... Select View Transport MIDI Controls Control click Windows or Command click Mac the Expand Collapse but ton in the Transport window to display the MIDI controls Alt click Windows or Option click Mac the Expand Collapse button in the Transport window to display the MIDI con trols and the Counters 2 In the Transport click the Metronome Click button so it is highlighted 3 To use a countoff when recor...

Страница 288: ...ng and editing meter events see Meter Events on page 512 To set the default meter for a session 1 Double click the Current Meter button in the Transport window 2 Enter the Meter for the session and set the Lo cation to 1 1 000 to ensure that the inserted meter event replaces the default 3 From the Click pop up menu select a note value for the beat 4 Click OK to insert the new meter event Setting t...

Страница 289: ...e Manual Tempo with the Tempo slider 1 To view the MIDI controls in the Transport window select View Transport MIDI Con trols 2 In the Transport window click the Tempo Ruler Enable button Conductor button so it becomes unhighlighted Pro Tools switches to Manual Tempo mode In this mode any tempo events in the Tempo track are ignored 3 To base the BPM value on something other than the default quarte...

Страница 290: ...it becomes highlighted and tap the T key on your computer keyboard repeatedly at the new tempo or Click in the Tempo field so it becomes highlighted and tap in the tempo by play ing a note repeatedly at the new tempo on your MIDI keyboard controller To compute the new tempo Pro Tools averages the last eight or fewer taps to determine the correct tempo The computed BPM value ap pears in the Transpo...

Страница 291: ...ource to a multi channel track Pro Tools HD only is similar to recording stereo audio tracks A single mono audio file is written for each channel in the track and these files appear as multichannel re gions in both the track s playlist and in the Re gion List To configure an audio track for recording 1 Connect mono or stereo sound sources to in puts on your Pro Tools audio interface 2 Choose Setup...

Страница 292: ... the Edit window with I O View enabled select the corresponding hardware output for monitoring such as A 1 2 from the track s Output Path selector 7 Record enable the track by doing one of the following In the Mix window click the track s Record Enable button or In the Edit window click the track s Record Enable button The track s Record Enable button flashes red the track s fader is solid red and...

Страница 293: ...ge 274 5 To have recording start from the beginning of the session click Return to Zero in the Trans port 6 Click Record in the Transport to arm Pro Tools for recording Record Ready mode The Record button flashes 7 Click Play in the Transport to begin recording If using Countoff Pro Tools counts off the spec ified number of measures and then begins re cording 8 Click Stop in the Transport to stop ...

Страница 294: ...ple audio tracks si multaneously up to the track recording limits of your system To record to multiple tracks con figure and record enable each track then record Follow the same steps as in Recording an Audio Track on page 277 For each record enabled track a new audio file is written to disk and a new region is created that appears both in the track s playlist and in the Region List Record Shortcu...

Страница 295: ...ely record a new take on the same track 1 In the Options menu ensure that the follow ing options are deselected Destructive Record Loop Record QuickPunch TrackPunch and De structivePunch 2 Record enable the track 3 Do one of the following To record from the beginning of the ses sion click Return to Zero in the Transport or If Options Link Timeline and Edit Selec tion is enabled click anywhere in t...

Страница 296: ...track 1 Do one of the following Click the Go to End button in the Trans port to locate to the end of the track this locates the end of the session or Tab to the end point of the last region on the track 2 From there begin recording Pro Tools adds the new material to the end of the track If using Destructive Record mode the new audio is appended to the audio file and re gion from the first take In ...

Страница 297: ...Audio To define a record range in the playlist or re place a portion of a recorded track you can punch in by specifying the record range before recording Though there are several ways to set record and play ranges see Setting Punch Loop Points on page 288 perhaps the easiest is to select within the track s playlist the range for recording During the recording process playback begins at the pre rol...

Страница 298: ...previous material in the existing audio file and region Monitoring During Punch Ins Pro Tools provides two monitoring modes for recording Auto Input monitoring and Input Only monitoring Loop Recording Audio Pro Tools provides a loop recording feature that lets you record take after take while the same section of audio repeats over and over This is a convenient technique for quickly recording multi...

Страница 299: ... When the end point is reached Pro Tools loops back to the start time and con tinues recording 8 To cancel all recorded takes while loop record ing press Control Period Windows or Command Period Mac 9 When finished click Stop to stop recording If you stop recording before you reach the mid point of the loop Pro Tools discards that take If you record more than half of the looped take Pro Tools will...

Страница 300: ... Selecting an Alternate Take on a Track Each region resulting from a punch or loop record pass has an identical start time the User Time Stamp You can select and audition alter nate takes from the Right click Matches sub menu or the Alternate Takes pop up menu even during playback To select an alternate take do one of the following Right click the region with the Selector or Grabber tools and sele...

Страница 301: ...h 3 Click OK to close the Preferences dialog 4 With the Selector tool select the take range for each track you want to replace 5 Do one of the following Right click any of the selected takes and se lect a different take from the Matches sub menu or Control click Windows or Command click Mac any of the selected takes and se lect a different take from the Alternate Takes pop up menu The selected tak...

Страница 302: ... gions in the session that have the same User Time Stamp will be affected In most instances you ll want to deselect the Separate Region Operates On All Related Takes option to prevent a large number of regions from being created when you use the Separate Region command Setting Punch Loop Points The start and end points of a record range for punch and loop recording can be set by the fol lowing met...

Страница 303: ...lay start end and length times and pre and post roll settings When setting a record or play range the range is reflected in these fields You can enter locations in the start and end fields to set the record or play range The Time line Selection Markers in the Main Timebase ruler are updated accordingly You can also enter a start and end point during playback Press the Down Arrow to set the start p...

Страница 304: ...a Memory Location 1 Ensure that Options Link Timeline and Edit Selection is selected 2 Set the record range by making an Edit or Timeline selection or by entering start and end times in the Transport window 3 To save the pre and post roll values enable and set the pre and post roll amounts by enter ing them in the Transport window or by drag ging the Pre and Post Roll Flags in the ruler that repre...

Страница 305: ... can be entered in the Transport window set from a track s playlist or Timebase ruler or by recalling a Memory Loca tion Setting Pre and Post Roll in the Transport Window Pre and post roll can be enabled and set in the Transport window To set and enable the pre and post roll times in the Transport window 1 Select View Transport Expanded 2 In the Transport window click in the pre roll field 3 Type ...

Страница 306: ...g the Post Roll Flag to the Timeline Selec tion End Marker Enabling Pre Post Roll from the Options Menu Pre and post roll as a pair can be enabled and disabled from the Options menu To enable both pre post roll from the Options menu Select Options Pre Post Roll Dragging Pre and Post Roll Flags in the Timebase Ruler The Pre and Post Roll Flags can be moved in the Main Timebase ruler either separate...

Страница 307: ... in the 192 I O enclosure are identified as AES EBU Encl The additional digital ports on the 192 I O and 192 Digital I O are TDIF AES EBU and ADAT Pro Tools can only receive digital audio from one of these ports at a time However inputs on both the 192 I O enclosure I O and Digital card can be used simultaneously For example on a 192 I O it is possible to clock off a source from one of the enclosu...

Страница 308: ...ivePunch 9 To have recording start from the beginning of the session click Return to Zero in the Trans port 10 Record enable the new audio track 11 Click Record in the Transport to arm Pro Tools for recording 12 Click Play to start recording 13 Start playback on the recording source 14 When the material from the source has fin ished click Stop in the Transport 15 Stop playback on the recording sou...

Страница 309: ...DI tracks or to record complex automa tion moves To record at half speed 1 Record enable the tracks you want to record at half speed 2 Click Record in the Transport to arm Pro Tools for recording 3 Press Control Shift Spacebar Windows or Command Shift Spacebar Mac Recording be gins and all existing track material plays at half speed 4 When you have finished recording click Stop Half Speed Playback...

Страница 310: ...Pro Tools Reference Guide 296 ...

Страница 311: ...ructivePunch to punch in on the fly with MIDI or Instrument tracks This capabil ity is available both in Normal Nondestructive Record mode and Destructive Record mode Recording from MIDI Devices The MIDI Inputs for record enabled MIDI and Instrument tracks determine what MIDI data is recorded in Pro Tools MIDI Inputs can be set to a specific device port and channel or they can be set to All where ...

Страница 312: ...wanted notes from certain devices such as drum machines or arpeggiators are not recorded MIDI Control Surfaces In order to use any MIDI control surfaces such as the Digidesign Com mand 8 they must be enabled in the Input De vices dialog MMC In order for Pro Tools to synchronize to MMC the MMC source must be enabled in the Input Devices dialog To enable input devices 1 Choose Setup MIDI Input Devic...

Страница 313: ...ew assignment follow MIDI track selection When multiple MIDI tracks are selected previewing uses the top track or left track in the Edit or Mix win dows To disable the Default Thru Instrument se lect None MIDI Input Filter Use the MIDI Input Filter to prevent certain types of MIDI messages from being recorded The MIDI Input Filter can be set to record All messages Only the specified messages or Al...

Страница 314: ... begins recording When enabled Pro Tools does not start recording until a MIDI event is received This ensures that recording begins only when you start playing and that the first note or other MIDI data is recorded precisely at the be ginning of the record range start time Wait for Note can be used when recording nor mally when punching in or when loop record ing If pre roll is enabled it occurs a...

Страница 315: ... trols 2 In the Transport window click the MIDI Merge button so it becomes highlighted Configuring MIDI or Instrument Tracks for Recording To configure one or more MIDI or Instrument tracks for recording 1 Create a new MIDI or Instrument track or use an existing MIDI or Instrument track 2 For Instrument tracks select View Mix Win dow Instruments or View Edit Window In struments Wait for Note enabl...

Страница 316: ...r Mix window Instrument track MIDI Input selector Mix window MIDI track MIDI Input selector Edit window Instrument track MIDI Input selector Edit window MIDI Input selector MIDI Input selector MIDI Input selector MIDI Input selector MIDI track MIDI Output selector Mix window Instrument track MIDI Output selector Mix window MIDI track MIDI Output selector Edit window Instrument track MIDI Output se...

Страница 317: ...icking its Record Enable button 14 Select Options MIDI Thru is selected then play your MIDI controller The MIDI device or instrument plug in assigned to the track s MIDI Output sounds and the track s meters register MIDI activity You are now ready to record MIDI data to the record enabled MIDI and Instrument tracks Recording MIDI and Instrument Tracks In Pro Tools you can record to one or more MID...

Страница 318: ...ch record enabled track a new MIDI re gion is created and appears both in the playlist and in the Region List MIDI Regions Created on Barlines When recording MIDI or when manually enter ing MIDI notes the beginning and ending of MIDI regions are created on bar boundaries This greatly facilitates arranging MIDI regions in a musically meaningful way in whole bar lengths The beginning of a recorded M...

Страница 319: ...ed To cancel a take while recording Press Control Period Windows or Com mand Period Mac before the Transport is stopped When in Loop Record mode all takes from each record pass are discarded Punch Recording MIDI To replace a portion of a MIDI or Instrument track you can punch in by specifying the record range before recording To punch in on a MIDI or Instrument track 1 Configure a MIDI or Instrume...

Страница 320: ... fly at any time dur ing playback Unlike audio tracks it is not nec essary to enable QuickPunch to perform real time punch recording To punch record on the fly with MIDI 1 Configure a MIDI or Instrument track for re cording see Configuring MIDI or Instrument Tracks for Recording on page 301 2 Ensure that Pro Tools is in Normal Nonde structive Record mode If necessary deselect the following in the ...

Страница 321: ...e the original material is ei ther lost unless you choose Edit Undo MIDI Recording or combined with new material if MIDI Merge was enabled during recording If an existing region contains material you want to keep use Duplicate to make a copy of the region Duplicate Command on page 449 or dupli cate the track s playlist or record in a new play list to keep a backup see Working with Playl ists on pa...

Страница 322: ...nable and set the pre roll time see Setting Pre and Post Roll on page 291 10 Click Record in the Transport to arm Pro Tools for recording The Record button flashes 11 Click Play to start recording The Record button flashes during pre roll When the start point is reached Pro Tools be gins recording When the end point is reached Pro Tools loops back to the start point and con tinues playing and reco...

Страница 323: ... Countoff in the Transport window 5 Select Options Link Timeline and Edit Selec tion 6 With the Selector tool select the loop range in the track s playlist 7 To hear track material up to the start point of the loop enable and set the pre roll time see Setting Pre and Post Roll on page 291 8 Click Record in the Transport to arm Pro Tools for recording The Record button flashes 9 Click Play to start...

Страница 324: ...ise control over note placement duration and velocity With MIDI Step Input you can also create musical passages that might be difficult to play accurately or at faster tempos Recording System Exclusive Data Pro Tools supports recording and playing Sys tem Exclusive data Sysex with MIDI tracks This allows you to use MIDI tracks in Pro Tools to store patch and configuration data for your MIDI device...

Страница 325: ...for MIDI and Instrument Tracks on page 345 To send Sysex data from Pro Tools to an external MIDI device 1 For the device receiving the System Exclusive data make sure its MIDI IN is connected to the MIDI interface s MIDI OUT Also make sure the device is set to receive Sysex Some devices re quire that memory protect be off For more in formation refer to the manufacturer s instructions 2 Make sure t...

Страница 326: ... the record range 10 Click Record in the Transport to arm Pro Tools for recording 11 Click Play in the Transport to start recording 12 When your previously recorded MIDI perfor mance is finished playing click Stop in the Transport to stop recording Recording Audio from an External MIDI Instrument You can record audio from an external MIDI in strument in one of two ways By bussing audio from the ou...

Страница 327: ...abil ity called QuickPunch QuickPunch lets you in stantaneously punch in and out on record en abled audio tracks during playback by clicking the Record button in the Transport When using QuickPunch Pro Tools begins re cording a new file when playback begins auto matically generating regions in that file at each punch in and punch out point These regions appear in the track s playlist and the compl...

Страница 328: ... enter and exit record mode QuickPunch crossfades can be edited in the same manner as standard crossfades see Using Fades on page 465 QuickPunch Guidelines for Pro Tools HD When using QuickPunch with Pro Tools HD two voices are required for each record enabled mono track This means that you can record up to half the total number of voices available on your system For example a Pro Tools HD Accel s...

Страница 329: ...acks 17 32 must be as signed to voices 33 48 QuickPunch Guidelines for Pro Tools LE For Pro Tools LE systems up to 16 mono or 8 stereo audio tracks can be simultaneously re corded with QuickPunch see Pro Tools LE Sys tem Capabilities on page 26 For Pro Tools LE with DV Toolkit 2 or Music Pro duction Toolkit up to 24 mono or stereo audio tracks can be simultaneously recorded with QuickPunch On thes...

Страница 330: ...ion QuickPunch punches in and out only within the selection or in the case of an insertion point only after the insertion point If you se lect Record Online at Time Code Lock Quick Punch disregards the selection and punches in and out whenever you want after Pro Tools has locked to time code Region and Take Numbering with QuickPunch After recording with QuickPunch the new au dio regions appear in ...

Страница 331: ...up voices on tracks that are not record enabled and do not need to be heard while recording do any of the following Set voice assignments for tracks to Off Make tracks inactive Group all RTAS plug ins before TDM plug ins As necessary voices in use by other tracks may be stolen while recording with TrackPunch thus silencing some tracks TrackPunch voice playback priority follows the same guidelines ...

Страница 332: ...Punch enabled audio tracks then click Record in the Transport to punch in and out all TrackPunch enabledtrackssimultaneously or Click Record in the Transport first then Alt Shift click Win or Option Shift click Mac track s Record Enable button to si multaneously punch in and out on all cur rently selected TrackPunch enabled tracks 10 While continuing local or remote playback do any of the followin...

Страница 333: ...e is automatically disabled and greyed out when Destructive record mode is en abled Audio Track RecordLock This setting lets Pro Tools tracks either emulate a digital dubber or maintain legacy behavior for track record status When the Audio RecordLock preference is en abled the record enabled audio tracks remain armed when playback or recording stops When the Audio RecordLock preference is not ena...

Страница 334: ...nabled in the Pro Tools transport To enable TrackPunch mode 1 Make sure Pro Tools is not recording or play ing back the Transport is stopped 2 Do one of the following Select Options TrackPunch Right click the Record button in the Trans port and select TrackPunch from the pop up menu Start click Windows or Control click Mac the Record button in the Transport to cycle through available Record modes ...

Страница 335: ... TrackPunch enabled the tracks Record Enable buttons are solid blue To TrackPunch enable or disable all selected audio tracks Alt Start Shift click Windows or Option Control Shift click Mac a track s Record Enable button When TrackPunch enabled the selected tracks buttons are solid blue Track Record Status Display Each track s Record Enable button indicates its TrackPunch and record enable status ...

Страница 336: ...d The track s Record Enable button flashes blue and red 3 Click Play in the Transport to begin playback 4 During playback click Record in the Transport to punch in and out on all TrackPunch enabled tracks simultaneously 5 Stop playback When you are finished with the record pass track Record Enable status and transport Record Arm status follow the current TrackPunch preference settings Start Record...

Страница 337: ... can be networked Track Punch and all other audio files and whole sessions can be available for secure transfer to other systems for review editing and ar chiving A typical pre dub session using TrackPunch includes the following steps 1 Configure synchronization between Pro Tools and other devices as appropriate 2 Choose Setup Preferences and click the Operation tab 3 Select enable Transport Recor...

Страница 338: ...o Track RecordLock 4 Configure synchronization and other settings as required 5 Put Pro Tools online and start the external source player 6 Whenever time code drops out or stops Pro Tools remains online and waits to receive new time code The Transport and record en abled tracks remain record enabled or Track Punch enabled When time code resumes Pro Tools begins recording to a new audio file proper...

Страница 339: ...gle contiguous file without any edits DestructivePunch is essentially a destructive version of TrackPunch mode Where Track Punch always records audio to a new file in the background DestructivePunch destructively records audio directly into the original file us ing a fixed 10 millisecond linear crossfade Up to 200 running punches can be performed in a track during a single DestructivePunch pass De...

Страница 340: ...indicator on the track To ensure that Low Latency monitoring is disabled for all record tracks Control Alt Start Shift click Windows or Command Option Control Shift click Mac the Track Compensation indicator on the track Enabling DestructivePunch Mode Before you can enable individual audio tracks for DestructivePunch recording you must put Pro Tools in DestructivePunch mode To enable DestructivePu...

Страница 341: ... Alt click Windows or Option click Mac a track s Record Enable button All tracks Record Enable buttons flash blue and red To simultaneously DestructivePunch enable and record enable all selected audio tracks Alt Shift click Windows or Option Shift click Mac a track s Record Enable button The Record Enable buttons for the selected audio tracks flash blue and red Display of DestructivePunch Status T...

Страница 342: ...able button lights solid red Record and Input Status LEDs Record and Input LEDs next to the Transport Record Enable button indicate track Record and Input status as follows in all recording modes Record Status LED When lit red indicates that at least one audio track is currently record en abled When off grey no tracks are currently record enabled Input Status LED When lit green indicates that at l...

Страница 343: ...the tracks you want to prepare are DestructivePunch enabled DestructivePunch Enabling Tracks without Record Enabling Them on page 326 3 Choose Options Prepare DPE Tracks Pro Tools consolidates audio on all Destructive Punch enabled tracks from the beginning of the session to the value specified in the Destructive Punch File Length preference DestructivePunch Recording After you have put Pro Tools ...

Страница 344: ... RecordLock and Transport Record Lock preference settings Starting Recording Immediately on Multiple Tracks To punch in on multiple tracks 1 Enable DestructivePunch mode Enabling DestructivePunch Mode on page 326 2 Click the Record Enable button on each track you want to punch in so that the track is both DestructivePunch enabled and Record enabled Each track s Record Enable button flashes blue an...

Страница 345: ...331 Part V Editing ...

Страница 346: ...332 ...

Страница 347: ...n performing edits see Nondestructive MIDI Editing on page 346 Editing During Playback Pro Tools lets you perform many editing tasks while the session plays This powerful capability lets you interactively modify and edit a session hearing the changes as you make them You will find many instances where you can use this ca pability to increase your productivity when working with a session Following ...

Страница 348: ... punch recording User Defined Regions These are regions that are explicitly defined such as when you record or import audio or MIDI capture separate or con solidate a selection trim a whole file audio re gion or rename an existing region Auto Created Regions These regions are auto matically created in the course of editing and in some instances when punch recording over existing regions Since thes...

Страница 349: ...Trim or Mute MIDI Tracks Can be set to Blocks Regions Notes Volume Pan Mute Velocity Pitch Bend After Touch Program Sysex and any continuous con troller type MIDI tracks are commonly set to Notes or Regions each of which displays notes in a piano roll format Use Notes View for in serting editing and copying and pasting MIDI notes Use Regions View to arrange capture or consolidate regions Other MID...

Страница 350: ...and select the format from the pop up menu The track displays the new format If the track is part of an active Edit Group all tracks in the group are set to the new format Track View set to Pan for audio track For details on editing automation data for audio tracks see Chapter 30 Auto mation For details on inserting and editing control ler data for MIDI tracks see Continuous Controller Events on p...

Страница 351: ...change to the previous or next Track View on all tracks press Control Alt Start Windows or Control Option Command Mac and the Left or Right Arrow key Toggling Common Track Views The most common editing view for audio tracks are Waveform and Volume View The most com mon editing views for MIDI and Instrument tracks are Notes and Regions View Pro Tools provides an easy way to toggle these views To to...

Страница 352: ...ave a Master View Volume When an Auxiliary Input or Master Fader track is dis played in its Master View any edits performed apply to all automation data in the track Track Height Tracks can be viewed in the Edit window at any of eight heights Micro Mini Small Medium Large Jumbo Extreme and Fit To Window Larger track heights are particularly useful for precise editing especially for MIDI Smaller tr...

Страница 353: ... as a separate Track View selector and meter for each channel To turn on Expanded Track Display From the Track Height selector click Ex panded Track Display Track Controls and Track Height The Track Height affects how the various track controls appear in the Edit window For in stance when a track s height is set to Small most of the buttons are reduced in size When the Track Height is set to Mini ...

Страница 354: ...laying Region Names Region Times and Other Data in Playlists Region names and times can sometimes get in the way of editing audio waveforms and MIDI data In these instances you may want to dis able their display In other instances such as ar ranging or spotting Foley displaying region names and times is extremely useful To enable or disable the display of region names in playlists Select or desele...

Страница 355: ... be displayed in regions in playlists and in the Region List This is useful for working with multichannel recordings and metadata made by field recorders Audio Regions and Waveforms When the Track View for audio tracks is set to Waveform Pro Tools draws a waveform dia gram of the audio Audio waveforms tell you several things about the recorded sound In Figure 16 the peaks represent places in the r...

Страница 356: ...ks While editing try to create regions that let you maintain a consistent beat If you always define regions so that they contain a whole number of beats you will be able to string the regions to gether and maintain a smooth steady rhythm It is sometimes useful to have a steady well de fined waveform such as a drum track as a guide when selecting and defining other regions If you have played in tim...

Страница 357: ... Pro Tools creates a map of the audio file on your hard disk which describes the order in which to play the track portions When trimming audio regions with any of the Trim tools or when editing the placement or or der of regions within a track use multiple play lists to easily return to a track s previous state For more information see Playlists on page 352 Audio Regions and Automation Data Automa...

Страница 358: ... are displayed as single pixel lines at the very top and bottom of the range see Figure 17 above To scroll the Notes display up or down for a MIDI or Instrument track do one of the following Click either the up or down arrow of the mini keyboard or With any of the Edit tools such as the Time Grabber tool selected press Control Alt Start Windows or Command Option Control Mac and click and drag up o...

Страница 359: ...t is selected When cutting or clearing a region or region group selection that includes a note s end point but not its start point the note remains and overlaps the edge of the region Similar rules also apply when MIDI regions or region groups containing MIDI regions are trimmed with any of the Trim tools If the MIDI region s start point is moved beyond a note s start point the note is removed If ...

Страница 360: ... Region List or return to a previously saved play list MIDI Regions and Continuous Controller Events Continuous controller events reside in MIDI re gions and not in tracks This means that when dragging regions that contain controller data from either a track or the Region List the con troller data is written to the destination track Unlike continuous controller events which rep resent nuances that...

Страница 361: ...8 To add a specific ruler to the display such as the Markers ruler for instance Select View Rulers Marker To change the display order for the rulers Click a ruler s name and drag up or down to the new location Ruler View Selector The Timebase and Conductor rulers can also be configured with the Ruler View selector Secondary Time Code Ruler Pro Tools HD and Pro Tools LE with DV Toolkit 2 Only A sec...

Страница 362: ...ou zoom in farther with the Zoomer tool the Time Scale begins to display tenths hundredths and thousandths of a second Time Code Pro Tools HD and Pro Tools LE with DV Toolkit 2 Only Displays the Time Scale in SMPTE frames The Time Code Rate and Session Start time are set from the Session Setup win dow Pro Tools supports the following frame rates 23 976 24 25 29 97 Non Drop 29 97 Drop 30 Non Drop a...

Страница 363: ...Mac or Return Mac to automatically navigate to a new location Setting the Sub Counter Time Scale Below each Main Counter is a Sub Counter which provides an additional timing reference To set the Time Scale for the Sub Counter Click a Sub Counter selector and select a Time Scale Main Counter selector in the Edit window Setting the Main Time Scale to the timebase currently displayed in the Sub Count...

Страница 364: ...Pro Tools lets you set any track timebase to ei ther sample based or tick based Audio in Pro Tools is sample based by default This means that if an audio region is located at a particular sample location it will not move from that location if the tempo changes in the session though its bar and beat location will change MIDI data in Pro Tools is tick based by default This means that if a MIDI regio...

Страница 365: ...ar in the Edit window The Timebase selec tor which is used for switching a track s time base is only visible in Small or larger track heights To switch the timebase of a track do one of the following If the track s height is set to Small or larger click the Timebase selector for the track and se lect the desired timebase The Timebase selector icon changes to reflect your choice or If the track s h...

Страница 366: ...en the Main Time Scale is set to Bars Beats This is most evident when you need audio regions to fall cleanly on the beat as when looping and notice that the material is sometimes a tick or two off With a few simple precautions this can be avoided When selecting audio regions to be copied du plicated or repeated make sure to select the ma terial with the Selector tool enable Grid mode for precise s...

Страница 367: ...Duplicate from the pop up menu 2 Enter a name for the new playlist and click OK The duplicated playlist appears in the track and the track s name is changed to the name of the new playlist New and duplicated playlists are auto named with the track name followed by a Period and the playlist number For example the first duplicated playlist on a track named Kick is auto named Kick 01 subsequent dupli...

Страница 368: ...st Renaming a Playlist You can rename a playlist by renaming the track to which it is assigned To rename a track s assigned playlist 1 Double click the track s name 2 Enter a new name and click OK Both the track and playlist names are updated Deleting a Playlist You can delete a playlist from a session entirely However since playlists require minimal disk space you do not need to delete them to co...

Страница 369: ...ement their playlists to keep them synchronized 7 If you want to hear the 01 take on the first group of tracks you can switch any playlist in the group back to playlist 01 All tracks in the group have playlists numbered with 01 suffixes even those tracks that were added to the original group after the earlier takes Empty playlists are automatically created on these newly added members so that play...

Страница 370: ...ave already been undone are shown in italics To redo operations in the Undo History window Click the operation italics in the list to redo The operation you choose as well as all the op erations in the queue before it are redone To toggle display of creation times in the Undo History window Click the Options pop up menu and choose Show Creation Times To undo all the operations in the Undo Queue Cl...

Страница 371: ...Undo field and enter a value of between 1 32 3 Click OK The Region List The Edit Window displays all audio regions MIDI regions and region groups in a single comprehensive Region List All regions of all types that are recorded im ported or created by editing appear in the Re gion List Items can be dragged from the list to tracks and arranged in any order All types of re gions can be auditioned fro...

Страница 372: ...es the Region List can also display information about the region s color coding type audio MIDI and region group timebase and parent file Color Displays the color coding for regions Icon Displays the icon for audio and MIDI re gions and region groups Timebase Displays the timebase for audio and MIDI regions and region groups File Name Displays the parent file name Disk Name Displays the name of th...

Страница 373: ... End in Parent File Name File Length File Creation Date File Modification Date Disk Name audio and region groups only Track Format Width By Channel Name By Scene and Take 3 Click the Region List pop up menu choose Sort By and select one of the following to apply additional sort criteria in other words to add a secondary sort criteria Ascending Descending Finding Regions Use the Find command to dis...

Страница 374: ...hes with a minimum of retyping To repeat a previous search 1 Click the Region List pop up menu and choose Find 2 Click the small arrow to the right of the text field in the Find dialog and select a text string from the Find History pop up menu The Find History is saved with the session In addition to storing each text string previously entered you can insert multiple entries into the Find History ...

Страница 375: ...rst region selected and the additional region will also be selected To select or deselect a range of regions with the Marquee 1 Move the cursor to the left of the region name until the Marquee icon with a small symbol appears To select regions the Marquee should be to the left of an unhighlighted region name To deselect regions the Marquee should be to the left of a highlighted region name 2 Click...

Страница 376: ...in dicates stereo and multichannel regions Stereo and multichannel regions are displayed in the Region List by default in collapsed view The individual regions can be displayed by click ing the arrow to the left of the region to expand the name To expand or collapse all stereo and multichannel regions Press Alt Windows or Option Mac while clicking the expand collapse triangle Individual items of a...

Страница 377: ...edraws wave forms for selected regions Select Parent in Workspace Highlights the par ent file of selected region in the DigiBase Work space Browser Object Select in Edit Window Selects region as an object in the Edit window Edit Modes Pro Tools has four Edit modes Shuffle Spot Slip and Grid Grid mode provides two modes of operation Relative and Absolute explained below The Edit mode is selected by...

Страница 378: ...le mode by disabling all key commands and control surface switches for Shuffle mode You cannot invoke Shuffle Lock while in Shuffle mode To lock out Shuffle Mode While in any Edit mode other than Shuffle mode Control click Windows or Command click Mac the Shuffle button on screen A lock icon appears in the Shuffle button To unlock Shuffle Mode Control click Windows or Command click Mac the locked ...

Страница 379: ...ats and the Grid is set to 1 4 notes dragging the region will be constrained to 1 4 notes preserving the region s relative posi tion to the nearest beat To select Absolute or Relative Grid mode Click the Grid mode selector and choose Ab solute or Relative Configuring the Grid The actual Grid size chosen from the Grid value pop up menu can be based on a time value us ing the Main Time Scale or if F...

Страница 380: ...he tool Zoom Buttons Use the Zoom buttons to zoom in and out vertically and horizontally on MIDI and audio track material You can also store and re call five Zoom presets Zoomer Tool Use the Zoomer tool to select a zoom view in a track Zoom Toggle Use the Zoom Toggle to switch be tween the current zoom view and a defined zoom view Trim Tools Use the Trim tools to trim regions and region groups MID...

Страница 381: ...Command Mac Click and drag on the Horizontal Zoom In button to zoom in continuously To zoom out horizontally for all tracks do one of the following Click the Horizontal Zoom Out button Press Control Windows or Command Mac Click and drag on the Horizontal Zoom Out button to zoom out continuously Audio and MIDI Zoom In and Out Buttons The Audio and MIDI Zoom buttons let you zoom in and out verticall...

Страница 382: ...ss Control Alt E Windows or Com mand Option E Mac To zoom in on a selection Press Alt F Windows or Option F Mac To zoom so that all regions are visible in the Edit window do one of the following Double click the Zoomer tool in the toolbar or Press Alt A Windows or Option A Mac Zoomer Tool Use the Zoomer tool to zoom in and out around a particular area within a track The Zoomer tool offers two mode...

Страница 383: ... a zoom has been performed For example when using the Smart Tool you can click the Single Zoomer tool and once the Zoom operation has been performed Pro Tools automatically switches back to the Smart Tool To use Single Zoom mode do one of the following Click the Zoomer tool pop up menu and se lect Single Zoom mode or Press the F5 key to toggle to Single Zoom mode Single Zoom is identified with an ...

Страница 384: ...e to have all shown audio tracks zoom as one To vertically zoom in or out of all audio tracks using continuous zoom 1 Select the Zoomer tool 2 Press Start Shift Windows or Control Shift Mac and drag up or down When you release the mouse all shown audio tracks will zoom to the same zoom level Zoom Preset Buttons Pro Tools lets you save up to five horizontal Edit window Zoom presets which can be rec...

Страница 385: ...te a separate ed itor window This is especially useful for editing MIDI notes Remove Range Selection After Zooming In When the Remove Range Selection After Zoom ing In option is selected the current Edit selec tion collapses into an insertion point after zoom toggling in Track Height Last Used When selected zoom toggling in changes all tracks containing an Edit Selection to the last used Track Hei...

Страница 386: ...pending on the Zoom Toggle preferences set tings the Zoom Toggle button in the Edit win dow lets you define a zoom state and toggle be tween it and the current zoom state or it zooms to the settings in the Zoom Toggle preferences When Zoom Toggle is enabled the Edit window displays the stored zoom state Additionally any changes made to the view while Zoom Tog gle is enabled are also stored in the ...

Страница 387: ...ews 1 Make a selection on one or more tracks 2 Do one of the following Press Alt Start E Windows or Op tion Control E Mac or With Commands Keyboard Focus enabled see Keyboard Focus on page 16 press Alt E Windows or Option E Mac Auto Toggle When Changing Selection When Zoom Toggle is enabled selecting a dif ferent range of material or selecting material on a different track affects Zoom Toggle as f...

Страница 388: ...rim tool Time Compression Expansion Trim tool also called TC E Trim tool Scrub Trim tool Pro Tools HD only Loop Trim tool The Trim tools are constrained by boundary re gions regardless of the current Edit mode as fol lows Trimming towards the left is constrained by the next region s left most boundary re gion start Trimming towards the right is constrained by the region s right most boundary re gi...

Страница 389: ...oint Time Compression Expansion Trim Tool The Time Compression Expansion Trim tool is a convenient tool for matching an audio region to the length of another region a tempo grid a video scene or to practically any other reference point you want The Time Compression Expansion Trim tool works by using the Time Compression Expan sion TC E AudioSuite plug in or a third party plug in to create a new au...

Страница 390: ...mpo of 90 BPM into a session with a tempo of 120 BPM In Grid mode you can use this tool to simply and quickly time compress the drum loop to the length of one measure with minimal loss of audio fidelity To use the Time Compression Expansion Trim tool in Grid mode 1 Set the Edit mode to Grid 2 Click the Trim tool pop up menu and select TCE 3 With the Time Compression Expansion tool drag the audio r...

Страница 391: ...sing the Time Compres sion Expansion AudioSuite plug in The new region appears in the playlist and in the Region List Scrub Trim Tool Pro Tools HD Only The Scrub Trim tool is a convenient tool for au ditioning material on up to two tracks to find a trim point You can drag in a track to hear the audio information then trim at a specific loca tion by releasing the mouse button This action creates a ...

Страница 392: ...point you want the loop to start Trimming Looped Regions You can trim looped regions in two ways Loop Trim a looped region to change how long the region is looped For example Loop Trim a looped region from 2 bars to four bars With a 1 bar region the number of loops changes from 2 to 4 Each loop iteration re mains the same length but the length of the entire looped region changes Trim the source re...

Страница 393: ... the cursor over a Loop icon in the looped region or anywhere along the bottom of the region The cursor indicates the Trim tool icon 3 Trim the start or end of the loop iteration The number of trimmed loop iterations in creases or decreases to fill the original length of the entire looped region Looped region Loop trimming a looped region Hold down the Start key on Windows or the Control key on Ma...

Страница 394: ...with the Selector tool 1 Select the Selector tool in the Edit window 2 Double click the desired region on a track To select an entire track with the Selector tool 1 Select the Selector tool in the Edit window 2 Triple click the desired track Making a Timeline Selection with the Selector Tool To make a Timeline selection with the Selector tool 1 Select the Selector tool in the Edit window 2 Click a...

Страница 395: ...note or within an automation playlist determines how the Smart Tool functions To select the Smart Tool click its icon in the up per left of the Edit window or press F6 F7 or F7 F8 simultaneously The Smart Tool in Waveform View or MIDI Track Regions View The following capabilities are available with the Smart Tool when working with audio tracks in Waveform or Blocks View or MIDI or Instru ment trac...

Страница 396: ...ontroller Views The following capabilities are available with the Smart Tool when working in both automation and controller views For the Selector tool position the cursor any where in the bottom 75 of the playlist for the Selector tool Drag with the Selector tool to se lect breakpoints For Trim tools position the cursor in the top 25 of the playlist for the Trim tool Drag with the Trim tool to tr...

Страница 397: ...n Follows Scrub Shuttle is enabled the edit cursor automatically locates to the point where scrubbing stops When the Scrolling option is set to Continuous Pro Tools HD and LE with DV Toolkit 2 only or Center Playhead Pro Tools HD only clicking with the Scrubber in a track s playlist centers the Edit window around that point and moves the Playhead there With these Scrolling Options scrubbed materia...

Страница 398: ...vide increasingly faster fast forward speeds and numbers from 4 down to 1 provide progressively faster rewind speeds 4 is the slowest rewind Shuttle Lock speed 1 is the fastest If multiple tracks are selected only the first two tracks are shuttled To play one or two tracks with the shuttle lock 1 With Pro Tools HD make sure the Operation preference for Numeric Keypad mode is not set to Shuttle see...

Страница 399: ...dows or Control 9 Mac on the numeric keypad Numeric Keypad Set to Shuttle Pro Tools HD Only Pro Tools offers another form of shuttling dif ferent from that of Shuttle Lock mode With the Numeric Keypad mode set to Shuttle playback of the current Edit selection is triggered by press ing and holding the keys on the numeric key pad playback stops once the keys are released Various playback speeds are ...

Страница 400: ...ented individually Since Auxiliary Input Master Fader and VCA Master tracks do not contain audio they are dis played as blank areas in the Universe window MIDI and Instrument tracks containing MIDI data are represented by single horizontal lines Resizing the Universe Window Even though the Universe window can be re sized horizontally and vertically the length of the entire session is always displa...

Страница 401: ... the Edit window This provides a convenient method of locating anywhere in the session or adjusting which shown tracks are visible in the Edit window To move the highlighted area in the Universe window 1 Choose Window Universe 2 Drag the highlighted area to a different posi tion in the Universe window to affect which tracks are displayed in the Edit window When all tracks are visible in the Edit w...

Страница 402: ...Pro Tools Reference Guide 388 ...

Страница 403: ... how the Edit window scrolls during playback and how the playback cursor functions See Scroll ing Options on page 395 for details Playback Location The playback location is displayed in the counters at the top of the Edit window and in the Transport window and in the Big Counter window To display the Counters in the Transport window Choose View Transport Counters Setting a playback point with the ...

Страница 404: ...Ruler during playback With the Timeline and Edit selections linked you can click a region or MIDI note with the Time Grabber tool to automatically update the Timeline with the selection s start time letting you play from that point Page Scrolling During Playback You can set Pro Tools to scroll the track display while playing and also have the edit cursor ap pear wherever playback stops To make the...

Страница 405: ...called rollback for mov ing the playback location in the Edit window You can also move the playback location in multiple increments by repeating the command See Repeating Back Forward Commands on page 392 Back Moves the playback location backward by the Back Forward Amount Back and Play Moves the current playback loca tion backward by the Back Forward Amount and automatically begins playback Forwa...

Страница 406: ...or Forward move To repeat Back Forward moves 1 Press and hold Control Windows or Com mand Mac 2 Click Rewind or Fast Forward the number of times you want to repeat moving the playback location backwards or forwards by the Back For ward Amount Extending Selections with Back or Back and Play Commands The Back or Back and Play commands can be used to extend a selection backwards by the length of the ...

Страница 407: ...counters or Press asterisk on the numeric keypad to highlight the Main Counter in the Edit window or the Main Counter in the Trans port window or Big Counter window if ei ther are displayed 2 Type in the new location Press Period to cy cle through to the different time fields 3 Press Enter to accept the new value and auto matically locate there Scrolling in a Timebase Ruler You can scroll the cont...

Страница 408: ...y visible in the Edit window The Playback Cursor locator will appear on the right edge of the Main Time base ruler after the playback cursor moves be yond the time visible in the Edit window The Playback Cursor locator is red when a track is record enabled and blue when no track is record enabled To locate the playback cursor when it is off screen Click the Playback Cursor locator in the Main Time...

Страница 409: ...The Edit window does not scroll during or after playback The playback cursor moves across the Edit window indicating the playback location After Playback The playback cursor moves across the Edit window indicating the playback location When playback has stopped the Edit window scrolls to the final playback location Page The playback cursor moves across the Edit window indicating the playback locat...

Страница 410: ...izontal scroll bar or type the location into one of the Edit Selection indicators or one of the Counters Moving the Playhead with these methods does not update the Timeline selection However up dating the Timeline selection automatically moves the Playhead to the Timeline insertion point With the Playhead enabled you can jump to and play an Edit or Timeline selection For de tails see Playing Timel...

Страница 411: ...cted for editing purposes During playback the Edit selection can be nudged quantized or transposed while the loop plays back com pletely independent and uninterrupted While you could theoretically do this with the Timeline and Edit selections linked as soon as playback is stopped the playback range would then be updated to that of the more recent edit range or to a single note when editing MIDI Ti...

Страница 412: ... and Edit Selection button so it be comes highlighted selected or un highlighted not selected Selecting Track Material Before audio and MIDI material can be edited it must first be selected The Track View deter mines how the material is viewed and selected When you make a selection it appears as a high lighted area of the tracks and is also indicated by blue start and end arrows Timeline Selection...

Страница 413: ...o one of the following Click in the track with the Selector tool and then choose Edit Select All or Triple click with the Selector tool in the track To select all regions in all tracks 1 Select the All Edit Group in the Group List pop up menu 2 Do one of the following Click in any track with the Selector tool and choose Edit Select All or Triple click with the Selector tool in any track Region Lis...

Страница 414: ...u want the selection to begin press the Down Ar row key 5 Press the Up Arrow key at the point where you want the selection to end The selected range be comes highlighted 6 To stop playback click Stop in the Transport window To automatically scroll to the beginning of the selection or to the location of the on screen cursor press the Left Arrow key To scroll to the end of the selection press the Ri...

Страница 415: ...seful if you want to select all regions between a noncontig uous Object selection To change a Time selection to an Object selection 1 Drag with the Selector tool in any track to de fine a selection or select in a Timebase ruler to select across all tracks 2 With the Object Grabber tool selected dou ble click the Grabber icon in the toolbar Re gions falling within the selection range become selecte...

Страница 416: ...tion or press the Right Ar row key to scroll to the end Nudging a Selection Range The selection range not the material within the selection can be moved by the Nudge value To nudge a selection range 1 Configure the Nudge value For details see Defining the Nudge Value on page 435 2 Make the initial selection with the Selector tool 3 While pressing Shift press Plus or Minus on the numeric keypad to ...

Страница 417: ...c to ex tend the selection to include the previous region boundary To extend a selection to a Marker or Memory Location 1 Do one of the following Click in a track with the Selector tool at the desired start or end point or Make a selection with the Selector or Time Grabber tool 2 Do one of the following Shift click a Marker in the Markers ruler or Shift click a Memory Location in the Mem ory Locat...

Страница 418: ...ld you want to change 2 Press Minus on the numeric keypad 3 Type the amount you want to subtract from the current time value then press Enter 4 Press Enter again to apply the change To add time values 1 In the Edit Selection indicator highlight the time field you want to change 2 Press Plus on the numeric keypad 3 Type the amount you want to add to the cur rent time value then press Enter 4 Press ...

Страница 419: ...llowing Press P on your computer keyboard to move the selection to the previous track or Press semicolon to move the selection to the next track In either instance the original Edit selection be comes deselected To extend a selection to an adjacent track 1 Enable Commands Keyboard Focus see Key board Focus on page 16 2 With the Selector or Time Grabber tool make a selection 3 Do one of the followi...

Страница 420: ...tart point for the selection then release 4 While pressing Shift scrub to an appropriate end point for the selection then release The range between the initial and final scrub be comes selected To move a selection to an adjacent region on the same track 1 Select a region with the Time Grabber 2 Do one of the following Press Start Tab Windows or Control Tab Mac to move the selection to the next re ...

Страница 421: ...bbing function also locates the cursor to region start and end points but not to sync points To set the start and end points of a selection with Tab to Transients 1 In the upper left of the Edit window click the Tab to Transients button so it becomes selected 2 If you will be setting the play range with this selection enable Options Link Timeline and Edit Selection 3 Click in the audio track just ...

Страница 422: ...ion and play just the pre roll or post roll material for a selection To play from the pre roll point to the start of a selection or to the current Cursor location Press Alt Left Arrow Windows or Op tion Left Arrow Mac To play to the post roll point from the end of a selection or from the current Cursor location Press Control Right Arrow Windows or Command Right Arrow Mac Auditioning Start and End ...

Страница 423: ... Link Timeline and Edit Selection 2 With the Selector tool select the track range you want to loop 3 Enable Loop Playback by doing one of the fol lowing Select Options Loop Playback Right click the Play button in the Transport window and select Loop from the pop up menu Start click Windows or Control click Mac the Play button in the Transport win dow Press Control Shift L Windows or Com mand Shift...

Страница 424: ...s indicated in the Main Timebase ruler by the blue Timeline Selection Markers or if a track is record enabled the Timeline Selection Markers are red The start end and length for the Timeline selection is dis played in the corresponding fields in the Trans port window To set the Timeline selection by dragging the Timeline Selection Markers 1 If you want to constrain movement to the cur rent Grid va...

Страница 425: ...s LE with DV Toolkit 2 Only When the Edit and Timeline selections are un linked you can compress or expand an audio se lection to fit the Timeline selection This feature works by using a Time Compression Expansion plug in to expand or compress the selected au dio material To fit an Edit selection to the Timeline 1 Deselect Options Link Timeline and Edit Se lections 2 With the Selector tool select ...

Страница 426: ...rcentage value based on length of the region last clicked before dragging Playing Timeline and Edit Selections with the Playhead Pro Tools HD Only When the Scrolling option is set to Center Play head selections in the Timeline do not deter mine when playback begins The Playhead it self denotes where playback begins when clicking Play in the Transport The Timeline and Edit selections however can st...

Страница 427: ...Start Marker The Play Start Marker determines where playback starts when the Transport is engaged You can posi tion the Play Start Marker independently of the Timeline Selection You can reposition the Play Start Marker during playback and playback con tinues from the new location To enable or disable Dynamic Transport mode Select or deselect Options Dynamic Trans port To reposition the Play Start ...

Страница 428: ... enabled the Play Start Marker snaps to the Timeline Selection Start Marker when you move the Timeline Selection draw a new Time line Selection or adjust the Timeline Selection Start When disabled the Play Start Marker doesn t move with the Timeline selection To have the Play Start Marker always snap to the Timeline Selection Start Marker 1 Choose Setup Preferences 2 Click the Operation tab 3 Sele...

Страница 429: ...ction while us ing the Play Start Marker to specify where play back begins This is especially useful for audi tioning loop transitions Enabling Dynamic Transport mode automati cally enables Loop Playback mode To audition a loop transition 1 Enable Dynamic Transport mode Options Dynamic Transport 2 Ensure that Loop Playback mode is enabled Options Loop Playback 3 Make a Timeline selection to loop I...

Страница 430: ... numeric keypad and then the Left Arrow To move the Play Start Marker to the Timeline Selection End Press Period on the numeric keypad and then the Right Arrow To move the Play Start Marker to the Edit Selection Start Press Period on the numeric keypad and then the Down Arrow To move the Play Start Marker to location of the Playhead Press Period on the numeric keypad and then the Up Arrow To nudge...

Страница 431: ...rs in the Region List and in the track s playlist For details on how these new re gions are automatically named see Auto Nam ing Options on page 489 When creating a new region from an existing re gion the original region remains in the Region List Capture Region Command The Capture Region command defines a selec tion as a new region and adds it to the Region List From there the new region can be d...

Страница 432: ...k near the cursor position or selection and choose Separate from the pop up menu 3 If the Editing preference for Auto Name Sepa rated Regions is disabled enter a name for the new region when prompted then click OK To separate regions according to the current grid resolution 1 Make an Edit selection 2 Choose Edit Separate Region On Grid To separate regions at transients 1 Make an Edit selection 2 C...

Страница 433: ...r track To separate a selection with the Separation Grabber tool 1 With the Selector tool make an Edit selection The selection can reside within a single region across adjacent regions within the same track or across multiple tracks 2 From the Grabber tools pop up menu choose the Separation Grabber tool 3 Click and drag the selection to the new loca tion or to another track A new region or regions...

Страница 434: ...ay a small dog ear corner to indicate overlapping region boundaries To toggle the display of overlap and underlap region boundaries Choose View Region Overlap Changing Region Overlap Underlap After tempo changes with tick based audio and other edits regions may overlap in undesired ways To correct this a region can be brought to the front or sent behind neighboring regions as needed To change the ...

Страница 435: ...moving the material between the Edit insertion point and the start or end point of the region To trim from a start point to insertion 1 With the Selector tool click inside the region or note where you want the new start point to be 2 Choose Edit Trim Region Start To Inser tion The region s start point is automatically trimmed to the insertion point To trim from an end point to insertion 1 With the...

Страница 436: ... of the region behind the gap is automatically trimmed expanded to the previ ous region or as far as possible if there is not enough underlying material to cover the gap and the end point of the region in front of the gap is automatically trimmed expanded to the next region or as far as possible if there is not enough underlying material to cover the gap Trimming with Nudge You can trim the start ...

Страница 437: ...ning region to its original length see Using the Trim Tools on page 374 or Delete both of the separated regions and drag the original region from the Region List to the original location see Placing Regions in Tracks on page 423 Placing Regions in Tracks Once you have created a region it appears in the Region List From the Region List you can drag it to a track to add to an existing arrangement of...

Страница 438: ...on List Drop Order Choose Region List Timeline Drop Order and then Top to Bottom or Left to Right To drag and drop multiple items from the Region List to multiple new tracks 1 From the Region List pop up menu choose Timeline Drop Order Top to Bottom 2 Search and sort the Region List if desired to configure the order in which items will be placed 3 Select multiple items in the Region List and do on...

Страница 439: ...ats mono stereo or other new tracks of each format will be created and those regions placed in them Placing Regions at the Edit Insertion Point You can drag a region from the same track from another track or from the Region List and align its start end or sync point to the Edit insertion point This technique is useful in post produc tion since it lets you set an Edit selection point during playbac...

Страница 440: ...ints The start end and sync point of one region can be aligned to the start of a different region on another track To align the start points of regions on different tracks 1 With the Time Grabber tool select the region you want to align to by clicking it 2 If the Scrolling option is set to Center Play head Pro Tools HD only move the playhead to the start of the selected region For details see Movi...

Страница 441: ...e start of the first region Sliding Regions A region or group of selected regions on the same track or on multiple tracks can be slid with the Time Grabber tool to new locations or to other tracks This feature is useful in post pro duction applications where the timing of audio events such as sound effects and dialog need to be spotted to music film or video Sliding regions is affected by whether ...

Страница 442: ...f the slipped re gion and any space between it and other re gions Shuffling Multiple Tracks and Multichannel Regions Selections across multiple tracks or on multi channel tracks can be shuffled Unlike shuffling regions on a single track any partially selected regions are cut and moved along with the dragged region This lets you retain only the ma terial that corresponds to the dragged region Movin...

Страница 443: ...or to the beginning of the following region using the Snap To Next or Snap To Previous commands This is useful for butt splicing ad jacent regions on a track To snap to the preceding region on a track 1 Do one of the following With the Time Grabber select a region or With the Selector select an area in a track that contains whole regions The regions do not need to be adjacent 2 Do one of the follo...

Страница 444: ...e is space between it and other regions in a track When the track is played back this space is silent It is also possi ble to move a region so that it overlaps or com pletely covers another region To slip regions 1 Enable Slip mode see Edit Modes on page 363 2 Drag a region from the Region List to an empty track 3 Drag a second region from the Region List to the same track somewhere in the middle ...

Страница 445: ...he Time Scale is set to Time Code select the Use Subframes option to display sub frames in the fields for improved accuracy 5 Do one of the following Click in the field for Start Sync Point or End and type in a new location Changing one of these locate points automatically updates the other locate points Click one of the up arrows next to Original Time Stamp or User Time Stamp to enter the associa...

Страница 446: ... provided in DigiBase browsers for both the Original and User Time Stamps Time Stamps and Matches Regions with identical User Time Stamps appear together in the Matches submenu in the Right click pop up menu when auditioning takes see Selecting an Alternate Take on a Track on page 286 Sliding Regions in Grid Mode Grid mode provides several useful capabilities for sliding and moving regions in trac...

Страница 447: ...rid boundaries If a re gion s start point falls between beats and the Grid is set to 1 4 notes dragging the region will snap its start time to the nearest 1 4 note the current absolute Grid value In Relative Grid mode regions can be moved by Grid or Nudge units If a region s start point falls between beats and the Grid is set to 1 4 notes dragging the region will be constrained to 1 4 notes preser...

Страница 448: ...own Arrow key while playing back 3 Choose Region Identify Sync Point A small down arrow appears at the bottom of the region with a vertical light grey line indicating the lo cation of the sync point To change the location of a sync point With the Selector tool click at a point in a re gion and choose Region Identify Sync Point The new location is identified as the sync point for the region Removin...

Страница 449: ...ments with the Plus and Minus keys on the numeric keypad The amount of the nudge is determined by the value specified in the Nudge Value pop up menu The Nudge function can be used in any of the Edit modes Nudging can be invaluable for adjusting the groove of a musical phrase or a sound effect relative to other elements in the session Since Pro Tools can nudge material during playback you can nudge...

Страница 450: ...d shifted material does not snap to the Grid when in Grid mode Nudging Regions on Multiple Tracks and in Multichannel Tracks When nudging a selection of multiple regions within a single track or across multiple tracks that also contains silence any automation data residing within the silence is also nudged Nudging by Next Nudge Value In addition to nudging by the current Nudge value you can also n...

Страница 451: ...y the Nudge value Shift Command Use the Shift command to move track material forward or back in time by a specified amount The Shift command can operate on selections regions MIDI notes MIDI controller data and automation breakpoints To shift a selection or region 1 With the Selector or Time Grabber tool select the track material you want to shift The se lected material can reside on multiple trac...

Страница 452: ...ined Grid For MIDI regions only the regions are quantized and all MIDI data contained within the regions such as notes are moved equally thereby re taining their rhythmic relationships To quan tize individual MIDI notes choose Event MIDI Grid Groove Quantize see Grid Groove Quan tize on page 584 Locking Regions If you have a region or group of regions that you want to permanently associate with a ...

Страница 453: ...different region This is also useful in music production if you want to replace a certain loop or sample for ex ample a drum beat with a new one You can use this compositionally if you know the tempo of a section or session to create a scratch piece with rough regions of the correct length and later replace them with final regions of the same length The Replace Region Dialog The following options ...

Страница 454: ...placed in the playlist and any remaining audio from the original re gion is removed If the replacement region is larger than the se lection it is placed in the playlist and trimmed to fit within the length of the original region Fit Region Using The Original Selection Length When the playlist selection extends be yond the original region the replacement re gion if larger than the original region i...

Страница 455: ...er you can replace regions on tracks with alternate channels and you can expand multiple channels to new tracks Replacing a Region with an Alternate Channel Pro Tools HD and Pro Tools LE with DV Toolkit 2 Only Pro Tools provides region replacement tools spe cifically for field recording workflows You can replace a mono region or selected portion of a mono region with a matching segment of an al te...

Страница 456: ...tching Scene and Take Matching Shoot Date applies only if Scene and Take contain any information for both channels Matching Tape name Matching Sound Roll name Alternate channel Sound Roll name matches current channel Tape name Alternate channel Tape name matches cur rent channel Sound Roll name Expanding Alternate Channels to New Tracks Pro Tools HD and Pro Tools LE with DV Toolkit 2 Only When wor...

Страница 457: ...ew tracks including the chan nel represented in the original track according to the chosen parameters Edit Commands Pro Tools provides many standard edit com mands such as cut copy and paste Pro Tools also many specialized edit commands that are optimized for audio and MIDI production such as Repeat Paste to Fill Cut Copy Paste and Clear Use the Cut Copy Paste and Clear commands to rearrange and e...

Страница 458: ...ata is placed on the Clipboard Also whenever you cut or copy auto mation data bounding breakpoints are created at each end of the selected area in order to pre serve the slope of the automation both inside and outside the selection If tracks are grouped copying and pasting on any of the tracks affects each of the other tracks in the group Tracks that are hidden even if they are part of a group bei...

Страница 459: ...d the material on the Clipboard appears as a new re gion in the Region List If a portion of a region was cut new regions are auto created from the material residing outside of the selection When working in Shuffle mode any subsequent regions slide over to fill any empty space Deleting Underlying Region Data When removing a region or selection you can choose to remove or keep the underlying region ...

Страница 460: ...u commands Cut Special Copy Special Paste Special and Clear Special for cutting copying pasting and clearing automation volume pan mute and plug in automation on audio Auxiliary Input Master Fader VCA Master and Instrument tracks These commands can also be used for MIDI controller data on MIDI and Instrument tracks Cut Special The Cut Special commands let you cut just auto mation data from the cur...

Страница 461: ...u copy one type of automation data to another or one type of continuous MIDI date to another type of contiguous MIDI data Clear Special The Clear Special commands let you clear just automation data from the current region Choices are All Automation Clears all automation or MIDI controller data whether it is shown or not Pan Automation Clears only pan automation or MIDI pan data whether it is shown...

Страница 462: ...plays Mute automation the Cut command cuts only pan data from track 1 volume data from track 2 and mute data from track 3 To copy all types of automation on all selected tracks when copying only automation or controller data Press and hold the Start key Windows or Control Mac and choose Edit Copy Special All Automation To paste to multiple tracks 1 Do one of the following Place the insertion point...

Страница 463: ...s that were selected with the Time Grabber tool material is always duplicated one measure later and is merged with existing track material instead of replacing it Duplicating Audio When using Duplicate or Repeat for audio that must fall cleanly on the beat such as rhythmic loops it is important that you select the audio material with the Selector tool or by typing in the start and end points in th...

Страница 464: ...racks are edited with any of the Trim tools or dragged with the Time Grabber tool material on all channels is affected equally as a group Split Selected Tracks To edit a specific channel within a stereo or multichannel track without affecting the other channels you can split the track into separate mono tracks Once the edits have been made to the separated material you can then drag or copy it bac...

Страница 465: ...s the number of channels in the destination track Processing Audio with AudioSuite Plug ins The AudioSuite plug ins included with your Pro Tools system can be used to process and modify audio regions or even entire audio files Do this in order to apply a specific AudioSuite process such as Normalization or DC Offset Re moval any number of audio regions in your ses sion Waveform Repair with the Pen...

Страница 466: ...s Region groups can be created on a single or on multiple adjacent audio MIDI and Instrument tracks Region groups let you nest multiple re gions into macro regions for groove and tempo manipulation editing and arranging Region groups can be placed on tracks alongside standard regions and edited using many of the same Pro Tools editing techniques Certain edits to a region group will apply to all re...

Страница 467: ...l separate the region at the selection boundary when you cre ate a region group Region groups created from object based selections include all selected and unselected regions between the first and last se lected region on the track 2 Choose Region Group The region group appears as one region with the region groups icon in the lower left corner Re gion groups also appear in the Region List Region G...

Страница 468: ... a region group 1 Select any region from the ungrouped region group 2 Choose Region Regroup If you used the Ungroup All command the Re group command recreates all previous nested re gion groups 3 If you regrouped an ungrouped region group that was used more than once in the session do one of the following when the Change All dia log opens Choose Modify to apply your changes to all other instances ...

Страница 469: ...ing regions to be grouped across multiple tracks Multitrack region group Region Group icon Mixed multitrack region group sample and tick based audio and tick based MIDI Multitrack region groups create nested re gion groups of multiple regions by track be fore grouping them across tracks The Regroup command supports multitrack region groups Mixed Region Group icon ...

Страница 470: ...oup Record into a region group Change playlists on a track that is part of a multitrack region group There may be situations where you want sepa rated region groups For example if you use the same accompaniment on verses one and two of a song you can group the parts of verse one and copy them as a region group for verse two but still have a continuous vocal track in the middle of those region grou...

Страница 471: ...m a tick based track to a sample based track the length of the region group does not change unless it is moved to another time location with a different tempo This is because region groups are converted from ticks to samples after they are moved into the sample based tracks Multitrack Region Groups with Sample and Tick Based Tracks Multitrack region groups can include both sam ple based and tick b...

Страница 472: ...ool works the same way as trimming regular re gions regardless of whether you are trimming a single track region group or a multitrack region group Trimming a region group does not trim the un derlying regions but rather trims the region group boundaries All underlying regions retain their original length and location This is true for all underlying audio and MIDI regions and nested region groups ...

Страница 473: ...elative location in tracks Fades and crossfades Region group names and format single or multitrack All MIDI data present in the region group such as notes controllers Sysex and so on Track names Region group files do not store the following Automation Plug ins Track routing Tempo and Meter map Region List information Importing Region Groups To import a region group Drag and drop the region group f...

Страница 474: ...opens 3 If you want to change the Destination Direc tory from the default auto created Region Groups folder to another location do the fol lowing Click the Choose button Navigate to the desired location Clicking Choose 4 To reset the Destination Directory to the de fault location click Reset 5 Enable one of the following options for resolv ing duplicate region group file names Prompting for Each D...

Страница 475: ...ed Loop Length Once looped the looped region can be edited much like a region group For example selecting and moving a looped region selects and moves the source region and all its loop iterations to gether Looped regions all iterations display a Loop icon in the lower right corner or each loop iter ation Creating Looped Regions You can create looped regions using the Loop command or using the Loo...

Страница 476: ...on or until the next region on the track If neces sary the last loop iteration will be trun cated to fit 4 If desired select the Enable Crossfade option This will create a crossfade at the loop point To edit the loop crossfade do the following Click the Settings button Configure the Loop Crossfades Click OK 5 In the Region Looping dialog click OK To rename the looped region name only or the region...

Страница 477: ...tire loop the source region and all its loop it erations but clicking the Loop icon of one of the loop iterations selects only that one itera tion Moving a looped region moves the source re gion and all its loop iterations together as a group Loop iterations cannot be moved inde pendently of their source region If you move or paste another shorter region over a looped re gion the loop is continued...

Страница 478: ...r in a film score To trim a looped region to the selection 1 Use the Selector tool to make an Edit selection including some or all of the looped region 2 Choose Edit Trim Region and one of the Trim Region commands To Selection To Fill Se lection Start to Fill Selection End to Fill Selec tion Automation and Looped Regions Looping an audio region does not loop any au tomation associated with the sou...

Страница 479: ...ns use the Selector tool to select across the end point of the first region and the start point of the second The length of the selection determines the length of the crossfade Though fades may ap pear to be discrete regions they cannot actually be separated from the regions in which they were created You can however create fade ins and fade outs for individual regions see Creat ing Fades at the B...

Страница 480: ...re gions you can use the Tab key to move the cur sor to the exact beginning or end of a region This crossfade type requires that region 2 con tain audio material before its start point Post Crossfade This type of selection creates a crossfade after the splice point It is useful if you want to main tain the amplitude of region 1 until its very end When making selections for crossfades that oc cur o...

Страница 481: ...erface outputs View First Track Crossfades Only If you are cross fading between more than one track this button allows you to view and pre view the audio of the first in a pair of adjacent tracks View Second Track Crossfades Only If you are cross fading between more than one track this button allows you to view and preview the audio of the second in a pair of adjacent tracks View Both Tracks Cross...

Страница 482: ... de fault view scale Fade Out Shape Settings The Out Shape setting lets you define the shape of the fade out from a region for a fade or from region 1 for a crossfade Standard Selects a single continuous fade curve This creates a general purpose fade that can be edited by dragging the curve itself S Curve Selects an S shaped curve which inverts its beginning and end characteristics This makes it p...

Страница 483: ...esulting crossfade is an equal power or equal gain crossfade depending on which one you select Equal Power Recommended for material that is not phase coherent as in the case of a crossfade between two completely different types of mate rial Use this option to avoid the volume drop that can occur with an Equal Gain crossfade With this fade you can Alt click Windows or Option click Mac the fade curv...

Страница 484: ...n fading in or fading out of si lence and crossfading between low amplitude regions Dithering is usually not necessary when applying fades to regions with audio at high am plitudes You can disable Dither while editing fades in the Fades dialog to speed up previews and fade recalculation then re enable Dither to create the final fade or crossfade Fade In Shape Settings The In Shape setting lets you...

Страница 485: ...ades in even more slowly than the previous curve Preset Curve 7 silences any audio until the end of the fade Typical Curve Combinations Following are the available combinations of fade out and fade in curves Linear Crossfade This is a good general purpose crossfade with a smooth even transition be tween region 1 and region 2 Equal Power Crossfade This is a good general purpose crossfade useful in ...

Страница 486: ...lso use an auto matic fade in out option which applies real time fade ins outs to all regions during play back These fades are not written to disk but are automatically applied during playback For more information see Using AutoFades on page 475 Creating Fade Ins and Fade Outs Depending on how you make the selection you can position a fade in or fade out at the exact beginning or end of a region o...

Страница 487: ...to the exact end of the region or a blank area after the region in the track 2 Do one of the following Choose Edit Fades Create or Press Control F Windows or Com mand F Mac 3 Select the fade out curve and configure the other Fade settings 4 Click the Audition button to audition the fade 5 Adjust the curve by dragging it or by selecting a different shape from the Out Shape pop up menu 6 Click OK Pr...

Страница 488: ...oad the audio into playback RAM 7 Do one of the following Adjust the curves by selecting different pre set shapes with the Out Shape and In Shape pop up menus or Drag the Fade In and Fade Out curves to a custom shape By choosing None as the Linking option you can drag the begin ning or end points of a fade curve to adjust its beginning or end point 8 Click the Audition button to audition the cross...

Страница 489: ... Tab Windows or Op tion Shift Tab Mac to extend the selec tion back to the previous region boundary 4 Do one of the following Choose Edit Fades Create or Press Control F Windows or Com mand F Mac 5 Select a fade type and click OK Using AutoFades Pro Tools HD Only Pro Tools HD can automatically apply real time fade ins and fade outs to all region boundaries in the session Specify the duration 0 to ...

Страница 490: ... value of zero the default means that no auto fading will oc cur 3 Click OK The AutoFade value is saved with the session and is automatically applied to all free standing region boundaries until you change it Creating Fades and Crossfades in Batches Using Batch Fades you can create many fades at once Select across several regions and use the Create Fades command to create crossfades for each regio...

Страница 491: ... all selected re gions Moving and Nudging Fades and Crossfades Fades and crossfades can be moved or nudged in tracks independently of their contributing re gions Moving or nudging fade ins or fade outs reveals or hides audio as the fade is moved from the edge of a contributing region Moving or nudging crossfades changes the overlap point of the contributing regions Moving or nudging fades is also ...

Страница 492: ...e in or out or Select multiple regions that include the fades and crossfades you want to move 2 Move the region selection by doing one of the following Drag the region selection with the Grabber tool to a new location on the track or Nudge the region selection by pressing Plus or Minus on the numeric keypad to move the region forward or backward on the track Nudging Regions Adjacent to Fade Ins or...

Страница 493: ...e crossfaded regions and remove the fade 1 Choose Setup Preferences and click the Ed iting tab 2 Deselect Preserve Fades when Editing 3 Click OK to close the Preferences dialog 4 Use the Time Grabber or Separation Grabber tool to select one of the contributing regions to a crossfade 5 Drag the selected region with the Grabber Nudging Regions Adjacent to Crossfades When you nudge either of the regi...

Страница 494: ...e or crossfade 1 With the Selector tool drag to select the ma terial for the new region 2 Do one of the following Choose Edit Separate Region At Selec tion or Press Control E Windows or Com mand E Mac Where your selection overlaps any fade ins or fade outs the fade is trimmed to fit the selec tion Where your selection overlaps a crossfade the crossfade is separated into a fade out and fade in at t...

Страница 495: ...ollowing Make a selection in the track and choose Edit Trim Region To Selection You can Trim across multiple regions and fades Affected fades are adjusted to the new region boundaries Click with the Selector in the region and choose Edit Trim Regions Start to Insertion or End to Insertion You can trim to region or fade boundary in the track Fade Boundaries and Shapes in Displayed Automation View F...

Страница 496: ...Pro Tools Reference Guide 482 ...

Страница 497: ...u want to quantize audio to musical val ues or locate sound effects to SMPTE locations The Strip Silence Window The Strip Silence window contains the following controls that let you set the parameters by which silence is defined when using the Strip Si lence command Adjusting these controls causes rectangles to temporarily appear in the selection see Figure 22 on page 485 indicating areas of silen...

Страница 498: ...ne or ambience to use else where Rename Opens the Rename Selected Regions di alog see Auto Naming for Strip Silence on page 484 Separate Separates regions based on the bound aries detected by Strip Silence Auto Naming for Strip Silence The Rename button in the Strip Silence window opens the Rename Selected Regions dialog which determines how regions are named with the Strip Silence command The dia...

Страница 499: ...n these sliders press Con trol Windows or Command Mac while ad justing them 5 To retain material before and after the new re gions adjust the sliders for Region Start Pad and Region End Pad 6 Once the Strip Silence rectangles encompass the audio that you want to keep press the Strip button The material defined as silence is removed from the selection and new regions are created which also appear i...

Страница 500: ... convenient way to insert silence on audio MIDI and Instrument tracks This command lets you make a selection on a track or tracks and insert precisely that amount of silence In Shuffle mode all data on the track is shuffled later in the track by an amount equal to the se lection In Grid mode the Insert Silence command works just like the Clear command Shuffle Mode When inserting silence on multi p...

Страница 501: ... point and moves the new regions later in the track by an amount equal to the length of the selection Consolidate Command During the course of normal edit operations any track can accumulate many regions How ever once a track or track range such as a verse or chorus reaches a satisfactory state you may want to consolidate multiple regions into a sin gle region When consolidating an entire audio tr...

Страница 502: ...ct Selected 5 Enter the amount of padding in milliseconds that you want for each region in the file 6 Click Compact to compact the file or Cancel to cancel the command Once the Compact operation has been com pleted the session is saved automatically Naming and Displaying Regions A typical session can become cluttered with doz ens of tracks and hundreds of regions There are a number of things you c...

Страница 503: ...2 Choose Auto Rename from the Region List pop up menu 3 In the Rename Regions dialog enter the text to be used when naming regions created from the selected region Name Determines the root name for the auto created regions Number Sets the start number for the sequen tially numbered new regions Zeros Determines the number of zeros that oc cur before the auto numbers Suffix Specifies text to be appe...

Страница 504: ...the Clear command to re move them from the session whole file regions can also be permanently removed from the hard drive on which they are stored To find and remove unused regions in a session 1 Do any of the following For MIDI regions from the Region List pop up menu choose Select Unused or For audio regions from the Region List pop up menu choose Select then choose Unused Unused Except Whole Fi...

Страница 505: ...powerful way to navigate your session while editing and arrang ing These can be markers to specific points in the Timeline Edit selections or even a set of track display settings that can be recalled Song Start Marker The Song Start Marker defines the initial tempo for Bar Beat based material New sessions open with a default tempo of 120 BPM When a new session is created the Song Start Marker has ...

Страница 506: ... the session to change tempo To display the Tempo ruler Select View Rulers Tempo Current Tempo As tempo events are encountered during play back the session s current tempo is displayed in the Transport window Dragging the Song Start Marker To move the Song Start Marker only with out moving the tick based data press Start Shift Windows or Control Shift Mac while dragging When dragging the Song Star...

Страница 507: ...to it that indicates its location These trian gles can be dragged to move the tempo event and they can be double clicked to edit the tempo event Editing and Moving Tempo Events Existing tempo events can be moved edited de leted and copied and pasted To move a tempo event by dragging In the Tempo ruler drag the triangle for the tempo event left or right If the Edit mode is set to Grid the dragged e...

Страница 508: ...elect the tempo events you want to remove 3 Choose Edit Clear to delete the selected tempo events Tap Tempo You can manually set the tempo for a Pro Tools session by tapping on your computer keyboard You can also use a connected MIDI keyboard to tap tempo To set the Manual Tempo by tapping on a computer keyboard 1 To view the MIDI controls in the Transport window select View Transport MIDI Con tro...

Страница 509: ...oard controller To compute the new tempo Pro Tools averages the last eight or fewer taps to determine the correct tempo The computed BPM value ap pears in the Transport s Tempo field Tempo Changes and Automation Drift When a track is sample based the track s auto mation playlist is unaffected by changes in tempo This means that automation is always aligned with the audio on the track with sample a...

Страница 510: ...o Editor The Tempo Editor is an expansion of the Tempo ruler opening in the rulers section of the Edit Window To display the Tempo Editor do one of the following Select View Rulers Tempo then View Rulers Tempo Tempo Editor or Click the Tempo Editor expand collapse trian gle Tempo changes applied to small regions To break an audio region into smaller re gions use Beat Detective For more informa tio...

Страница 511: ... Line The Line shape draws in a straight line from click to release Tempo values change in steps according to the Tempo Edit Density and Reso lution For more information see Selecting Tempo Edit Density on page 498 Parabolic The Parabolic shape draws the best possible curve to fit your freehand drawing The shape is reproduced as a series of steps according to the Tempo Edit Density setting S Curve...

Страница 512: ...tor lets you specify the density of tempo events created in the Tempo ruler when you draw a tempo curve with the Pencil tool To select the Tempo Edit Density for Pencil tool edits Click the Tempo Edit Density selector and se lect a time value from the pop up menu Tempo events created by drawing with the Pencil tool are placed in the Tempo ruler at the specified density Because it can be unnecessar...

Страница 513: ...with any of the Grabber tools Drag a tempo event to the left or right to adjust the location of the tempo change Selecting Tempo Events You can easily select a single tempo event or an entire tempo curve within the Tempo Editor To Select a tempo event in the Tempo Editor Using the Selector tool or any Grabber tool dou ble click on the horizontal tempo line Tempo curve adjustment All the new tempo ...

Страница 514: ... tool lets you scale all the tempo events of the session or within a time selection The Trim tool also lets you stretch a region of tempo events to cover a longer or shorter area in the timeline To scale all the session s tempo events with the Trim tool 1 Open the Tempo Editor 2 Select the Trim tool 3 Click above the tempo events and drag up or down Dragging up increases the tempo values dragging ...

Страница 515: ...lected group of tempo events in the Tempo Editor 1 Open the Tempo Editor 2 Using the Selector tool select the area you wish to move 3 Click on any selected tempo event with any Grabber tool and drag horizontally to move the tempo events to a new location To copy and Paste tempo events in the Tempo Editor 1 Open the Tempo Editor 2 Using the Selector tool select the area you wish to copy 3 Choose Ed...

Страница 516: ...mpo events is tick based and tempo event Bar Beat locations remain constant after the tempo curve is drawn though their relation to audio is scaled resulting in a new sample loca tions To change the timebase display Click the Linearity Display Mode selector and select a timebase from pop up menu Tempo Edit Density and Linearity Display Mode When both the Tempo Edit Density setting in the Tempo Edi...

Страница 517: ...es mid curve times and tempo values Scale Lets you scale tempos within the selection by a percentage amount Stretch Lets you select a region of tempo events and apply them to a larger or smaller selection area To open a specific Tempo Operations window page Choose Event Tempo followed by one of the Tempo Operations page commands such as Constant To open the last active Tempo Operations window page...

Страница 518: ... causes the tempo to change Tempo Specifies the tempo in beats per minute BPM to apply to the selected range Resolution Advanced Option Lets you select the BPM note value for your tempo setting Density Advanced Option Lets you specify the density of the tempo change events written to the Tempo ruler Preserve Tempo after Selection If selected the previous tempo setting that was in effect at the sel...

Страница 519: ...nsity of the tempo change events written to the Tempo ruler Preserve Tempo after Selection If selected the previous tempo setting that was in effect at the selection end point is preserved after the selec tion If unselected the last tempo event created by the tempo operation continues to the end of the session or until the next tempo event be yond the selected range Parabolic The Parabolic page le...

Страница 520: ... the Tempo ruler Preserve Tempo after Selection If selected the previous tempo setting that was in effect at the selection end point is preserved after the selec tion If unselected the last tempo event created by the tempo operation continues to the end of the session or until the next tempo event be yond the selected range S Curve The S Curve page lets you create tempos that ac celerate or decele...

Страница 521: ... rapid tempo change around the midpoint This value can be set with the Curva ture slider Mid Point Specifies the Main Time Scale location for the curve mid point This value can be set with the Mid Point slider Mid Tempo Specifies the tempo at the mid point This value can be set with the Mid Tempo slider Resolution Advanced Option Lets you select the BPM note value for your tempo setting Density Ad...

Страница 522: ...tart or end values changes the selection range Start and End Time Displays the absolute time for the selection start and end points When the Main Time Scale is set to Bars Beats times are displayed in the Sub Time Scale When the Main Time Scale is set to any absolute timebase times are calculated and displayed in Bars Beats Average Tempo Displays the Average Tempo in beats per minute BPM across th...

Страница 523: ...beats or measures and calculates its tempo based on the specified meter In doing this Bar Beat Markers for the calculated tempo are inserted and appear in the Tempo ruler at the beginning and end of the selection in addition meter events are in serted into the Meter ruler Bar Beat Markers Bar Beat Markers look similar to tempo events but instead have small blue triangles to indicate their location...

Страница 524: ... original audio region with the Repeat command When working with a selection the Identify Beat command only calculates a single tempo for the selected range If the tempo varies from measure to measure or beat to beat you ll need to use the Identify Beat command for each tempo variance making sure to accurately de fine a precise selection range or beat location for the tempo change To accurately de...

Страница 525: ...just for the new tempo location When dragging a Bar Beat Marker Its BPM value is recalculated along with the Bar Beat Marker to its immediate left Bar Beat Markers to the right of the dragged marker re main unchanged Its bar and beat location is dragged with the Bar Beat Marker If the Bar Beat Marker was originally placed at 3 1 000 it remains there unless it is edited Its sample and SMPTE locatio...

Страница 526: ... insert a Bar Beat Marker on each beat see Figure 23 so the tempo is ac curately reflected After the Bar Beat Markers are inserted further adjustments in the tempo map are possible by dragging each of the Markers as necessary to align with the associated beat within the audio Meter Events You can change meter in the Meter ruler or make precise meter changes in the Time Opera tions window Meter eve...

Страница 527: ...indow do the follow ing Enter the Location and Meter for the meter change and If you want the inserted meter event to fall cleanly on the first beat of the nearest mea sure select the Snap To Bar option 3 Select a note value for the number of clicks to sound in each measure For a dotted note click value select the dot option Add Meter Change button Manually inserting a meter event Current Meter di...

Страница 528: ...l meter events 1 If you want to constrain the selection to the current Grid value set the Edit mode to Grid 2 Drag in the Meter ruler to select the range that includes the meter events If the beginning of the selection includes a meter event press Control Windows or Com mand Mac so the Selector tool appears 3 Choose Edit Copy 4 Click in the Meter ruler at the point where you want to paste the mete...

Страница 529: ...to locations other than the first beat of a measure Time Operations The Time Operations window lets you Change Meter Insert Time Cut Time Move Song Start To open a specific Time Operations window Choose Event Time followed by one of the Time Operations commands such as Change Meter To open the last active Time Operations window Choose Event Time Operations Window Partial measure of 4 4 To insert m...

Страница 530: ...he session or until the next bar Change The Change fields let you specify the number of bars of the new meter that you wish to have replace the selected range Pro Tools automatically calculates the nearest whole bar number or you can specify a number of bars to be affected Time is inserted or deleted in whole bar increments at the end of the selec tion as necessary on all affected tracks when you ...

Страница 531: ...l click where you want the meter change to begin The meter change will be made at the beginning the nearest bar or Enter the first measure number in the Start ing At Bar field 2 Choose Event Time Change Meter 3 Specify a new meter and click setting 4 Select Until the Next Bar from the Apply Change To pop up menu 5 Click Apply to enter the new meter and to move the insertion point to the end of the...

Страница 532: ... Lets you shift Bar Beat based markers and insert time into tick based tracks Marker events and tick based tracks after the start point of the selection are shifted past the end point by the length of time inserted If the time selection includes any audio regions on tick based tracks the audio regions are sepa rated at the Start point and the new region con taining the previous selection is shifte...

Страница 533: ...selection start point If your Main Time Scale is sample based Realign Meter Ruler Only is not available Meter and Tempo Rulers Lets you cut time from the Meter and Tempo rulers Meter and tempo events within the selection are removed and the meter and tempo events that occur after the end point of the selection are shifted to the se lection start point Tick Based Markers and Tracks Lets you shift B...

Страница 534: ...When enabled this lets you set the Song Start Marker to any bar num ber Move The Move controls let you choose which items shift when the Song Start is moved as follows Song Start Only Moves the Song Start Marker only Meter and Tempo Rulers Tick Based Markers and Tracks and Sample based Markers and Tracks Moves the Song Start Marker Meter and Tempo rulers tick based tracks and your choice of sample...

Страница 535: ...like Sibel ius The default key signature is C major Key Signature Ruler The Key Signature ruler lets you add edit and delete key signatures You can use key signatures to indicate key and key changes in your Pro Tools session Key signatures can also be used for certain diatonic functions such as transposing in key or constraining pitches to the specified key To view the Key Signature ruler do one o...

Страница 536: ...it Clear or press Delete Key Change Dialog The Key Change dialog lets you specify the mode major or minor the key from seven flats to seven sharps the range affected for ex ample from Bar 1 to the next key change and whether or not MIDI notes on pitched tracks are transposed or constrained to key see Pitched Tracks on page 523 The Key Change dialog opens whenever you add or edit a Key Signature ma...

Страница 537: ... notes when changing keys and applying diatonic transposi tion Constrain Pitches To Key When the Edit Pitched Tracks option is enabled lets you constrain pitches to the notes of the new key This means that any diatonic pitches of the old key on Pitched tracks that are not in the new key are in dividually transposed to the nearest diatonic pitch of the new key For example when chang ing from C majo...

Страница 538: ...Signature Map option When selected key signatures if present are imported into Pro Tools with the imported session data Memory Locations and Markers Each session can save up to 999 Memory Loca tions that can be used to recall Markers to important locations in the ses sion Edit selections across one or more tracks Record and play ranges along with pre and post roll times Track settings that include...

Страница 539: ...d aligning track material You can click a Marker in the Markers ruler to recall its location along with its stored General Properties Selection Recalls an Edit selection or edit cursor location whose reference can be either Bar Beat tick based or Absolute sample based A Selec tion Memory Location lets you store Edit selec tions for one or more tracks that you return to often within a session If th...

Страница 540: ... editing down to the sample level or trimming MIDI notes Group Enables Recalls which Edit and Mix Groups are enabled This option is helpful in re calling groups for particular edit and mixing op erations such as muting all drum tracks or fad ing a stereo pair Window Configuration Recalls a specific Window Configuration This option is helpful in recall ing specific Window Configurations to facilita...

Страница 541: ...lection Memory Location such as zoom settings pre and post roll times Show Hide status for tracks Track Heights and Edit and Mix Group enables 2 Select a range of material in one or more tracks 3 Do one of the following Press Enter on the numeric keypad or From the pop up menu in the Memory Lo cations window click the Name button choose Add Memory Location 4 In the New Memory Location dialog selec...

Страница 542: ... window 5 When the location is reached press Enter on the numeric keypad A Marker is automatically created and appears in the Markers ruler Auto created Markers are named with increasing numbers as in Marker 1 Marker 2 and Marker 3 When the option for Default To Marker is dese lected new Memory Locations default to what ever type was last created Therefore if a Selec tion Memory Location was creat...

Страница 543: ...h the Marker are recalled Editing Memory Locations Memory Locations can be renamed edited de leted and copied and pasted To rename a Memory Location 1 Do one of the following In the Memory Locations window double click the Memory Location you want to re name or If renaming a Marker Memory Location double click the Marker in the Markers ruler 2 Enter the new name for the Memory Location and click O...

Страница 544: ...Marker by dragging In the Markers ruler click and drag the Marker left or right If the Edit mode is set to Grid the dragged event snaps to the current Grid value If using Spot mode the Spot dialog opens To align a Marker to a different location 1 Make sure to select Options Link Timeline and Edit Selection 2 Do one of the following In any of the Timebase rulers click with the Selector tool at the ...

Страница 545: ...ere you want to paste the tempo events 5 Choose Edit Paste The contents of the Clip board are pasted from the insertion point re placing any existing Markers To extend an Edit selection in a track to the Markers ruler 1 Using the Selector or Time Grabber tool select a track range 2 Shift click in the Markers ruler Shift click again in the Tempo ruler to remove it from the selection To select all M...

Страница 546: ...ocations General Property Mem ory Locations display nothing in this column You can click at the top of the Main Time Scale column for a pop up menu that lets you change the Main Time Scale Show Sub Counter When selected a column ap pears in the Memory Locations window that dis plays the locations based on the Sub Timescale for Markers and the start times for Selection Memory Locations General Prop...

Страница 547: ...w Memory Location as one of the other types Auto Name Memory Location When selected Memory Locations are created automatically without encountering the New Memory Loca tion dialog If the Default To Marker option is selected a Marker Memory Location is auto cre ated Otherwise the Memory Location type is determined by whatever type Marker Selec tion or None was created last View Filter Icons When Sh...

Страница 548: ...Pro Tools Reference Guide 534 ...

Страница 549: ... Con forming Regions with Beat Detective on page 550 Beat Detective and Source Material Beat Detective is most effective with audio or MIDI that has clear attack transients or accent patterns including most instruments used in popular music such as drums guitar or bass Beat Detective will be less successful with audio material with soft attacks or legato phrasing such as strings and vocals Uses fo...

Страница 550: ...g can be used to automatically clean up foley tracks that contain many regions requiring trimming and crossfading effectively removing the gaps of si lence between the regions thus retaining the room tone throughout the track Beat Detective Requirements Beat Detective is available with all Pro Tools sys tems RAM Requirements for Beat Detective Beat Detective operations can require a large amount o...

Страница 551: ...e sections Operation Selection and Detection Depending on the Operation mode the con trols in the Action section change The Selection options for Beat Detective are available in each of the Operation modes The Beat Detective modes include the following Operation Lets you choose to analyze either MIDI or audio material Bar Beat Marker Generation Generates Bar Beat Markers corresponding to transient...

Страница 552: ...tracks Make sure the selection s start and end points fall cleanly on the beat To zero in on an audio region s start and end points zoom to the sam ple level and use the Tab to Transients option see Tabbing to Transients on page 407 2 Choose Event Beat Detective 3 You must define or capture the selection every time you make a new selection or change the tempo map To define the selection range do o...

Страница 553: ...llest sub division of the beat contained in the selection The Contains option includes quarter notes eighth notes six teenth notes the default setting thirty sec ond notes and a triplet modifier The selected Contains option determines the groove tem plate grid locations for DigiGroove templates Calculating Tempo with Beat Detective If you know the meter and start and end points of the audio select...

Страница 554: ... high fre quency inharmonic material such as cym bals and hi hats while avoiding low frequency material Low Emphasis works well with low fre quency material such as bass guitar and kick drum as well as with most harmonic material such as piano or rhythm guitar 6 Click the Analyze button 7 Depending on the rhythmic content of the se lection set the Resolution to Bars Beats or Sub Beats 8 Adjust the...

Страница 555: ...of the following MIDI chord recognition al gorithms from the Analysis pop up menu Last Note First Note Loudest Note Average Location Highest Note Lowest Note 8 Click the Analyze button MIDI Chord Recognition Since MIDI notes in a chord may be played at slightly different moments Beat Detective inter prets notes that are close together closer than half the time value that is set in the Selection Co...

Страница 556: ...ction resolution to Bars or Beats 5 Click the Generate button 6 Do one of the following In the Realign Session dialog choose Pre serve Tick Position if you wish to let the tick based material shift in absolute time This option maintains prior Beat Detective functionality or Choose Preserve Sample Position if you wish to have the tick based material main tain its absolute position This option can b...

Страница 557: ...ttings Deleting Beat Triggers False triggers which do not represent an actual beat or sub beat in the source material may ap pear when raising the Sensitivity slider to detect quiet material In these instances you can locate and manually delete any false triggers To delete a beat trigger 1 With the Beat Detective window open select any Grabber tool in the Edit window 2 Locate the false trigger you...

Страница 558: ...ger to promote it 3 If necessary repeat steps 1 2 to promote addi tional beat triggers 4 Lower the Sensitivity slider to a value where the false triggers disappear Once beat triggers are promoted they will only disappear if the Sensitivity value is set to 0 To demote all beat triggers in the selection return ing them to their original state click the Ana lyze button Redefining a Beat Trigger s Met...

Страница 559: ...nform the material see Separating Re gions with Beat Detective on page 548 To generate Bar Beat Markers with Beat Detective 1 In the Edit window make an audio selection 2 In the Beat Detective window select Bar Beat Marker Generation mode 3 Define or capture the selection as described in Defining a Beat Detective Selection on page 538 4 Set the Detection resolution to Bars or Beats and configure t...

Страница 560: ...emplate as ve locity data which can be applied to change the dynamics of MIDI tracks Beat Detective translates the amplitude of sig nals in audio tracks to MIDI velocity according to a linear scale For example A 0 dBFS signal equals a MIDI velocity of 127 A signal at 6 dBFS equals a MIDI velocity of 64 A signal at 12 dBFS equals a MIDI velocity of 32 A 48 dBFS equals a MIDI velocity of 1 Capturing...

Страница 561: ...terial you might want to apply the template to material that con tains sixteenth notes If a template only has eighth note resolution but the material being conformed contains sixteenth notes adjacent sixteenth notes will be mapped to the same eighth note location Groove Extrapolation Beat Detective s ability to extract tempo data from a wide range of material is enhanced by its powerful groove ext...

Страница 562: ... page 538 4 Configure the Detection options so the selec tion s peak transients are accurately detected see Generating Beat Triggers on page 540 5 Click the Separate button Regions are separated based on the detected beat triggers Trigger Pad When separating regions the Beat Detective window displays an option called Trigger Pad Enter a value 0 50 ms in this field to pad re gion start points where...

Страница 563: ...ed re gions in each of the drum tracks at the same lo cation based on the beat triggers from the kick drum track see Figure 26 The separated regions can then be conformed as a group You can also utilize Collection mode Pro Tools HD and Pro Tools LE with Music Production Toolkit only when working with multiple tracks Collection mode lets you analyze and de tect triggers on tracks individually and i...

Страница 564: ...s selected 3 In the Edit window if not already selected se lect the separated regions you want to conform Make sure the selection s start and end points fall cleanly on the beat 4 In the Beat Detective window define or recap ture the selection as described in Defining a Beat Detective Selection on page 538 5 To affect how strongly the regions are con formed to the Grid tempo map select the Strengt...

Страница 565: ...pply the feel of a cap tured passage to the selected audio regions For information about creating DigiGroove tem plates see DigiGroove Templates on page 546 To conform regions using Groove Conform 1 In the Beat Detective window select Region Conform mode 2 Select Groove 3 In the Edit window if not already selected se lect the separated regions you want to conform Make sure the selection s start an...

Страница 566: ...Standard Conform can lead to bet ter results by ensuring that the performance is accurately mapped to the correct bars beats and sub beats before the groove template is ap plied Experimentation is the best way to deter mine when it is appropriate to use this option 9 Click the Conform button to automatically conform all regions in the selection 10 Audition the new conformed regions by clicking Pla...

Страница 567: ...rmed regions This allows you to later con form the regions to a different tempo map or groove template or use different Conform set tings However sync points are only created as they are needed If gaps between regions are cre ated during Region Conform Fill Gaps in Edit Smoothing mode will trim regions to fill the gap and a sync point will be created at each region s original start point If there ...

Страница 568: ...u have drum tracks for kick snare hi hat and overhead mics If you analyze a se lection across all of the tracks you may get many false triggers when you raise the Sensitiv ity slider high enough to capture the hi hat ma terial coming mainly from the tracks for the overhead mics However if you analyze only the track for the overhead mics the resulting beat triggers are slightly later than the mater...

Страница 569: ...peak transients are accurately detected see Generating Beat Triggers on page 540 5 Click the Collection Mode button 6 In the Detection Collection Mode section click Add to add all the current beat triggers to the collection 7 Click the Normal Mode button and move the selection to the next track you want to analyze Make sure to keep the selection range constant for each track 8 Configure the Detect...

Страница 570: ... Therefore when a ses sion is opened later the previous collection ma terial is still there until it is cleared 12 Once the desired beat triggers have been added to the collection you can use them to generate Bar Beat Markers or groove template or separate regions However this must be done from the Collection Mode section when the triggers are displayed in multiple colors To separate regions acros...

Страница 571: ...557 Part VI MIDI Editing ...

Страница 572: ...558 ...

Страница 573: ...and view tools that are optimized for MIDI editing Mirrored MIDI Editing Mirrored MIDI Editing lets you edit MIDI re gions and have your edits apply to every MIDI region of the same name This can be particu larly useful when editing looped MIDI regions To enable Mirrored MIDI Editing do one of the following Select Options Mirror MIDI Editing or Enable the Mirrored MIDI Editing button in the Edit w...

Страница 574: ... the Pencil tool shape pop up menu 2 Select a Pencil tool shape Freehand When in Notes View the Freehand shape inserts a single MIDI note whose velocity is defined by the Default Note On Velocity MIDI preference The pitch location and duration of the note are determined by where on the MIDI track you click and release with the mouse When editing MIDI velocities or continuous controller data the Fr...

Страница 575: ...DI option in the MIDI Preferences page Square When in Notes View the Square shape inserts a series of MIDI notes on a single pitch whose ve locities alternate between the defined Default Note On Velocity MIDI preference and 127 The duration of each note is determined by the cur rent Grid value When editing MIDI velocities or continuous controller data the Square shape draws a square pattern that r...

Страница 576: ...ools you can manually insert MIDI notes using the Pencil tool To insert a MIDI note 1 Set the MIDI or Instrument track to Notes View 2 Select the Pencil tool and make sure it is set to Freehand The cursor will change to the Pencil tool when located over the playlist area of a MIDI or Instrument track in Notes View 3 To insert quarter notes on the beat set the Main Time Scale to Bars Beats and set ...

Страница 577: ...with varying velocities The length and spacing for the inserted notes are deter mined by the current Grid value or by the Cus tom Note Duration value The note velocities are determined by the Pencil tool shape Use the Square shape for alternating velocities of loud and soft Use the Triangle shape for a ramp up and down of velocities The Line shape en ters notes with identical velocities MIDI note ...

Страница 578: ... they can be edited To select MIDI notes do one of the following With the Pencil tool or any Grabber tool Shift click each note With any Grabber tool move the cursor to where there are no notes the Marquee appears and click and draw a rectangle around the group of notes you want to edit When using a Grabber tool if any portion of the rectangle touches a note either its start or end point the note ...

Страница 579: ...osing Notes MIDI notes can be transposed by dragging up or down with the Pencil tool or any Grabber tool If several notes are selected before dragging each is transposed To transpose a MIDI note 1 Set the MIDI or Instrument track to Notes View 2 Select the Pencil tool or any Grabber tool 3 While pressing Shift drag the note up or down You can also select notes in the Select Split Notes window See ...

Страница 580: ...rimming Note Start and End Times Like regions start and end points for MIDI notes can be adjusted with the Trim tool If several notes are selected when performing the trim each note is changed To change the start or end points for a group of MIDI notes 1 Set the MIDI or Instrument track to Notes View 2 Using the Pencil tool or any Grabber tool Shift click each note you want to trim 3 Do one of the...

Страница 581: ... stalk The taller the veloc ity stalk the higher the velocity value 0 127 To edit MIDI velocity 1 Set the MIDI or Instrument track to Velocity View 2 Select any Grabber tool 3 Do one of the following Drag the top diamond of the velocity stalk up or down or If two notes have the same start time with velocity stalks on top of each other Con trol drag Windows or Command drag Mac the actual note up or...

Страница 582: ...ted with the Pencil tool or any Grabber tool its attributes are displayed in the Event Edit area Pitch is listed by note name and octave number Attack and release velocities are listed with their MIDI values 0 127 Edit Selection Start End and Length times are displayed in the Main Time Scale To change an attribute for a MIDI note 1 In the MIDI or Instrument track s playlist area select the note wi...

Страница 583: ...es can also be deleted with the Pencil tool To delete a group of MIDI notes with the Clear command 1 Using the Grabber or Selector tool select the notes to be deleted see Selecting MIDI Notes on page 564 2 Do one of the following Choose Edit Clear to delete the selected notes The track s underlying controller data remains intact or Press the Backspace Windows or Delete Mac key To delete a single M...

Страница 584: ...r expand MIDI regions in Grid mode 1 Set the Edit mode to Grid 2 Set the MIDI or Instrument track to Regions View 3 Select the TCE Trim tool 4 With the TCE Trim tool drag the MIDI re gion s start or end point to compress or expand the region to the Grid for example by quarter notes A new MIDI region is automatically cre ated and appears both in the playlist and in the Region List Using the Time Co...

Страница 585: ... front to the rear or from the rear to the front To compress or expand MIDI regions in Shuffle mode 1 Set the Edit mode to Shuffle 2 Set the MIDI or Instrument track to Regions View 3 Select TCE Trim tool 4 With the Time Compression Expansion Trim tool drag the MIDI region s start or end point to compress or expand the region freely A new MIDI region is automatically created and ap pears both in t...

Страница 586: ...rting and Editing Controller Events Continuous controller events can be edited with any of the following methods Individual breakpoints can be dragged with any Grabber tool to adjust their location or value A group of selected breakpoints can be scaled up or down with any of the Trim tools New controller events can be drawn in with the Pencil tool to replace existing events Events can be drawn wit...

Страница 587: ...ers list To manually enable a continuous controller for automation 1 Click the Track View selector for the MIDI or Instrument track you want to edit and select Add Remove Controller from the controllers pop up 2 Select the MIDI controller range for the con troller you want to automate 3 Select the continuous controllers that to auto mate from the list on the left and click Add 4 Click OK to close ...

Страница 588: ...the Mix or Edit window Once specified the default program change message is sent to your instrument when playing the track To set the default program change for a MIDI or Instrument track 1 From the Mix or Edit window click the Patch Select button 2 Do one of the following In the Patch Select dialog select a program number or If you are using patch name files choose a bank from the pop up menu in ...

Страница 589: ...d On Windows in Program Files Common Files Digidesign MIDI Patch Names Digidesign On Mac in Library Audio MIDI Patch Names Digidesign To import MIDI patch names into Pro Tools 1 Choose Setup MIDI MIDI Studio and ver ify the MIDI Device definition in the MIDI Stu dio Setup window Windows or Audio MIDI Setup Mac 2 Verify the MIDI track s output is correctly as signed to the MIDI device 3 Click the M...

Страница 590: ...ck s playlist with the Pencil tool Existing program changes can be edited moved and copied and pasted To insert a program change with the Pencil tool 1 Set the MIDI or Instrument track to Program Change view 2 If you want the inserted event to snap to a Grid value enable Grid mode 3 Click with the Pencil tool in the track s playlist at the point where you want to insert the pro gram change 4 In th...

Страница 591: ...ac Auditioning Programs When the Patch Select dialog is open Pro Tools can automatically scroll through the different patches for a track s assigned MIDI device To audition patches 1 If you want to audition patches for a MIDI track or Instrument during playback click Play in the Transport window 2 Open the Patch Select dialog by clicking the Patch Select button or by inserting or editing a program...

Страница 592: ...ontains other Sysex events you want to delete select the entire region with any Grabber tool when the track is displaying regions 2 Do one of the following Choose Edit Clear to remove the selected events from the track or Press the Backspace Windows or Delete Mac Note and Controller Chasing Note Chasing Note Chasing allows long sustained MIDI notes to be heard when playing from a point after their...

Страница 593: ...ccurs for a MIDI track s default program change along with any program change events residing within the track There fore if you have chosen a default program change for a track when playing from any point within the track the program change event is sent to the track s assigned device Default Controller Values and Chasing Though new MIDI tracks appear to have default values for continuous control...

Страница 594: ...00 for the offset A negative value causes the MIDI tracks to play back earlier than the au dio tracks a positive value causes the MIDI tracks to play back later To allow for monitoring latency in Pro Tools LE set the offset to a value that is roughly equiva lent to the H W Buffer Size 3 Click OK Individual MIDI and Instrument Track Offsets You can offset individual MIDI and Instrument track offset...

Страница 595: ...he upper left of the window Stuck Notes If you encounter stuck notes with any of your MIDI devices you can silence them with the All MIDI Notes Off command To turn off all stuck notes Choose Event All MIDI Notes Off Remove Duplicate Notes The Remove Duplicate Notes command is useful for removing duplicate notes from a MIDI per formance If a note starts within the first 25 of the duration of a note...

Страница 596: ...Pro Tools Reference Guide 582 ...

Страница 597: ...ut Quantize Step Input The MIDI Operations window can be left open revisiting it as necessary to apply a command or to try out different options for a particular com mand To open a specific MIDI Operations window page Choose Event MIDI followed by one of the MIDI Operations such as Grid Groove Quan tize You can also apply quantize duration de lay and transpose nondestructively using MIDI Real Time...

Страница 598: ... a note on your MIDI controller keyboard to auto matically enter it Changing a value for a particular control such as the Swing Percentage in the Quantize window automatically enables the control Grid Groove Quantize The Grid Groove Quantize command adjusts MIDI note locations and durations so that tim ing is improved or so that a particular rhythmic feel is achieved The default Grid Groove page p...

Страница 599: ...ve Quantize window can apply Grid Quantize when a specific rhythmic value is selected in the Quantize Grid pop up menu When a groove template is selected in the Quan tize pop up menu Groove Quantize can be ap plied For information on Groove Quantize see Groove Quantize on page 589 What to Quantize The options under What to Quantize deter mine what aspects of the selected MIDI notes are quantized a...

Страница 600: ...on and the Tuplet value For example if an sixteenth note equals 240 ticks quintuplet sixteenth notes with 5 in time of 4 would yield a Grid size of 192 ticks or 240 ticks 5 4 Offset Grid By Offsets the Quantize Grid forward or back in time by a specified number of ticks Use this option to achieve a pushed feel by us ing positive values or a laid back feel by using negative values Randomize When se...

Страница 601: ...ntize Grid Use this option to preserve the feel of notes close to the beat while correcting others that are drasti cally away from the beat Figure 31 shows the Quantize Grid set to quarter notes with the Exclude Within option set to 25 Attacks and releases falling within the shaded area equivalent to a sixteenth note area around each beat are not quantized Strength When selected notes are moved a ...

Страница 602: ...ptions for Tuplet Off set Grid By and Swing are not selected 6 Select the Exclude Within option with a value of 10 15 7 Select the Strength option with a value of 70 80 8 Ensure that the remaining Quantize options are deselected 9 Click Apply 10 Audition the change If the desired effect is not achieved undo the edit and experiment with different values for Exclude Within and Strength Quantizing wi...

Страница 603: ...tize When using the Quantize command you may have to experiment with many of the controls to achieve the results you want Try different values for Include and Exclude Within and Strength these controls determine which notes are affected and how drastically they are changed Additionally use the Randomize con trol which adds a percentage of randomness to the quantize to make tracks sound less me cha...

Страница 604: ... you have se lected a groove template specific information about the template s meter and duration in bars is displayed under the pop up menu Show Comments The Comments field displays any comments saved with the Groove Template from Beat Detective The Comments field can not be edited in the Grid Groove Quantize page but can be edited when saving a groove tem plate from the Groove Quantize page Pre...

Страница 605: ...Slider Settings To Save the groove template with the current Options Slider Settings 1 In the Grid Groove Quantize window select Recall with Template if you want to restore all Groove Quantize Options to the settings that are saved with the current template 2 Click the Save button 3 Enter or edit any comments you want to save with the template 4 Do one of the following Click the Save button to sav...

Страница 606: ...the downbeat when making a selection to apply a groove template To apply Grove Quantize 1 With the Grabber or Selector tool select the MIDI notes you want to Groove Quantize 2 Choose Event MIDI Grid Groove Quan tize 3 Select a groove template from the Grid Quan tize pop up menu 4 Enable Timing Duration and Velocity as de sired and adjust their sliders to the percentages you want 5 If desired enabl...

Страница 607: ...e repeated or truncated to match the number of beats in the selection For example if the Groove Template contains fewer beats than the selection such as a one bar template in 6 8 being applied to a one bar selec tion in 4 4 the template repeats to make up the difference If the Groove Template contains more beats than the selection on a track such as a one bar template in 6 4 being applied to a two...

Страница 608: ...Restores the original start times of the selected notes This changes the du rations of selected notes if the Duration option is not enabled Duration Restores the original durations of the selected notes If the Timing Quantization op tion is not enabled the start times of selected notes are not restored and the end times are af fected Velocity Restore the original velocities of the se lected notes ...

Страница 609: ...Flatten Performance command locks in the current performance for selected notes cre ating a new restore to state for the specified note attributes when using Restore Perfor mance To flatten the performance 1 With the Grabber or Selector tool select the MIDI notes you want to flatten 2 Choose Event MIDI Flatten Performance to open the Restore Performance page 3 Select the note attributes to flatten...

Страница 610: ...o another over time The curve for this change can be adjusted 99 to affect how gradually the change oc curs MIDI Operations window Change Velocity page Velocity values usually affect the loudness of MIDI notes Depending on how velocity is mapped with any MIDI instrument veloci ties may also affect other aspects of an in strument s sound such as filter cutoff en velopes and modulations The settings...

Страница 611: ...further change Fading Velocities To change velocities smoothly over time 1 Select the range of MIDI notes to be edited 2 Choose Event MIDI Change Velocity 3 Select the Change Smoothly option with the range set from 127 to 0 4 Click Apply Preserving Existing Velocity Relationships To partially preserve the existing velocity rela tionships and still achieve velocity fades use the option for Change S...

Страница 612: ...nt pitches remain unchanged To create a gap be tween previously overlapping notes enter the desired gap in beats and ticks Transform Sustain Pedal To Duration The Transform Sustain Pedal To Duration op tion extends the length of all notes that are sounding when the sustain pedal controller 64 is down 64 to 127 to the point when the sus tain pedal goes up 0 to 63 Enable the Delete Sustain Pedal Eve...

Страница 613: ...fied per centage value For example using Set all to with a value of 480 ticks along with a Random ize value of 50 yields durations anywhere be tween 360 and 600 25 of the duration value Change Duration Examples To make notes more staccato 1 Select the range of MIDI notes to be edited 2 Choose Event MIDI Change Duration 3 Select the option for Scale By with a percent age value of 50 4 Click Apply T...

Страница 614: ... to F 3 for exam ple transposes the notes up by an augmented fourth six semitones Transpose All Notes To Transposes all selected notes to the same pitch Use the slider or the number entry box to enter the desired pitch to which to transpose all selected notes Transpose In Key Transposes selected notes in key up or down by scale steps based on the Key Signature ruler To transpose MIDI notes 1 If yo...

Страница 615: ...rans pose down a third enter 2 5 Click Apply Select Split Notes The Select Split Notes window provides a com plete set of tools to select and split notes based on a wide variety of criteria Additional tools are provided to specify whether selected data is cop ied to the clipboard or to new tracks whether the data is split to multiple new tracks or a single destination and more Pitch Criteria All N...

Страница 616: ...itch New tracks zoom to single note display If the selection includes multiple tracks each track has its data split separately Include MIDI Controller Data Includes all contin uous MIDI data including pitchbend and after touch on the entire track without any restric tion on time selection Selecting and Splitting Notes To select and split notes 1 Do one of the following With the Grabber or Selector...

Страница 617: ...e closed hi hat is assigned to MIDI note number 42 F 1 at Stan dard Pitch If the hi hat for your drum kit is as signed to a different note make sure to specify it 4 Click Apply Selecting Notes in a Chord Another use for Select Split Notes is to select only the upper or lower notes in a chord Many times you may only want to affect the upper or lower notes in a chord for example to increase velociti...

Страница 618: ...s you precise control over note placement duration and velocity With MIDI step input you can also create musical passages that might be difficult to play accurately or at a fast tempo To enter MIDI notes with Step Input using an external MIDI device 1 Make certain your external MIDI device is properly connected and working with Pro Tools 2 Choose Event MIDI Step Input 3 Select the Enable option MI...

Страница 619: ...I tracks in your session Step Increment The options in the Step Increment section let you set the spacing and duration of MIDI events entered using the Step Input operation You can select any size from whole notes to sixty fourth notes including dotted values Tuplet Lets you input irregular note groupings such as triplets or quintuplets The tuplet length is calculated from the note spacing selec t...

Страница 620: ...ally inserting a musical rest When a note is being held on the MIDI key board Next Step changes to read Increment and adds the Step Increment value to the held note increasing its length by the Step Incre ment value While the note is being held the Step Increment value can be changed allowing you to create notes of any musical length Redo Step Reinserts the last note that was re moved by the Undo ...

Страница 621: ...ies can be adjusted dur ing playback so you can listen for the desired re sults Once you have found the settings you want you can write the settings to the selected tracks or regions This overwrites the corre sponding MIDI properties on selected tracks or regions and resets the Real Time Properties dis play to its default settings Real Time Properties can be adjusted in the Real Time Properties Vi...

Страница 622: ...yed automatically To select a different Real Time Property in Mini or Small track height view Control click Windows or Command click Mac on a real time property element to select a different element from the pop up menu Real Time Properties Window Using the Real Time Properties window you can apply Real Time Properties to selected tracks or regions To open the Real Time Properties window Choose Ev...

Страница 623: ...ty or Transpose Enabled Real Time Prop erties are highlighted and display their settings 3 If you are using the Real Time Properties win dow and Link Track and Edit Selection mode is enabled select the track or region to affect from the Apply To pop up menu 4 Configure the Real Time Properties settings see Real Time Properties Settings on page 610 Enabled Real Time Properties are heard on play bac...

Страница 624: ... 5 to 4 Tu plet is only available in the expanded Real Time Properties window Offset Value Enable Offset and enter the desired offset value in Ticks between 2000 and 2000 Offset is only available in the expanded Real Time Properties window Strength Value Enable Strength and enter the amount as a percentage between 0 and 100 Strength is only available in the expanded Real Time Properties window Inc...

Страница 625: ...Durations options are only available in the expanded Real Time Properties window Delay Delay lets you delay or advance all MIDI data in the selected region or track Select from the Delay pop up menu to delay MIDI data or select to advance MIDI data Select Ticks or Milli seconds from the Ticks or Milliseconds pop up menu Enter the Delay amount in Tick or Milli second values Delay is limited to a ma...

Страница 626: ...roperties consis tently apply to MIDI sequences throughout the entire track However regions with region based Real Time Properties will take precedence over any track based Real Time Properties You can clear region based Real Time Properties by selecting the region and clicking the Clear Re gion Properties button in the Real Time Proper ties window see Writing Real Time Properties to Tracks or Reg...

Страница 627: ...5 Click the Write to Region button To clear Real Time Properties from a region 1 Select the region for which you want to clear Real Time Properties 2 Open the Real Time Properties window Event MIDI Real Time Properties 3 Select Regions from the Real Time Properties Apply To pop up menu 4 Click the Clear Region Properties button Real Time Properties In the MIDI Event List In the MIDI Event List the...

Страница 628: ...t takes into account the ef fect of Real Time Properties whenever the Dis play Events as Modified by Real Time Properties option is enabled When editing or inserting an event in a track or region with active Real Time Properties Pro Tools takes the properties into account and edits or inserts the event in a differ ent place if necessary to match the effect of the Real Time Properties Real Time Pro...

Страница 629: ...pes can be hidden with the View Filter Opening the MIDI Event List To open the MIDI Event List do one of the following Choose Event MIDI Event List Start double click Windows or Control dou ble click Mac a MIDI or Instrument track name in the Mix or Edit window Press Alt Equal Windows or Option Equal Mac MIDI Event List Track selector Options menu Insert menu Unlike playlists in the Edit window yo...

Страница 630: ...ed in the Start col umn When several events reside at the same location the location is only indicated for the top event with the others dimmed The dimmed locations can be edited by double clicking them Event Column Displays the event type indicated by an icon and associated event values Length Info Column Displays the end point or length for notes depending on which option is selected in the Opti...

Страница 631: ...o move through the MIDI Event List do any of the following Double click to edit a value Press Tab or the Down Arrow to move to the next event with or without the edit field se lected Press Control Tab Windows or Option Tab Mac or the Up Arrow to move to the previ ous event with or without the edit field se lected With an edit field selected press the Right Ar row to move to the next edit field to ...

Страница 632: ...rom the pop up menu or Press Control N Windows or Com mand N Mac 2 Enter the location pitch attack and release velocities and length for the new note To move between the Event Entry fields use the Left and Right Arrow keys When a field is selected enter a value with any of the following methods Enter the value on the numeric keypad Drag up or down to scroll to the value Play the note on your MIDI ...

Страница 633: ...on the numeric keypad To insert the controller event and exit Event Entry mode press Return on the QWERTY keyboard To exit Event Entry mode without insert ing the controller event press Escape on the QWERTY keyboard To insert a program change in the MIDI Event List 1 Do one of the following Click the Insert button and choose Pro gram Change from the pop up menu or Press Control P Windows or Com ma...

Страница 634: ...event field you want to edit or To edit a selected event press Control En ter Windows or Command Enter Mac 2 Enter a new value with any of the following methods Enter the new value on the numeric key pad While pressing Alt Windows or Option Mac press the Up or Down Arrow to scroll to a new value While pressing Control Windows or Command Mac drag up or down to scroll to a new value Play the new not...

Страница 635: ... click Mac the event you want to delete To delete a selection of events in the MIDI Event List 1 Select the events you want to delete by either dragging in the Start column or by Shift click ing each event 2 To view only the events you want to delete use the View Filter see View Filter for MIDI Event List on page 616 Events not displayed cannot be deleted 3 Do one of the following Choose Edit Clea...

Страница 636: ... MIDI Event List automatically when the Edit selection changes in the Edit window Show Note Length Displays note lengths in stead of note end times in the Length Info col umn of the MIDI Event List Show Note End Time Displays note end times instead of note lengths in the Length Info col umn of the MIDI Event List Insert At Edit Location Defaults the location for inserted events defaults to the Edi...

Страница 637: ...623 Part VII Mixing ...

Страница 638: ...624 ...

Страница 639: ...if ferent playback systems you are attempting to anticipate what the intended audience will hear Reference Mixes Tapes and discs of rough mixes let you audition mixes outside the studio in dif ferent listening environments Format Compatibility Monitoring Stereo mixes must often be mono compatible When you are mixing in multichannel surround mixes may also need to be compatible with stereo or mono ...

Страница 640: ...acks Audio tracks play audio from disk record audio to disk or monitor input signals when record enabled or in TrackInput monitoring mode In serts on audio tracks are pre fader Sends can be pre or post fader Instrument tracks are listed under both au dio tracks and MIDI tracks because they are a combination of Auxiliary Input and MIDI tracks Audio Auxiliary Input Master Fader VCA Master MIDI and I...

Страница 641: ... audio from external MIDI instruments and other audio sources into the mix to mon itor or route to audio tracks for recording to disk such as from the audio outputs of a MIDI synthesizer Consolidate volume control of any submix under a single fader Play back audio from an instrument plug in even though Instrument tracks are the recom mended way to integrate instrument plug ins such as Digidesign s...

Страница 642: ...bus or hardware output to guard against clipping Control submix levels Control effects sends levels Control submaster bussed tracks levels Apply dither or other inserts to an entire mix Use Master Faders to control submix levels send level masters and other outputs Master Faders can control either audio interface outputs or in ternal busses A Stereo Master Fader controls the level of a pair of out...

Страница 643: ...track the duplicated track s assignment will be inactive Instrument Tracks Instrument tracks provide the same audio signal routing options as Auxiliary Input tracks except that their input must come from an instrument plug in inserted on that Instrument track or from a bus or hardware input Instrument tracks provide up to ten pre fader inserts Instrument tracks are used as inputs for instru ment p...

Страница 644: ...from the pop up menu 5 Adjust the Instrument fader to set the volume it defaults to dB VCA Master Tracks Pro Tools HD Only VCA Master tracks emulate the operation of voltage controlled amplifier channels on analog consoles where a VCA channel fader would be used to control group or offset the signal levels of other channels on the console VCA Master tracks do not pass audio so they do not have inp...

Страница 645: ...of audio Auxiliary Input Instrument MIDI and other VCA Master tracks in a VCA controlled group Muting a VCA controlled group does not change the original mute state of slave tracks Mute buttons on slave tracks that were previ ously unmuted show an implicit mute Solo The VCA Solo button controls the solo state of audio Auxiliary Input Instrument MIDI and other VCA Master tracks in a VCA controlled ...

Страница 646: ...is identical to that of the slave tracks If the slave tracks are different formats the number of level meters on the VCA Master track is set to one Record Enable TrackInput and Slave Tracks When a slave track is record enabled the Record Enable button is lit or set to Input Only mode the TrackInput button is lit its automation is temporarily turned off and its Volume fader is no longer affected by...

Страница 647: ...ach insert can be either a soft ware plug in insert or a hardware insert or an in strument plug in Inserts provide the following features Plug ins and hardware inserts route the signal from the track through the effect of your choice and automatically return it to the same track Hardware inserts send and return the signal to corresponding input and output channels of an audio interface which can b...

Страница 648: ...th the Edit window and Mix window provide Window View selectors to configure their views Displaying Views To display all views in the Mix or Edit window do one of the following Select View Mix Window or Edit Window All or Click the Mix Window View selector or Edit Window View selector and select All To display none of the views in the Mix or Edit window do one of the following Select View Mix Wind...

Страница 649: ... volume MIDI pan and MIDI mute Inserts View Shows inserts software plug ins and hardware I O inserts in each track Deselect to hide Sends View Sends A E and Sends F J Shows send assignments in each track Deselect to hide For more information see Configuring Sends View in the Mix and Edit Windows on page 640 I O View Edit Window Only Shows Input and Output selectors and Volume and Pan indica tors i...

Страница 650: ... Compensation View can be shown in the Mix Window Delay values can be specified in either samples or milliseconds as selected in the Display Pref erences page For more information on Delay Compensation see Delay Compensation on page 656 Track Color View Shows track color in each track Deselect to hide For detailed information see Color Coding for Tracks Regions Markers and Groups on page 146 Trans...

Страница 651: ...alog For more in formation see Configuring Pro Tools System Settings in the Playback Engine on page 32 Output Audio Path Track Output Path selectors route the post fader signals to the assigned output or bus paths The Output Path selector routes the main track out put to the chosen main or sub path Tracks can be routed directly to hardware output or inter nal bus paths and subpaths for submixing m...

Страница 652: ...rent track An asterisk indicates that one or more cur rently assigned outputs is Inactive Inactive Outputs An output path can be made inactive either glo bally in the I O Setup dialog affecting all tracks assigned to that path or locally per assignment only affecting that output on that audio track or Auxiliary Input When opening sessions outputs will be made inactive automatically if the required...

Страница 653: ...s Sends can be assigned to available output and bus paths main or sub paths in mono or ste reo or any of the supported multichannel for mats for surround mixing Each send can have multiple assignments for example to available output and bus paths Sends must be returned to the mix through an Auxiliary Input audio track or Instrument track to be audible in Pro Tools They can be monitored and process...

Страница 654: ... Send selectors in clude bus and output paths Internal Mix Busses Pro Tools HD provides 128 busses and Pro Tools LE provides 32 busses for routing signals internally Internal bus paths are useful for submixing and processing with plug ins Bus paths are defined in the I O Setup dia log and are available in all supported channel formats mono stereo or multichannel as sup ported on your system Hardwa...

Страница 655: ...Mix Window or Edit Win dow Sends A E or Sends F J 2 Do one of the following Select View Sends A E Assignments or View Sends F J Assignments or When displaying sends in an individual Send View such as Send A View Control click Windows or Command click Mac the Send selector and select Assignments Individual Send Views A J Individual Send Views such as Send A provide send level pan and mute controls ...

Страница 656: ...splay the controls for an individual send you also have the option of displaying send level meters Send level meters show peak values and indicate clipping that occurs while the meter is displayed if a send clips any time before its meter is dis played this is not shown If you are using a slower computer hiding send level meters can improve screen redraw times To display send level meters when vie...

Страница 657: ...ks with inactive sends can still affect the sends automa tion playlists When opening sessions sends will automati cally be made inactive if the required hardware or other resources are not available To make a send inactive Control Start click Windows or Command Control click Mac on the Send assignment or Make the Track inactive See Making Tracks Inactive on page 145 To toggle sends in the same pos...

Страница 658: ...ty Sends can only be copied to other tracks with a compatible send output format mono stereo or other In addition the following conditions apply when moving or copying sends among tracks When copying a stereo send from a mono track to a stereo track Send pan automation if any will be dropped without warning When copying a stereo send from a stereo track to a mono track the left Send pan auto matio...

Страница 659: ...hange the default FMP Follows Main Pan setting for newly created Sends 1 Choose Setup Preferences and click Mixing 2 Under Setup select or deselect Send Pans De fault to Follow Main Pan Output Windows for Tracks and Sends Track outputs and sends can be opened for dis play and editing in dedicated windows Track Output windows provide track fader pan automation solo and mute controls Send windows pr...

Страница 660: ... any Output Window button or Send Assignment button To set a window to remain open when opening additional Output windows Make sure the Target is disabled For additional information see Targeted Win dows on page 649 Panner Linking Stereo outputs provide two panning controls one for each side of the left right pair Multi channel outputs provide a multichannel pan ner The Output window provides cont...

Страница 661: ...tor Controls in Output Windows All Output windows provide standard selectors for path automation and other controls in the top area of the window the Output Editor area Close Closes the window Track Selector Provides access to any audio track Auxiliary Input or Master Fader in the session Output View Selector Provides access to other outputs track and send in the track if any dis playing the selec...

Страница 662: ...iscrete adjust ment of individual sides or channels When linked all changes affect all channels See Pan ner Linking on page 646 Target Identifies the target of plug in settings commands Also sets the current window for display of Output windows See Targeted Win dows on page 649 Path Meter View Opens the path Meter View These meters display levels of the selected path not the levels of the track or...

Страница 663: ... Click the Track selector and choose a track from the pop up menu To reassign output Click the Output Path selector and select a path from the pop up menu To display the controls for a different send on the same track Click the Send View selector and select the send To assign a different send to the same track Click the Send selector and choose an output or bus path from the pop up menu To add an ...

Страница 664: ... existing or create a new Auxiliary Input track with a channel format that corresponds to the channel format of your audio source mono stereo or multichannel 4 Set the input of the Auxiliary Input track to the corresponding input path 5 Assign the track output to the appropriate path or paths for monitoring 6 Adjust the Auxiliary Input fader to mix the au dio input Monitoring and Mixing Audio with...

Страница 665: ...IDI instrument to available MIDI in put and output ports on your MIDI interface 4 If necessary configure the MIDI Studio Setup Setup MIDI MIDI Studio 5 Use an existing or create a new Instrument track with a channel format that corresponds to the channel format of your audio source mono stereo or multichannel 6 Choose View Mix Window Instruments to show the MIDI controls of the Instrument track 7 ...

Страница 666: ...s corresponds to the channel format of the plug in outputs mono stereo or multichannel 7 Set the inputs of the Auxiliary Input tracks to receive the individual outputs of the plug in 8 Assign the outputs of the Auxiliary Input tracks to the appropriate path or paths for mon itoring 9 Adjust the Auxiliary Input faders to mix the individual outputs of the plug in Creating a Submix A submix is create...

Страница 667: ...ck controls the output levels of all tracks routed to it You can apply mix automation to the volume pan mute and send level send pan and send mute controls of the Auxiliary Input You can also bounce a submix to disk to free up the voices for use by other tracks See Chapter 31 Mixdown for more information Send and Return Submixing for Effects Processing When you are submixing for reverb delay and s...

Страница 668: ...mix outputs 2 Assign a send mono or stereo and set the send destinations on the source tracks to the output path connected to the external device Configure the sends for pre or post fader as needed 3 Choose Track New 4 Specify the track type Aux Input and format stereo or mono then click Create 5 From the Auxiliary Input track s Input Path se lector select the input path connected to the ex ternal...

Страница 669: ...main mix outputs 2 Assign a send mono or stereo and set the send destinations on the source tracks to the output path connected to the external device Configure the sends for pre or post fader as needed 3 Choose Track New 4 Specify the track type Aux Input and format stereo or mono then click Create 5 From the Auxiliary Input track s Output Path selector select the output path not the main outputs...

Страница 670: ...t click Windows or Control click Mac the Solo button Generating Stereo Output from a Mono Send Return You can use an Auxiliary Input to generate a ste reo output from a mono send Set the send des tination to a mono Auxiliary Input track and place a mono to stereo plug in on the Auxiliary Input The output of the Auxiliary Input be comes stereo To create a stereo effect from a mono source you must u...

Страница 671: ...lect a Delay Compensation setting 3 Click OK The Delay Compensation status will be saved as a session and system preference Delay Compensation View The Delay Compensation View displays the to tal amount of plug in delay on each track lets you apply a user offset of track delay and dis plays the total amount of delay that Pro Tools applies to each track The Delay Compensation View can be shown in t...

Страница 672: ...h the modifier for a negative delay Control drag Windows or Command drag Mac in the User Offset field to scroll to a new value Press the Up and Down Arrow keys to in crease or decrease the numerical values 3 Press Enter To bypass the user delay Start Control click Windows or Command Control click Mac the User Offset field The user defined delay will appear greyed out and it will no longer be appli...

Страница 673: ...elay To bypass an Auxiliary Input s Delay Compensation Start Control click Windows or Command Control click Mac the Track Compensation in dicator The reported track delay will be zero and will appear greyed out Delay Compensation for MIDI When Delay Compensation is active a MIDI event that is recorded to sound in time with delay compensated material actually is recorded late by the length of total...

Страница 674: ...2 Enter the total system delay into the User Off set field Dither Dither is a special form of randomized noise used to mask quantization noise in digital audio systems Digital audio s poorest distortion per formance exists at the lowest end of the dy namic range where quantization distortion can occur Dither reduces quantizing errors by intro ducing very low level random noise thereby minimizing d...

Страница 675: ...r CD or other 16 bit media Inserts on Master Fader process post fader This form of dithering lets you use dither plug ins from Digidesign or third party manufacturers When using the Bounce to Disk see Dither and Bounce to Disk on page 744 AudioSuite Dither For AudioSuite plug in pro cessing dither is based on the Dither plug in For most AudioSuite plug ins dither can be au tomatically applied in t...

Страница 676: ...s functions You can use a control sur face to adjust on screen faders and knobs acti vate transport controls or scrub and shuttle in Pro Tools There are several optional Digidesign control surfaces for mixing in Pro Tools Digidesign s D Control and D Command Pro Tools HD Only Innovative tactile worksurfaces that employ a familiar intuitive channel strip center section console layout Digidesign s C...

Страница 677: ...g in inserts are software in serts that process audio material on a track in real time For example the DigiRack EQ com pressor and delay plug ins supplied with your Pro Tools system can be used as real time plug in inserts Additional real time plug ins are available from Digidesign and from many third party develop ers Hardware I O Inserts Hardware I O inserts can route audio through an external d...

Страница 678: ...outing features helps maximize your sys tem s processing power Insert Formats Mono Inserts Used on mono tracks Inserts that occur on a track after a stereo insert are automat ically used in stereo as well Stereo Inserts Used on stereo tracks A stereo hardware I O insert sends the signal to an in put output path Mono In Stereo Out Plug in Inserts Used to re turn a stereo effect from a mono source C...

Страница 679: ...onal latency and will take up two additional voices per channel one voice for input and one voice for output in the following conditions When inserted on an Auxiliary Input or Master Fader track When inserted on an Instrument track that does not contain an instrument plug in When inserted after a TDM plug in on any kind of track For example the initial insert of an RTAS plug in on a mono Auxiliary...

Страница 680: ... Both the Mix and Edit windows can be config ured to show or hide inserts Plug in windows provide complete access to plug in controls To show or hide inserts do one of the following In the Mix window or Edit window select View Mix Window or Edit Window Inserts or Select Inserts View from the Edit Window or Mix Window View selector When you use Pro Tools 6 9 x or lower to open a session originally ...

Страница 681: ... situations The system has insufficient DSP resources A plug in is not installed A plug in type is not available RTAS or TDM Opening the session results in plug in type substitutions This can happen if the type is available but substituting would result in an unsupported condition such as opening a session containing a TDM plug in for which an RTAS version is unavailable To make an insert inactive...

Страница 682: ...he Insert selector on the track and select the plug in that you want to use See TDM and RTAS Plug ins on page 665 for related informa tion To remove an insert from a track Click the Insert selector and choose No Insert Display of inactive plug ins Display of inactive Plug in window Hardware inserts do not provide a bypass control You can use the inactive feature whenever you need to mute or bypass...

Страница 683: ...ug ins on an audio track use one of the following two strategies based on your recording needs To ensure that RTAS plug ins stay active when you record enable a track or use TrackInput monitoring order all TDM plug ins before RTAS plug ins or To conserve voices and minimize processing latency order all RTAS plug ins before TDM plug ins Plug in Menu Organization You can customize how plug in lists ...

Страница 684: ...ave a Manufacturer defined will appear in the Other manufacturer folder Most Digidesign distributed third party plug ins will be grouped under Digidesign when this op tion is enabled Category and Manufacturer Organizes plug ins in two levels of menus The top menus display plug ins by process category such as EQ Dy namics and Delay with individual plug ins listed in the category submenus The bottom...

Страница 685: ... Preferences and click Mixing 2 Under Setup choose a plug in from the De fault EQ or Default Dynamics pop up menu 3 Click OK to close the Preferences window Plug in Favorites To find a plug in faster a plug in can be desig nated as a favorite Favorite plug ins are shown at the top of the plug in menu When a plug in becomes a favorite it is still shown in its plug in category and its name ap pears ...

Страница 686: ...ack Selector Accesses any non MIDI track in a session Insert Position Selector Accesses any insert on the current track Plug in Selector Lets you select any real time plug in installed in the Plug ins folder that is created when you install Pro Tools Effect Bypass Button Disables the currently dis played plug in This lets you compare the track with and without the effect Plug ins cannot be moved o...

Страница 687: ... See Auto mating Plug ins on page 703 Automation Safe When enabled prevents exist ing plug in automation from being overwritten Target Button When multiple Plug in windows are open clicking this button selects that plug in as the target for any computer keyboard com mands For more information see Targeted Windows on page 649 Key Input Selector Lets you select audio on a particular input or bus and...

Страница 688: ... au tomatically synchronize to the session tempo for rhythmic delay echo and similar effects Opening Plug in Windows To open a plug in window Click the plug in button in the Mix or Edit window channel strip By default each plug in you open will appear in the same location as a currently open plug in replacing it in the same window location Opening Multiple Plug in Windows Pro Tools normally displa...

Страница 689: ...get window is also the focus of keyboard shortcuts for plug in settings Using the Librarian The Settings Librarian makes it easy to create your own library of plug in settings Using the Librarian and Settings pop up menus you can copy paste save and import these settings from plug in to plug in or from session to session Once you create and save settings files to disk and tell Pro Tools where to f...

Страница 690: ...e standard default set ting for that plug in or User Default your cus tom setting Save Plug in Settings To Selects the folder where plug in settings are saved If you choose Session Folder the settings are saved in a folder named Plug in Settings within the current Session folder If you choose Root Settings Folder the settings are saved in the folder you specified with the Set Root Settings Folder ...

Страница 691: ...ttings pop up menu 2 Type a name and click OK The setting appears in the Librarian menu To load a previously saved setting Choose the setting from the Librarian pop up menu To import a setting 1 Choose Import Settings from the Settings pop up menu 2 Locate the settings file you want to import and click Open Pro Tools loads the setting and copies it to the root destination folder To copy a setting ...

Страница 692: ...r Option key Mac while performing the command Plug in Settings Dialog The Plug in Settings dialog lists the settings files for the current plug in type From this list you can select a new setting or audition a series of settings Auditioning plug in settings is espe cially useful for selecting patch names for virtual MIDI instrument plug ins or trying out different effects types applied to your aud...

Страница 693: ...value for the number of seconds that will elapse between each program change 4 Select the option for Increment Patch After the specified number of seconds Pro Tools selects the next setting 5 When you are finished auditioning settings do one of the following Click Done to stop incrementing patches and to close the Plug in Settings dialog or Select the Increment Patch option to stop incrementing pa...

Страница 694: ...ple you cannot replace a 1 Band EQ 3 with a plug in setting for 4 Band EQ 3 Bypassing Plug ins Plug ins can be bypassed from their Plug in win dow or from the Mix and Edit window Inserts View Plug in settings files found in the Workspace browser and sorted by Plug in Name With DigiBase Pro Pro Tools HD and Pro Tools LE with DV Toolkit 2 only you can create catalogs of specific plug in set tings th...

Страница 695: ...n if it is not al ready deselected 2 Click the Link Enable buttons for the chan nels whose controls you want to link For exam ple on plug ins that do provide discrete LFE controls from the LFE Enable button you can link all channels except the LFE by highlighting the icons representing the five full range speak ers in a multi mono plug in Editing Plug in Controls You can adjust plug in controls by...

Страница 696: ... numeric keyboard to in put the value and remain in keyboard edit ing mode or Press Enter on the alpha keyboard Win dows or Return Mac to enter the value and leave keyboard editing mode To clear plug in clipping Press Alt C Windows or Option C Mac Plug in Automation and Safe All real time plug ins can be fully automated and support all Pro Tools Automation modes Write Touch and Latch plus Trim The...

Страница 697: ...effect A com mon production technique is to use these con trols to filter a drum track so that only specific high frequency sounds such as a hi hat or low frequency ones such a tom or a kick trigger the effect Using a Key Input for External Side Chain Processing To use a key input for external side chain processing 1 Click the plug in s Key Input selector and se lect the input or bus carrying the ...

Страница 698: ...channels mapped to audio interface channels in the I O Setup dialog If you plan to use a device as an insert be sure to connect the device to matching inputs and out puts on your system For example a hardware insert being supplied by outputs 7 8 needs to be returned to hardware inputs 7 8 To define a hardware insert 1 Choose Setup I O then click the Inserts tab 2 Select an insert path or click New...

Страница 699: ...ols system 1 Connect an unused output or pair of outputs for a stereo device of your Pro Tools system to an input of the external signal processor 2 Connect the output of the external signal pro cessor to an unused input or pair of inputs for a stereo device of your Pro Tools system 3 Define what physical ports are routed to Pro Tools input and output ports as appropri ate in either the Hardware S...

Страница 700: ...oring When recording or monitoring Pro Tools can synchronize to an external clock source Op tions for external clock vary according to the type of Pro Tools system you are using Pro Tools HD Systems Pro Tools HD systems can receive external clock through any of the digital inputs on any Pro Tools HD I O including AES EBU S PDIF and Optical With an expanded Pro Tools HD system that in cludes Legacy...

Страница 701: ...stem Mbox 2 Mbox 2 Pro and Mbox Systems Pro Tools can receive external clock from the S PDIF input on these interfaces To select an external clock source for an Mbox 2 Mbox 2 Pro or Mbox system 1 Choose Setup Hardware 2 Choose the SPDIF Windows or SPDIF RCA Mac from the Clock Source pop up menu 3 Click OK If you set the Optical Format to S PDIF Pro Tools will watch the Optical port for ex ternal c...

Страница 702: ...Pro Tools Reference Guide 688 ...

Страница 703: ... and smooth fader automation Automation QuickStart Pro Tools provides many options for recording replacing and editing automation data The basic steps for automation recording are Enable the automation type that you want to record volume pan mute send level send pan send mute or plug in automation Put the appropriate tracks in an automation writing mode Write Touch or Latch or a Trim mode If you a...

Страница 704: ...nly Mute audio Pan audio On VCA Master tracks Pro Tools HD only these parameters include Volume Volume Trim Mute You can display and edit each of these automat able playlists individually from Pro Tools even during playback In addition on MIDI and Instrument tracks you can display and edit other continuous MIDI controller data such as mod wheel breath con troller foot controller or sustain in a si...

Страница 705: ...ack s corresponding automation playlist so it can be edited with or independently from its associated audio re gions When you copy or cut audio data from a track while it is in Waveform View the underlying au tomation data is cut or copied with it If you paste audio data from other locations or tracks into an edit playlist you may change the underlying automation data on the track When you trim re...

Страница 706: ... or Latch mode or remain in Write mode after the completion of an automa tion pass in Write mode To set the Automation mode after a Write pass 1 Choose Setup Preferences and click Mixing 2 Under Automation select an After Write Pass Switch To option Touch Latch or No Change 3 Click OK to close the Preferences window Touch Mode Touch mode writes automation only while a fader or switch is touched or...

Страница 707: ...position when you re lease a control AutoJoin with Latch Mode Pro Tools HD Only Pro Tools provides two different methods to re sume writing automation on controls that were active at the point where the transport stopped AutoJoin Lets you automatically resume writing automation in Latch mode Join Lets you manually resume writing automa tion in Latch mode Join is available only with Digidesign supp...

Страница 708: ...writ ing automation Trim Mode Pro Tools HD Only Pro Tools HD can adjust or trim existing track volume and send level automation data in real time Pan mute and plug in automation cannot be trimmed in this manner Trim mode works in combination with the other Automation modes Read Touch Latch Touch Latch and Write and is useful when you want to preserve all of your volume automation moves but need to...

Страница 709: ...an move a Trim fader during playback to audition new trim values but no automation is written The Trim fader retains its position until the track is removed from Trim mode or if you manually coalesce the Trim level When this mode is enabled non trimmable controls all controls other than track volume and send level behave as if they are in regular Read mode no automation data is written Touch Trim ...

Страница 710: ...ls other than track volume and send level are not in Write mode but behave as if they are in regular Touch mode no automation is written unless a control is touched This is to prevent the controls from overwriting all of their automation data on ev ery pass in Write Trim mode Automation Preferences Pro Tools gives you several options for control ling the writing and playback of automation data To ...

Страница 711: ...s not affect MIDI tracks For instructions see Thinning Automation on page 711 AutoMatch Time AutoMatch Time is the amount of time it takes for a fader to return by ramping up or down to the level of automation still on the track as the automation pass ends This time value is set in the Automation Preferences page see Auto mation Preferences on page 696 AutoMatch is automatically applied to all Tou...

Страница 712: ...from the Automation window See En abling and Suspending Automation on page 708 Viewing Automation Pro Tools creates a separate playlist in the Edit window for each type of automation in a track including a playlist for each type of Trim auto mation This data can be viewed and edited in the same way as audio and MIDI data To display an automation playlist Click the Track View selector and select fr...

Страница 713: ...y automation pass you can display a composite automation playlist that shows the contribution of the Trim automation to the main Volume or Send Level automation data This composite playlist display cannot be directly edited The composite playlist is shown in both the main automation playlist and the Trim automa tion playlist To display the composite playlist Choose View Automation Composite Playli...

Страница 714: ...tch mode These modes add new automation only when you actually move a control See Automation Modes on page 692 To write additional automation to a previous pass 1 Enable Options Link Timeline and Edit Se lection 2 In the Edit window make a selection or place the cursor in the location where you want to start writing automation 3 In the Mix or Edit window click the Automa tion Mode selector on each...

Страница 715: ... a series of mute on off states on a track in quick succes sion the manual method for clearing this auto mation data would require you to move to the Edit window choose automation playlist for Mute select the mute automation data and de lete it In Pro Tools this can be done automati cally To automate a switched control such as the Mute button 1 Perform another automation pass on the track 2 When y...

Страница 716: ...to automate For each track click the Au tomation Mode selector and set the Automation mode For the initial automation pass choose Write mode 3 If sends are not currently visible on your tracks select View Mix Window or Edit Win dow Sends A E or Sends F J 4 To display send controls do one of the follow ing Click the send to open the Output window for the send that you want to automate or Choose Vie...

Страница 717: ...her automation procedures be cause you must enable individual plug in con trols for automation To enable plug in controls for automation 1 Open the Plug in window for the plug in you want to automate 2 Do one of the following Click the Automation Enable button in the Plug in window or Control Alt Start click Windows or Com mand Option Control click the Track View selector in the Edit window 3 In t...

Страница 718: ...rol for the parameter Enabling Automation for All Plug in Parameters To enable all plug in parameters 1 Make sure the plug in window is open for the plug in you want to automate 2 Control Alt Start click Windows or Com mand Option Control click Mac on the Auto button at the top of the plug in window Automatically Enabling Plug ins for Automation You can set Pro Tools to automatically enable all co...

Страница 719: ... track stop writing and return to ex isting automation levels To AutoMatch all controls on a track Control click Windows or Command click Mac the Automation Mode selector on the track AutoMatching Individual Automation Types You can invoke AutoMatch on individual auto mation types across a session To AutoMatch all controls of one automation type In the Automation window Control click Windows or Co...

Страница 720: ...apability lets you pre pare for an automation pass before starting play back To prime controls for writing automation in Latch mode while the transport is stopped 1 Choose Setup Preferences and click Mixing 2 Under Automation select Allow Latch Prime in Stop 3 Click OK to close the Preferences window 4 In the Automation window make sure the controls you want to automate are write en abled 5 Click ...

Страница 721: ...ol will no longer be primed To take a track out of Latch Prime Control click Windows or Command click Mac the Automation Mode selector on the track The selector button unbolds to indicate that the track is no longer primed To take all tracks out of Latch Prime do one of the following Alt Control click Windows or Option Com mand click Mac the Automation Mode selec tor on a track or Click the AutoMa...

Страница 722: ...hile the transport is stopped See Priming Controls for Writing Automation in Latch Mode on page 706 3 In the Automation window click the AutoJoin button 4 In the Automation window click the Capture button and then click the Punch Capture but ton The AutoJoin marker a vertical red line ap pears on screen at the punch point 5 Issue a Back and Play command roll back the external machine to before the...

Страница 723: ...ol name is italicized in the Track View selector To suspend automation for individual controls on a track 1 In the Edit window set the Track View selector to show the automation playlist for the control you want to suspend 2 Do one of the following To suspend writing and playback of auto mation for only the displayed control Control click Windows or Command click Mac the control name in the Track ...

Страница 724: ...ton in the Automation window displays bold red text When an automation type is enabled but is not writing anywhere in the session the corre sponding button in the Automation window displays normal red text Automation Enable Guidelines The following rules determine whether automa tion is enabled for a track Although Pro Tools shows a single Automa tion mode for each track all automatable con trols ...

Страница 725: ...ct a range of data to be removed 2 Press Start Backspace Windows or Con trol Delete Mac All automation data within the selection is re moved for all automation playlists on that track regardless of whether automation is write en abled for those controls Clearing Trim Automation Pro Tools HD Only If Trim automation has not been coalesced on a track you can clear it When you clear Trim au tomation a...

Страница 726: ...e Selector tool highlight the automa tion data you want to thin To thin all automa tion of the selected type in the track click with the Selector tool in the track and choose the Se lect All command 3 Choose Edit Automation Thin Pro Tools HD or Edit Thin Automation Pro Tools LE to thin the selected automation by the amount you have selected in the Mixing Preferences page Drawing Automation Use the...

Страница 727: ...n using the Pencil tool to draw MIDI auto mation the data is drawn as a series of discrete steps You can control the resolution or den sity of these steps to help manage the amount of MIDI data sent for a given MIDI controller move To set the resolution for the Pencil tool 1 Choose Setup Preferences and click MIDI 2 Enter a value for Pencil Tool Resolution When Drawing Controller Data The value ca...

Страница 728: ...oints by clicking once on the graph line Alt click Windows or Option click Mac breakpoints with the Pencil tool to remove them Using the Trim Tools The Trim tools let you adjust all selected break points up or down by dragging anywhere within that selection Editing Automation Types Each automatable control has its own automa tion playlist that can be displayed by choosing it from the Track View se...

Страница 729: ... an existing point on the line graph with the any Grabber tool and drag it to a new posi tion To clear one breakpoint Alt click Windows or Option click Mac with any Grabber tool To edit several breakpoints at once Use the Selector tool to select a range in the automation playlist that contains the break points and do one of the following To move the breakpoints earlier or later in the track press ...

Страница 730: ... channel can be displayed and edited when the plug in is unlinked and the track is in Expanded Track Display Expanded Track View By default a single automation playlist is dis played on stereo and multichannel tracks The playlist occupies the entire height of the track similar to mono automation playlists Optionally you can display an expanded view of the track whereby the same automation play lis...

Страница 731: ...thout affecting the other members do one of the following Press the Start key Windows or Control Mac while you perform the edit Cutting Copying and Pasting Automation Cutting automation data is different from delet ing it and yields different results although both change the existing automation data Copying automation leaves the original automation data intact You delete automation data by selecti...

Страница 732: ...e main format is displayed any edits performed on the track apply to all data in the track The main view formats are Audio tracks Blocks and Waveform MIDI tracks Blocks Regions and Notes For example when an audio track is set to Waveform or Blocks cutting copying and past ing affects the audio data and all types of auto mation data on that track If the track is set to show Pan automation only the ...

Страница 733: ...mation data for plug ins or sends that do not exist on the target track is ig nored when pasted Cut Copy Clear and Paste Special Commands The four special commands Cut Special Copy Special Paste Special and Clear Special simplify the tasks involved with moving or clearing different types of automation data and MIDI controller data between tracks sends and plug ins These commands let you Edit autom...

Страница 734: ...ecify a crossfade to smooth transitions between regions To Current Automation Type Pastes the automa tion data or MIDI controller data from the clip board to the selection as current automation type or MIDI controller This lets you copy auto mation from any type to any other type For ex ample you can copy a Left Pan automation to Plug in automation Or you can copy MIDI vol ume data and paste it to...

Страница 735: ... you want at the end of the selection For example to glide automation volume to Infin ity move the Volume fader to Infinity 5 Choose Edit Automation Glide to Current To do a Glide Automation to all current enabled parameters 1 In the Automation window make sure the au tomation types are write enabled 2 In each track you want to automate click the Track View selector and select from the pop up menu...

Страница 736: ...end levels in real time by using Trim mode When a track is trim enabled you are not re cording absolute fader positions but relative changes in the existing automation See Trim Mode on page 694 for more information To enable Trim mode In the Mix or Edit window click the Automa tion Mode selector of the track where you want to trim automation and select Trim When a track s Trim mode is enabled its ...

Страница 737: ...click Mixing 2 Under Coalesce Trim Automation select one of the following After Every Pass On Exiting Trim Mode Manually To coalesce Trim automation on a track when exiting Trim mode 1 Choose Setup Preferences and click Mixing 2 Under Coalesce Trim Automation select On Exiting Trim Mode 3 Click OK to close the Preferences window 4 Make sure the Pro Tools transport is stopped 5 On the track where y...

Страница 738: ...c parameter the associated track must be in one of the following Automation modes and meet the following conditions Latch Mode The control for the parameter must be changed touched during the automation pass Touch Mode The control for the parameter must be changed touched Write Mode All controls on that track must be in Write mode This command can be undone To write current automation values to th...

Страница 739: ...rite Automation to Start All or End button in the Automation window 7 Stop playback The relative changes to the track volume and send levels at that point are written to the corre sponding area of the track selection Writing Automation to the Start End or All of a Track or Selection on Stop The Automation window provides options for writing automation on any automation playlist including Trim play...

Страница 740: ...xt Breakpoint and Write Automation to Punch Point commands do not operate when the Pro Tools transport is stopped They only af fect automation for those parameters that are currently write enabled and currently writing automation data Optionally the Write Automation to Next Breakpoint and Write Automation to Punch Point commands can be configured to be ap plied automatically after a valid automati...

Страница 741: ...control began writing automation Write To Next Breakpoint or Punch Point and Trim Mode While in Trim mode it is also possible to write trim values for track volume and send levels to the next written breakpoint or back to the auto mation punch in point To write current trim values to the next breakpoint or to the punch point 1 Choose Window Automation 2 Make sure that the automation type track vol...

Страница 742: ...nch Point on Stop The Automation window provides an option for automatic Write Automation to Next Break point on Stop or Write Automation to Punch Point on Stop To configure Write Automation to Next Breakpoint on Stop 1 Choose Window Automation 2 Click the Write Automation to Next Break point on Stop button or the Write Automation to Punch Point button When this option is enabled automation writ i...

Страница 743: ...writ ing controls except controls in Write mode punch out of writing automation Write to Punch point Currently writing controls continue writing automation Applying Write To Commands to Selected Tracks The Write Automation To commands nor mally apply to all tracks currently writing auto mation It is possible to apply these commands to selected tracks only To apply any of the Write Automation To co...

Страница 744: ...nt and stops before the end of the second event Mute Overwrite Extend is supported in Touch and Latch mode as follows Touch Mode Writes the current state as long as the Mute button is held Latch Mode Writes the current state until you stop or AutoMatch out To overwrite a mute state on one or more tracks 1 Choose Window Automation 2 Make sure Mute is write enabled Overwriting a mute automation even...

Страница 745: ...e is write enabled 3 In the Mix or Edit window click the Automa tion Mode selector of the track you want to au tomate and select Touch or Latch mode 4 In each track you want to automate click the Track View selector and select mute To overwrite mute states on multiple tracks set all tracks to the same Automation mode Placing the cursor before the start of a mute event To overwrite mute states on m...

Страница 746: ...n so that data outside the selection is not affected To a Cursor Location Automation data is written at the insertion point After the insertion point the automation ramps to the next breakpoint value or if no breakpoints exist remains at the newly written value for the remainder of the ses sion For more information on cutting copying and pasting automation data within a session see Writing Automat...

Страница 747: ...bled in the Automation window choose Write to All Enabled Adding Snapshot Automation to Empty Automation Playlists When you use a Write Automation command on an automation playlist with no previously written automation data the selected value is written to the entire playlist and not just the se lected area This is because a playlist with no automation data contains only a single automation break ...

Страница 748: ... and apply automation 1 In the Automation window make sure that the automation parameters you want to edit are write enabled Deselect any parameters whose automation you want to preserve 2 Click the Automation Mode selector and se lect Read mode for the tracks that have automa tion you want to capture 3 Make sure to select Options Link Timeline and Edit Selection 4 With the Selector tool select th...

Страница 749: ...rameter choose Trim to Current or To write the current delta value for all auto mation parameters enabled in the Automa tion window choose Trim to All Enabled Previewing Automation Pro Tools HD Only Automation Preview mode lets you audition changes to a mix and compare them to existing automation values without committing them to the automation playlist When you put Pro Tools in Automation Preview...

Страница 750: ...ow lights to indi cate a preview value is available to punch 5 Start playback and adjust the isolated control to audition the changes Taking Controls Out of Isolated State You can take controls out of their isolated state without leaving Preview mode To take all controls on a track out of their isolated state do one of the following Control click Windows or Command click Mac the automation mode se...

Страница 751: ...e to Next Breakpoint can be used to extend the punched value in the same manner as other automation Capturing Automation Pro Tools HD Only You can capture current automation values at one location in a session and quickly apply them in another location with the Capture and Punch Capture commands The Capture com mand temporarily stores the value of all con trols currently writing automation and the...

Страница 752: ...n capture the state of all automatable controls except on tracks with their Automa tion Mode set to Off in a session regardless of whether they are currently writing automation To capture the automation values of all controls When you reach a location where you want to capture the current automation states Alt click Windows or Option click Mac the Capture button To capture the automation values of...

Страница 753: ...e that you want to preview in another location on a track See Capturing Automation Values on page 737 4 Go to a location where you want to preview the captured automation states and click the Preview button in the Automation window 5 Click the Punch Capture button The affected controls are isolated and updated to the captured values The Punch Preview but ton in the Automation window lights to indi...

Страница 754: ...ectly ed ited To display the composite playlist on VCA slave tracks Choose View Automation Composite Playlist Coalescing VCA Automation There are several ways to commit or coalesce the contribution of a selected VCA Master track s Volume and Mute automation to the au tomation playlists of its slave tracks Clearing the VCA Master You can use a VCA Master to write grouped au tomation coalesce the VC...

Страница 755: ...each of the slave tracks Removing a Slave Track from a VCA Group You can remove an individual slave track from a VCA group which commits the VCA automa tion to that track leaving the VCA Master and the other slave tracks untouched The coalesced slave track plays back exactly as it did when it was in the VCA group To coalesce automation from a VCA Master to an individual slave track 1 Do one of the...

Страница 756: ...ction You can commit VCA automation across an Edit selection in a VCA Master track without com mitting the automation on the entire length of the track To coalesce automation in an Edit selection on a VCA Master track 1 Select the VCA Master track whose automa tion you want to coalesce 2 Make an Edit selection in the VCA Master track that includes the range of automation you want to coalesce 3 Do ...

Страница 757: ...voices and bus paths to accommodate the submix and the new tracks While recording to tracks you can adjust mixer or other controls Selecting Audio for Loops Submixes and Effects Both Bounce to Disk and recording to tracks op erate on the current Timeline or Edit selection if any This makes it easy to turn multitrack selec tions into mono stereo or multichannel loops Submixes stems and other specia...

Страница 758: ... use 16 bit files they are still being processed at a higher bit rate 24 bit audio input and output signal paths with internal 48 bit mixing and processing for Pro Tools HD systems 24 bit audio input and output signal paths with internal 32 bit floating point processing for Pro Tools LE systems For this reason whether you are using a 16 bit session or a 24 bit session it is recommended that you us...

Страница 759: ... all tracks that you want to record and enough voices available to record the destination tracks In contrast the Bounce to Disk command lets you bounce all available voices to disk without holding any in reserve but you cannot manu ally change any controls during the bounce See Bounce to Disk on page 746 for more infor mation To record a submix to a track 1 Apply any plug ins or external processor...

Страница 760: ...Bounce to Disk The Bounce to Disk command lets you mix down with all available voices on your system Since it records to separate audio files you do not have to reserve any tracks for a bounce Pro Tools bounces are done in real time so you hear audio playback of your mix during the bounce process though you cannot adjust it You can use the Bounce to Disk command to create and automatically import ...

Страница 761: ...e to Disk 1 Make a Timeline selection to define the range to be bounced 2 Choose File Bounce to Disk 3 Configure the Bounce options see Bounce Options on page 747 4 Click Bounce Bouncing with Mute Frees Assigned Voice Pro Tools HD Only When bouncing sessions that include muted tracks enabling Mute Frees Assigned Voice can in some instances increase the number of tracks that can be successfully bou...

Страница 762: ...ou can drag and drop from the DigiBase browser Windows Explorer or Mac Finder or you can use the Im port Audio command Files in this format do not have to be converted to be used in Pro Tools QuickTime QuickTime is Apple s multimedia audio file for mat Pro Tools does not directly support this type of file in its sessions To use a QuickTime audio file within Pro Tools use the Import Au dio command ...

Страница 763: ... chosen is given to the codec as a base sample rate for operations The actual sample rate of the resulting file is determined in the MP3 Encoder Options dialog For example if a base sample rate of 48000 Hz is chosen the MP3 Encoder Options dialog will allow output streams in 48 24 or 12 kHz depending on en coding quality When you export or bounce to MP3 format you can set the following options Enc...

Страница 764: ...v2 3 you can enter a CD track number for the file This information is displayed by many MP3 players Year Enter a year for the file This information is displayed by many MP3 players Mac File Settings Mac File Type and Creator If you expect your file to be used on a Mac you can enter the Mac file type and creator This will allow users to double click the file to open their MP3 player Default Button ...

Страница 765: ...st be split into multi mono files on import requiring addi tional disk space Resolution This option lets you select between three differ ent bit resolutions for the bounce conversion Bounce to Disk does not apply dither when con verting during or after a bounce to a lower reso lution including when bouncing to 16 bit When you need to create a lower resolution bounce file use a Dither plug in or si...

Страница 766: ...nt to work at a sample rate of 88 2 kHz if the final delivery will be at 44 1 kHz such as compact disc This will provide a slightly faster sample rate conversion to 44 1 kHz than from 96 kHz 48000 This is a standard sample rate for Profes sional and DVD video as well as some broadcast and recording label archiving and is supported by DA 88 98 DAT and ADAT decks 44100 This is the standard sample ra...

Страница 767: ...ding a Submix with Bounce to Disk You can create a submix with the Bounce to Disk command by muting tracks or bypassing inserts that are not part of the submix and selecting the part of the session you want to bounce Or you could solo only the audio you want to bounce You can also create a submix by recording to new tracks For details see Recording to Tracks on page 745 To bounce a submix to disk ...

Страница 768: ...tiple files keep chan nels time aligned with each other by Shift selecting them in the Region List and drag ging them simultaneously into existing tracks of the right format 2 When working with stereo tracks set the Pan controls hard left and hard right 3 Solo the track with the bounce on it 4 Click Play in the Transport window to hear the results of the bounce Final Mixdown In final mixdown you c...

Страница 769: ... pressing com pact discs Mastering to a Digital Recorder Although it is usually best to master sessions di rectly to hard disk Pro Tools also lets you mas ter digitally direct to any AES EBU equipped or S PDIF equipped digital recorder such as a DAT deck 24 Bit Input and Output Pro Tools HD systems support full 24 bit audio input and output signal paths with 48 bit inter nal mixing and processing ...

Страница 770: ...l media such as DAT tapes use error correction schemes to fix the occasional bad data that is received in a digital transfer These corrections are deviations from the actual data and with successive reproductions represent a subtle form of generation loss You can avoid this loss by creating and main taining masters on random access digital media such as a hard drive and transferring them to sequen...

Страница 771: ...757 Part VIII Video Sync Surround ...

Страница 772: ...758 ...

Страница 773: ... channels are mapped to outputs 1 6 of a Pro Tools audio interface Use channels 7 8 to monitor a stereo mix for a stereo version or for cue mixes and monitoring To connect your audio interfaces for 5 1 format mixing and monitoring 1 Determine the 5 1 format and track layout you want to use 2 Connect the output channels of your audio interface to the corresponding input channels of your monitoring ...

Страница 774: ...rt tracks and media from other sessions plus their associated paths and track assignments After importing session data you can use the I O Setup dialog to configure main and sub paths for the requirements of the session For more information see Chapter 6 I O Setup New Sessions and I O Settings When you create a new session you can specify a surround format that you want to use as your I O Setup De...

Страница 775: ...s Paths One 5 1 main bus path with sub paths for 5 0 no LFE left right stereo LCR and center mono and One stereo main path with two mono sub paths Default Input and Insert Paths with 5 1 Settings The 5 1 Mix settings files provide default stereo main paths and mono sub paths for inputs and inserts If you need multichannel input paths or inserts you can create them in the I O Setup di alog see Cust...

Страница 776: ... When you select a preset 5 1 I O Settings file default layout for the corre sponding multichannel format paths you create will match the selected format s track layout In addition the I O Setup dialog like the Main page of the Hardware Setup dialog provides controls for routing the physical inputs and out puts on your audio interface to available inputs and outputs in Pro Tools Remapping Channels...

Страница 777: ...nd create a mono sub path for the Surround channel 11 Click OK to close the I O Setup 5 1 Tracks Formats Mapping and Metering Path definitions in I O Setup determine how au dio is routed through and metered on your au dio interfaces Pro Tools internal on screen metering of 5 1 format paths always follows the Film track lay out L C R Ls Rs LFE Pro Tools track layout of 5 1 format audio tracks in th...

Страница 778: ...ch out put is muted when AFL After Fader Listen or PFL Pre Fader Listen Solo mode is enabled and a track is soloed Default Path Order for 5 1 Tracks You can specify the default track layout for all new 5 1 format paths you create To choose a new default 5 1 format path order track layout 1 Choose Setup I O 2 Click the Output tab 3 Use the Default Path Order menu and sub menus to choose the track l...

Страница 779: ...is deter mined by the paths defined in the I O Setup di alog Multichannel mixing is supported on Pro Tools HD systems only and only when the Surround Mixer plug in is installed in your plug ins folder In this chapter all references to Pro Tools refer to Pro Tools HD systems Multichannel QuickStart The following is an overview of how to get started mixing in multichannel for surround in Pro Tools T...

Страница 780: ... round see Chapter 34 Surround Panning and Mixing Pro Tools HD Only Multichannel Audio Tracks Multichannel audio tracks contain an individ ual channel for each signal in the track for ex ample a 5 1 track would have six channels for left center right left surround right surround and LFE Multichannel audio tracks can be Recorded directly into Pro Tools using multi ple microphones or microphone arra...

Страница 781: ...the multichannel track 2 Choose Track Split Into Mono To have discrete control of gain on individual channels of a multichannel track 1 Insert a multi mono Trim plug in on the mul tichannel track 2 Unlink the Trim plug in by clicking the Link icon so that it is unlit 3 Use the Channel selector to display the con trols for a channel and adjust the gain When dragged into a multichannel track audio f...

Страница 782: ...d Because changing the output format has these effects a warning dialog appears whenever you change the output format of a track to a format of fewer channels Specifically this will occur whenever automation playlists will have to be deleted Multiple Output Assignments and Track Format When a track is assigned to more than one path of differing formats the main output for that track will match the...

Страница 783: ...ed by Start clicking Windows or Control clicking Mac the Selector tool and assigning another path Multichannel Sends All track formats including mono and stereo let you assign one or more multichannel sends This provides a multichannel panner in the Sends View Sends are also useful to bus tracks for multichannel plug in processing Figure 39 shows a mono audio track with a 5 1 6 channel send View S...

Страница 784: ...ge 628 Multichannel Instrument Tracks Multichannel tracks can be used to monitor and route multichannel instrument plug ins or mul tichannel external MIDI instruments Mono Multi Mono and Multichannel Plug ins Plug ins can be used in mono multi mono or multichannel formats For information about mono stereo and mono in stereo out plug ins see Chapter 29 Plug in and Hardware Inserts Multi Mono Plug i...

Страница 785: ...es a specific channel within a multichannel track for plug in parame ter editing This menu appears only on multi mono plug ins inserted on tracks with more than two channels Master Link Button When enabled links the controls on all channels of a multi mono plug in so that they can be adjusted in tandem Link Enable Buttons Let you selectively link the controls of specific channels of a multi mono p...

Страница 786: ...and signal routing to maximize the available re sources When to Assign Multichannel Outputs Assign 5 1 paths only to those tracks that need to be panned to all six channels For example a sound effects track with a jet fly over should be assigned a 5 1 path to be able to fly the sound from front to back In a music mix you can fly a solo instrument or make a synth pad swirl around the room as a spec...

Страница 787: ...ial ef fect In a typical music mix the basic tracks are placed in the stereo sound field and remain there Surround mixes can become incoherent if too many elements are continuously moving For special effects some tracks can be panned dy namically bouncing between speakers or sweep ing from one side to the other Figure 40 Using signal routing and sub paths to mix in surround Tracks routed to sub pa...

Страница 788: ...o Tools HD system with one 96 I O audio interface Sub paths have been defined for Mix Music and FX main output paths Additional stereo output paths with mono sub paths have also been defined for the remaining channels Example Bus Paths Figure 42 shows example bus paths Two 5 1 format main paths have been defined Music and FX each with several sub paths Example Sub Paths Sub paths let you route to ...

Страница 789: ...ix with music and ef fects stems or submixes Submix Stem Examples Figure 44 shows a routing configuration for an effects submix Some tracks are routed to stereo sub paths while others are assigned to mono LCR or other sub paths Two tracks one stereo one mono are assigned to multichannel busses for surround panning A 5 1 Auxiliary Input as signed to the FX main bus path serves as a sub mixer Figure...

Страница 790: ...tracks in this example are routed to the front left right channels using a stereo sub path A 5 1 Auxiliary Input controls the bus and stem output Main Stems Example Figure 46 shows two Auxiliary Input channels assigned to additional 5 1 format paths for a main mix Figure 45 Music stem Figure 46 Main stems ...

Страница 791: ...u can add any amount of any multichannel path to the overall LFE out put In the above example the track s Center percentage has been turned off and the LFE fader has been raised to route it to the LFE chan nel Figure 48 shows how a traditional LFE track can be routed to only the LFE channel This ex ample uses a custom defined LFE sub path to the FX main bus path LFE and Filtering Pro Tools applies...

Страница 792: ...Pro Tools Reference Guide 778 ...

Страница 793: ... you become fa miliar with main and sub paths and the I O Setup dialog before starting multichannel Pro Tools projects Introduction to Pro Tools Surround Panning There are four different track panning methods available In the Edit window using the reduced height Panner Grid in the I O View In the Mix window using the reduced height Panner Grid In the Output window using the full size Panner Grid T...

Страница 794: ...k is in Automation Read mode red in an Automa tion Touch Latch Touch Latch or Write modes and yellow in Automation Off or Auto mation Suspend mode In Trim mode the Volume fader and LFE fader are yellow Output windows provide additional features and controls and a much larger Grid For de tails see Output Windows on page 780 Output Windows Output windows provide panning controls called panners as we...

Страница 795: ... of window Track Fader Solo Mute and Auto All Output windows provide track volume and mute controls You can adjust and automate track volume or mute directly using these con trols The larger fader and Mute button are equivalent to those in the Pro Tools Mix win dow Opening a multichannel Output window For instructions on managing multiple Out put windows see Output Windows for Tracks and Sends on ...

Страница 796: ...r relative positions outside the Panner Grid These speakers are also used as Snap Pan to Speaker controls This section identifies all the controls and features found in Pro Tools multichannel panners Figure 49 Output window with a 5 1 format multichannel panner X Y Grid LFE fader Track fader and meter Position knob panners Divergence Pan Location cursor Panning Mode button Track Automation Solo an...

Страница 797: ...mode or Automation Suspend mode Panning Mode Button This button located below the X Y Grid pro vides access to Surround panning modes see Panning Modes on page 784 Position Controls The Position controls let you set the positions of the panner Front Displays and controls the current front X axis left right position of the panner Rear Displays and controls the current rear X axis left right positio...

Страница 798: ...uted to the LFE channel LFE faders in Track and Send windows can follow groups The Pro Tools LFE channel is always full bandwidth For more information on how to use the LFE fader see LFE Faders in Multichannel Panners on page 790 Panning Modes The Panning Mode button provides access to four panning modes X Y mode Divergence Ed iting 3 Knob mode and AutoGlide mode Pan ning controls can be automated...

Страница 799: ... X Y Grid Grid Options and Shortcuts Fine Adjust Mode Hold down the Control key Windows or Command key Mac for fine ad justment of all Panner controls Constraining to X or Y Movement Shift drag the Pan Location cursor to constrain its movement to the X or Y direction Reset to Default Alt click Windows or Option click Mac in the Panner Grid to reset all con trols to their default position Snap Pan ...

Страница 800: ...tely between the front and rear position of the panning trajectory while X Y mode panning takes place in the full 360 Panning Grid Diver gence and Center Percentage are variable in both Panning modes To enable 3 Knob Panning mode Click on the Panning Mode button until the 3 Knob mode icon is displayed The panner trajectory line appears across the Grid extending from the front X axis to the rear Y ...

Страница 801: ...t the AutoGlide Time 1 Choose Setup Preferences and click the Mix ing tab 2 Set the AutoGlide Time in the Automation section To do an AutoGlide automation pass 1 Click the Panning Mode button until the AutoGlide mode icon is displayed The Panning Mode button displays a slanted dotted line that ends with a filled in dot repre senting a cursor at its top right corner 2 In the Mix or Edit window clic...

Страница 802: ...vergence Controls divergence between front speakers X axis only Rear Divergence Controls divergence between the rear speakers X axis only Front Rear Divergence Controls divergence be tween front and rear the Y axis Center Percentage Determines whether there is a discrete center image a completely phantom center image or a variable amount in between Divergence In the Panner Grid the current diverge...

Страница 803: ...discrete center channel for the track or a phan tom center channel Center Percentage Example In film and video production the center chan nel often contains dialog To enhance the clarity of dialog it is often beneficial to keep elements such as music out of the center speaker By re ducing the Center Percentage on music tracks music panned to the front of the soundfield can be panned to only the le...

Страница 804: ...bal attribute or on a group by group basis See Selecting Group Attributes on page 160 LFE Enable Some multichannel plug ins including the mul tichannel DigiRack Dynamics III Compres sor Limiter provide LFE Enable This lets you enable or bypass processing of the LFE channel if present To process the LFE channel in a multichannel plug in Click to enable LFE Enable in supporting mul tichannel plug in...

Страница 805: ...d their Path Meter Views are always arranged in the following order L C R Ls Rs LFE To use the Surround Scope Plug in On a multichannel Master Fader click an In sert button and select Multi channel TDM plug in Sound Field Surround Scope Surround Scope displays output levels in both a 360 Grid and in traditional LED meters For more information on Pro Tools meter ing see 5 1 Tracks Formats Mapping a...

Страница 806: ...Pro Tools Reference Guide 792 ...

Страница 807: ...t systems will rarely stay perfectly syn chronized for longer than a couple of minutes SMPTE Trigger Resolved with a SYNC Peripheral Pro Tools HD Only You can use an optional Digidesign SYNC pe ripheral to resolve Pro Tools recording and play back speed with any of the following clock ref erence sources while slaving Pro Tools to time code LTC Video source House video reference VITC 1x Word Clock ...

Страница 808: ...arming VTR emulation serial time code and other capabilities See the MachineControl Guide for more information or contact your Digidesign dealer Ext Clock Output Pro Tools can be used as the master device in your synchronization setup where all other de vices are then slaved to Pro Tools word clock output With Pro Tools HD systems clock output can be configured for 1x word clock or 256x Slave Cloc...

Страница 809: ...ode Offsets ex pand collapse triangle The controls in this section configure settings of Digidesign SYNC Peripherals Settings are pro vided for Clock and Positional Reference Video Format and Variable Speed Override To show Time Code Settings section Click the Time Code Settings expand collapse triangle The controls in this section provide time code generation and freewheel options and separate pu...

Страница 810: ... optional word clock rates are available at higher session sample rates External sources can be any multiple of the base rate The base rate is 44 1 kHz for 88 2 and 176 4 kHz sources The base rate is 48 kHz for 96 and 192 kHz sources If an external source is chosen and no valid sync clock is detected at the External Clock In the I O will return to Internal mode System Delay When Delay Compensation...

Страница 811: ...ettings including clock reference positional reference video for mat and VSO Clock Reference This menu lets you set the Pro Tools clock reference When using a Digidesign SYNC peripheral the Clock Reference selector lists all supported clock types for the SYNC peripheral When using Pro Tools HD systems without a SYNC peripheral choices include any currently enabled digital format or source availabl...

Страница 812: ...r respectively Unique values can be defined for each of these three types offsets or you can link all three to adjust in unison If you are using Digidesign s MachineControl option additional options for External Time Code Offsets are available See the MachineCon trol Guide for more information Time Code Settings Generator The Generator lets you enable Pro Tools genera tion and output of LTC and MT...

Страница 813: ...ring to Work with SMPTE The first step when preparing to work with SMPTE is to choose an appropriate SMPTE frame rate Pro Tools supports all standard SMPTE frame rates If you are working with SMPTE striped tape it is important to know the frame rate In some cases a SYNC peripheral can be used to do this Configuring Pro Tools for SMPTE Synchronization and MachineControl system settings are enabled ...

Страница 814: ...apture an incoming SMPTE address as the session start time 1 Click in the Session Start field 2 Begin playback of the time code source 3 At the location where you want to capture the incoming value press Equal in the numeric keypad 4 Press Enter to accept the value You can then edit the captured address The session uses the frame number you enter as its SMPTE start frame when online If there are e...

Страница 815: ...pically this command is used for integrating test tones pre roll Academy leader and similar pre program material into Pro Tools sessions To set a relative frame position for a session Feet Frames 1 With the Selector tool click in a track or make a selection where you want to redefine the position 2 Choose Setup Current Feet Frames Position 3 Enter a Feet Frame position to correspond to the time co...

Страница 816: ... be controlled from within Pro Tools and that recalls and re stores pull factors automatically when a session opens Other synchronization peripherals must be configured manually Configuring Pull Up and Pull Down To pull up or pull down audio or video 1 Choose Setup Session 2 From the Time Code Settings section of the Session Setup window select a Pull Up Down Rate Audio Rate Pull Up Down Controlsa...

Страница 817: ...nged in such a way that the video would have to be pulled by an unsup ported amount the video remains unaffected This setting is latching is not enabled by de fault and its state is stored with the session Example of Auto Match Pull Factors Auto Match Pull Factors links audio and video pull factors when changing session frame rate For example assume a Pro Tools session is set to a frame rate of 25...

Страница 818: ... Pull Down Settings Pull Up Down Sample Rate 44100 48000 88200 96000 176400 192000 4 1667 and 0 1 45983 50050 91967 100100 n a n a 4 1667 45938 50000 91875 100000 n a n a 4 1667 and 0 1 45892 49950 91783 99900 n a n a 0 1 44144 48048 88288 96096 176576 192192 0 1 44056 47952 88112 95904 176224 191808 4 0 and 0 1 42378 46126 84757 92252 n a n a 4 0 42336 46080 84672 92160 n a n a 4 0 and 0 1 42294 ...

Страница 819: ...d media and the video is set to pull down by 4 set the session Frame Rate to 24 fps Plug ins For proper operation at larger 4 pull rates plug ins must utilize sample clock instead of an absolute time clock All Digidesign plug ins are based on sample clock Higher Sample Rates and Pull Factors 4 audio pull rates are not available in 176 4 and 192 kHz sample rate sessions No Video Recording with Pull...

Страница 820: ...n Generating Time Code Using a SYNC peripheral Pro Tools can generate SMPTE and MIDI Time Code MTC You can then make Pro Tools a master synchronization source with other devices slaved to it A SYNC peripheral cannot generate 30 fps 24 fps or 23 976 fps time code while locked to video input or video reference A SYNC peripheral cannot generate 30 fps 24 fps or 23 976 fps time code while it is locked...

Страница 821: ...the pop up and use the Pro Tools on screen transport controls to drive the device Pro Tools does not support remote track arming of MMC controlled external devices You need to manually arm tracks for recording on the ex ternal device Enabling MIDI Machine Control in Pro Tools Pro Tools as MMC Master When Pro Tools is the Master it sends MMC commands to the slave device and receives MTC information...

Страница 822: ... se lected device s transport and act as the clock master 13 To have the Pro Tools transport chase the playback location of the slave device click the Online button in the Transport window Pro Tools as MMC Slave When Pro Tools is the slave it receives MMC commands from the master device and sends MTC information back to the slave device To slave Pro Tools to an external device using MIDI Machine C...

Страница 823: ...rom the Transport pop up in the Pro Tools Transport window The selected item will act as Transport Master When the Transport Master is set to Pro Tools the playback position is gov erned by the on screen cursor in Pro Tools When the Transport Master is set to MMC the playback position is governed by the external device s play position MMC Transport Settings When using MMC you can set the following...

Страница 824: ...aster Serial time code requires both the SYNC peripheral and external devices to be locked to house video reference To set a Minimum Sync Delay 1 Choose Setup Preferences and click Syn chronization 2 Enter a number of frames in the Minimum Sync Delay field 3 Click OK to close the Preferences dialog Configuring Minimum Sync Delay for External MMC Devices Locked to House Sync When controlling a hous...

Страница 825: ...Control lets Pro Tools act as the master or slave to external Sony 9 pin or V LAN for transport only machines in addition to pro viding remote track arming from within Pro Tools MIDI Beat Clock Some MIDI devices such as drum machines hardware sequencers and arpeggiators can only synchronize to MIDI Beat Clock To synchronize these devices to Pro Tools you can transmit MIDI Beat Clock to them Many p...

Страница 826: ... with the Time Grab ber tool in Spot mode The numeric fields func tion as both data displays and editing controls for the currently selected regions Information in these fields is displayed in SMPTE Time Code Minutes Seconds Feet Frames Samples or Bars Beats depend ing on which Time Scale format is selected A highlighted numeric field indicates the cur rent active field for numeric entry editing E...

Страница 827: ... button at the top left of the Edit window to put Pro Tools into Spot mode 4 Identify the SMPTE frame location where you want to trigger playback of your region by paus ing your video deck on that frame 5 With the Time Grabber tool click a region in a track or in the Region List and drag it into a track The Spot dialog appears 6 Enter the SMPTE frame location by doing one of the following If you a...

Страница 828: ...g incoming time code addresses If you click a region with any of the Trim tools in Spot mode the Spot dialog will appear allowing you to enter a value in the Start or End and Duration fields to specify exactly where you want to trim the region s beginning or end Use this to edit the length of a region to correspond to a partic ular visual hit point Trimming a region that contains a sync point see ...

Страница 829: ...tamp command This fea ture is particularly useful in post production sit uations where the SMPTE time code on video work prints often changes from one edit revi sion to another To time stamp a region or regions with a new SMPTE frame number 1 In a track select the region that you want to time stamp 2 From the Region List pop up menu choose the Time Stamp command 3 Enter a new SMPTE time by doing o...

Страница 830: ...the very end It is somewhere in the middle making it tough to spot In this scenario use the Iden tify Sync Point command to create a point in the region and synchronize that point to a SMPTE frame To create a sync point in a region 1 Do one of the following Click with the Selector tool at the point in the region that you want to synchronize to a SMPTE frame location or Press the Down Arrow key whi...

Страница 831: ...or video tape deck Resolve All Components of Your System When striping time code make sure that the time code generator and the video record deck are resolved to the same crystal reference For example when striping 29 97 Drop Frame time code onto a VTR both the SMPTE generator and the VTR should be resolved to the same black burst or house sync generator During play back the master deck should be ...

Страница 832: ... make real time calculations as Pro Tools does when it tries to trigger and synchronize to SMPTE also needs to know that the frame for mat is 29 97 and not 30 fps Since Pro Tools al lows this choice of frame rate this does not re ally pose a problem The problem exists because many users cannot readily distinguish 29 97 from 30 fps Even though NTSC tapes only use 29 97 some production companies wil...

Страница 833: ...it through FireWire to an external monitor Bounce the video track to a QuickTime movie Pro Tools LE with DV Toolkit 2 and Pro Tools HD let you do the following with video Import multiple video files into the Time line Create multiple video tracks with Quick Time movies and Avid video in the Time line Select from multiple video playlists on each video track Mix multiple codecs in video tracks Organ...

Страница 834: ...playback Use this setting if you require uninterrupted Quick Time movie playback Hard Drive Tips for Best Performance For best results always use dedicated video only and audio only drives For complete information on hard drive require ments visit the Digidesign website www digidesign com Applying Pull Ups to QuickTime Movies Applying a pull up to QuickTime movies in a session may have unpredictab...

Страница 835: ...and multiple QuickTime movies per track Pro Tools HD with an Avid video peripheral lets you mix QuickTime and Avid video in the Timeline but not together on the same video track To create a new video track 1 Choose Track New 2 In the New Tracks dialog do the following Select Video Track from the Track Type pop up menu and Enter the number of new video tracks 3 Click Create A new empty video track ...

Страница 836: ...aylist Assigning a playlist to another video track Renaming a playlist Deleting a playlist Multiple Codecs on an Individual Video Track Pro Tools HD and Pro Tools LE with DV Toolkit 2 Only A single video track can contain video regions compressed with different video codecs How ever once the first video file has been added to a session all additional video files added to the Timeline must have the...

Страница 837: ...ew frames If video pull up or pull down is enabled frames do not change position Frames View Performance When using Frames View to view movie content in the video track your computer may exhibit reduced or sluggish performance If this hap pens on your computer hide the video track or switch to Blocks View Blocks View In Blocks View video frames are replaced by col ored blocks Video Track Type Icon...

Страница 838: ...line and Pro Tools will not output video Locking Video Tracks You can lock one or more video tracks to pre vent any video regions on those tracks from be ing edited When a video track is locked Pro Tools restricts all editing operations involving the track ex cept for locking and unlocking video regions A locked video track displays a small lock to in dicate that the video track has been locked an...

Страница 839: ... can set the session time code rate manually with the Time Code Rate pop up menu in the Session Setup window In order for the grids and rulers to align with the actual frames of the video files in the Timeline the session s Time Code Rate setting should be set to match the video engine rate the frame rate of the first video clip added Video Engine Rate Indicator The Video Engine Rate indicator dis...

Страница 840: ...ro Tools Importing Video into Pro Tools with Drag and Drop You can drag and drop video files from a DigiBase browser or from Windows Explorer or Mac Finder to the Timeline a track a Track List or the Region List When you use this method to import video into Pro Tools the Video Import Options dialog ap pears This dialog contains multiple options for customizing how files are imported The video fram...

Страница 841: ...selected video files to a blank area in the Timeline to create a new video track or an existing video track to place it within that track Configuring Video Import Options The Video Import Options dialog appears when you import video into Pro Tools by using the Import Video command or dragging video files from a DigiBase browser or from Windows Ex plorer or Mac Finder Destination Section The Destin...

Страница 842: ...nds by which each video clip will be separated when imported into the video track Import Audio from File QuickTime Movies Only When selected the audio from the QuickTime movie you are importing will be extracted and placed into new mono or stereo audio tracks in the Timeline Mono or stereo audio with a sam pling rate of 48 kHz or lower are supported When unselected only the video portion of the Qu...

Страница 843: ...rting the video do the following 1 Choose File Import Audio 2 In the Import Audio dialog navigate to the QuickTime movie from which you want to im port audio and select it 3 Under the Region section click the name of the audio region you want to extract from the QuickTime movie and click Convert Region or Add Region 4 Select other audio files as desired and click Done to import the audio 5 In the ...

Страница 844: ...e video region to a ses sion It can be played back but cannot be ed ited and will not be listed in the Region List When you import video or open a session cre ated by Pro Tools HD or Pro Tools LE with DV Toolkit 2 only the main or first available video track containing QuickTime regions will be imported You can play back and view multiple regions and tab through region boundaries However you canno...

Страница 845: ...g Video Track Material Selecting within video frame boundaries see Selecting within Video Frame Boundaries on page 832 Selecting and editing across multiple Video and audio tracks see Selecting and Editing Across Multiple Audio and Video Tracks on page 832 Link or unlink track and Edit selections Auto scroll video tracks Loop playback Universe window see Browsing Video in the Video Universe Window...

Страница 846: ...ute unmute regions AudioSuite plug ins Waveform Repair with the Pencil tool Strip silence Consolidate regions Selecting and Editing Across Multiple Audio and Video Tracks You can create a selection across multiple audio and video tracks and cut copy or paste audio and video simultaneously Audio and video that is selected and cut copied or pasted follow the current Edit mode Selecting within Video ...

Страница 847: ... of the selection determines the duration of the space inserted 2 Choose Edit Insert Silence Renaming Video Disk Files When renaming audio regions in either the Timeline or the Region List you have the option of also renaming the audio files on disk How ever this does not apply to video files on disk To rename video files on disk you must rename them in a DigiBase browser or in Windows Ex plorer o...

Страница 848: ...Video window and select Video Out FireWire Resizing the Video Window You can resize the Video window by dragging or using the Video window pop up menu To resize the Video window by dragging Place the cursor at the bottom left or bottom right of the Video window and drag the window to the size you want To resize the Video window by using the Video window pop up menu Right click Windows or Mac or Co...

Страница 849: ...y Windows or Control Mac and a number on the numeric keypad 0 9 9 is fastest 5 is normal speed and 0 stops shuttling Once Shuttle Lock mode is initiated Fast For ward and Rewind become highlighted in the Transport window 4 Press additional keys to change the playback speed or press Plus or Minus to switch the playback direction plus for forward minus for backward 5 To stop playback press Start 0 W...

Страница 850: ... tool 2 Do one of the following To move the beginning of a video region to the far left of the Timeline while maintain ing the current zoom resolution in the Edit window click the video frame representing the region once To zoom in on a video region so that it fills the entire Edit window double click the video frame representing the region To zoom a range of selected regions so that they fill the...

Страница 851: ... simul taneously zooming to fill the Edit window Alt drag Windows or Option drag Mac multiple video frames Playback of HD QuickTime Movies Pro Tools lets you import and play back Quick Time High Definition video files Setting Session Time Code Rate for HD QuickTime Movie Import When playing back QuickTime movies with frame rates higher than 30 fps Pro Tools syncs properly only if the Time Code Rat...

Страница 852: ...the FireWire cable from a camera In this type of file the audio and video data are stored in an interleaved fashion as opposed to a QuickTime file where audio and video are stored separately Playing QuickTime DV Movies through the FireWire Port To Play QuickTime DV Movies through the FireWire Port 1 Import a QuickTime DV movie into a Pro Tools session See Importing Video into Pro Tools on page 826...

Страница 853: ...cks Fill in spaces with black Render all video effects Use Apple DV Codec Enable the Apple DV codec 2 Make sure Use Avid Codec is not enabled Tips for Optimizing Movie Playback When using Pro Tools to play QuickTime mov ies without an Avid video peripheral the qual ity of the playback is dependent on the speed of your computer and hard drive the size in pix els of the movie and the quality of the ...

Страница 854: ...f the session or To bounce a portion of the session enable Options Link Timeline and Edit Selec tion and make a selection in the Edit win dow 6 Choose File Bounce to QuickTime Movie The Bounce dialog appears if you are bouncing QuickTime movies or the Bounce to QuickTime dialog appears if you are bouncing Avid video to QuickTime movies 7 Select your mix s output or bus path from the Bounce Source ...

Страница 855: ...that was chosen when the session was saved will be displayed All QuickTime movies on the main video track will be displayed but the video track will be locked and cannot be edited All additional video tracks playlists and video regions will not be shown However they will continue to be saved with the ses sion and will be available if the session is opened on a system that supports them When using ...

Страница 856: ...Pro Tools Reference Guide 842 ...

Страница 857: ...button 493 509 Add Unique Triggers 556 adding a new playlist 353 sends 639 AES EBU Hardware Setup 39 AFL After Fader Listen 142 AFL PFL Mutes Output Path selector 61 AFL PFL Path selecting 60 setting a level 61 AFL PFL Path selector 60 After Fader Listen mode 142 After Playback Scrolling option 395 After Write Pass Switch To option 76 692 AIFF file format 748 All MIDI Notes Off command 581 all tra...

Страница 858: ...lide mode 787 AutoGlide Time preference 75 787 AutoJoin command 693 indicator 694 AutoMatch all controls 705 button 705 indicators 699 individual automation types 705 individual controls 705 individual controls with ICON 705 AutoMatch Time preference 75 697 Automatically Copy Files on Import option 77 228 Automatically Create Click Track in New Sessions option 77 Automatically Create Fades for Imp...

Страница 859: ... 511 audio with varying tempos 512 editing 511 from Identify Beat command 510 generated with Beat Detective 545 moving 511 Bars Beats Time Scale 348 Batch Fades dialog 477 Beat Detective 535 536 beat triggers deleting 543 generating 540 inserting 544 moving 543 promoting 544 Collection Mode 554 conforming regions 550 defining the selection 538 detecting transients 540 DigiGroove templates 546 edit...

Страница 860: ...s 447 720 All Automation 447 720 Pan Automation 447 720 Plug in Automation 447 720 Clear Trim Automation Track command 132 711 click 272 configuring 272 enabling 273 Click plug in 272 click track 272 clicks 294 clicks and pops avoiding 343 Clip Hold options 3 Second 124 Clip Indication options 65 Infinite 124 None 124 Clip LED 673 clipping 257 673 clock source 686 Clock Source pop up menu 39 Close...

Страница 861: ...71 overlap 471 pre post 475 removing 474 trimming 474 types 465 with dither 470 Current Feet Frames Position command 801 current meter 104 512 Current Meter button 274 Current Meter indicator 104 current tempo 104 492 Current Time Code Position command 801 Current Time display 796 Cursor location 98 value 98 custom session templates 91 Custom Shuttle Lock Speed 385 Custom Shuttle Lock Speed prefer...

Страница 862: ...ting compacting audio files 488 Destructive Record mode 269 282 destructive recording 282 DestructivePunch 325 File Length preference 329 Prepare DPE Tracks 329 preparing for 328 recording 329 DestructivePunch File Length preference 70 329 Digi 002 25 punching with footswitch 313 Digi 002 Rack 25 DIgiBase Clip Name 179 DigiBase A audio volumes 177 Active Tasks 205 Advanced Search mode 186 audition...

Страница 863: ...ow example 208 Workspace searching 197 Workspace browser 165 195 DigiBase and DigiBase Pro preferences 207 DigiBase Pro catalog database file 167 Catalogs 166 199 consolidating with 202 creating 201 opening 201 Clip Name 200 Copy Database Comments to Clip Names 175 Copy File Comments to Clip Names 175 saving a search as a Catalog 187 search features 184 sharing catalog database files 168 DigiDeliv...

Страница 864: ...h Edit command 411 Clear command 446 Clear Special commands 447 720 Consolidate command 487 Copy command 445 Copy Special commands 446 719 Copy to Send command 703 Create Fades command 474 475 Cut command 445 Cut Special commands 446 719 Delete Fades command 474 Duplicate command 449 Fade To End command 474 Fade To Start command 473 Fades command 467 Heal Separation command 423 Identify Sync Point...

Страница 865: ...ates On All Related Takes option 288 418 Effect Bypass button 672 effects printing to disk 743 Enable Session File Auto Backup option 68 enabling Auto Backup option 68 automation 708 groups 161 MIDI input devices 298 plug in automation 682 End To Insertion command 421 Enforce Mac PC Compatibility option 90 247 EQ plug ins 663 equal gain crossfades 469 equal power crossfades 469 471 Event Edit Area...

Страница 866: ...ommand 88 Save command 87 Save Copy In command 89 247 Send via DigiDelivery 233 files Clip Name 200 missing fades 190 final mixdown 754 Find All Candidates 192 Find History 360 Find Matching Tracks option 222 Find Region List command 359 Find Regions By Name 360 Include Subsequently Added Regions 360 finding regions 359 Find History 360 FireWire QuickTime DV25 playback 838 First Selected MIDI Trac...

Страница 867: ...ort option 244 HFS drives and Windows systems 245 hidden tracks and group edits 132 and groups 132 and selections 398 Hide All Floating Windows command 113 Hide and Make Inactive Track command 132 Hide Show Track command 132 hiding all tracks 131 auto created regions 490 tracks 131 High Quality QuickTime Image option 68 Highest QuickTime Playback Priority setting 68 820 history Find regions 360 Ho...

Страница 868: ...ew Filter dialog 617 MIDI Input Filter dialog 300 input levels 257 Input Only Monitoring mode 261 Input Path selector 122 134 Input Quantize command 583 604 Input selectors 134 Insert Position selector 672 Insert Silence command 486 and Shuffle mode 486 and Slip mode 487 Insert Time command 515 517 inserting controller events 572 in MIDI Event List 618 meter events 513 MIDI notes 562 plug ins on t...

Страница 869: ...ors 393 Location indicators locating with 393 locations for MIDI notes dragging 566 quantizing 587 randomizing 586 589 Lock Region command 438 Lock Settings File command 676 Locked indicator 798 Locked Track command 133 locking regions 438 Loop Playback option 409 and Touch mode 700 loop points 288 Timeline Selection Markers 289 Loop Record mode 270 285 loop recording and pre post roll 284 audio 2...

Страница 870: ...k button 103 273 Mic Preamps View 635 MIDI 12 assigning channels 140 channels 13 common misconceptions 14 control surfaces 13 controller devices 13 controller events 571 Default Thru Instrument 299 devices 13 import by drag and drop 235 importing 234 interface 13 local control 13 loop recording 307 offsets 580 patch name files midnam 575 patch names 575 select and split notes 601 setting the Grid ...

Страница 871: ...p recording 307 note chasing 579 Notes View 335 344 output 140 punch recording 305 punching on the fly 306 recording 297 Regions View 335 345 selecting a pitch range in 603 Sysex View 578 Velocity View 567 MIDI Volume fader 123 MIDI Zoom In button 367 MIDI Zoom Out button 367 mini keyboard 565 Minimize Additional I O Latency option 35 Minimum Sync Delay option 79 Minimum Sync Delay preference 79 8...

Страница 872: ...eting paths 53 No Output option 639 No Peak Hold option 65 123 no scrolling during playback 395 noncontiguous selections 400 nondestructive editing 333 for audio 343 for MIDI 346 Nondestructive Record mode 269 nondestructive recording 281 recording to a new playlist 282 with QuickPunch 313 nonlinear 5 Non Linear Transport Error Suppression option 79 Normal QuickTime Playback Priority setting 68 82...

Страница 873: ... 134 Output selectors 134 Output Window button 781 Output windows 637 outputs default 5 1 paths and sub paths 761 format and tracks 768 to multichannel paths 769 overlap crossfades 471 overlapping paths 54 P P browsers 196 Page Scrolling option 390 395 Pan automation 714 Pan indicator 122 Pan slider 123 panning 3 knob 786 automation and groups 717 fine adjust mode 785 grids 780 guidelines 773 link...

Страница 874: ...led 412 tracks 279 389 Playlist selector 8 353 playlists 8 352 adding new 353 and groups 354 and multichannel tracks 716 and nondestructive MIDI editing 346 assigning 354 automation playlists 353 690 698 auto naming 353 changing timebase of 352 deleting 354 duplicating 353 edit playlists 352 Playlist selector 353 recalling 354 recording to new 283 renaming 354 setting pre post roll in 292 plug in ...

Страница 875: ...ckPunch 314 315 TrackPunch 317 Pro Tools video track Frames View 823 processing bandwidth 42 Processing Preferences 76 Program Change dialog 574 575 program changes 13 574 and bank select 574 auditioning 577 chasing 579 default for MIDI tracks 574 deleting 577 editing 577 inserting 576 moving 577 Project browser 199 242 pull up and pull down and plug ins 805 and rulers 805 audio 802 video 802 Punc...

Страница 876: ...acks 301 destructively 282 DestructivePunch mode 329 from a digital source 293 from Record Pause mode 281 indicator 101 keyboard shortcuts 280 Loop Record 285 MIDI regions 304 monitoring latency 263 multichannel tracks 277 multiple audio tracks 280 nondestructive 5 nondestructively 281 nonlinear 5 online 806 QuickPunch mode 313 record enabling tracks 258 status LED 320 System Exclusive data 310 to...

Страница 877: ...ions 423 hiding auto created 490 inserting silence into 486 locking 438 looping 461 managing 488 MIDI 304 moving in Grid mode 433 moving regions with fades 478 multichannel 334 muting 439 nudging 436 nudging regions with fades 478 offline 334 Original Time Stamp 432 pasting 445 placing at Edit insertion point 425 placing in tracks 423 quantizing 438 removing silence from 485 removing unused 490 re...

Страница 878: ...po Operations 507 scaling note velocities 568 597 Scroll into View command 127 Scroll Into View Track command 132 Scroll to Track Banks Controllers option 74 Scroll To Track command 127 395 scroll wheel and MIDI track s Note display 344 374 scrolling a Pro Tools window 393 zooming in the Edit window 374 zooming in the Edit windows 374 scrolling a track into view 127 in the ruler 393 Mix and Edit t...

Страница 879: ...ds View 635 Separate Region commands 418 and multiple tracks 419 and related takes 288 At Selection 418 At Transients 418 On Grid 418 Separate Region Operates On All Related Takes option 288 418 Separate Region Operates On All Related Takes preference 71 Separation Grabber 419 session data importing 218 Session Data to Import menu 222 Session File Backups folder 85 session parameters 89 Session Se...

Страница 880: ...imit 40 Solo button 142 Solo in Place mode 142 Solo Latch options 144 Solo modes 142 selecting 143 Solo Safe mode 144 soloing tracks 142 tracks in a submix 656 Song Start Marker 491 editing tempo 492 moving 492 Sort By option 359 sorting data in browsers 176 Markers 533 regions 359 secondary sorts 177 Sound Designer II file format 748 Source Path 747 Speed Cal indicator 798 split MIDI 601 Split In...

Страница 881: ...ation 38 system resources 10 System Usage window 42 View options 42 T T browsers 196 Tab to Transients button 407 take over surround pan 785 takes auditioning 286 auditioning from Matches List 286 default names 264 numbering for QuickPunch 316 recording additional 281 Takes List pop up menu and multiple tracks 287 tapping in the tempo 276 Target button 673 Tascam DA30 39 Task Manager 216 tasks act...

Страница 882: ...in Timebase rulers 410 sliding in the Ruler 411 start end and length fields 102 Timeline Selection Markers 410 toggling track height 339 Track View 337 zoom level 373 Tool Tips 64 115 Touch Timeout option 74 Track Compensation cmp indicator 658 track controls Edit window 98 Mix window 98 track data 334 Track Height 338 and Zoom Toggle 372 resizing 340 track layout default path order 61 track level...

Страница 883: ... length fields 102 289 transport controls 99 Transpose Real Time Properties 611 Transpose command 583 600 transposing 600 by octave 601 key 600 MIDI notes 565 tracks 600 Trim automation coalescing 723 Trim Automation commands 735 Trim to All Enabled 735 Trim to Current 735 Trim Region commands End to Fill Selection 422 End to Insertion 421 Start to Fill Selection 421 Start to Insertion 421 To Fill...

Страница 884: ...ices and RTAS 665 and track priority 137 auto assignment of ascending 138 for TrackPunch 317 volume Performance 167 Transfer 167 Volume automation 714 Volume fader 123 Volume indicator 122 volume ddb 167 volumes Volume browsers 104 164 169 VSO see Variable Speed Override W Wait for Note 103 300 WAV file format 244 748 AES31 Broadcast compliant 244 WaveCache 181 WaveCache wfm file 84 167 Waveform W...

Страница 885: ... 370 Zoom Toggle command 372 373 Zoom Toggle preferences 72 Zoomer tool 366 367 368 zooming 367 a track area 369 all the way out 368 around a track point 368 continuously 367 horizontally for all tracks 367 in the ruler 369 on a selection 368 recalling zoom levels 370 return to the previous zoom level 368 storing zoom levels 370 to make all regions visible 368 vertically for all audio tracks 367 v...

Страница 886: ...City CA 94014 3886 USA Tel 650 731 6300 Fax 650 731 6399 TECHNICAL SUPPORT USA Tel 650 731 6100 Fax 650 731 6384 PRODUCT INFORMATION USA Tel 800 333 2137 INTERNATIONAL OFFICES Visit the Digidesign website for contact information www digidesign com ...

Отзывы: