


Chapter 5
5-4
5.1.1 Normal, Master and Relative Cues .....................................
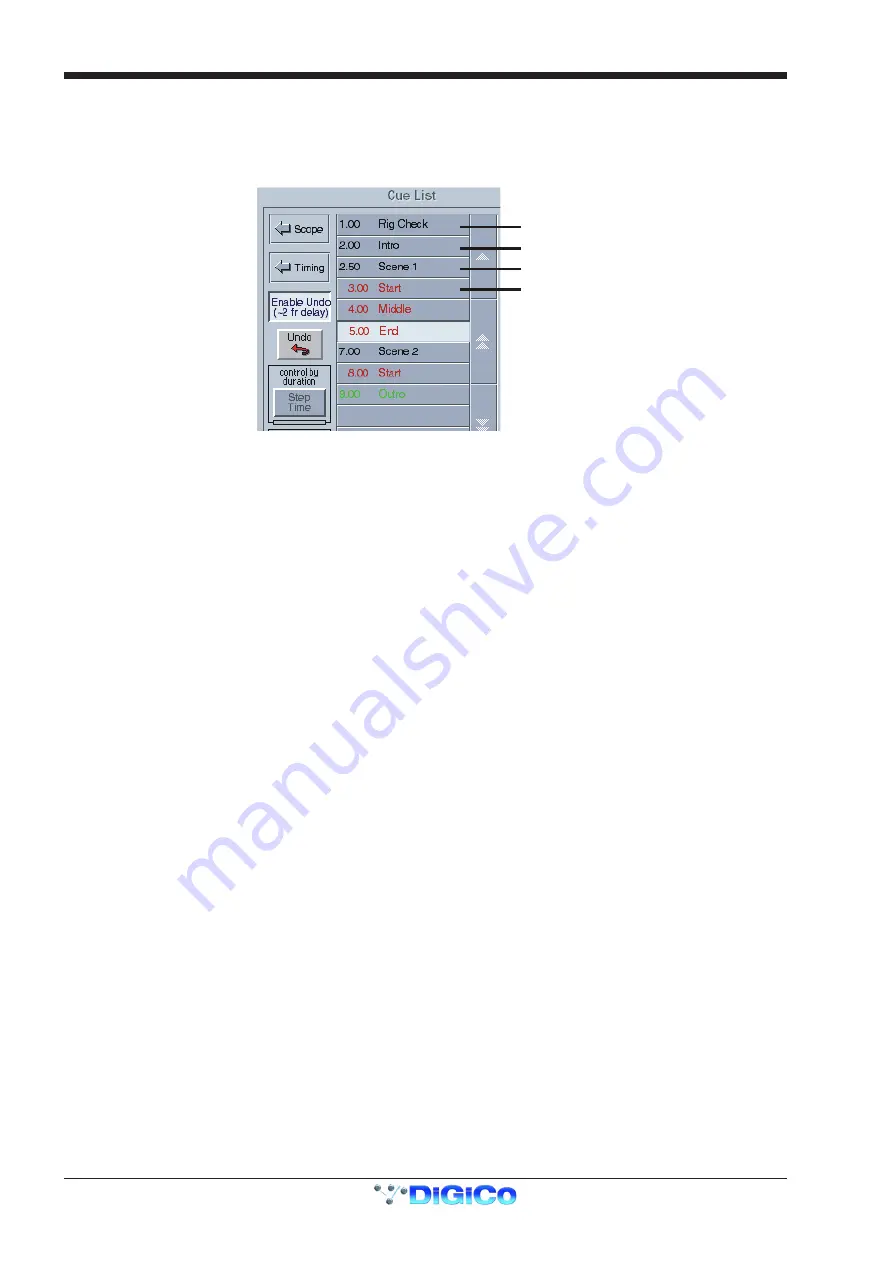
There are three types of Cue:
1) NORMAL CUE
- this appears in black on the list and is always followed by another NORMAL CUE or MASTER CUE.
2) MASTER CUE
- this appears in black on the list and is always followed by a RELATIVE CUE.
3) RELATIVE CUE
- this appears in red on the list and it's entry is indented. It is always relative to the MASTER CUE above it.
Normal Cue
Master Cue
Relative Cue
Normal Cue
A Normal or Master cue (black entry in the list) is an absolute snapshot of the current state of all the console controls.
A Relative cue (red entry in the list) is a snapshot of the current state of all the console controls but the variable dB controls such as the
fader levels, gains and auxiliary sends are stored as offsets from the previous Master cue in the list. Therefore, if the level of a dB control
is changed in the Master cue the same control will change by the same amount in all of its relatives.
If non-dB controls such as EQ frequency, pan and Q are changed in a Master cue, only relatives that have the same settings will change
with it and then to exactly the same value as the Master Cue.
Commonly, a Master cue would be used as a starting point at the beginning of a performance and would contain all the basic routing and
levels. The subsequent cues would be Relative and would contain the changes that were required for each different part of the perform-
ance. If used in this way, any global changes that are made to the Master cue will automatically update the relatives without the necessity
for changing each cue individually.
There may also be several groups of Master and Relative cues that relate to different parts of the performance. Eg. One group per scene
or per song.
A Master Cue and its associated Relatives are known as a Cue Group and the members of these groups can be updated in isolation from
all other cues using the Live Update function in combination with the
Update Group
button.(See Section 5.2).
5.1.2 Storing a Cue ........................................................................
The first cue must always be a Normal or Master cue and a new session will always contain one default cue.
This default cue will be a flat console state with all faders down and all channels muted.
To store a new cue, touch the Cue List panel's
Insert
button and a new cue will be inserted below the currently assigned (green) cue and
you will be prompted to name it. Initially this cue will be a copy of the cue above it but can be edited or replaced immediately
(See Replac-
ing a Cue)
.
Alternatively, touch an unused button in the list and a new cue will be added to the end of the list. This cue will initially be a copy of the last
cue on the list.
To store a Relative cue, you must first create a second Normal cue and this can then be changed to Relative by assigning the cue to the
worksurface using the
Scroll Up/Down
buttons (it will then be in green text) and pressing the
Relative
button. The details of the cue
should then be shown in red and indented.
Once the Relative button is pressed, all subsequent cues will also be Relative until you choose to change them. All cues with the exception
of the first cue may be made Relatives or Masters at any time.
5.1.3 Recalling a Cue ....................................................................
To recall a cue, simply touch the cue button you require and this cue will then remain highlighted until the next cue is recalled - This
function can be switched on or off using the button labelled
Touch To Fire.
Alternatively, the buttons on the Worksurface on the right of the screen provide
Scroll Up/Down
buttons to change the assigned cue
named in the worksurface display and listed on screen in green.
You can also use the dedicated
Fire Next
and
Fire Previous
buttons on the console worksurface which are situated above and below the
Lower Master Bank buttons.
The following keyboard keys can also be used to navigate through the cue list.
Home, end, up, down, page up, page down.
Alpha keys move the assigned cue to the one whose name starts with letter pressed.
The
Fire
button then recalls the assigned cue.
The
Undo
button is only enabled if the
Enable Undo
option button is pressed on the screen.
The
x fade
button has a LED which indicates whether the assigned snapshot has cross-fading enabled, and may be used to switch off
this feature temporarily while recalling the cue.
Cue firing can also be controlled by specific events on MIDI channel 16 (See Cues and MIDI).
Содержание D5T
Страница 1: ...Operation Manual Issue A September 2004 Software Versions 2 4...
Страница 2: ......
Страница 10: ......
Страница 11: ...Chapter 1 1 1 Chapter 1 Getting Started...
Страница 12: ...Chapter 1 1 2...
Страница 32: ...Chapter 2 2 1 Chapter 2 Inputs and Console Channels...
Страница 33: ...Chapter 2 2 2...
Страница 58: ...Chapter 3 3 1 Chapter 3 Busses and Outputs...
Страница 59: ...3 2 Chapter 3...
Страница 68: ...4 1 Chapter 4 Chapter 4 Master Section...
Страница 69: ...Chapter 4 4 2...
Страница 91: ...5 1 Chapter 5 Chapter 5 The Cue List...
Страница 92: ...Chapter 5 5 2...
Страница 111: ...Chapter 6 6 1 Chapter 6 Automation...
Страница 127: ...7 1 Chapter 7 Chapter 7 Effects...
Страница 128: ...7 2 Chapter 7...
Страница 135: ...8 1 Chapter 8 Chapter 8 Troubleshooting...
Страница 136: ...Chapter 8 8 2...
Страница 139: ...A 1 AppendixA Appendix A D5TC Theatre Masters Controller...
Страница 140: ...A 2 Appendix A...
Страница 147: ...B 1 Appendix B Appendix B Multiple Console Setups Inc Redundant Engines...
Страница 148: ...B 2 Appendix B...
Страница 162: ...B 16 Appendix B Standalone PC Screen Appearance...


