background image

4

4

Operation

4.1

4.1

Basic operation

4.1.1

4.1.1

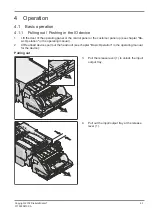
Pulling out / Pushing in the IO device

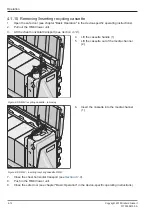
1.

Lift the door of the operating panel or the control panel or the customer panel up (see chapter "Ba-
sic Operation" in the operating manual).

2.

At Rearload devices pull out the head unit (see chapter "Basic Operation" in the operating manual
for the device).

Pulling out

1

1

3.

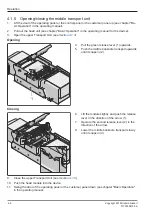
Pull the release lever (1) to unlock the input/
output tray.

1

4.

Pull out the input/output tray at the release
lever (1).

Copyright 2018 Diebold Nixdorf
01750308109 A

4-1

Содержание RM4V

Страница 1: ...5 4 3 2 1 RM4V Operator Manual 01750308109 A...

Страница 2: ...Title Page ii Copyright 2018 Diebold Nixdorf 01750308109 A...

Страница 3: ...t should be treated as confidential material for security reasons Any unautho rized disclosure or use of confidential material may violate the U S Theft of Trade Secrets provisions of Section 1832 of...

Страница 4: ...Opening Closing the lower transport unit 4 7 4 1 7 Emptying the head compartment 4 8 4 1 8 Opening Closing the chest horizontal transport 4 10 4 1 9 Opening Closing loopback transport of chest transpo...

Страница 5: ...bottom of the upper transport module 5 10 5 3 7 Note jam in middle transport module 5 11 5 3 8 Note jam in lower transport module 5 12 5 3 9 Note jam in safe distribution transport 5 13 5 3 10 Note ja...

Страница 6: ...sette opening 4 20 Figure 4 10 RM4V recycling cassette _closing cover 4 20 Figure 4 11 RM4V closing recycling cassette 4 21 Figure 4 12 RM4V recycling cassette_moving contact pressure 4 21 Figure 4 13...

Страница 7: ...specified order 1 3 1 3 Basic information The basic function of the Recycling Module Generation Four Vertical RM4V is to deliver media bank notes and other valuable documents to the consumer that is...

Страница 8: ...try sen sor Channels 1 through 4 also contain dedicated gate sensors in the paper path The chest horizontal transport then counts the number of notes to pick The notes travel along the chest horizonta...

Страница 9: ...note describes a hazard with a medium degree of risk which if not avoided could result in death or grave bodily injury CAUTION This warning note describes a hazard with a low degree of risk which if n...

Страница 10: ...erruption in the operating manual l For further system specific notes please refer to the operating manuals l Inform the customer service responsible for you Unless otherwise stated grasp the componen...

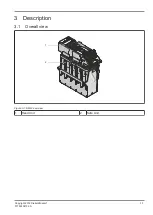
Страница 11: ...3 3 Description 3 1 3 1 Overall view 5 4 3 2 1 2 1 Figure 3 1 RM4V overview 1 Head Unit 2 Safe Unit 3 2 Copyright 2018 Diebold Nixdorf 01750308109 A 3 1...

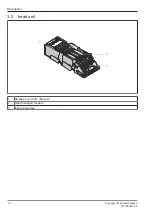
Страница 12: ...Description 3 2 head unit 1 2 3 1 Storage on a drum Escrow 2 Head transport module 3 Input output tray 3 3 3 2 Copyright 2018 Diebold Nixdorf 01750308109 A...

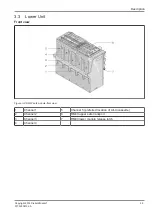
Страница 13: ...e 3 2 RM4V safe module front view 1 Channel 1 5 Channel 5 preferred location of All In cassette 2 Channel 2 6 RM4V upper safe transport 3 Channel 3 7 RM4V lower module release latch 4 Channel 4 Copyri...

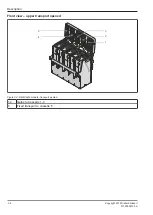
Страница 14: ...on Front view upper transport opened 5 4 3 2 1 5 4 3 1 2 Figure 3 3 RM4V safe module transport pivoted 1 4 Gates to Cassette 1 4 5 Fixed transport to cassette 5 3 4 Copyright 2018 Diebold Nixdorf 0175...

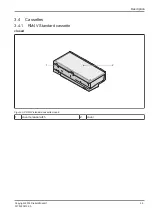
Страница 15: ...Description 3 4 3 4 Cassettes 3 4 1 3 4 1 RM4V Standard cassette closed 1 2 2 1 Figure 3 4 RM4V standard cassette closed 1 cover release latch 2 cover Copyright 2018 Diebold Nixdorf 01750308109 A 3 5...

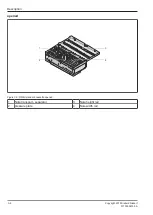
Страница 16: ...scription opened 3 1 2 4 Figure 3 5 RM4V standard cassette opened 1 Note transport separator 3 Note height rail 2 pressure plate 4 Note width rail 3 4 2 3 6 Copyright 2018 Diebold Nixdorf 01750308109...

Страница 17: ...Description 3 4 2 RM4V All in cassette closed 1 2 2 1 Figure 3 6 RM4V All in cassette closed 1 cover release latch 2 cover Copyright 2018 Diebold Nixdorf 01750308109 A 3 7...

Страница 18: ...Description opened Figure 3 7 RM4V All in cassette opened 1 note transport 3 note width rail always use 0 setting for note width 2 pressure plate 3 8 Copyright 2018 Diebold Nixdorf 01750308109 A...

Страница 19: ...Description bottom closed 1 2 3 Figure 3 8 RM4V All in cassette bottom closed 1 cover 2 release lever for cover 3 cassette connector Copyright 2018 Diebold Nixdorf 01750308109 A 3 9...

Страница 20: ...Description bottom opened 2 1 Figure 3 9 RM4V All in cassette bottom opened 1 compartment 2 cover opened 3 10 Copyright 2018 Diebold Nixdorf 01750308109 A...

Страница 21: ...mer panel up see chapter Ba sic Operation in the operating manual 2 At Rearload devices pull out the head unit see chapter Basic Operation in the operating manual for the device Pulling out 1 1 3 Pull...

Страница 22: ...at the release lever 1 until the modul engages 6 Push the head module into the device 7 Swing the door of the operating panel or the customer panel down see chapter Basic Operation in the operating m...

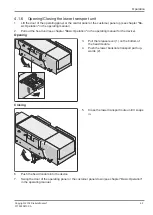
Страница 23: ...ter Ba sic Operation in the operating manual 1 2 2 Pull out the coin tray at the grip 1 1 2 3 Remove any coins that may be left in the coin tray 2 4 Push in the coin tray at the grip 1 5 Swing the doo...

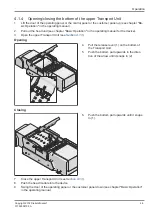
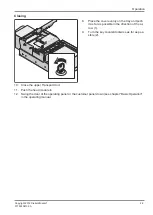
Страница 24: ...in the direction of the arrow 2 5 Open the upper banknote transport in the di rection of the arrow 3 Closing 2 1 6 Hold the opened banknote transport with one hand and slightly lift it up 7 Operate th...

Страница 25: ...e upper Transport Unit see Section 4 1 3 Opening 2 1 4 Pull the release lever 1 on the bottom of the Transport Unit 5 Push the bottom part upwards in the direc tion of the arrow until it snaps in 2 Cl...

Страница 26: ...ase lever 1 upwards 5 Push the middle banknote transport upwards until it snaps in 2 Closing 3 1 2 6 Lift the module slightly and push the release lever in the direction of the arrow 1 7 Operate the s...

Страница 27: ...Operation in the operating manual for the device Opening 2 1 3 Pull the release lever 1 on the bottom of the head module 4 Push the lower banknote transport path up wards 2 Closing 1 5 Close the lowe...

Страница 28: ...manual 2 Pull out the head unit see chapter Basic Operation in the operating manual for the device 3 Open the upper Transport Unit Opening 2 1 4 Turn the key clockwise as far as possible 1 5 Pull the...

Страница 29: ...on of the ar row 1 9 Turn the key counterclockwise as far as pos sible 2 10 Close the upper Transport Unit 11 Push the head module in 12 Swing the door of the operating panel or the customer panel dow...

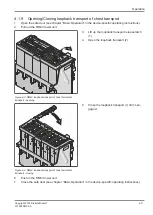
Страница 30: ...ening 1 Figure 4 1 RM4V opening safe transport 3 Lift the handle of the chest horizontal trans port Closing 1 Figure 4 2 RM4V closing the safe transport 4 Close the chest horizontal transport carefull...

Страница 31: ...transport of chest horizontal transport opening 3 Lift up the loopback transport release latch 1 4 Open the loopback transport 2 1 Figure 4 4 RM4V loopback transport of chest horizontal transport clos...

Страница 32: ...gure 4 5 RM4V recycling cassette removing 4 Lift the cassette handle 1 5 Lift the cassette out of the media channel 2 1 Figure 4 6 RM4V inserting recycling cassette RM4V 6 Insert the cassette into the...

Страница 33: ...2 Figure 4 7 RM4V removing All in cassette 2 Lift the cassette handle 1 3 Lift the cassette out of the media channel 2 1 Figure 4 8 RM4V inserting All in cassette 4 Insert the cassette into the media...

Страница 34: ...foreign objects Banknotes that have been torn taped dog eared creased stapled or clipped may not be used Remove any bank wrappers made of paper plas tic or rubber before inserting the banknotes If you...

Страница 35: ...New and used banknotes If you use new and used banknote bundles in one cassette always insert the bundles with the used banknotes into the cassette first Then insert the bundles with the new banknote...

Страница 36: ...the bulging side is pointing towards the pressure carriage Insert the two bundle halves into the cassette as shown in the illustration 1 Please do not use any extremely deformed ban knotes Always ins...

Страница 37: ...comments for deformed banknotes Possible deformation of banknotes Type A Type B Type C Bulge near the holo gram S shaped bulge Wavy shaped bulge Type A Turn the bundle so that the deformed corner of t...

Страница 38: ...sure carriage Type C If the bundle has a wavy shape as a result of be ing tied turn it so that the deformed corners are pointing towards the end from which the ban knotes are dispensed and not towards...

Страница 39: ...Operation Copyright 2018 Diebold Nixdorf 01750308109 A 4 19...

Страница 40: ...Cassette Opening 1 2 1 2 Figure 4 9 RM4V recycle cassette opening 1 Turn the cassette lever 1 2 Open the cassette front cover 2 Closing 1 Figure 4 10 RM4V recycling cassette _closing cover 3 Close th...

Страница 41: ...2 4 2 2 2 Inserting Removing notes NOTE Please note the general chapter preparing banknotes Section 4 2 1 1 Open the front cover of the recycling cassette see Section 4 2 2 1 1 Figure 4 12 RM4V recyc...

Страница 42: ...s 1 Figure 4 14 RM4V recycling cassette_filling in notes 4 Insert the banknote bundle into the cassette 1 If more banknote bundles are to be refilled the notes being inserted must always be lo cated b...

Страница 43: ...e All in cassette from the media channel see Section 4 1 11 Opening 1 2 1 2 Figure 4 15 RM4V Opening All in cassette 2 Turn the cassette lever 1 3 Open the cassette front door 2 Closing 1 Figure 4 16...

Страница 44: ...Operation Locking 1 2 1 2 Figure 4 17 ain_cassette locking cover 5 Release the lever 1 and push down the cover 2 4 24 Copyright 2018 Diebold Nixdorf 01750308109 A...

Страница 45: ...g All in cassette back cover 2 Turn the cassette lever 1 3 Open the cassette back cover 2 1 Figure 4 19 Closing back cover All in cassette 4 Push down the cover 1 5 Push the cover into the direction o...

Страница 46: ...the front cover of the recyling cassette see Section 4 2 3 1 1 2 3 Figure 4 20 RM4V ain_cassette moving contact pressure 2 Push away 1 the pressure carriage 3 from the feed stack 2 Taking out banknot...

Страница 47: ...t the banknote bundle into the cassette 1 If more banknote bundles are to be refilled the notes being inserted must always be lo cated between the pressure carriage and in serted stack See also chapte...

Страница 48: ...height All In Cassette 158W x 65H 0 X Recycling cassette 5 130W x 65H 5 2 10 137W x 65H 4 2 20 144W x 65H 4 2 50 151W x 65H 4 2 100 158W x 65H 4 2 Table 4 2 Canadian Dollar CAD Currency Cassette Type...

Страница 49: ...Cassette Front Door Rail Size height All In Cassette 181W x 74H 0 X Recycling cassette 10 126W x 74H 6 0 20 137W x 74H 4 0 50 148W x 74H 3 0 100 159W x 74H 2 0 200 170W x 74H 1 0 1000 181W x 74H 1 0...

Страница 50: ...rrency Standards This section describes media standards that you should be aware of when loading the recycling cas settes The term currency is used to refer to any type of dispensable media NOTE Altho...

Страница 51: ...Figure 5 1 RM4V unacceptable media 1 Folded corners 6 Pin 2 Tape repair 7 Bow 3mm 0 12 inch 3 Hole 8 Limp note 4 Staple 9 Crumpled note 5 Tear exceeding 13mm 0 12 inch 5 2 Copyright 2018 Diebold Nixdo...

Страница 52: ...on as the unit concerned is pulled out of the device This ensures that no rotating parts can be touched during the working steps described below All subassemblies of the head and safe unit have to be...

Страница 53: ...p see chapter Ba sic Operation in the operating manual 2 At Rearload devices pull out the head unit see chapter Basic Operation in the operating manual for the device Pulling out 1 1 3 Pull the releas...

Страница 54: ...ray at the release lever 1 until the modul engages 6 Push the head module into the device 7 Swing the door of the operating panel or the customer panel down see chapter Basic Operation in the operatin...

Страница 55: ...position Turn the green wheel under the plate to move the pressure plate in the direction of the arrow 1 Turning the input output tray upwards in the di rection of the arrow 2 moves it into the colle...

Страница 56: ...note path 1 Jam in collecting position Remove the banknote s in the event of a jam in this banknote path If necessary open and check the collecting tray to remove any jammed notes see Opening clos ing...

Страница 57: ...g 1 Input output tray is in collecting position Turn the input output tray in the direction of the ar row to bring it back to the dispensing and extrac tion position 5 8 Copyright 2018 Diebold Nixdorf...

Страница 58: ...nsport module 1 Open the upper Transport Unit see Section 4 1 3 Eliminating note jam 1 2 Check the area of the switches 3 Clearing the banknote jam 1 4 Close the upper Transport Unit see Section 4 1 3...

Страница 59: ...the upper transport module 1 Open the bottom of the upper Transport Unit see Section 4 1 4 2 Remove the banknotes from this banknote path 3 Close the bottom of the upper Transport Unit see Section 4...

Страница 60: ...transport module 1 Open the upper Transport Unit see Section 5 3 5 Eliminating note jam 1 2 Remove the bank notes from the banknote path 1 Closing 3 Close the upper Transport Unit see Section 5 3 5 Co...

Страница 61: ...Note jam in lower transport module 1 Open the lower Transport Unit see Section 4 1 6 2 Eliminate the banknote jam if necessary 3 Close the lower Transport Unit see Section 4 1 6 5 12 Copyright 2018 Di...

Страница 62: ...t horizontal transport see Section 4 1 8 5 4 3 2 1 Figure 5 2 RM4V checking the safe transport 2 Remove notes from bottom of lower platten of the chest horizontal transport 1 5 3 Close the chest horiz...

Страница 63: ...gure 5 3 RM4V middle platten of chest horizontal transport removing notes from transport area 2 Remove notes from loopback transport 1 of the chest horizontal transport Loopback transport should only...

Страница 64: ...n 4 1 8 1 2 3 4 5 Figure 5 4 RM4V cassette transport checking 2 Remove the banknotes 1 5 from the cas sette transports If too little of the note ex posed do not pull out the note from the out side of...

Страница 65: ...pen the cover of the recycling cassette Section 4 2 2 1 1 1 Figure 5 5 RM4V recycling cassette checking notes 2 Look for jammed notes in the shown areas 1 3 Close the cover of the recycling cassette S...

Страница 66: ...tte 1 Open the cover of the all in cassette Section 4 2 3 1 1 1 Figure 5 6 RM4V checking all in cassette 2 Remove jammed notes from the cassette 1 3 Close the cover of the all in cassette Section 4 2...

Отзывы: