13
PowerScanner™ Microphone
Installing the PowerScanner
To install the PowerScanner:
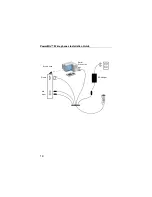
1. The
PowerScanner’s
cable is split into five cables.
a. Insert the
speaker cable
into the sound card’s
Speaker
port
. The speaker cable’s connector is
green and has a small speaker icon embossed
on it.
b. Insert the
MIDI
cable
into the sound card’s
Mic
port
. The
MIDI
cable’s connector is orange and
has a small microphone icon embossed on it.
c. Insert the
game port connector
(15-pin
connection) into the sound card’s
game port
.
d. Insert the
serial cable
(7-pin connection) into a
serial port
on your computer.
Note:
Refer to your sound card’s documentation
if you need help locating these ports.
e. Connect the
remaining cable
to the
Switching
AC Adaptor’s cable
.
2. Plug the
Switching AC Adaptor’s power cord
into an
electrical outlet
.
3. Follow the instructions beginning on page 15 to
install the Microphone Wizard and test the
microphone. When you have finished the test, you
are ready to use the
PowerScanner
.
Содержание PowerMic
Страница 2: ...Giving New Meaning to Voice...
Страница 3: ...Installation Guide PowerMic Microphones USB PowerMic PowerMic Scanner PowerScanner...
Страница 20: ...14 PowerMic Microphones Installation Guide Sound card AC Adaptor Mic Spur Game Serial Connection...
Страница 32: ...26 PowerMic Microphones Installation Guide...
Страница 33: ...Giving New Meaning to Voice...


