6 PIECE OUTDOOR FURNITURE
ASSEMBLY INSTRUCTIONS
Страница 1: ...6 PIECE OUTDOOR FURNITURE ASSEMBLY INSTRUCTIONS...
Страница 2: ...or small hardware that may have become loose inside the carton during shipment Identify and count all hardware and parts to compare with parts and hardware list Follow assembly instructions closely Im...
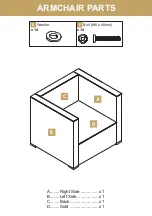
Страница 3: ...ARMCHAIR PARTS F E Washer x 14 x 14 A Right Side x 1 B Left Side x 1 C Back x 1 D Seat x 1 A C D B Bolt M6 x 40mm...
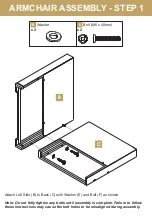
Страница 4: ...to Back C with Washer E and Bolt F as shown Note Do not fully tighten any bolts until assembly is complete Failure to follow these instructions may cause the bolt holes to be misaligned during assemb...
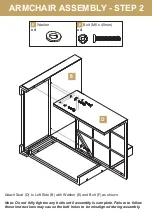
Страница 5: ...Left Side B with Washer E and Bolt F as shown Note Do not fully tighten any bolts until assembly is complete Failure to follow these instructions may cause the bolt holes to be misaligned during assem...
Страница 6: ...o Back C with Washer E and Bolt F as shown Note Do not fully tighten any bolts until assembly is complete Failure to follow these instructions may cause the bolt holes to be misaligned during assembly...
Страница 7: ...RMCHAIR ASSEMBLY STEP 4 Attach Right Side A to Back C and Seat D with Washer E and Bolt F as shown IMPORTANT Fully tighten all bolts after this step is complete Washer x 6 x 6 Bolt M6 x 40mm A C D F E...
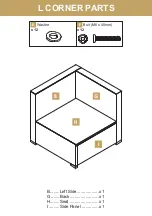
Страница 8: ...L CORNER PARTS F Washer x 12 x 12 Bolt M6 x 40mm F E B Left Side x 1 G Back x 1 H Seat x 1 I Side Panel x 1 B G H I...
Страница 9: ...B to Back G with Washer E and Bolt F as shown Note Do not fully tighten any bolts until assembly is complete Failure to follow these instructions may cause the bolt holes to be misaligned during assem...
Страница 10: ...and Bolt F as shown Note Do not fully tighten any bolts until assembly is complete Failure to follow these instructions may cause the bolt holes to be misaligned during assembly L CORNER ASSEMBLY STE...
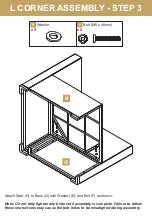
Страница 11: ...nd Bolt F as shown Note Do not fully tighten any bolts until assembly is complete Failure to follow these instructions may cause the bolt holes to be misaligned during assembly L CORNER ASSEMBLY STEP...
Страница 12: ...ttach Side Panel I to Seat H and Back G with Washer E and Bolt F as shown IMPORTANT Fully tighten all bolts after this step is complete L CORNER ASSEMBLY STEP 4 Washer x 4 x 4 Bolt M6 x 40mm F E H G I...
Страница 13: ...R CORNER PARTS F Washer x 12 x 12 Bolt M6 x 40mm F E A Right Side x 1 J Back x 1 K Seat x 1 I Side Panel x 1 A J K K I...
Страница 14: ...A to Back J with Washer E and Bolt F as shown Note Do not fully tighten any bolts until assembly is complete Failure to follow these instructions may cause the bolt holes to be misaligned during asse...
Страница 15: ...E and Bolt F as shown Note Do not fully tighten any bolts until assembly is complete Failure to follow these instructions may cause the bolt holes to be misaligned during assembly R CORNER ASSEMBLY ST...
Страница 16: ...nd Bolt F as shown Note Do not fully tighten any bolts until assembly is complete Failure to follow these instructions may cause the bolt holes to be misaligned during assembly R CORNER ASSEMBLY STEP...
Страница 17: ...ttach Side Panel I to Seat K and Back J with Washer E and Bolt F as shown IMPORTANT Fully tighten all bolts after this step is complete R CORNER ASSEMBLY STEP 4 Washer x 4 x 4 Bolt M6 x 40mm F E J K I...
Страница 18: ...CHAIR PARTS F E Washer x 10 x 10 L Back x 1 M Seat x 1 I Side Panel x 2 Bolt M6 x 40mm L M I...
Страница 19: ...Back L with Washer E and Bolt F as shown Note Do not fully tighten any bolts until assembly is complete Failure to follow these instructions may cause the bolt holes to be misaligned during assembly W...
Страница 20: ...ttach Side Panels I to Seat M and Back L with Washer E and Bolt F as shown IMPORTANT Fully tighten all bolts after this step is complete Washer x 8 x 8 Bolt M6 x 40mm F E M I I L CHAIR ASSEMBLY STEP 2...
Страница 21: ...TABLE PARTS F E Washer x 12 x 12 N Table Frt Bck Panel x 2 O Side Panel x 2 P Glass Top x 1 Q Table Top Panel x 1 Bolt M6 x 40mm P N O N Q...
Страница 22: ...o Table Top Panel Q with Washer E and Bolt F as shown Note Do not fully tighten any bolts until assembly is complete Failure to follow these instructions may cause the bolt holes to be misaligned duri...
Страница 23: ...E ASSEMBLY STEP 2 Attach Side Panels O to Table Frt Bck Panels N with Washer E and Bolt F as shown IMPORTANT Fully tighten all bolts after this step is complete Washer x 8 x 8 F Bolt M6 x 40mm F E N N...
Страница 24: ...TABLE ASSEMBLY STEP 3 Carefully position Glass Top P into place as shown while making sure the suction cups adequately grasp the Glass Top P bottom surface P Q...
Страница 25: ...OTTOMAN PARTS F E Washer x 12 x 12 O Side Panel x 2 R Ottoman Frt Bck Panel x 2 S Ottoman Top Panel x 1 Bolt M6 x 40mm R O S...
Страница 26: ...to Ottoman Top Panel S with Washer E and Bolt F as shown Note Do not fully tighten any bolts until assembly is complete Failure to follow these instructions may cause the bolt holes to be misaligned d...
Страница 27: ...N ASSEMBLY STEP 2 Attach Side Panels O to Ottoman Frt Bck Panels R with Washer E and Bolt F as shown IMPORTANT Fully tighten all bolts after this step is complete Washer x 8 x 8 F Bolt M6 x 40mm F E O...
Страница 28: ...Your patio set includes connectors that allow you to customize the layout of your pieces To use the connectors simply place them over the adjoining frames as shown above CONFIGURATIONS...
Страница 29: ...ADDITIONAL CONFIGURATIONS Sofa with Chaise L Corner Chair R Corner Ottoman Chaise Lounge Ottoman Chair Loveseat L Corner R Corner Chaise Lounge with Arms Ottoman Armchair...
Страница 30: ...Place seat cushions and back pillows into position Enjoy your new patio set ASSEMBLY COMPLETE...