16
Chapter 2
HARDWARE INSTALLATION
User's Manual |
EB100-KU
1
1
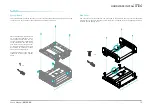
Please follow the steps below to install the memory card into the socket.
Step 1:
Insert the memory card into the
slot while making sure 1) the
notch and the key are aligned,
and 2) the non-connector end
rises approximately 45 degrees
horizontally. Press the card firmly
into the socket while applying and
maintaining even pressure on both
ends.
Step 2:
Press the end of the card far from
the socket down while making
sure the retention notch and the
clip align as indicated by the dot-
ted line in the illustration. If the
retention notch and the clip do not
align, please remove the card and
re-insert it. Press the card all the
way down.
Step 3:
The clips snap automatically and
abruptly to the retention notches
of the card sounding a distinctive
click, and lock the card in place.
Inspect that the clip sits in the
notch. If not, please pull the clips
outward, release and remove the
card, and mount it again.
Notch
Retention Notch
Key
Socket Top View
DDR3 SO-DIMM
Retention Clip
45°
Step 1
Step 2
Step 3
X
System Memory
X
Jumper Settings
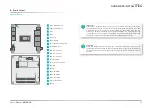
Clear CMOS (JP1)
JP1
If any anomaly of the followings is encountered —
a) CMOS data is corrupted;
b) you forgot the supervisor or user password;
c) failure to start the system due to BIOS mis-configuration
— it is suggested that the system be reconfigured with default values stored in the ROM BIOS.
To load the default values stored in the ROM BIOS, please follow the steps below.
1. Power-off the system and unplug the power cord.
2. Put a jumper cap on JP1’s pin 2 and pin 3. Wait for a few seconds and set JP1 back to
its default setting, i.e. jumper cap on pin 1 and pin 2.
3. Plug the power cord and power-on the system.
2-3 On: Clear CMOS
1-2 On: Normal (default)
1
3 2
1
3 2
Note:
The jumper is located on the top side of the board, and can only be accessed
after removing the board from the top cover. Please refer to previous sections for
instruction.


