background image

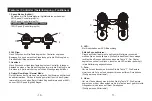
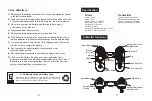
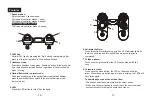
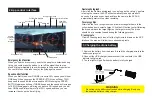
Controller functions

speed-select button

throttle 
left stick

LED

calibration

power swith

right stick

one key start

one key stop

trim

video

picture

headless mode

speed-select 
button

flip button

optical flow mode / 
normal mode

164 feet ( 50 m)                                                                           

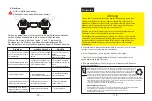
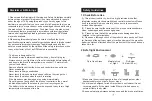
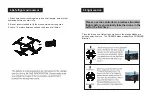
(1) Please ensure batteries are fitted in the correct orientation as shown
     in the instruction manual.

(9) Don't attempt to disassemble or Modify the battery in any way.

3. Use of Battery

Li-Po Battery Disposal & Recycling

Waste Lithium-polymer batteries must not be placed with household trash.
Please contact local environmental or waste agency or the supplier of your
model or your nearest Li-Po battery recycling center. 

(10) Don't use the battery if it gives of an odor, generates heat, 
    becomes discolored or deformed,or appears abnormal in any way. If 
    the battery is in use or being charged, remove it from the device or 
    charger immediately and discontinue use.

(8) Don't connect the battery directly to wall outlets or car 
     cigarette-lighter sockets.

(7) It is recommended to only use the USB charging cable that comes
     with the drone to charge the battery.

(6) If the device is not going to be used for an extended period of time,
     remove batteries to prevent potential damage from battery leakage.

(4) Dispose used batteries carefully.

(3) Do not mix new and old batteries as this can lead to a poor 
     performance of the product.

(5) Please keep dead batteries away from heat and fire.

(2) Avoid short circuits by fiting the batteries incorrectly, and do not crush 
     or squeeze the batteries as this could carry the risk of an explosion. 

Specification


Drone

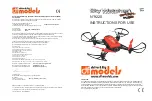
  Item no.: 9220
  Weight:  80g
  Battery: Li-po,3.7v 1000mAh
  Max Flight Time: 10 mins
  Charging time: 150 mins
  Hovering: Enabled
  Operating Temperature Range: 0  to 40 C
  Dimensions: 180x 170x 38mm
 

o

o


Transmitter

  Operating Frequency: 2.4GHz
  Max transmission distance: 40m
  Battery: 1.5V AAA (not included)
  Operating Temperature: 0 to 40 C

o

o

2

3

optical flow mode / 
normal mode

Содержание Sky Watcher 9220

Страница 1: ...ial requirements and the other relevant provisions of the Directive RED 2014 53 EU when used for it intended purpose Est conforme aux exigences des directives et ordonnances suivantes RED 2014 53 EU I...

Страница 2: ...aut bewahren Sie Akkus Batterien immer au erhalb der Reichweite von Kindern auf nicht wieder aufladbare Batterien d rfen nicht geladen werden aufladbare Batterien m ssen vor dem Laden aus der Fernsteu...

Страница 3: ...n bei den ersten Flugversuchen den einen oder anderen Fehlversuch Fliegen Sie NIEMALS ohne Rotorsch tzer ACHTUNG 1 Behalten Sie das Flugger t immer in Sichtweite und unter Kontrolle 2 Benutzen Sie imm...

Страница 4: ...Entnehmen Sie den Akku aus dem Copter und stecken Sie diesen an das Ladekabel Nur beiliegendes Kabel verwenden 3 Die LED leuchtet nun rot Ladevorgang l uft 4 Ist die LED erloschen ist der Akku voll g...

Страница 5: ...ante 1 Landen Variante 1 Start Landung Variante 2 Variante 1 Dr cken Sie die Start Taste am Controller Die Rotoren beginnen zu laufen Dr cken Sie nun den linken Steuerkn ppel nach oben Das Modell star...

Страница 6: ...hwebeflug nicht ruhig an einem Punkt halten und immer in eine Richtung abdriften k nnen Sie das Modell austrimmen um einen ruhigen Schwebeflug zu bekommen Bewegt sich das Modell nach hinten trimmen Si...

Страница 7: ...inken leuchten die LEDs wieder dauerhaft ist die Kalibrierung abgeschlossen 5 6 7 8 7 Foto Um ein Foto aufzunehmen dr cken Sie die Taste 7 Die Kamera nimmt nun ein Foto auf und speichert dieses auf Ih...

Страница 8: ...werden 2 Sobald der Sender zu piepen beginnt m ssen Sie umgehend Ihr Modell zum Startpunkt zur ck fliegen oder die Auto Return Home Taste dr cken Das Piepen des Senders ist ein Hinweis dass der Akku d...

Страница 9: ...1 Ersatzakku 9222 Ersatzrotorbl tter 4 9223 Rotorsch tzer 4 9224 Ersatzmotor Kabelfarbe rot blau 9225 Ersatzmotor Kabelfarbe weiss schwarz 9226 Geh use Rahmen 9227 Ladekabel USB 9228 Hauptplatine 9229...

Страница 10: ...LAN mit Ihrem Smartphone 3 Starten Sie die APP WOWITOYS und dr cken die Taste 4 Um die Stuerung per Phone zu aktivieren dr cken Sie den ON OFF Button und dann den Altitude hold Button 5 Das Modell ist...

Страница 11: ...mAktivieren des Modells befindet sich die Drohne bei 30 Leistung Durch dr cken der Speed Taste k nnen Sie die Einstellung ndern 30 60 oder 100 Agilit t k nnen gew hlt werden Fliegen Sie im freien imme...

Страница 12: ...ks Dr cken des rechten Buttons nach rechts l sst das Modell nach rechts fliegen durch dr cken nach links fliegt das modell nach links Steuerung Trimmung Sollte sich das Modell im Schwebeflug nicht ruh...

Страница 13: ...e das Modell mit den rechten Trimm Buttons nach links Bewegt sich das Modell nach hinten trimmen Sie das Modell mit den rechten Trimm Buttons nach vorne Bewegt sich das Modell nach vorne trimmen Sie d...

Страница 14: ...Hinweise 24...
Страница 15: ...t Complies with the essential requirements and the other relevant provisions of the Directive RED 2014 53 EU when used for it intended purpose Est conforme aux exigences des directives et ordonnances...

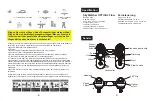
Страница 16: ...all the propellers are undamaged and are installed in the right orientation 4 Please do a thorough check of the product before each use Check for firmness of the parts any signs of cracks and wear of...

Страница 17: ...ately and discontinue use 8 Don t connect the battery directly to wall outlets or car cigarette lighter sockets 7 It is recommended to only use the USB charging cable that comes with the drone to char...

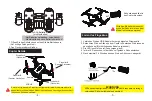
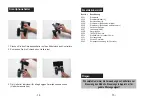
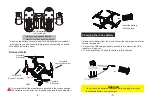
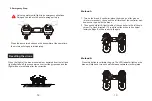
Страница 18: ...larity as shown 2 Re attach the battery cover Propeller A Clockwise Propeller A Clockwise Propeller B Counter Clockwise Propeller B Counter Clockwise HEAD Camera Charging the drone battery insert the...

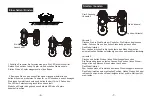
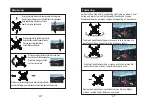
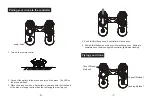
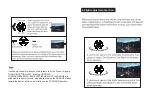
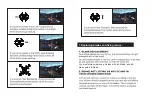
Страница 19: ...throttle up once controller will beep once Flying your drone Take off Method 1 Landing Method 1 Take Off Landing Method 2 1 Turn on the remote control power swith 5 Pull left throttle down once contro...

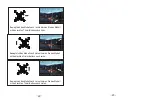
Страница 20: ...Landing Method 1 Press the one key stop button the drone will land by itself Method 2 Push the throttle left stick down until the drone lands Use throttle right stick to control forward backward left...

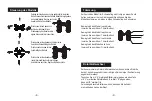
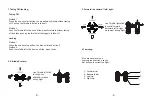
Страница 21: ...the photo button the LED on the drone will blink once Press once the video button the LED on the drone will blink twice Press the same button again to stop recording the LEDs will blink twice again 8...

Страница 22: ...t down corner 7 o clock direction This will reset the drone to its original factory settings will be ready to fly again Press the above two buttons on the transmitter at the same time the motors will...

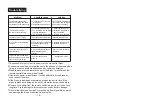
Страница 23: ...cceleration sensor losed its balance after crashing Restart and re calibrate the drone The drone rotates upwards when pushing up the throttle lever or the drone sways The motor doesn t work properly R...

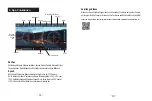
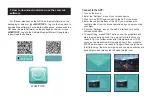
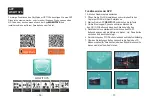
Страница 24: ...APP of the drone 4 Enter the control interface of this APP you would see the real time video from the drone camera and you now can start your flight Connect to the APP 6 To begin flying press START bu...

Страница 25: ...beeps and the speed will increase to 100 Pressing again will bring you back to 30 speed and you will hear ONE beep Always learn to fly at 30 speed and then you can increase it as you get better at fly...

Страница 26: ...drone outside in strong wind 3 Leave 1 5 meters between you and the drone at all times 5 Flight control Please use the controller to practise simulated flights before you actually take the drone in t...

Страница 27: ...ignore TURN RIGHT TURN LEFT by using UP DOWN FORWARD BACKWAD BANK LEFT BANK RIGHT the DRONE will still be able to fly everywhere also please keeping the ORANGE blades toward the front at all times it...

Страница 28: ...You must always replace a A blade with a A blade and a B blade with a B blade 7 Replacing blades and fixing issues...

Страница 29: ...affected 4 If the drone power is insufficient it will be difficult to fly the drone or even take off the drone 5 If the drone is damaged or deformed please repair it in time If the blade is broken or...

Страница 30: ...ormen gefertigt Manufactured in accordance with the following harmonised standards Et a t fabriqu conform ment aux norms harmonis es suviantes EN 62479 2010 Draft EN 301 489 1 V2 2 0 2017 03 Final Dra...

Отзывы: