APCO CVS-6000 SWING CHECK VALVES
Instruction
D12006
December 2012
Страница 1: ...APCO CVS 6000 SWING CHECK VALVES Instruction D12006 December 2012 ...
Страница 2: ... from service with suitable protection for any potential pipeline material in the valve Inspection Your APCO CVS 6000 Swing Check Valve has been packaged to provide protection during shipment however it can be damaged in transport Carefully inspect the unit for damage upon arrival and file a claim with the carrier if damage is apparent Parts Recommended spare parts are listed on the assembly drawi...
Страница 3: ...isc Seat Replacement 7 Operation 8 Series 6000 Valves 8 Series 6000B Valves 8 Series 6100 Valves 8 Speed Control Adjustment 8 Start up Procedure Series 6000 Valves 8 Start up Procedure Series 6000B Valves 9 Start up Procedure Series 6100 Valves 10 Adjustment of Flow Control Valve 11 Operation of Internal Cushion 11 Timing Valve Adjustment Series 6100 Valves 12 Oil Filling Procedure 13 Series 6000B...
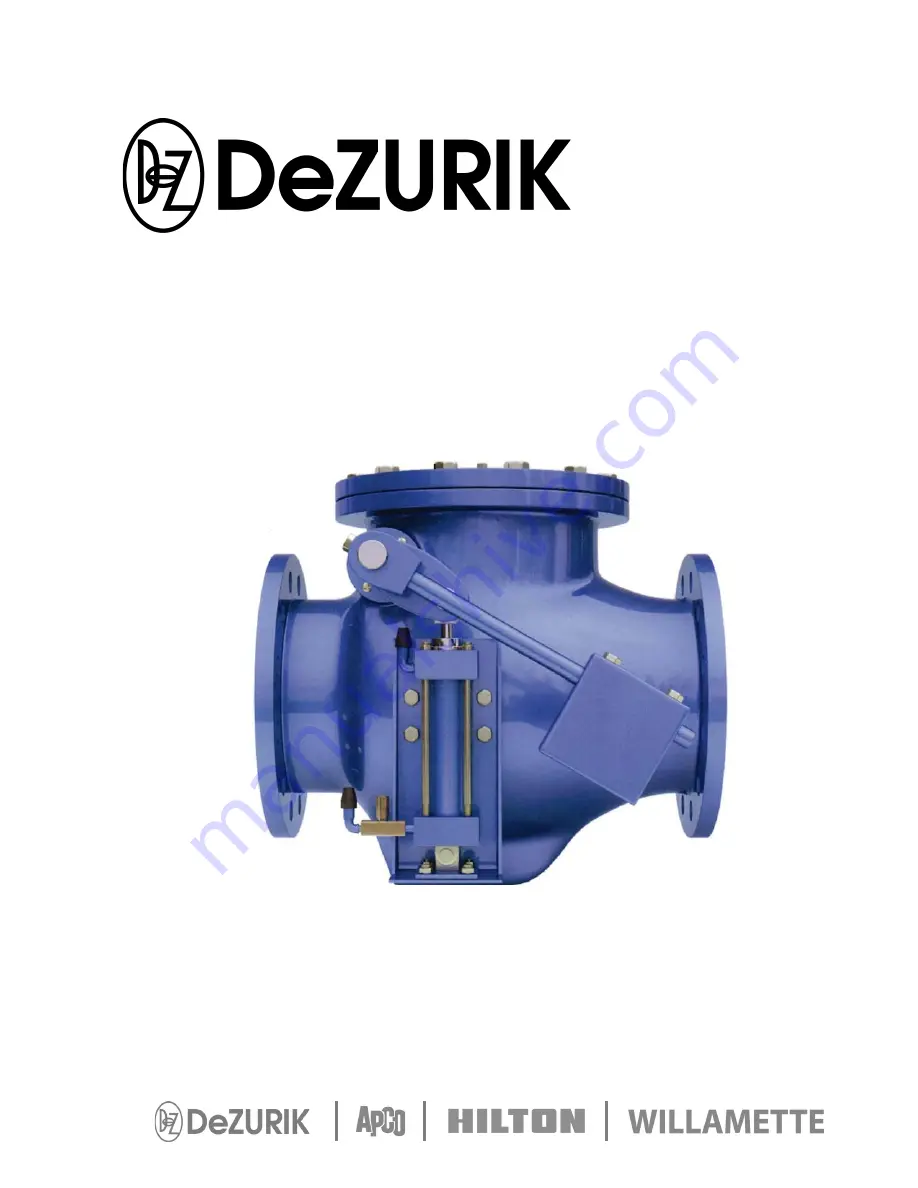
Страница 4: ...tc is secured around over the valve to keep off rain and mud Skid and set the assembly on a flat solid and well drained surface for protection from ground moisture runoff and pooled rain water Installation The APCO CVS 6000 Swing Check Valves may be installed in a horizontal or vertical position with the flow upward In either case the Counterweight Arm 44 should be set 25 30 below the horizontal l...
Страница 5: ...nder by removing the breather caps Recommended lubricants SAE 10W 20 WD 40 Figure 1 Lubrication of Cylinder Series CVS 6000B Valves A periodic approximately 6 months lubrication of the exposed area of buffer rod is required to keep the valve in good operating condition Through the course of normal operation the Hydro pneumatic Accumulator 73 must be checked for loss of pressure It is normal for th...
Страница 6: ...nly Disconnect the pin between cushion lever 27 and cylinder 20 6 Unscrew eye bracket mounting bolts 25 to remove cylinder 20 7 Loosen cushion lever set screw 35 to remove cushion lever 27 8 Remove cover 2 by unscrewing cover bolts 4 9 Unscrew disc arm set screws 14 10 Remove pivot shaft cover 15 and seal retainer 37 at both ends of the shaft 11 Pull pivot shaft from the right side of the valve fa...
Страница 7: ...n pivot shaft cover screws 16 14 Install gasket or O ring 3 and cover 2 then fasten with cover screws 4 15 Series 6000 and 6100 valves only Insert cushion lever key 34 on the pivot shaft 13 and position cushion lever 27 in line with cylinder 20 and tighten set screw 35 16 Series 6000 and 6100 valves only Connect cushion lever 27 to cylinder 20 17 Insert counterweight arm key on pivot shaft 13 if p...
Страница 8: ...ides additional control over the last 5 of disc closing movement The oil operated dashpot cylinder 20 incorporates the use of a Hydro pneumatic accumulator 50 a device that activates and pushes the Buffer Rod 84 into the valve body The dashpot cylinder is self contained and uses oil as a controlling media creating a completely closed system which eliminates problems of corrosion electrolysis and m...
Страница 9: ... or at zero reverse flow The Series 6000 Swing Check Valve is not a silent closing check valve Start up Procedure CVS 6000B Valves 1 Position counterweights 29 midway on the lever 2 Remove pipe plug on top of oil reservoir 58 and install Air Breather which is shipped with the valve 3 Check for proper oil levels Make sure oil tanks are in vertical position a Hydro pneumatic Tank 50 Release air pres...
Страница 10: ...evels Make sure oil tank is in vertical position The oil level should be checked when the valve is closed Oil should be visible in the elbow which is the oil fill level Add if necessary See Oil Filling Procedure 4 Open flow control valve 30 three complete turns counter clockwise from fully closed position See ADJUSTMENT OF FLOW CONTROL VALVE 5 Turn cushion adjustment screw two complete turn counte...
Страница 11: ...d of its stroke In Figure 3 as the Cushion Plunger 1 enters Cushion Cavity 2 the exhaust air oil is almost completely trapped by the Ball Check 3 and the Adjusting Screw 4 creating a back pressure against Piston Assembly The back pressure cushions and slows the final part of the Piston stroke thus reducing the high impact hammering of the Piston Assembly against the Cylinder Cap Turning the Adjust...
Страница 12: ... time period of disc closure is achieved by adjusting the contact distance between the Timing Valve cam and the Timing Valve roller Turning the cam counter clockwise will increase the length of contact between the cam roller and the cam permitting the disc to close at a fast rate from its full open position Turning the cam clockwise will decrease the length of contact permitting the disc to close ...
Страница 13: ...t spills out of the side port This is the oil fill level 4 Replace both fittings and pressurize tank according to the formula Tank pressure Line pressure 5 psi 4 5 Set flow control valve three 3 turns counterclockwise from fully closed position 6 Start pump and observe if buffer rod 33 extends If not while valve is still open add more pressure in increments of 5 PSI until rod fully extends Step 2 ...
Страница 14: ...open and close swing check valve by lifting Counterweight Arm 44 at least three times to force out any entrapped air in the cylinder s 6 Remove pipe plug in street elbow located on side of Oil Reservoir 58 and check oil level Refill if necessary and repeat step 5 until proper oil level is maintained when the swing check valve is fully closed 7 Check system for any entrapped air by manually opening...
Страница 15: ...over Seal 20 Cylinder Assembly 21 Cylinder Bracket Mounting Screw 23 Lockwasher 24 Cylinder Bracket 25 Mounting Screw 26 Nut 27 Cushion Lever 29 Counter Weight 30 Flow Control Valve 31 Seat Retaining Ring 32 Seat Retaining Ring Screw 33 Pivot Shaft Key 36 Arm Set Screw 37 Seal Retainer 39 Lock Nut 40 Set Screw 41 Disc Pin Retaining Ring 42 Cover Pipe Plug 43 Body Seat Seal 44 Counter Weight Arm As...
Страница 16: ...iner 38 Lever Arm Screw 39 Lock Nut 40 Set Screw 41 Disc Pin Retaining Ring 42 Cover Pipe Plug 43 Body Seat Seal 44 Counter Weight Arm Assembly 50 Tubing 53 Pivot Sleeve Bearing 56 Dashpot Spacer 57 Disc Arm Sleeve 58 Oil Reservoir 60 Collar 61 Rod Stop 62 Rod Stop Set Screw 65 Cylinder Rod Coupler 66 Cylinder Rod Adaptor 69 Mounting Screw 71 Buffer Rod Seal 72 Bracket Screw 73 Hydro Pneumatic Tan...
Страница 17: ...t Mounting Screw 23 Lockwasher 24 Cylinder Bracket 25 Mounting Screw 26 Nut 27 Cushion Lever 29 Counter Weight 30 Flow Control Valve 31 Seat Retaining Ring 32 Seat Retaining Ring Screw 33 Pivot Shaft Key 34 Cushion Lever Key 35 Set Screw 36 Arm Set Screw 37 Seal Retainer 39 Lock Nut 40 Set Screw 41 Disc Pin Retaining Ring 42 Cover Pipe Plug 43 Body Seat Seal 44 Counter Weight Arm Assembly 45 Timin...
Страница 18: ...to remove object Disc seat is worn or damaged Replace disc seat Valve leaks at flange joint Loose flange bolting Tighten flange bolting Blown flange gasket Replace flange gasket Miss alignment or damage to field piping and supports Adjust miss alignment or repair piping or supports Damaged flange face s or improper flange connections Repair flange replace valve body or adjust flange connections Va...
Страница 19: ...antee shall be null and void if after shipment from our factory the item is modified in any way or a component of another manufacturer such as but not limited to an actuator is attached to the item by anyone other than DeZURIK Inc Factory Service personnel All orders accepted shall be deemed accepted subject to this limited warranty which shall be exclusive of any other or previous Warranty and th...