


22
EnGLIsH
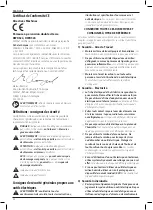
Variable Speed (Fig. C)
Variable speed permits speed control. The further the
trigger switch
1
is depressed, the higher the speed of the
percussion drill.
If necessary, press the lock-on button
8
for continuous
operation and release the switch. The lock-on button works only
in full speed, forward rotation.
To stop the tool in continuous operation, press the switch briefly
and release it. Always turn the tool off when work is finished and
before unplugging.
nOTE:
Use lower speeds for starting holes, drilling in plastics or
ceramics or for driving screws.
Reversing Lever (Fig. C)
The reversing lever
2
, located above the trigger switch, changes
the direction of rotation of the percussion drill and is used when
backing out screws and jammed drill bits.
To operate the tool in reverse, release the trigger switch
1
and
push the lever to the left (when viewed from the chuck end).
To operate the drill in forward, release the trigger switch and
push the lever to the right (when viewed from the chuck end).
Return the reversing lever to the forward position after all
operations in reverse are completed.
High/Low Speed Operation (Fig. A, D)
The two speed gear drive in the dual range percussion
drill permits effective operation over an extended range of
applications with greater selection of accessories.
For
LOW sPEED
operation, turn the collar
4
to the drill bit
symbol for drilling position 1.
For
HIGH sPEED
operation, turn the collar
4
to the drill bit
symbol for drilling position 2.
The gear train has been designed for shifting only when the unit
is off. It may be necessary, however, to rotate the chuck slightly
by hand to align the gears while turning the collar.
NOTICE:
DO NOT ATTEMPT TO CHANGE SPEEDS by
turning the collar when the tool is running. Doing so will
damage the gear train.
Hammer/Drill Selector (Fig. A, D)
To switch the tool from the drilling mode to the hammering
mode (or vice-versa) rotate the collar
4
to the applicable
symbol as shown in Figure D.
Turn the collar
4
to the drill bit symbol for drilling or to the
hammer symbol for hammerdrilling, as shown in the figure.
Torque Limiting Clutch
This tool is equipped with a torque limiting clutch that reduces
the maximum torque reaction transmitted to the operator in
case of jamming of a drill bit. This feature also prevents the
gearing and electric motor from stalling. The torque limiting
clutch has been factory-set and cannot be adjusted.
ASSEMBLY AND ADJUSTMENTS
WARNING: To reduce the risk of serious personal
injury, turn tool off and disconnect tool from power
source before making any adjustments or removing/
installing attachments or accessories.
Be sure the
trigger switch is in the OFF position. An accidental start-up
can cause injury.
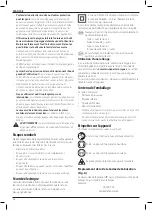
Side Handle (Fig. B)
WARNING: To reduce the risk of personal injury,
ALWAYS operate the tool with the side handle
properly installed.
Failure to do so may result in the side
handle slipping during tool operation and subsequent loss
of control. Hold tool with both hands to maximize control.
A side handle
5
is supplied with this percussion drill. It clamps
to the front of the gear case as shown in Figure B and can be
rotated 360˚ for right- or left- hand use.
After the side handle is rotated into position, it should be
pushed rearward until the slots
10
on the lip of the side handle
are aligned with and fully engaged with the projecting tabs
11
on the underside of the gear case. The side handle is then
securely clamped by turning clockwise until tight.
OPERATION
Instructions for Use
WARNING: To reduce the risk of injury, turn unit
off and disconnect machine from power source
before installing and removing accessories, before
adjusting or changing set-ups or when making
repairs.
Be sure the trigger switch is in the OFF position.
An accidental start-up can cause injury.
WARNING:
Always observe the safety instructions and
applicable regulations.
•
To reduce the risk of personal injury, ALWAYS
ensure workpiece is anchored or clamped firmly.
If drilling thin material, use a wood “back-up” block to
prevent damage to the material.
•
To reduce the risk of personal injury, always
operate the tool with the side handle properly
installed.
Failure to do so may result in the side
handle slipping during tool operation and subsequent
loss of control. Hold tool with both hands to
maximize control.
• Do not attempt to tighten or loosen drill bits (or any
other accessory) by gripping the front part of the
chuck and turning the tool on. Damage to the chuck
and personal injury may occur.
• Burn Hazard.
ALWAYS
wear gloves when changing
bits. Accessible metal parts on the tool and bits may
get extremely hot during operation. Small bits of
broken material may damage bare hands.
Содержание DWD522
Страница 1: ...DWD522 DWD524 Final Page size A5 148mm x 210mm ...
Страница 3: ...1 Fig A Fig B Fig C 3 4 1 2 5 7 6 8 11 10 5 9 2 1 8 ...
Страница 4: ...2 Fig E Fig D Fig F Fig G 4 6 5 3 Fig H ...
Страница 102: ...100 ...
Страница 103: ...101 ...