background image

User Manual DEV 5072  

22 

 Copyright DEV Systemtechnik GmbH 2016-2017 


5.4


Operation via Web Interface  

The Web Interface is a comfortable user interface for operating the product, i.e. the 
device is controlled via a computer and a web browser as the communication 
application. Several users (assumed the appropriate number of licenses) can access 
the device at a time. Eight licenses are included in the delivery and it is possible to 
purchase additional license keys at any time, please contact DEV Systemtechnik. 

Note: 


Most of the screenshots shown in this section were made from the Web Inter-
face of a DEV 5072 equipped with two 48 V power supply modules. Other 
configurations deviate from the layout but not from the basic functionality.  


For power systems in combination with the DEV 5101, the Web Interface of the 
DEV 5072 provides additional functionality, which is indicated in the following 
description.  


The screenshots shown here vary with respect to date and time; they were 
updated for relevant changes only, otherwise they are the same as the 
screenshots of the latest versions of this document.  

5.4.1


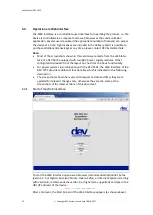
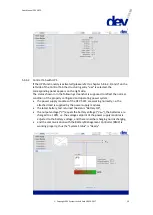
Start of the Web Interface  


To start the Web Interface open a web browser (recommended is Mozilla Firefox 
(version 3.5 or higher) but also Chrome, Opera, Safari, or Internet Explorer (starting 
with version 8, recommended is version 9 or higher) are supported) and type in the 
URL (IP address) of the device:  

http://<IP-of-the-device>/


After a moment, the Start Screen of the Web Interface appears (as shown above). 

Содержание 5072

Страница 1: ... Managed Power Supply Chassis DEV Systemtechnik GmbH Grüner Weg 4A 61169 Friedberg GERMANY Tel 49 6031 6975 100 Fax 49 6031 6975 114 support dev systemtechnik com www dev systemtechnik com Revision 2016 11 28 DEV 91 0123 E ...

Страница 2: ...Power Supply Modules 13 4 2 4 Reset of the Device and the Restore of Factory Defaults 14 4 3 Device Factory Settings 15 4 3 1 Factory Settings for the DEV 5072 Chassis 15 4 3 2 Factory Network Settings 16 4 3 3 Factory SNMP Settings 16 4 4 Communication Interface Configuration 17 4 4 1 Serial Interface 17 4 4 2 Ethernet Interface 17 4 4 2 1 Ethernet Connection 17 4 4 2 2 Network Setup via the Seri...

Страница 3: ...umber Device Index Number 48 5 5 3 The dev 5071 MIB Tree 49 5 5 4 MIB Objects 49 5 5 4 1 devPowerTraps 50 5 5 4 1 1 devPowerTraps trapAlarmText 50 5 5 4 1 2 devPowerTraps trapAlarm 50 5 5 4 1 3 devPowerTraps trapModeChange 50 5 5 4 2 instrument 51 5 5 4 2 1 instrument controllerMac 51 5 5 4 2 2 instrument firmwareRevision 51 5 5 4 2 3 instrument instrumentType 51 5 5 4 2 4 instrument mibRevision 5...

Страница 4: ...rveillance 58 5 5 4 4 1 surveillance trapEnableMask 59 5 5 4 4 2 surveillance errorEnableMask 59 5 5 4 4 3 surveillance numberOfErrors 60 5 5 4 4 4 surveillance errorTable 60 5 5 4 4 4 1 surveillance errorTable errorEntry errorIndex 60 5 5 4 4 4 2 surveillance errorTable errorEntry errorNr 60 5 5 4 4 4 3 surveillance errorTable errorEntry errorCount 60 5 5 4 4 4 4 surveillance errorTable errorEntr...

Страница 5: ...turally redundancy is provided only if the DEV 5072 is equipped with more than one power supply module DEV Systemtechnik GmbH declares that this equipment meets all relevant standards and rules The unit carries a CE mark Please read all instructions before installation or usage of the product 2 1 Warranty The product has a warranty against defects in material and workmanship for a period of two ye...

Страница 6: ...ined service staff only Environmental Conditions The equipment is designed for indoor use and for an ambient temperature range of 10 50 C 14 122 F at 100 load The maximum operational altitude is 3000 m 3280 yds above sea level Mechanical Integration It is not permitted to fix the chassis on the rack mount flanges only Balanced weight distribution of the chassis has to be ensured by placing it on a...

Страница 7: ...for service staff that is not trained by DEV Systemtechnik To avoid injuries trained service staff has always to disconnect all power connections to discharge circuits and to remove external voltage sources before touching or replacing components Energy Hazard The output terminals of the DEV 5072 chassis and the connector at the rear side of power supply modules are capable of providing hazardous ...

Страница 8: ...inally the device provides an FTP FTPS server for downloading log files and for uploading firmware updates chapter 5 6 3 1 2 Power Supply Modules As stated above the DEV 5072 chassis can be equipped with up to four power supply modules to deliver the required power It is recommended to install an additional power supply module for the pursued power in order to provide redundancy if one of the powe...

Страница 9: ...ion of the DEV 5072 chassis remains unchanged AC plugs at the rear side of the chassis are not to be connected if the corresponding power supply module slot is not populated If one of the power supply modules is deactivated via Web Interface chapter 5 4 4 1 or via SNMP chapter 5 5 4 3 5 2 the DC LED of this power supply module is red indicating that it is not delivering output voltage If all power...

Страница 10: ...2500 48 S DC AC HFE2500 48 S PS2 PS1 PS3 PS4 PS1 Slot for power supply module 1 equipped with a 48 V power supply module PS2 Slot for power supply module 2 equipped with a 48 V power supply module PS3 Slot for power supply module 3 equipped with a 48 V power supply module PS4 Slot for power supply module 4 covered with a blind plate Rear View Reset Status AC3 AC2 AC1 AC4 G ND A A Com Eth B B Statu...

Страница 11: ... for power supply module slot 3 AC2 AC plug for power supply module slot 2 GND Grounding bolt AC1 AC plug for power supply module slot 1 A Primary DC output terminal for negative polarity A Primary DC output terminal for positive polarity For the warnings for the DEV 5072 with respect to Grounding AC Connection Cables please refer to chapter 2 3 First the DEV 5072 chassis needs to be connected to ...

Страница 12: ...ied and on the length of the cables Make sure that an appropriate configuration with respect to number and to diameter of the cables is installed For the cable cross section per polarity and per set of output terminals with an assumed total maximum output current of 200 A a minimum of 35 mm cable cross section is according to regulations The next table informs regarding the total maximum output cu...

Страница 13: ...ange of Power Supply Modules The DEV 5072 is delivered with the number of ordered power supply modules that are already installed Therefore you may proceed in reading the next chapter In case that a power supply module has to be exchanged or that a DEV 5072 is to be upgraded with an additional power supply module the following instructions are to be noticed Please consider the related warnings sta...

Страница 14: ... can be performed in three different ways 1 Reset via the Reset push button located at the rear side of the chassis please refer to the drawing in chapter 4 2 2 Press and hold e g by using a ballpoint pen the Reset button for approximately 3 seconds 2 Reset via the serial interface when terminating the configuration program chapter 4 4 2 2 1 3 Reset via Web Interface chapter 5 4 6 4 2 Note During ...

Страница 15: ... considered depend on the AC input voltage As shown in in chapter 3 1 2 a power supply module delivers up to 1500 W power if supplied with 100 170 V AC and is capable to deliver more power if the AC input voltage is larger than 170 V AC but smaller than 265 V AC Note if not in combination with the DEV 5101 that it is possible to alter the relation of the output voltage setpoint and of the current ...

Страница 16: ... Output Current 170 265 V AC 2496 W 19 2 V 104 0 A 197 6 A 296 4 A 395 2 A 170 265 V AC 2496 W 24 0 V 104 0 A 197 6 A 296 4 A 395 2 A 170 265 V AC 2496 W 29 0 V 86 1 A 172 1 A 258 2 A 344 3 A 100 170 V AC 1500 W 19 2 V 78 1 A 156 3 A 234 4 A 312 5 A 100 170 V AC 1500 W 24 0 V 62 5 A 118 8 A 178 1 A 237 5 A 100 170 V AC 1500 W 29 0 V 51 7 A 103 4 A 155 2 A 206 9 A 48 V Power Supplies Maximum Possib...

Страница 17: ...ace The Sub D 9 pos female connector for the standard serial RS 232 interface is located in the middle at the rear side of the DEV 5072 chassis chapter 7 describes the pin assignment The serial interface configuration for DEV 5072 standalone applications is described by the following parameters Transmission rate 38400 Data bits 8 Parity check none Start Stop bit 1 Handshake none In combination wit...

Страница 18: ...serial interface for a standalone DEV 5072 establish a hardware connection between a RS 232 port of a PC e g COM1 and the DEV 5072 serial interface using a straight cable please refer to chapter 7 for the pin assignment of the serial connector Next start a terminal application e g MS Windows HyperTerminal on your PC Note The interface settings of the terminal application have to match the serial i...

Страница 19: ...68 0 99 q quit without saving x save configuration and exit your choice Choices can be executed by typing the character in the first column of each line followed by a CR The second column of each line provides a short description of the choice and the third column displays in parentheses the current setting of the corresponding choice In the example above the IP address and the netmask are differe...

Страница 20: ...the device your choice 2 CR Current netmask is 255 255 0 0 Enter netmask NONE to clear To change the current netmask type in a different valid entry to clear it type in NONE CR and just entering CR maintains the current setting 4 4 2 2 4 3 set gateway This choice is used to change the gateway address of the device your choice 3 CR Current gateway is 192 168 0 99 Enter gateway NONE to clear To chan...

Страница 21: ... 5 2 Initialization of the Device The device performs a health check and a configuration check during power up and after a device reset This takes about 60 seconds there is no manual configuration necessary all settings including the operation mode after power up or after a reset remain unchanged Note During a reset the device still delivers output voltage i e the power supply module outputs are n...

Страница 22: ...les Other configurations deviate from the layout but not from the basic functionality For power systems in combination with the DEV 5101 the Web Interface of the DEV 5072 provides additional functionality which is indicated in the following description The screenshots shown here vary with respect to date and time they were updated for relevant changes only otherwise they are the same as the screen...

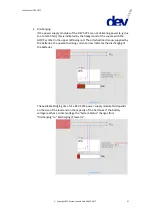
Страница 23: ...vice is in the same subnet of the common network chapter 4 4 2 1 If the network connection to the device gets lost during a session an appropri ate notification will pop up After confirmation the web browser is redirected to the Start Screen If the device is accessible again a new authentication is required During power up or a device reset the device displays a different screen If the device is o...

Страница 24: ...responding tab instead In the middle on the top of the window two buttons are located indicating that the device is either in Remote Mode as shown in the screenshot above or in Local Mode as shown in the screenshot of chapter 5 4 3 Changing the operation mode of the device via Web Interface is performed by clicking on the desired button e g clicking in the situation above on the button highlights ...

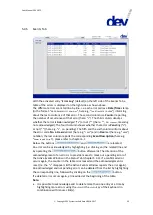
Страница 25: ...pen unless the button is operated or if the web browser in other words the connection to the device is closed It is possible to start a Web Interface session on another computer using the same user account this automatically terminates the session on the preceding computer 5 4 3 Status Tab The upper part of the Status Tab shows the front side of the DEV 5072 in a simpli fied representation Thus a ...

Страница 26: ...module appears in gray is additionally labeled with No Surveillance and the related error messages are no longer displayed in the Active Events Window 5 4 3 1 Status Tab with UPS If the UPS functionality is activated please refer to chapter 5 4 6 3 1 the Status Tab of the DEV 5072 Web Interface provides an additional box below the symbolic representation of the fourth power supply module In combin...

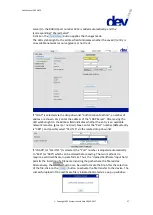
Страница 27: ...ating the average of the output voltages of all installed power supply modules The second information is the Total Current which is the sum current obtained at the output of each installed power supply module The Setup section permits the adjustment of Voltage Setpoint i e the output voltage of the device chapter 3 1 2 provides information on the output voltage ranges for the different power suppl...

Страница 28: ...led Disabled Not present Wrong Voltage or Unsupported module type red green or gray indicators for AC Status DC Status and Fan Status and the display of Output Voltage Output Current and Temperature The Surveillance Enable check box is used e g to enable or to disable the surveillance of a power supply module slot Clicking on the button turns off the output of the selected power supply module e g ...

Страница 29: ... condition of the properly configured and operating power system the power supply modules of the DEV 5072 are working normally i e the attached load is supplied by the power supply modules the latest battery test returned the status Battery OK the output voltage V equals the battery voltage VBat the batteries are charged to a 100 i e the voltage setpoint of the power supply modules is adjusted to ...

Страница 30: ...attery test is executed the System Status is indicated here as Selftest active alternatively the System Status can be obtained via the Setup Tab chapter 5 4 3 1 or via SNMP chapter 5 5 4 3 9 After completion of the battery test the result is shown in the line labeled Latest Selftest Result Normally Battery OK is displayed as in the initial screenshot In certain situations e g during discharge the ...

Страница 31: ...th the AC DC symbol in the upper left being red The attached load is now supplied by the batteries the upward pointing current arrow indicates the discharging of the batteries The available bridging time for a DEV 5072 power supply module fail depends on the size of the load and on the capacity of the batteries If the battery voltage reaches a critical voltage the System Status changes from Discha...

Страница 32: ...th the communication to the BMC no sensible information is displayed in the panel In these cases System Status and Latest Selftest Result usually indicate Unknown numbers are repre sented either as or as zero values and instead of the battery capacity indication with the percentage value a white bar labeled Battery capacity unknown is shown Furthermore the white bar labeled Battery capacity unknow...

Страница 33: ...l here e g 4866 notation the last column reports the corresponding Event Description here e g Power Supply 2 Error please refer to chapter 6 1 Below the buttons and are located An error can be acknowledged by highlighting i e clicking on the related line and by operating the button afterwards The intention of the acknowledgement of an error is to provide means to mask out a pending error of the Ac...

Страница 34: ...Y hh mm ss here e g Tue 07 Jun 2016 10 33 54 The second column shows the User here ADMIN The Log column reports the activity here e g Logged in from 192 168 0 148 The User Log panel comprises the button and the button With the button the table is cleared without confirmation and after operating the button a browser specific window pops up and suggests the storage of the table as userlog csv The fi...

Страница 35: ...up Tab On the left side the Setup Tab contains the menu items structuring the different entries described in the following Initially the single entries are not displayed To demonstrate the available setup entries all menu items above were folded out in the following screenshot ...

Страница 36: ...fining the user community that can access the device Local This is the standard authorization method The user community is defined and managed via the User Management entry please refer to chapter 5 4 6 1 3 RADIUS The user community is defined and managed by one or two RADIUS servers The permission category can be altered individually via the User Management entry chapter 5 4 6 1 3 LDAP The user c...

Страница 37: ... indicates whether the entry is an available network resource green or not red Next enter the Port number default entry is 389 and possibly select SSL TLS via the related drop down list If LDAPS or StartTLS is selected the Port number is adjusted automatically to 636 or 389 which can be altered before saving The two methods do require a valid certificate in pem format Thus the Upload Certificate i...

Страница 38: ...ethod is RADIUS or LDAP all approved users of the RADIUS or of the LDAP server may access the device using their RADIUS or their LDAP authentication Passwords except the password of the ADMIN user cannot be changed locally if the active authorization method is RADIUS or LDAP The first login of a RADIUS or LDAP user generates a local account providing read permission A user with admin permission ma...

Страница 39: ...w pops up for confirmation Note Passwords except the password of the ADMIN user cannot be changed if the authorization method is RADIUS or LDAP chapter 5 4 6 1 1 English and German are the languages supported by the current firmware version 5 4 6 1 3 User Management The currently logged in user has to have admin permission to access the User Management entry where users can be added or deleted and...

Страница 40: ...ick on the trash bin icon right to the user entry a window pops up for confirmation Note As already mentioned user names and passwords are case sensitive Passwords except the password of the ADMIN user cannot be changed if the authorization method is RADIUS or LDAP chapter 5 4 6 1 1 Do not forget to click on the button to store the settings made before selecting or adding another user After adding...

Страница 41: ...Setup The menu item System Setup on the left side of the Setup Tab provides access to the Network entry to the SNMP entry and to the HTTPS FTPS entry for users with admin permission 5 4 6 2 1 Network For the network setup of the device at least the fields IP Address and Netmask have to contain valid entries Gateway Nameserver 1 and Nameserver 2 are to be specified by their IP addresses the Nameser...

Страница 42: ...ck box below these entries is used to enable the switching between Local Mode and Remote Mode via SNMP please refer to chapter 5 5 4 3 1 Additionally up to four Trap Destination IP Addresses can be defined via the IP ad dress and the port in the format ip address port e g 192 168 0 148 121 If port is not specified the standard SNMP trap port 162 is assigned The LED symbols right to the IP addresse...

Страница 43: ...vides means to enable the HTTPS FTPS functionality and possibly to deactivate the HTTP FTP functionality As stated in the lower part of the entry the HTTPS FTPS functionality can be acti vated with a valid certificate in pem format only Thus it is recommended to upload a certificate file in the first step The Upload Certificate input field permits the insertion of a filename including the path whe...

Страница 44: ...TP FTPS server is subject of chapter 5 6 The content of the test pem certificate in the screenshot above was anonymized A click on the button causes a pop up window to appear explaining the consequences 5 4 6 3 Feature Setup The menu item Feature Setup on the left side of the Setup Tab provides access for users with admin permission to the device specific setup entries i e here to the Power Supply...

Страница 45: ... entry but all connections between the DEV 5072 and the BMC are to be uninstalled please refer to the DEV 5101 user manual 5 4 6 4 Software Service The Software Service menu item on the left side of the Setup Tab provides access for users with admin permission to the Restore Factory Defaults entry and to the Firmware Update entry 5 4 6 4 1 Restore Factory Defaults With a click on the button the se...

Страница 46: ...rtion of a filename including the path where the file resides Alternatively the button can be used to locate the file After the selection of the file click on the button to activate the file transfer to the device As soon as the upload is finished the installation is started please observe the text output which appears in the Update Status text window If for any reason a device reset is required t...

Страница 47: ... the device is configured for 48 V MAC Address here 00 D0 93 3C 73 9E In the right column on the top the Software Configuration is described Device Firmware version here 32 0073 B 07 Linux Kernel version here 3 14 73 Q SNMP Software version here 3 1 13 the current IP Address of the device here 192 168 0 11 Web Interface Licenses usually 8 here 1 SNMP Licenses here 1 The download icon located on th...

Страница 48: ... an own individual management Object ID OID In the system the objects are the variables which can be simple values or tables The object information is stored in the Management Information Base MIB Note The iReasoning MIB Browser Personal Edition including Trap Receiver by iReasoning Inc is recommended to test the communication via SNMP 5 5 2 Private Enterprise Number Device Index Number The Privat...

Страница 49: ...ation of the MIB string please refer to chapter 5 5 2 iso org dod internet private enterprises dev systemtechnik dev 5071 and of the corresponding object E g the complete textual OID of the object instrument controllerMac is and are symbolizing that the two consecutive lines are actually one line iso org dod internet private enterprise dev systemtechnik dev 5071 instrument controllerMac Note Some ...

Страница 50: ... message please refer to chapter 6 1 obtained via errorDescription chapter 5 5 4 4 5 To enable the trap bit 6 enum errortext in the trapEnableMask is to be set 5 5 4 1 2 devPowerTraps trapAlarm This trap number 4 OID 1 3 6 1 4 1 21035 34 0 4 is triggered if the device either detects a new error or if a pending error disappears The trap delivers errorNr please refer to chapter 5 5 4 4 4 2 and error...

Страница 51: ...TET STRING SIZE 32 Access read only Description The device firmware revision Example B 07 5 5 4 2 3 instrument instrumentType OID 1 3 6 1 4 1 21035 34 1 3 0 Syntax OCTET STRING SIZE 64 Access read only Description The device type Example DEV5072 48V i e the output voltage configuration of the DEV 5072 chassis is 48 V please refer to the note of chapter 3 1 2 5 5 4 2 4 instrument mibRevision OID 1 ...

Страница 52: ...User Manual DEV 5072 52 Copyright DEV Systemtechnik GmbH 2016 2017 5 5 4 3 application ...

Страница 53: ...sured voltages from all installed power modules in mV Example 47680 i e 47 680 V 5 5 4 3 3 application outputCurrent OID 1 3 6 1 4 1 21035 34 2 3 0 Syntax INTEGER32 Access read only Description The calculated cumulative output current in mA Example 108233 i e 108 233 A 5 5 4 3 4 application numberOfChannels OID 1 3 6 1 4 1 21035 34 2 4 0 Syntax INTEGER32 Access read only Description The number of ...

Страница 54: ...mance 3 error the AC input voltage exceeds the specifications 4 not applicable the power supply module is not present thus the AC input status cannot be obtained 5 5 4 3 5 4 application channelTable channelEntry channelTempWarning OID 1 3 6 1 4 1 21035 34 2 5 1 4 x Syntax INTEGER ok 1 warning 2 error 3 notApplicable 4 Access read only Description The temperature status of the power supply module p...

Страница 55: ... mV 9999 is returned if the power supply module slot is empty 5 5 4 3 5 8 application channelTable channelEntry channelOutCurrentSet OID 1 3 6 1 4 1 21035 34 2 5 1 8 x Syntax INTEGER32 Access read write Description The current alarm level of the power supply module in mA Note channelOutCurrentSet is defined as read write due to downward compatibility reasons with the DEV 5071 but for the DEV 5072 ...

Страница 56: ... channelTable channelEntry channelEnable OID 1 3 6 1 4 1 21035 34 2 5 1 11 x Syntax INTEGER disabled 1 enabled 2 Access read write Description The surveillance of the power supply module slot is can be enabled or disabled Note The factory setting is 2 enabled for all power supply module slots 5 5 4 3 6 application outputVoltageSet OID 1 3 6 1 4 1 21035 34 2 6 0 Syntax INTEGER32 Access read write D...

Страница 57: ...the relay is open i e the battery is disconnected 6 test active a battery test is active please refer to chapter 5 4 4 2 7 unknown the UPS status is unknown this value is returned for devices without applied UPS functionality as well 5 5 4 3 10 application upsLoadVoltage OID 1 3 6 1 4 1 21035 34 2 9 0 Syntax INTEGER32 Access read only Description The UPS output load voltage in mV 9999 means not av...

Страница 58: ...cation upsBatteryTest OID 1 3 6 1 4 1 21035 34 2 13 0 Syntax INTEGER inactive 1 active 2 notApplicable 3 Access read write Description The UPS battery test please refer to chapter 5 4 4 2 status can be read or set possible values 1 inactive the battery test is inactive 2 active the battery test is active read or is to be started write 3 not applicable An UPS battery test is not available i e this ...

Страница 59: ...f all bits are 1 then all errors are enabled the errors are grouped into classes each error class can be masked out with its corresponding bit set to 0 Note The errorEnableMask is defined as follows Hex 8000 4000 2000 1000 0800 0400 0200 0100 0080 0040 0020 0010 0008 0004 0002 0001 Bit 15 14 13 12 11 10 9 8 7 6 5 4 3 2 1 0 Class ANT COM LNB OPT AMP MAT OUT INP SWI FAN POW INT Bit Class Number Clas...

Страница 60: ...l pending and whether the error was acknowledged or not If numberOfErrors please refer to chapter 5 5 4 4 3 is 0 the errorTable is not available 5 5 4 4 4 1 surveillance errorTable errorEntry errorIndex OID 1 3 6 1 4 1 21035 34 3 4 1 1 x Syntax INTEGER32 1 256 Access not accessible Description A unique value for each table entry ranging between 1 and the number of entries defined by numberOfErrors...

Страница 61: ...le for this type of device thus 0 is returned 5 5 4 4 5 surveillance errorDescription OID 1 3 6 1 4 1 21035 34 3 5 0 Syntax OCTET STRING SIZE 64 Access accessible for notify Access accessible for notify Description errorDescription contains the latest error description string which is used for trapAlarmText please refer to chapter 5 5 4 1 1 5 6 FTP FTPS Server The device provides an integrated FTP...

Страница 62: ...The FTP FTPS server listens on Port 21 unencrypted and via explicit TLS and on Port 990 implicit TLS with PROT C and PROT P supported Enable HTTPS FTPS is checked and Disable HTTP FTP is checked The FTPS server listens on Port 990 implicit TLS only Additionally the data channel Port 989 has to be encrypted PROT C is not accepted i e the FTPS client has to send a PROT P to the FTPS server The follo...

Страница 63: ...supply module is enabled chapter 5 4 4 1 AC Line i Low Error if the input voltage of the module is not within specifications Power Module i Error if there are e g communication problems with the module Power Supply Temperature i Error if the power supply module was turned off due to the temperature of the power supply module being too high Output i Voltage Error if the output voltage of the power ...

Страница 64: ...ructure Problem if there was detected a communication problem with the BMC Error Code Description Decimal Hexadecimal 7680 0x1E00 Prewarn Battery Deep Discharge 7696 0x1E10 Battery Relay Open V Low 7712 0x1E20 Battery Relay Open V High 7728 0x1E30 Prewarn Battery Temperature High 7744 0x1E40 Error Battery Over Temperature 7760 0x1E50 Error Battery Temperature Sensor 7776 0x1E60 Error Battery Over ...

Страница 65: ...open Serial Connector Connector Sub D 9 female Connector screws UNC 4 40 Serial Connector RS 232 Pin Functionality Pin 1 do not use Pin 2 Tx Pin 3 Rx Pin 4 do not use Pin 5 GND Pins 6 9 do not use do not use means that normally the pin should be left open It is usually not a problem to use a fully populated 1 1 Sub D 9 m f cable to establish a RS 232 connection between the device and a PC 8 Techni...

Страница 66: ...lectromagnetic compatibility EMC Part 3 2 Limits Limits for harmonic current emissions equipment input current 16 A per phase IEC 61000 3 2 2014 German version EN 61000 3 2 2014 DIN EN 61000 3 3 2014 03 Electromagnetic compatibility EMC Part 3 3 Limits Limitation of voltage changes voltage fluctuations and flicker in public low voltage supply systems for equipment with rated current 16 A per phase...

Страница 67: ...lektromagnetische Verträglichkeit EMV Teil 3 2 Grenzwerte Grenzwerte für Oberschwingungsströme Geräte Eingangsstrom 16 A je Leiter IEC 61000 3 2 2014 Deutsche Fassung EN 61000 3 2 2014 DIN EN 61000 3 3 2014 03 Elektromagnetische Verträglichkeit EMV Teil 3 3 Grenzwerte Begrenzung von Spannungsänderungen Spannungsschwankungen und Flicker in öffentlichen Niederspannungs Versorgungsnetzen für Geräte m...

Страница 68: ...User Manual DEV 5072 68 Copyright DEV Systemtechnik GmbH 2016 2017 This Page Intentionally Left Blank ...

Страница 69: ...assis Options general options 79 and future options Modules DEV 79 0241 DEV 79 0242 DEV 79 0243 and future modules to which this declaration refers to is in conformity with Directive 2011 65 EU of the European Parliament and of the Council of 8 Jun 2011 on the restriction of the use of certain hazardous substances in electrical and electronic equipment RoHS Signed for and on behalf of DEV Systemte...

Страница 70: ...rectory information services RADIUS LED Light Emitting Diode M C System Management and Control System MAC Media Access Control address is the hardware address for the unique identification of a device within a network MIB Management Information Base NE Network Element NMS Network Management System OID Object IDentifier PC Personal Computer PE Protective Earth PEM Privacy enhanced Electronic Mail p...

Страница 71: ...User Manual DEV 5072 Copyright DEV Systemtechnik GmbH 2016 2017 71 12 Notes ...

Отзывы: