EN
1
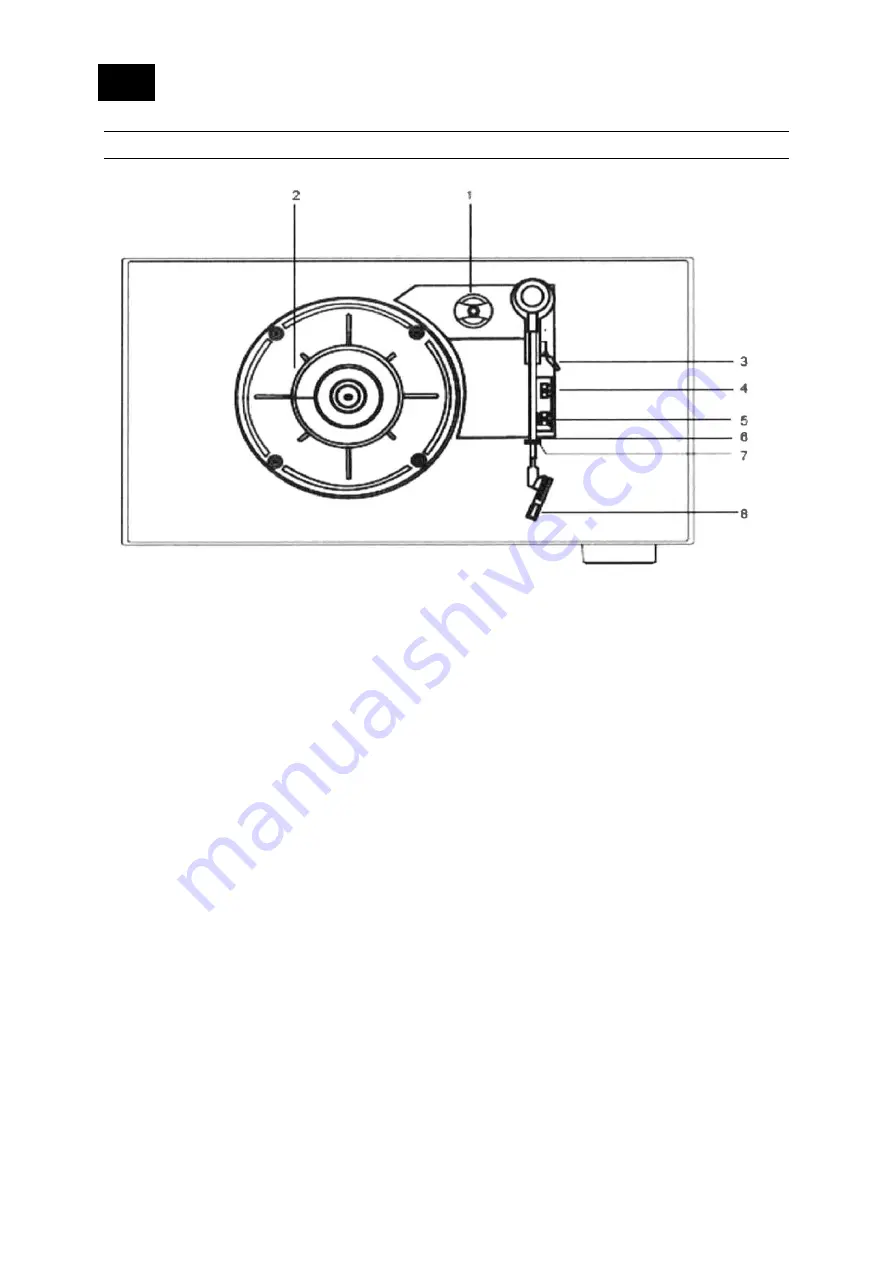
DEVICE DESCRIPTION AND FUNCTION KEYS
1 Spindle adapter.
2 Turntable platter
3 Tone arm lever
4 33/45/78 RPM turntable speed
selection
5 Turntable auto stop on/off
6 Tone arm
7 Tone arm clip
8 Stylus and stylus cover
Страница 1: ...E DESCRIPTION AND FUNCTION KEYS 1 Spindle adapter 2 Turntable platter 3 Tone arm lever 4 33 45 78 RPM turntable speed selection 5 Turntable auto stop on off 6 Tone arm 7 Tone arm clip 8 Stylus and sty...
Страница 2: ...open close 14 Play Pause and Disconnect BT mode 15 Stop CD mode 16 Tune Skip buttons 17 Radio presets CD repeat 18 Source Phono CD DAB FM radio BT Aux in 19 Headphone socket 20 Rotary volume control...
Страница 3: ...1 Standby ON OFF 2 0 9 Keyboard 3 Scan 4 Select 5 Vol 6 EQ 7 Tune Skip Forward 8 Mode Phono DAB FM CD BT Aux 9 Play Pause 10 Tune Skip Backward 11 Stop 12 Mute 13 Infor Menu 14 CURSOR 15 Preset Progr...
Страница 4: ...It is within 1 4 meters of a power socket Please ensure that the mains power lead and speaker wires are not a trip hazard It is where it will be in range of the connected or paired bluetooth devices...
Страница 5: ...ower on Short press the Power button Your Retro Turntable will turn on DAB will be displayed and your product will be in Phono Turntable modes Standby mode This product is designed to go to Standby mo...
Страница 6: ...PH Turntable mode and to continue turning even when the record you are playing comes to an end you change to another mode or switch the Retro Turntable product to Standby mode then set this switch to...
Страница 7: ...end playing your record 1 Use the tone arm lever to lift the tone arm and stylus from the record 2 To resume play use the tone arm lever to gently lower the stylus onto your record again CD PLAYER Che...
Страница 8: ...ton Stop Short press the button Repeat and Random modes Short press the Preset Repeat button on remote control A icon is displayed Continuously short press the Repeat button to cycle through the avail...
Страница 9: ...and Open will be displayed Remove the CD from the compartment Short press the button to close the CD drawer followed by NO Disc will be displayed Note It you stop or pause playing a CD for approximat...
Страница 10: ...the frequency band Short press the Tune Skip or button to adjust the frequency band in 0 05MHz steps Note If reception is poor check whether the wire aerial is fully extended or try moving the product...
Страница 11: ...be selected when you switch the radio back on Wire radio aerial Please make sure that the wire aerial on the back of the Retro Turntable is fully extended and adjusted before you attempt to tune to a...
Страница 12: ...ore up to 20 DAB radio stations in its preset memories for instant access to your favorite stations 1 Tune the Retro Turntable to the DAB radio station that you wish to preset 2 Long press the Preset...
Страница 13: ...e displayed as MRD 52 Select the device name to begin pairing Note If your device requests a password please enter 0000 to complete the device pairing 5 When pairing is complete connected will be show...
Страница 14: ...in Aux in mode If you are not in Aux in mode repeatedly short press the Source button to go to Aux in mode check the display Using a 3 5mm audio input connection cable not included Aux in allows for...
Страница 15: ...EN 15 Technical specification Power Input DC 9 V 2 A Audio output 2 x 5 W RMS Frequency range FM 87 5 108 MHz DAB 174 928 239 2 MHz Bluetooth 2402 2480 MHz Version 5 0 Pairing name MRD 52...
Страница 16: ...uld not be disposed of with other household waste but should be disposed of separately All cities have established collection points where electric and electronic equipment can either be submitted fre...
Страница 17: ...erating Frequency Range FM 87 5 108MHz DAB 174 928 239 2MHz Bluetooth 2402 2480MHz Max Output Power 2 x 5 W DENVER ELECTRONICS A S Omega 5A Soeften DK 8382 Hinnerup Denmark www facebook com denverelec...