

Fusion 9700 Operatory
Light
Operator’s Guide
Adjusting Flex Arm Friction
Tools Required: Standard Hex Key Set, Large Flat-Head (slotted) Screwdriver and Phillips Head Screwdriver.
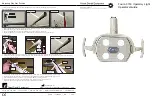
1. Using a phillips head screwdriver, loosen the #6 screw under the cap at the end of the flex arm nearest the rigid arm.
2. Remove the end cap and slide off the flex arm top cover.
3. Insert a large flat-head screwdriver and tighten the slotted nut to adjust spring tension.
4. Replace the flex arm top cover and end cap securing with the phillips head screw previously removed.
End cap
Two small
holes
Flex arm top cover
Housing
screws (4)
Friction block
Flex arm
Slotted nut
Large flat head
screwdriver
Large slot
Phillips screw
End cap
Phillips screw
Pivot Post Light
3. Insert a 9/64” hex key into the two small holes in the side of the flex arm and completely loosen the friction block
4. Insert a large flat-head screwdriver into the large slot and tighten the slotted nut to adjust flex arm spring tension.
5. Adjust the friction block to provide one to two pounds maximum of break-away force.
6. Replace the flex arm cover and secure using the four 5/64” hex key screws previously removed.
7. Replace the end cap and tighten the #6 screw using a phillips head screwdriver.
Ceiling Light
Flex arm top cover
Flex arm top cover
1. Using a phillips head screwdriver, loosen the #6 screw under the cap at the end of the flex arm nearest the light head.
2. Using a 1/16” hex key, remove the four housing screws from the underside of the flex arm (two on each end). Then slide off the flex arm top
cover along with the end cap.
Adjustment nut
Flex arm
6.24.19
0097-044
Rev. -
4 of 4
DTE Oregon, Inc.
Address 6200 ne cherry drive hillsboro oregon 97124
USA
Phone
800 . 423 . 3555
503 . 640 . 3012 |
Fax
503 . 693 . 9715 |
Digital
forestdental.com
Forest Denta
l Equipment