5
7.
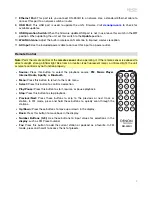
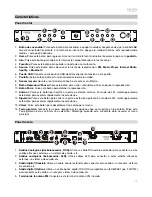
Ethernet Port:
This port lets you connect DN-350UI to a network. Use a standard Ethernet cable to
connect this port to a network switch or router.
8.
USB Port:
This USB port is used to update the unit's firmware. Visit
denonpro.com
to check for
available updates.
9.
USB Operation Switch:
When the firmware update USB port is not in use, leave this switch in the
Off
position. When updating the unit, set this switch to the
Update
position.
10.
WLAN Antenna:
Adjust the built-in wireless LAN antenna to improve wireless reception.
11.
AC Input:
Use the included power cable to connect this input to a power outlet.
Remote Control
Note:
Point the remote control at the
remote sensor
when operating it. If the remote sensor is exposed to
direct sunlight, strong artificial light (like from an inverter-type fluorescent lamp), or infrared light, the unit
or remote control may not function properly.
•
Source:
Press this button to select the playback source:
FM
,
Music Player
,
Internet Radio
,
Spotify
, or
Bluetooth
.
•
Menu:
Press this button to return to the main menu.
•
Select:
Press this button to confirm a selection.
•
Play/Pause:
Press this button to start, resume, or pause playback.
•
Stop:
Press this button to stop playback.
•
Previous/Next:
Press these buttons to skip to the previous or next track or
station. In FM mode, press and hold these buttons to quickly scan through the
stations.
•
Up/Down:
Press these buttons to move up or down in the display.
•
Back:
Press this button to move back in the display.
•
Number Buttons (0–9):
Use these buttons to input values for selections in the
display
, such as FM Preset number.
•
Fav:
Press this button to add the current station or podcast as a favorite. In FM
mode, press and hold it to access the list of presets.
MENU
SELECT
SOURCE
DN-350UI
1
2
3
4
5
6
7
8
9
FAV
9
0

