background image

Steps

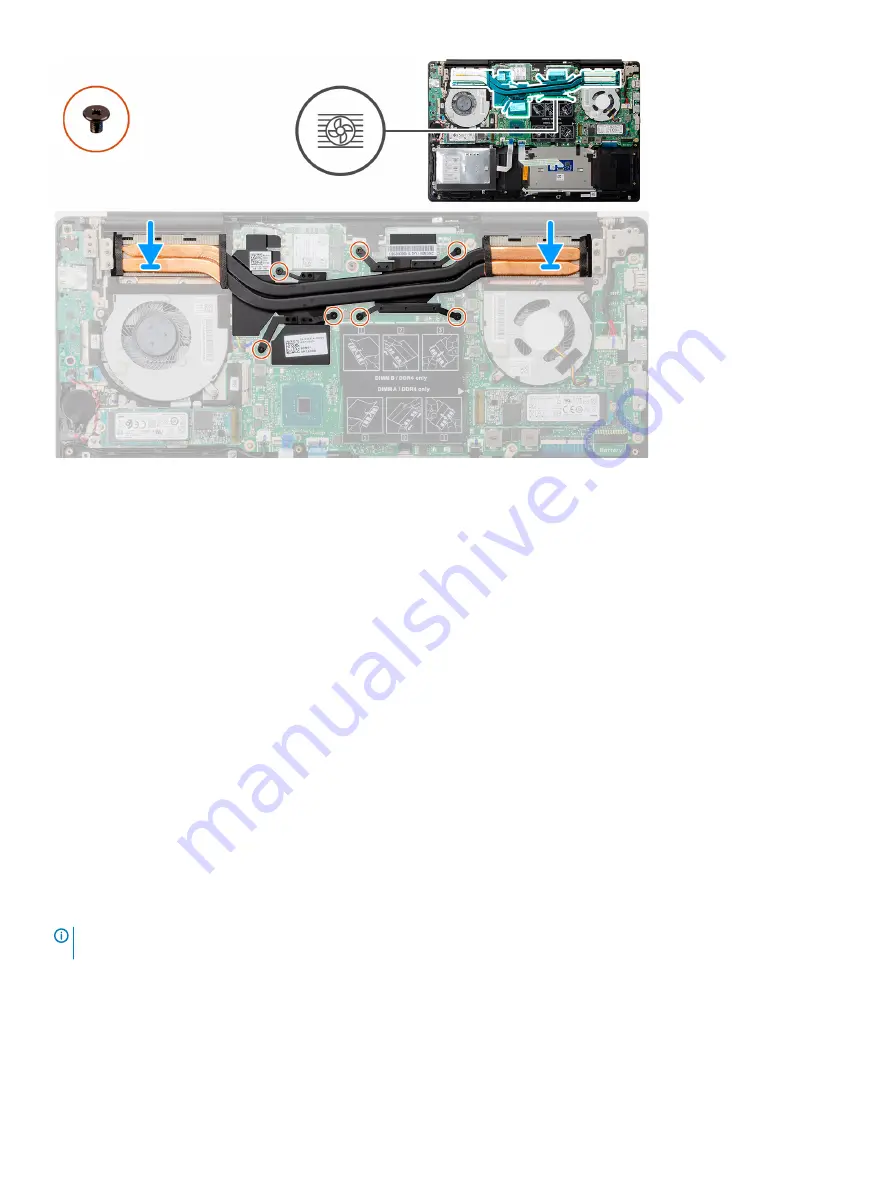
Place the heat sink on the system board and align the screw holes on the heat sink with the screw holes on the system board.

In sequential order (as indicated on the heat sink), tighten the seven captive screws that secure the heat sink to the system board.

Next step

1

Install the 

CPU fan

.

2

Install the 

GPU fan

.

3

Install the 

battery

.

4

Install the 

base cover

.

5

Follow the procedure in 

After working inside your computer

.

Coin-cell battery

Removing the coin-cell battery

Prerequisites

1

Follow the procedure in 

Before working inside your computer

.

2

Remove the 

base cover

.

3

Remove the 

battery

.

NOTE: 

Removing the coin-cell battery resets the BIOS setup program's settings to default. It is recommended that you note the 

BIOS setup program's settings before removing the coin-cell battery.

About this task

The figure indicates the location of the coin-cell battery and provides a visual representation of the removal procedure.

Disassembly and reassembly

41

Содержание Vostro 7590

Страница 1: ...Vostro 7590 Service Manual Regulatory Model P83F Regulatory Type P83F001 ...

Страница 2: ...amage to hardware or loss of data and tells you how to avoid the problem WARNING A WARNING indicates a potential for property damage personal injury or death 2019 Dell Inc or its subsidiaries All rights reserved Dell EMC and other trademarks are trademarks of Dell Inc or its subsidiaries Other trademarks may be trademarks of their respective owners 2019 07 Rev A01 ...

Страница 3: ...ell battery 16 Installing the 3 cell battery 17 WLAN card 18 Removing the WLAN card 18 Installing the WLAN card 19 Memory modules 20 Removing the memory modules 20 Installing the memory modules 21 Solid state drive 22 Removing the M 2 2280 solid state drive 22 Installing the M 2 2280 solid state drive 23 Removing the M 2 2230 solid state drive 25 Installing the M 2 2230 solid state drive 25 Removi...

Страница 4: ...ader 46 Power adapter port 47 Removing the power adapter port 47 Installing the power adapter port 48 Touchpad 50 Removing the touchpad 50 Installing the touchpad 51 Display assembly 52 Removing the display assembly 52 Installing the display assembly 55 Display bezel 58 Removing the display bezel 58 Installing the display bezel 59 System board 60 Removing the system board 60 Installing the system ...

Страница 5: ...ing your system BIOS using a USB flash drive 82 Updating the Dell BIOS in Linux and Ubuntu environments 83 Flashing the BIOS from the F12 One Time boot menu 83 System and setup password 86 Assigning a system setup password 86 Deleting or changing an existing system setup password 87 5 Troubleshooting 88 Enhanced Pre Boot System Assessment ePSA diagnostics 88 Running the ePSA diagnostics 88 System ...

Страница 6: ...ouching an unpainted metal surface at the same time as touching a connector on the back of the computer CAUTION Handle components and cards with care Do not touch the components or contacts on a card Hold a card by its edges or by its metal mounting bracket Hold a component such as a processor by its edges not by its pins CAUTION When you disconnect a cable pull on its connector or on its pull tab...

Страница 7: ... in full contact with your skin and ensure that you remove all jewelry such as watches bracelets or rings prior to bonding yourself and the equipment Electrostatic discharge ESD protection ESD is a major concern when you handle electronic components especially sensitive components such as expansion cards processors memory DIMMs and system boards Very slight charges can damage circuits in ways that...

Страница 8: ...est once per week A wrist strap tester is the best method for doing this test If you do not have your own wrist strap tester check with your regional office to find out if they have one To perform the test plug the wrist strap s bonding wire into the tester while it is strapped to your wrist and push the button to test A green LED is lit if the test is successful a red LED is lit and an alarm soun...

Страница 9: ...ad close The closer it is to your spine the less force it exerts on your back 5 Keep your back upright whether lifting or setting down the load Do not add the weight of your body to the load Avoid twisting your body and back 6 Follow the same techniques in reverse to set the load down After working inside your computer About this task After you complete any replacement procedure ensure that you co...

Страница 10: ...ced NOTE Some computers have magnetic surfaces Ensure that the screws are not left attached to such surface when replacing a component NOTE Screw color may vary with the configuration ordered Table 1 Screw list Component Secured to Screw type Quantity Screw image Base cover Palm rest and keyboard assembly M2x5 5 Base cover Palm rest and keyboard assembly M2x5 3 6 Cell Battery Palm rest and keyboar...

Страница 11: ...board M2x4 1 M 2 2230 solid state drive Palm rest and keyboard assembly M2x4 1 M 2 2280 solid state drive Palm rest and keyboard assembly M2x4 2 USB Type C bracket System board M2x5 2 Touchpad bracket Palm rest and keyboard assembly M2x3 3 Touchpad Palm rest and keyboard assembly M1 6x2 2 Wireless card bracket System board M2x4 1 System board Palm rest and keyboard assembly M2x4 6 Base cover Remov...

Страница 12: ...the five screws M2x5 that secure the base cover to the palm rest and keyboard assembly 2 Loosen the three captive screws that secure the base cover to the palm rest and keyboard assembly 12 Disassembly and reassembly ...

Страница 13: ...e installation procedure About this task The figure indicates the location of the base cover and provides a visual representation of the installation procedure Steps 1 Place the base cover on the palm rest and keyboard assembly and snap the base cover into place 2 Tighten the three captive screws that secure the base cover to the palm rest and keyboard assembly 3 Replace the five screws M2x5 that ...

Страница 14: ...attery gets stuck in a device as a result of swelling do not try to free it as puncturing bending or crushing a Lithium ion battery can be dangerous In such an instance contact for assistance and further instructions If the battery gets stuck inside your computer as a result of swelling do not try to release it as puncturing bending or crushing a lithium ion battery can be dangerous In such an ins...

Страница 15: ...he battery off the palm rest and keyboard assembly Installing the 6 cell battery Prerequisite If you are replacing a component remove the existing component before performing the installation procedure About this task The figure indicates the location of the battery and provides a visual representation of the installation procedure Disassembly and reassembly 15 ...

Страница 16: ...ery cable to the system board Next steps 1 Install the base cover 2 Follow the procedure in After working inside your computer Removing the 3 cell battery NOTE The battery type in your computer varies depending on the configuration ordered Prerequisite 1 Follow the procedure in Before working inside your computer 2 Remove the base cover About this task The figure indicates the location of the batt...

Страница 17: ...e battery off the palm rest and keyboard assembly Installing the 3 cell battery Prerequisite If you are replacing a component remove the existing component before performing the installation procedure About this task The figure indicates the location of the battery and provides a visual representation of the installation procedure Disassembly and reassembly 17 ...

Страница 18: ...d assembly 3 Connect the battery cable to the system board Next steps 1 Install the base cover 2 Follow the procedure in After working inside your computer WLAN card Removing the WLAN card Prerequisites 1 Follow the procedure in Before working inside your computer 2 Remove the base cover 3 Remove the battery About this task The figure indicates the location of the WLAN card and provides a visual r...

Страница 19: ...LAN card 4 Slide and remove the WLAN card from the WLAN card slot Installing the WLAN card Prerequisite If you are replacing a component remove the existing component before performing the installation procedure About this task The figure indicates the location of the WLAN card and provides a visual representation of the installation procedure Disassembly and reassembly 19 ...

Страница 20: ... card bracket to the WLAN card Next step 1 Install the battery 2 Install the base cover 3 Follow the procedure in After working inside your computer Memory modules Removing the memory modules Prerequisites 1 Follow the procedure in Before working inside your computer 2 Remove the base cover 3 Disconnect the battery cable About this task The figure indicates the location of the memory module and pr...

Страница 21: ...the memory module off the memory module slot on the system board Installing the memory modules Prerequisite If you are replacing a component remove the existing component before performing the installation procedure About this task The figure indicates the location of the memory module and provides a visual representation of the installation procedure Disassembly and reassembly 21 ...

Страница 22: ...e base cover 3 Follow the procedure in After working inside your computer Solid state drive Removing the M 2 2280 solid state drive Prerequisites 1 Follow the procedure in Before working inside your computer 2 Remove the base cover 3 Disconnect the battery cable About this task The figure indicates the location of the solid state drive and provides a visual representation of the removal procedure ...

Страница 23: ... the M 2 2280 solid state drive Prerequisite If you are replacing a component remove the existing component before performing the installation procedure About this task The figure indicates the location of the solid state drive bracket and provides a visual representation of the bracket alignment procedure to accommodate the M 2 2280 solid state drive NOTE The computer is shipped with solid state ...

Страница 24: ...ive 2 Align the notch on the solid state drive module with the tab on the solid state drive slot 3 Slide the solid state drive module firmly into the solid state drive slot at an angle 4 Secure the tab on the solid state drive slot with the slot on the solid state drive bracket 5 Replace the two screws M2x4 that secure the solid state drive module shield to the palm rest and keyboard assembly 24 D...

Страница 25: ... the removal procedure Steps 1 Remove the screw M2x4 that secures the solid state drive to the palm rest and keyboard assembly 2 Slide and remove the solid state drive module from the solid state drive slot on the system board Installing the M 2 2230 solid state drive Prerequisite If you are replacing a component remove the existing component before performing the installation procedure About this...

Страница 26: ... drive bracket to accommodate the M 2 2230 solid state drive 2 Align the notch on the solid state drive module with the tab on the solid state drive slot 3 Slide the solid state drive module firmly into the solid state drive slot at an angle 4 Replace the screw M2x4 that secures the solid state drive module to the palm rest and keyboard assembly 26 Disassembly and reassembly ...

Страница 27: ...rovides a visual representation of the removal procedure Steps 1 Remove the screw M2x4 that secures the solid state drive to the system board 2 Slide and remove the solid state drive module from the solid state drive slot on the system board Installing the M 2 2280 PCIe solid state drive Prerequisite If you are replacing a component remove the existing component before performing the installation ...

Страница 28: ...ttery cable 2 Install the base cover 3 Follow the procedure in After working inside your computer Hard drive Removing the hard drive Prerequisites 1 Follow the procedure in Before working inside your computer 2 Remove the base cover 3 Disconnect the battery cable About this task The figure indicates the location of the hard drive and provides a visual representation of the removal procedure NOTE T...

Страница 29: ... the palm rest and keyboard assembly 3 Lift the hard drive assembly along with its cable off the palm rest and keyboard assembly 4 Disconnect the interposer from the hard drive assembly 5 Remove the four screws M3x3 that secure the hard drive bracket to the hard drive 6 Lift the hard drive off of the hard drive bracket Disassembly and reassembly 29 ...

Страница 30: ...mponent before performing the installation procedure About this task The figure indicates the location of the hard drive and provides a visual representation of the installation procedure NOTE The hard drive is available only in computers shipped with 3 cell battery 30 Disassembly and reassembly ...

Страница 31: ...mbly 5 Replace the three screws M2x4 that secure the hard drive assembly to the palm rest and keyboard assembly 6 Connect the hard drive cable to the system board Next steps 1 Connect the battery cable 2 Install the base cover 3 Follow the procedure in After working inside your computer Speakers Removing the speakers Prerequisites 1 Follow the procedure in Before working inside your computer 2 Rem...

Страница 32: ...r grommets before lifting the speakers 3 Lift the speakers along with the cable off the palm rest and keyboard assembly Installing the speakers Prerequisite If you are replacing a component remove the existing component before performing the installation procedure About this task The figure indicates the location of the speakers and provides a visual representation of the installation procedure 32...

Страница 33: ... guides on the palm rest and keyboard assembly 3 Connect the speaker cable to the system board Next step 1 Install the battery 2 Install the base cover 3 Follow the procedure in After working inside your computer Graphics Processing Unit GPU fan Removing the GPU fan Prerequisites 1 Follow the procedure in Before working inside your computer Disassembly and reassembly 33 ...

Страница 34: ...and keyboard assembly 2 Disconnect the GPU fan cable from the system board 3 Slide and lift the GPU fan off the palm rest and keyboard assembly Installing the GPU fan Prerequisite If you are replacing a component remove the existing component before performing the installation procedure About this task The figure indicates the location of the GPU fan and provides a visual representation of the ins...

Страница 35: ...onnect the GPU fan cable to the system board Next step 1 Install the battery 2 Install the base cover 3 Follow the procedure in After working inside your computer CPU fan Removing the CPU fan Prerequisites 1 Follow the procedure in Before working inside your computer 2 Remove the base cover 3 Remove the battery About this task The figure indicates the location of the CPU fan and provides a visual ...

Страница 36: ... lift the CPU fan off the palm rest and keyboard assembly Installing the CPU fan Prerequisite If you are replacing a component remove the existing component before performing the installation procedure About this task The figure indicates the location of the CPU fan and provides a visual representation of the installation procedure 36 Disassembly and reassembly ...

Страница 37: ...battery 2 Install the base cover 3 Follow the procedure in After working inside your computer Heat sink Removing the heat sink UMA NOTE The heat sink type in your computer varies depending on the configuration ordered Prerequisites 1 Follow the procedure in Before working inside your computer 2 Remove the base cover 3 Remove the battery 4 Remove the GPU fan 5 Remove the CPU fan About this task The...

Страница 38: ...at sink off the palm rest and keyboard assembly Installing the heat sink UMA Prerequisite If you are replacing a component remove the existing component before performing the installation procedure About this task The figure indicates the location of the heat sink and provides a visual representation of the installation procedure 38 Disassembly and reassembly ...

Страница 39: ...attery 4 Install the base cover 5 Follow the procedure in After working inside your computer Removing the heat sink discrete NOTE The heat sink type in your computer varies depending on the configuration ordered Prerequisites 1 Follow the procedure in Before working inside your computer 2 Remove the base cover 3 Remove the battery 4 Remove the GPU fan 5 Remove the CPU fan About this task The figur...

Страница 40: ... the heat sink off the system board Installing the heat sink discrete Prerequisite If you are replacing a component remove the existing component before performing the installation procedure About this task The figure indicates the location of the heat sink and provides a visual representation of the installation procedure 40 Disassembly and reassembly ...

Страница 41: ... procedure in After working inside your computer Coin cell battery Removing the coin cell battery Prerequisites 1 Follow the procedure in Before working inside your computer 2 Remove the base cover 3 Remove the battery NOTE Removing the coin cell battery resets the BIOS setup program s settings to default It is recommended that you note the BIOS setup program s settings before removing the coin ce...

Страница 42: ...embly Installing the coin cell battery Prerequisite If you are replacing a component remove the existing component before performing the installation procedure About this task The figure indicates the location of the coin cell battery and provides a visual representation of the installation procedure 42 Disassembly and reassembly ...

Страница 43: ...ll the base cover 3 Follow the procedure in After working inside your computer I O board Removing the I O board Prerequisites 1 Follow the procedure in Before working inside your computer 2 Remove the base cover 3 Remove the battery 4 Remove the GPU fan About this task The figure indicates the location of the I O board and provides a visual representation of the removal procedure Disassembly and r...

Страница 44: ...s M2x3 that secure the I O board to the palm rest and keyboard assembly 5 Lift the I O board off the palm rest and keyboard assembly Installing the I O board Prerequisite If you are replacing a component remove the existing component before performing the installation procedure About this task The figure indicates the location of the I O board and provides a visual representation of the installati...

Страница 45: ...sembly 4 Connect the coin cell battery cable to the I O board 5 Connect the fingerprint reader cable to the I O board and close the latch to secure the cable 6 Connect the I O board cable to the I O board and close the latch to secure the cable Next step 1 Install the GPU fan 2 Install the battery 3 Install the base cover 4 Follow the procedure in After working inside your computer Power button wi...

Страница 46: ...e two screws M1 2x2 that secure the power button with optional fingerprint reader to the palm rest and keyboard assembly 2 Lift the power button with optional fingerprint reader along with the fingerprint reader cable off the palm rest and keyboard assembly Installing the power button with optional fingerprint reader Prerequisite If you are replacing a component remove the existing component befor...

Страница 47: ... 2 Install the GPU fan 3 Install the WLAN card 4 Install the battery 5 Install the base cover 6 Follow the procedure in After working inside your computer Power adapter port Removing the power adapter port Prerequisites 1 Follow the procedure in Before working inside your computer 2 Remove the base cover 3 Remove the battery About this task The figure indicates the location of the power adapter po...

Страница 48: ...nect the power adapter port cable from the system board 5 Lift the power adapter port along with its cable off the palm rest and keyboard assembly Installing the power adapter port Prerequisite If you are replacing a component remove the existing component before performing the installation procedure About this task The figure indicates the location of the power adapter port and provides a visual ...

Страница 49: ...to the palm rest and keyboard assembly 3 Using the alignment posts close the display hinges 4 Replace the three screws M2 5x5 that secure the left display hinge to the system board Next step 1 Install the battery 2 Install the base cover 3 Follow the procedure in After working inside your computer Disassembly and reassembly 49 ...

Страница 50: ...re in Before working inside your computer 2 Remove the base cover 3 Remove the battery 4 Remove the speakers About this task The figure indicates the location of the touchpad and provides a visual representation of the removal procedure 50 Disassembly and reassembly ...

Страница 51: ... M1 6x2 screws that secure the touchpad to the palm rest and keyboard assembly 5 Lift the touchpad along with the cable off the palm rest and keyboard assembly Installing the touchpad Prerequisite If you are replacing a component remove the existing component before performing the installation procedure About this task The figure indicates the location of the component and provides a visual repres...

Страница 52: ...e the three M2x3 screws that secure the touchpad bracket to the palm rest and keyboard assembly Next step 1 Install the speakers 2 Install the battery 3 Install the base cover 4 Follow the procedure in After working inside your computer Display assembly Removing the display assembly Prerequisites 1 Follow the procedure in Before working inside your computer 2 Remove the base cover 3 Remove the bat...

Страница 53: ...Disassembly and reassembly 53 ...

Страница 54: ...ard 3 Open the latch and disconnect the display cable from the system board 4 Remove the three screws M2 5x5 that secure the left display hinge to the system board 5 Remove the three screws M2 5x5 that secure the right display hinge to the system board 6 Open the display hinges at an angle of 90 degrees 54 Disassembly and reassembly ...

Страница 55: ... assembly Prerequisite If you are replacing a component remove the existing component before performing the installation procedure About this task The figure indicates the location of the component and provides a visual representation of the installation procedure Disassembly and reassembly 55 ...

Страница 56: ...56 Disassembly and reassembly ...

Страница 57: ...x5 that secure the left display hinge to the system board 5 Replace the three screws M2 5x5 that secure the right display hinge to the system board 6 Connect the display cable on to the connector on the system board and adhere the tape to the system board Next step 1 Install the WLAN card 2 Install the battery 3 Install the base cover 4 Follow the procedure in After working inside your computer Di...

Страница 58: ...LAN card 5 Remove the display assembly About this task The figure indicates the location of the display bezel and provides a visual representation of the removal procedure Steps 1 Carefully pry the edges of the display bezel off the display back cover and antenna assembly 2 Remove the display bezel off the display back cover and antenna assembly 58 Disassembly and reassembly ...

Страница 59: ... display bezel and provides a visual representation of the installation procedure Step Align the display bezel with the display back cover and antenna assembly and gently snap the display bezel into place Next step 1 Install the display assembly 2 Install the WLAN card 3 Install the battery 4 Install the base cover 5 Follow the procedure in After working inside your computer Disassembly and reasse...

Страница 60: ...M 2 2280 solid state drive 5 Remove the M 2 2230 solid state drive 6 Remove the WLAN card 7 Remove the GPU fan 8 Remove the CPU fan 9 Remove the heat sink 10 Remove the memory module 11 Remove the display assembly About this task The figure indicates the location of the system board and provides a visual representation of the removal procedure 60 Disassembly and reassembly ...

Страница 61: ...Disassembly and reassembly 61 ...

Страница 62: ...62 Disassembly and reassembly ...

Страница 63: ...tem board 8 Remove the two screws M2x5 that secure the USB Type C port bracket to the system board 9 Remove the six screws M2x4 that secure the system board to the palm rest and keyboard assembly 10 Gently release the ports on the system board from the slots on the palm rest and keyboard assembly and lift the system board off the palm rest and keyboard assembly Installing the system board Prerequi...

Страница 64: ...64 Disassembly and reassembly ...

Страница 65: ...Disassembly and reassembly 65 ...

Страница 66: ...m board 6 Connect the keyboard backlight cable to the system board and close the latch to secure the cable 7 Connect the touchpad cable to the system board and close the latch to secure the cable 8 Connect the speaker cable to the system board 9 Connect the power adapter cable to the system board 10 Connect the I O board cable to the system board and close the latch to secure the cable Next step 1...

Страница 67: ...6 Remove the GPU fan 7 Remove the CPU fan 8 Remove the speakers 9 Remove the display assembly 10 Remove the I O board 11 Remove the power button with fingerprint reader 12 Remove the power adapter port 13 Remove the touchpad 14 Remove the system board NOTE The system board can be removed along with the heat sink About this task The figure indicates the location of the palm rest and keyboard assemb...

Страница 68: ... a visual representation of the installation procedure Step Place the palm rest and keyboard assembly on a flat surface Next step 1 Install the system board 2 Install the touchpad 3 Install the power adapter port 4 Install the power button with fingerprint reader 5 Install the I O board 6 Install the display assembly 7 Install the speakers 8 Install the CPU fan 9 Install the GPU fan 10 Install the...

Страница 69: ...o not have the Service Tag use the auto detect feature or manually browse for your notebook model 4 Click Drivers and Downloads 5 Select the operating system installed on your notebook 6 Scroll down the page and select the driver to install 7 Click Download File to download the driver for your notebook 8 After the download is complete navigate to the folder where you saved the driver file 9 Double...

Страница 70: ...Updating the BIOS in Windows System and setup password Boot menu Press F12 when the Dell logo appears to initiate a one time boot menu with a list of the valid boot devices for the system Diagnostics and BIOS Setup options are also included in this menu The devices listed on the boot menu depend on the bootable devices in the system This menu is useful when you are attempting to boot to a particul...

Страница 71: ...y pressing F12 key The one time boot menu displays the devices that you can boot from including the diagnostic option The boot menu options are Removable Drive if available STXXXX Drive NOTE XXX denotes the SATA drive number Optical Drive if available SATA Hard Drive if available Diagnostics NOTE Choosing Diagnostics will display the ePSA diagnostics screen The boot sequence screen also displays t...

Страница 72: ... change to the system date and time takes effect immediately System configuration Table 3 System Configuration options Option Description SATA Operation Allows you to configure the operating mode of the integrated SATA hard drive controller The options are Disabled AHCI RAID On By default the RAID On option is enabled NOTE SATA is configured to support RAID mode Drives Allows you to enable or disa...

Страница 73: ...SB Only Thunderbolt Auto Switch Allows you to configure the method used by the Thunderbolt controller to perform the PCIe device enumeration By default the Auto switch option is enabled The options are Native Enumeration BIOS Assist Enumeration Audio Allows you to enable or disable the integrated audio controller By default the Enable Audio option is selected The options are Enable Microphone Enab...

Страница 74: ...elete the password System Password Allows you to set change or delete the system password The entries to set password are Enter the old password Enter the new password Confirm new password Click OK once you set the password NOTE By default the Enter the old password field is marked as Not set Hence password has to be set for the first time you login and then you can change or delete the password S...

Страница 75: ...ear PPI Bypass for Enable Commands PPI Bypass for Disbale Commands PPI Bypass for Clear Command Attestation Enable This option is enabled by default Key Storage Enable This option is enabled by default SHA 256 This option is enabled by default Absolute This field lets you Enable Disable or Permanently Disable the BIOS module interface of the optional Absolute Persistence Module service from Absolu...

Страница 76: ...ble Expert Key Management Enable Custom Mode By default this option is disabled The Custom Mode Key Management options are PK By default this option is disabled KEK db dbx Intel Software Guard Extensions options Table 7 Intel Software Guard Extensions Option Description Intel SGX Enable This field specifies you to provide a secured environment for running code storing sensitive information in the ...

Страница 77: ...sor sleep states C states This option is set by default Intel TurboBoost This option enables or disables the Intel TurboBoost mode of the processor Hyper Thread Control Allows you to enable or disable the HyperThreading in the processor Disabled Enabled Default Power management Table 9 Power Management Option Description Lid Switch Allows you to disable the lid switch The options are Enable Lid Sw...

Страница 78: ...rs to improve the battery health By default the Enable Advanced Battery Charge Mode option is disabled Primary Battery Charge Configuration Allows you to select the charging mode for the battery The options are Adaptive enabled by default Standard ExpressCharge Primarily AC use Custom If Custom Charge is selected you can also configure Custom Charge Start and Custom Charge Stop NOTE All charging m...

Страница 79: ...o display full screen logo when your image matches screen resolution By default the Enable Full Screen Logo option is disabled Warnings and Errors Allows you to select different options to either stop prompt and wait for user input continue when warnings are detected but pause on errors or continue when either warnings or errors are detected during the POST process Select one of the following opti...

Страница 80: ...rvice tag of your computer Asset Tag Allows you to create a system asset tag if an asset tag is not already set This option is not set by default BIOS Downgrade Allows you to flash previous revisions of the system firmware Allow BIOS Downgrade This option is set by default Data Wipe Allows you to securely erase data from all internal storage devices Wipe on Next Boot This option is not set by defa...

Страница 81: ...nabled Updating the BIOS in Windows Prerequisite It is recommended to update your BIOS System Setup when you replace the system board or if an update is available For laptops ensure that your computer battery is fully charged and connected to a power outlet About this task NOTE If BitLocker is enabled it must be suspended prior to updating the system BIOS and then re enabled after the BIOS update ...

Страница 82: ...r more information on this subject see Knowledge Article https www dell com support article sln153694 Updating your system BIOS using a USB flash drive About this task If the system cannot load into Windows but there is still a need to update the BIOS download the BIOS file using another system and save it to a bootable USB Flash Drive NOTE You will need to use a bootable USB Flash drive Please re...

Страница 83: ...the BIOS supports this BIOS update option NOTE Only systems with BIOS Flash Update option in the F12 One Time Boot Menu can use this function Updating from the One Time Boot Menu To update your BIOS from the F12 One Time boot menu you will need USB key formatted to the FAT32 file system key does not have to be bootable BIOS executable file that you downloaded from the Dell Support website and copi...

Страница 84: ...3 The Bios flash menu will open then click the Flash from file 4 Select external USB device 84 System setup ...

Страница 85: ...5 Once the file is selected Double click the flash target file then press submit 6 Click the Update BIOS then system will reboot to flash the BIOS System setup 85 ...

Страница 86: ...n your computer CAUTION Anyone can access the data stored on your computer if it is not locked and left unattended NOTE System and setup password feature is disabled Assigning a system setup password Prerequisite You can assign a new System or Admin Password only when the status is in Not Set About this task To enter the system setup press F2 immediately after a power on or re boot Steps 1 In the ...

Страница 87: ...Setup password if the Password Status is Locked About this task To enter the System Setup press F2 immediately after a power on or reboot Steps 1 In the System BIOS or System Setup screen select System Security and press Enter The System Security screen is displayed 2 In the System Security screen verify that Password Status is Unlocked 3 Select System Password alter or delete the existing system ...

Страница 88: ...erminal when the diagnostic tests are performed Running the ePSA diagnostics 1 Turn on your computer 2 As the computer boots press the F12 key as the Dell logo appears 3 On the boot menu screen select the Diagnostics option 4 Click the arrow at the bottom left corner Diagnostics front page is displayed 5 Click the arrow in the lower right corner to go to the page listing The items detected are lis...

Страница 89: ...ery image not found 3 4 Recovery image found but invalid 3 5 Power rail failure 3 6 System BIOS Flash incomplete 3 7 Management Engine ME error Camera status light Indicates whether the camera is in use Solid white Camera is in use Off Camera is not in use Caps Lock status light Indicates whether Caps Lock is enabled or disabled Solid white Caps Lock enabled Off Caps Lock disabled Recovering the o...

Страница 90: ... connectivity issues a WiFi power cycle procedure may be performed The following procedure provides the instructions on how to conduct a WiFi power cycle NOTE Some ISPs Internet Service Providers provide a modem router combo device Steps 1 Turn off your computer 2 Turn off the modem 3 Turn off the wireless router 4 Wait for 30 seconds 5 Turn on the wireless router 6 Turn on the modem 7 Turn on you...

Страница 91: ...ne based support and service options Availability varies by country and product and some services may not be available in your area To contact Dell for sales technical support or customer service issues Steps 1 Go to Dell com support 2 Select your support category 3 Verify your country or region in the Choose a Country Region drop down list at the bottom of the page 4 Select the appropriate servic...

Отзывы: