background image

Dell UltraSharp U2718Q Monitor

User’s Guide

Model: U2718Q

Regulatory model: U2718Qb

Содержание UltraSharp U2718Q

Страница 1: ...Dell UltraSharp U2718Q Monitor User s Guide Model U2718Q Regulatory model U2718Qb ...

Страница 2: ...WARNING indicates a potential for property damage personal injury or death ____________________ Copyright 2017 Dell Inc All rights reserved This product is protected by U S and international copyright and intellectual property laws DellTM and the Dell logo are trademarks of Dell Inc in the United States and or other jurisdictions All other marks and names mentioned herein may be trademarks of thei...

Страница 3: ...pability 21 Universal Serial Bus USB Interface 21 LCD Monitor Quality and Pixel Policy 22 Maintenance Guidelines 23 Setting Up the Monitor 24 Attaching the Stand 24 Connecting Your Monitor 27 Organizing Your Cables 29 Removing the Monitor Stand 30 Wall Mounting Optional 30 Operating the Monitor 32 Power On the Monitor 32 Using the Front Panel Controls 32 ...

Страница 4: ...ng the Monitor 48 Adjusting the Rotation Display Settings of Your System 49 Troubleshooting 50 Self Test 50 Built in Diagnostics 51 Common Problems 52 Product Specific Problems 54 Universal Serial Bus USB Specific Problems 55 Speakers Specific Problems 55 Appendix 56 FCC Notices U S Only and Other Regulatory Information 56 Contact Dell 56 ...

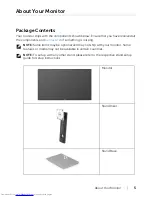
Страница 5: ...ived all the components and Contact Dell if something is missing Monitor Stand Riser Stand Base NOTE Some items may be optional and may not ship with your monitor Some features or media may not be available in certain countries NOTE To set up with any other stand please refer to the respective stand setup guide for setup instructions ...

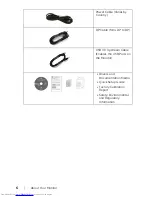
Страница 6: ...y DP Cable Mini DP to DP USB 3 0 Upstream Cable Enables the USB Ports on the Monitor Drivers and Documentation Media Quick Setup Guide Factory Calibration Report Safety Environmental and Regulatory Information 6 About Your Monitor ...

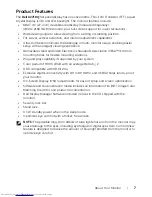
Страница 7: ...solutions Plug and play capability if supported by your system Color gamut of 99 9 sRGB with an average Delta E 2 HDR compatible with HDMI 2 0a Extensive digital connectivity with DP mDP HDMI and USB3 0 helps future proof your monitor On Screen Display OSD adjustments for ease of setup and screen optimization Software and documentation media includes an Information File INF Image Color Matching Fi...

Страница 8: ...bout Your Monitor Identifying Parts and Controls Front View Front panel controls Description 1 Function buttons For more information see Operating the Monitor 2 Power On Off button with LED indicator Label ...

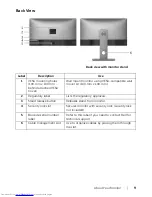
Страница 9: ...nt kit 100 mm x 100 mm 2 Regulatory label Lists the regulatory approvals 3 Stand release button Releases stand from monitor 4 Security lock slot Secures monitor with security lock security lock not included 5 Barcode serial number label Refer to this label if you need to contact Dell for technical support 6 Cable management slot Use to organize cables by placing them through the slot Label ...

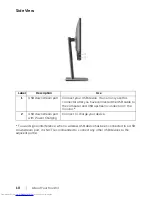
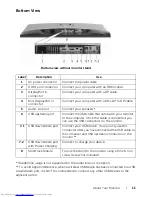
Страница 10: ...ve connected the USB cable to the computer and USB upstream connector on the monitor 2 USB downstream port with Power Charging Connect to charge your device To avoid signal interference when a wireless USB device has been connected to a USB downstream port it is NOT recommended to connect any other USB devices to the adjacent port s Label ...

Страница 11: ... this cable is connected you can use the USB connectors on the monitor 7 1 USB downstream port Connect your USB device You can only use this connector after you have connected the USB cable to the computer and USB upstream connector on the monitor 7 2 USB downstream port with Power Charging Connect to charge your device 8 Stand lock feature To lock the stand to the monitor using a M3 x 6 mm screw ...

Страница 12: ...l Luminance output 350 cd m typical Contrast ratio 1300 to 1 typical Faceplate coating Antiglare with hard coating 3H Backlight LED edgelight system Response time 8 ms Normal 5 ms Fast Color depth 1 07 billion colors Color gamut 99 9 sRGB 99 9 Rec 709 80 7 DCI P3 Calibration accuracy Delta E 2 average Built in devices USB 3 0 super speed hub with 1 x USB 3 0 upstream port 4 x USB 3 0 downstream po...

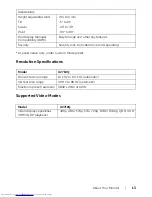
Страница 13: ...preset resolution 3840 x 2160 at 60Hz Supported Video Modes Video display capabilities HDMI DP playback 480p 480i 576p 576i 720p 1080i 1080p QHD UHD Adjustability Height adjustable stand Tilt Swivel Pivot 0 to 130 mm 5 to 21 45 to 45 90 to 90 Dell Display Manager Compatibility DDM Easy Arrange and other key features Security Security lock slot cable lock sold separately Model U2718Q Model U2718Q ...

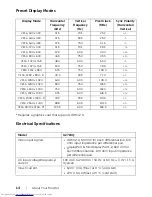
Страница 14: ...0 VAC to 240 VAC 50 Hz or 60 Hz 3 Hz 1 5 A typical Inrush current 120 V 30 A Max at 0 C cold start 220 V 60 A Max at 0 C cold start VESA 640 x 400 31 5 70 1 25 2 VESA 640 x 480 31 5 59 9 25 2 VESA 640 x 480 37 5 75 0 31 5 VESA 720 x 400 31 5 70 1 28 3 VESA 800 x 600 37 9 60 3 40 0 VESA 800 x 600 46 9 75 0 49 5 VESA 1024 x 768 48 4 60 0 65 0 VESA 1024 x 768 60 0 75 0 78 8 VESA 1152 x 864 67 5 75 0 ...

Страница 15: ... 02 inches Width 611 3 mm 24 07 inches Depth 49 1 mm 1 93 inches Height extended 433 4 mm 17 06 inches Height compressed 387 2 mm 15 24 inches Width 292 4 mm 11 51 inches Depth 200 3 mm 7 89 inches Weight with packaging 9 40 kg 20 72 lb Weight with stand assembly and cables 6 55 kg 14 44 lb Weight without stand assembly For wall mount or VESA mount considerations no cables 3 70 kg 8 16 lb Weight o...

Страница 16: ...79 BTU hour maximum 102 36 BTU hour typical Power Management Modes If you have VESA s DPM compliance display card or software installed in your PC the monitor can automatically reduce its power consumption when not in use This is referred to as Power Save Mode If the computer detects input from the keyboard mouse or other input devices the monitor automatically resumes functioning The following ta...

Страница 17: ...Total energy consumption in kWh as defined in Energy Star 7 0 version Zero power consumption in OFF mode can only be achieved by disconnecting the main cable from the monitor Maximum power consumption with max luminance and USB active This document is informational only and reflects laboratory performance Your product may perform differently depending on the software components and peripherals you...

Страница 18: ...ML2 p GND ML2 n ML3 p GND ML3 n GND EDID WP AUX p GND AUX n Hot Plug Detect Re PWR 3 3 V DP_PWR 18 About Your Monitor Mini DisplayPort Connector 1 2 3 4 5 6 7 8 9 10 11 12 13 14 15 16 17 18 19 20 Pin Number 20 pin Side of the Connected Signal Cable 1 GND 2 Hot Plug Detect 3 ML3 n 4 GND ...

Страница 19: ...About Your Monitor 19 5 ML3 p 6 GND 7 GND 8 GND 9 ML2 n 10 ML0 n 11 ML2 p 12 ML0 p 13 GND 14 GND 15 ML1 n 16 AUX p 17 ML1 p 18 AUX n 19 GND 20 3 3 V DP_PWR ...

Страница 20: ...S DATA 1 TMDS DATA 1 SHIELD TMDS DATA 1 TMDS DATA 0 TMDS DATA 0 SHIELD TMDS DATA 0 TMDS CLOCK TMDS CLOCK SHIELD TMDS CLOCK CEC Reserved N C on device DDC CLOCK SCL DDC DATA SDA DDC CEC Ground 5V POWER HOT PLUG DETECT 20 About Your Monitor HDMI Connector 1 2 3 4 5 6 7 8 9 10 11 12 13 14 15 16 17 18 19 ...

Страница 21: ...ormation about changing the monitor settings see Operating the Monitor Universal Serial Bus USB Interface This section gives you information about the USB ports that are available on the monitor Transfer Speed Data Rate Power Consumption Super speed 5 Gbps 4 5 W Max each port High speed 480 Mbps 4 5 W Max each port Full speed 12 Mbps 4 5 W Max each port NOTE This monitor is Super Speed USB 3 0 com...

Страница 22: ...3 0 capable computer NOTE The monitor s USB interface works only when the monitor is On or in the power save mode If you turn Off the monitor and then turn it On the attached peripherals may take a few seconds to resume normal functionality LCD Monitor Quality and Pixel Policy During the LCD Monitor manufacturing process it is not uncommon for one or more pixels to become fixed in an unchanging st...

Страница 23: ...ecial screen cleaning tissue or solution suitable for the anti static coating Do not use benzene thinner ammonia abrasive cleaners or compressed air Use a lightly dampened warm cloth to clean the monitor Avoid using detergent of any kind as some detergents leave a milky film on the monitor If you notice white powder when you unpack your monitor wipe it off with a cloth Handle your monitor with car...

Страница 24: ...e stand setup guide for the setup instructions CAUTION Do not remove the monitor from the packaging box before attaching the stand To attach the monitor stand 1 Follow the instructions on the flaps of carton to remove the stand from the top cushion that secures it 2 Insert the stand base blocks fully into the stand slot 3 Lift the screw handle and turn the screw clockwise 4 After fully tightening ...

Страница 25: ...cover as shown to expose the VESA area for stand assembly 6 Attach the stand assembly to the monitor a Fit the two tabs on the upper part of the stand to the groove on the back of the monitor b Press the stand down till it snaps into place ...

Страница 26: ...e one hand in the cutout area on the bottom cushion and use the other hand to hold the stand b Lift the monitor carefully to prevent it from slipping or falling CAUTION Do not press on the panel screen when lifting the monitor 8 Remove the cover from the monitor ...

Страница 27: ...structions NOTE Do not connect all cables to the computer at the same time To connect your monitor to the computer 1 Turn Off your computer and disconnect the power cable Connect the DP Mini DP to DP HDMI cable from your monitor to the computer Connecting the HDMI cable Optional Purchase Connecting the DisplayPort Mini DP to DP cable ...

Страница 28: ...28 Setting Up the Monitor Connecting the DisplayPort DP to DP cable Optional Purchase CAUTION The graphics are used for the purpose of illustration only Appearance of the computer may vary ...

Страница 29: ... peripherals to the downstream USB 3 0 ports on the monitor 3 Plug the power cables for your computer and monitor into a nearby outlet 4 Turn On the monitor and the computer If your monitor displays an image installation is complete If it does not display an image see Universal Serial Bus USB Specific Problems 5 Use the cable slot on the monitor stand to organize the cables Organizing Your Cables ...

Страница 30: ...p guide for the setup instructions To remove the stand 1 Place the monitor on a soft cloth or cushion 2 Press and hold the stand release button 3 Lift the stand up and away from the monitor Wall Mounting Optional Screw dimension M4 x 10 mm Refer to the instructions that come with the VESA compatible wall mounting kit 1 Place the monitor panel on a soft cloth or cushion on a stable flat table 2 Rem...

Страница 31: ...acket from the wall mounting kit to the monitor 5 Mount the monitor on the wall by following the instructions that comes with the wall mounting kit NOTE For use only with UL listed wall mount bracket with minimum weight load bearing capacity of 3 70 kg ...

Страница 32: ...erating the Monitor Power On the Monitor Press the button to turn On the monitor Using the Front Panel Controls The front panel control buttons provide quick access to primary software functionalities for controlling the monitor ...

Страница 33: ...e the MENU button to launch the On Screen Display OSD See Accessing the Menu System 3 Exit Use this button to exit the OSD main menu 4 Power with power light indicator Use the Power button to turn the monitor On and Off The white light indicates the monitor is On and fully functional A glowing white light indicates the power save mode Front Panel Button Use the buttons on the front of the monitor ...

Страница 34: ...the setting options As you move from one icon to another the option name is highlighted See the following table for a complete list of all the options available for the monitor 3 Press the button once to activate the highlighted option 4 Press and button to select the desired parameter 5 Press to enter the submenu and then use the and buttons according to the indicators on the menu to make your ch...

Страница 35: ...the button to decrease the brightness min 0 max 100 NOTE Manual adjustment of Brightness is disabled when Dynamic Contrast is switched On Contrast Adjust the Brightness first and then adjust the Contrast only if further adjustment is necessary Press the button to increase the contrast and press the button to decrease the contrast min 0 max 100 The Contrast function adjusts the degree of difference...

Страница 36: ...sing the DisplayPort DP connector mDP Select the mDP input when you are using the Mini DisplayPort mDP connector HDMI Select the HDMI input when you are using the HDMI connector Auto Select Turning on the function allows you to scan for available input sources Reset Input Source Reset your monitor input settings to the factory settings Color Use Color to adjust the color setting mode ...

Страница 37: ...00K 6500K 7500K 9300K and 10000K Custom Color Allows you to manually adjust the R G B color settings Press the and buttons to adjust the R G B colors values and create your own preset color mode NOTE To reduce the risk of eye strain and neck arm back shoulders pain from using the monitor for long periods of time we suggest you set the screen about 20 to 28 inches 50 70 cm from your eyes blink freq...

Страница 38: ...to adjust the hue from 0 to 100 Use to increase the purple shade of the video image Use to increase the green shade of the video image NOTE Hue adjustment is available only when you select Movie or Game preset mode Saturation This feature can adjust the color saturation of the video image Use or to adjust the saturation from 0 to 100 Use to increase the colorful appearance of the video image Use t...

Страница 39: ...rast if you select Game or Movie preset mode Response Time Allows you to set the Response Time to Normal or Fast Smart HDR HDR is short for High Dynamic Range This technology simulates the human visual system to process a wider range of luminosity than traditional imaging technique can do It is most suitable for displaying images with a large amount of darkness or bright scenes NOTE This function ...

Страница 40: ...Sets the OSD display to one of the eight languages English Spanish French German Brazilian Portuguese Russian Simplified Chinese or Japanese Rotation Rotates the OSD by 90 degrees counter clockwise You can adjust the menu according to your Display Rotation Transparency Select this option to change the menu transparency by pressing the and buttons Minimum 0 Maximum 100 Timer Sets the length of time...

Страница 41: ...dby mode NOTE USB On Off During Standby mode is only available when the USB upstream cable is unplugged This option will be greyed out when the USB upstream cable plugs in Monitor Sleep Allows you to let the monitor turn off automatically or stay on when your computer goes into sleep mode When Enable is selected the monitor goes to sleep as the system sleeps when Disable is selected you may preven...

Страница 42: ... DDC CI Display Data Channel Command Interface allows your monitor parameters brightness color balance and etc to be adjustable via the software on your computer You can disable this feature by selecting Off Enable this feature for best user experience and optimum performance of your monitor ...

Страница 43: ...led When the monitor does not support a particular resolution mode you will see the following message LCD Conditioning Helps reduce minor cases of image retention Depending on the degree of image retention the program may take some time to run You can enable this feature by selecting On Firmware Displays the current firmware version Reset Others Resets all settings under the Others menu to the fac...

Страница 44: ...ges addressable by this monitor Recommended mode is 3840 x 2160 You will see the following message before the DDC CI function is disabled When the monitor enters the Power Save mode the following message appears Activate the computer and wake up the monitor to gain access to the OSD NOTE The message may be slightly different according to the connected input signal If you press any button other tha...

Страница 45: ...lution To set the maximum resolution for the monitor In Windows 7 Windows 8 and Windows 8 1 1 For Windows 8 and Windows 8 1 only select the Desktop tile to switch to classic desktop 2 Right click on the desktop and click Screen Resolution 3 Click the Dropdown list of the Screen Resolution and select 3840 x 2160 4 Click OK In Windows 10 1 Right click on the desktop and click Display settings 2 Clic...

Страница 46: ...le computer Go to http www dell com support enter your service tag and download the latest driver for your graphics card If you are using a non Dell computer portable or desktop Go to the support site for your computer and download the latest graphic drivers Go to your graphics card website and download the latest graphic drivers ...

Страница 47: ...pective stand setup guide for set up instructions Tilt Swivel With the stand attached to the monitor you can tilt and swivel the monitor for the most comfortable viewing angle NOTE The stand is detached when the monitor is shipped from the factory Vertical Extension NOTE The stand extends vertically up to 130 mm The figure below illustrates how to extend the stand vertically ...

Страница 48: ...Rotating the Monitor Before you rotate the monitor your monitor should be fully vertically extended Vertical Extension and fully tilted up to avoid hitting the bottom edge of the monitor Rotate clockwise Rotate counterclockwise ...

Страница 49: ... you are using the monitor with a non Dell computer you need to go the graphics driver website or your computer manufacturer website for information on rotating the contents on your display To adjust the Rotation Display Settings 1 Right click on the desktop and click Properties 2 Select the Settings tab and click Advanced 3 If you have an ATI graphics card select the Rotation tab and set the pref...

Страница 50: ...ialog box should appear on screen against a black background if the monitor cannot sense a video signal and is working correctly While in self test mode the power LED remains white Also depending upon the selected input the dialog shown below will continuously scroll through the screen NOTE The message may be slightly different according to the connected input signal 4 This box also appears during...

Страница 51: ...video cable s from the back of the computer or monitor The monitor then goes into the self test mode 3 Press and hold Button 1 on the front panel for 5 seconds A gray screen appears 4 Carefully inspect the screen for abnormalities 5 Press Button 1 on the front panel again The color of the screen changes to red 6 Inspect the display for any abnormalities 7 Repeat steps 5 and 6 to inspect the displa...

Страница 52: ... or ghosting Eliminate video extension cables Reset the monitor to factory settings Change the video resolution to the correct aspect ratio Shaky Jittery Video Wavy picture or fine movement Reset the monitor to factory settings Check environmental factors Relocate the monitor and test in another room Missing Pixels LCD screen has spots Cycle power On Off Pixel that is permanently Off is a natural ...

Страница 53: ... is connected properly and is secure Reset the monitor to factory settings Perform monitor self test feature check to determine if the intermittent problem occurs in self test mode Missing Color Picture missing color Perform monitor self test feature check Ensure that the video cable connecting the monitor to the computer is connected properly and is secure Check for bent or broken pins in the vid...

Страница 54: ... monitor No Input Signal when user controls are pressed No picture the LED light is white Check the signal source Ensure the computer is not in the power saving mode by moving the mouse or pressing any key on the keyboard Check whether the signal cable is plugged in properly Re plug the signal cable if necessary Reset the computer or video player The picture does not fill the entire screen The pic...

Страница 55: ...cable to your computer Reconnect the USB peripherals downstream connector Reboot the computer Wireless mouse is not working or lagging Do not respond or responds slowly Increase the distance between the USB 3 0 peripherals and the wireless USB receiver Position your wireless USB receiver as close as possible to the wireless mouse Use a USB extender cable to position the wireless USB receiver as fa...

Страница 56: ...gulatory information see the regulatory compliance website located at www dell com regulatory_compliance Contact Dell For customers in the United States call 800 WWW DELL 800 999 3355 NOTE If you do not have an active Internet connection you can find contact information on your purchase invoice packing slip bill or Dell product catalog Dell provides several online and telephone based support and s...

Отзывы: