background image

 Operating your monitor   

  49

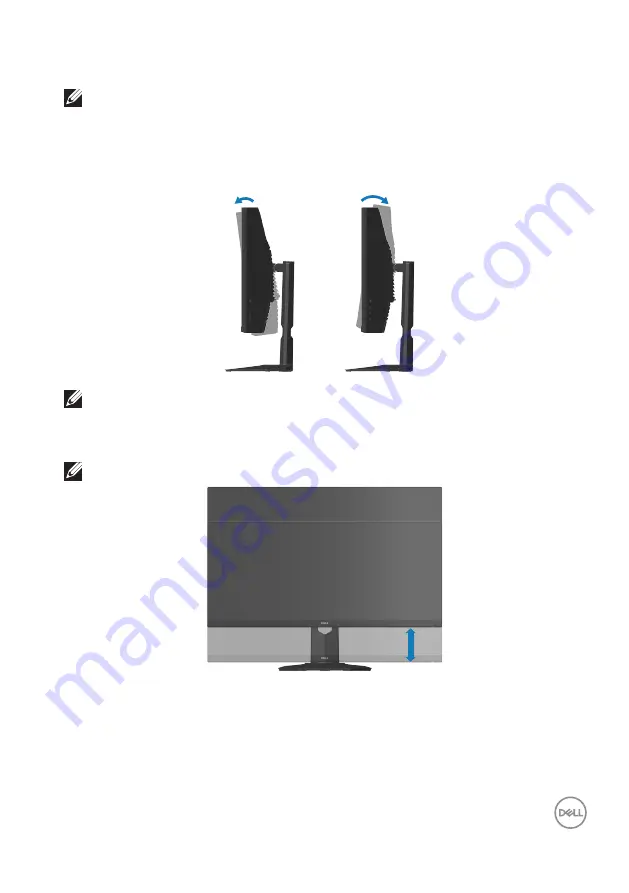
Using the tilt and vertical extension

  NOTE: These values are applicable to the stand that was shipped with 

your monitor. To set up with any other stand, see the documentation 
that shipped with the stand.

Tilt Extension

5° 

21° 

  NOTE: The stand is detached when the monitor is shipped from the 

factory.

Vertical Extension

  NOTE: The stand can be extended vertically up to 100 mm. 

100 mm

Содержание S3222DGM

Страница 1: ...Monitor Model S3222DGM Regulatory Model S3222DGMc Dell S3222DGM Monitor User s Guide ...

Страница 2: ...or loss of data if instructions are not followed WARNING A WARNING indicates a potential for property damage personal injury or death Copyright 2021 Dell Inc or its subsidiaries All rights reserved Dell EMC and other trademarks are trademarks of Dell Inc or its subsidiaries Other trademarks may be trademarks of their respective owners 2021 05 Rev A00 ...

Страница 3: ...2 Monitor specifications 14 Resolution specifications 16 Supported video modes 16 Preset display modes 17 Physical characteristics 20 Environmental characteristics 21 Plug and play capability 22 LCD monitor quality and pixel policy 22 Setting up the monitor 23 Connecting the stand 23 Connecting your monitor 25 Connecting the HDMI and DisplayPort 1 2 cable 25 Organizing cables 26 ...

Страница 4: ... 32 Control buttons 33 Using the On Screen Display OSD menu 34 Accessing the menu system 34 Menu and Power button lock 43 OSD warning messages 45 Setting the maximum resolution 48 Using the tilt and vertical extension 49 Tilt Extension 49 Vertical Extension 49 Ergonomics 50 Handling and moving your display 52 Maintenance guidelines 53 Cleaning your monitor 53 Troubleshooting 54 Self Test 54 Built ...

Страница 5: ... 5 Product specific problems 61 Appendix 62 FCC notices U S Only and other regulatory information62 Contacting Dell 62 EU product database for energy label and product information sheet 62 ...

Страница 6: ... power available in your location Keep the monitor in room temperature Excessive cold or hot conditions can have an adverse effect on the liquid crystal of the display Connect the power cable from the monitor to a wall outlet that is near and accessible See Connecting your monitor Do not place and use the monitor on a wet surface or near water Do not subject the monitor to severe vibration or high...

Страница 7: ... table below If any component is missing contact Dell For more information see Contacting Dell NOTE Some items may be optional and may not ship with your monitor Some features or media may not be available in certain countries Monitor Stand riser Stand base Power cable varies by countries HDMI 2 0 cable 1 8 m ...

Страница 8: ...8 About your monitor DisplayPort 1 2 cable 1 8 m Quick Setup Guide Safety Environmental and Regulatory Information ...

Страница 9: ...ght for them Color gamut of 99 sRGB Digital connectivity with DisplayPort and HDMI Enabled with gaming console VRR supportability Plug and play capability if supported by your computer On Screen Display OSD adjustments for ease of setup and screen optimization Game enhanced features such as Timer Frame Rate Counter and Dark Stabilizer in addition to enhanced game modes such as FPS MOBA RTS SPORTS ...

Страница 10: ...tor on or off Solid white light indicates that the monitor is turned on and functioning normally Blinking white light indicates that the monitor is in Standby Mode 2 Downlights When the monitor is completely set up tap the touch sensor to turn the downlights on or off see Downlights This feature can be activated or deactivated via the OSD see Downlight ...

Страница 11: ... Rules Opera on is subject to the following two condi ons 1 this device may not cause harmful interference and 2 this device must accept any interference received including interference that may cause undesired opera on ZU10322 21007 R R E2K S3222DGMc 㥐㦤㣄 ڕ TPV Electronics Fujian Co Ltd For Korea 㐔㷡㢬 ڕ DELL INC For Korea 080 200 3800 R33037 RoHS For UK only Cain Road Bracknell RG12 1LF 21 14321 2 ...

Страница 12: ...ock slot Secure your monitor using a security lock purchased separately to prevent unauthorized movement of your monitor See Securing your monitor using Kensington lock optional 3 Stand lock feature To lock the stand to the monitor using a M3 x 6 mm screw screw not included 4 HDMI 1 2 0 port Connect to your computer using a HDMI cable 5 HDMI 2 2 0 port Connect to your computer using a HDMI cable ...

Страница 13: ...ely set up tap the touch sensor to turn the downlights on or off The factory setting is on so the downlights are active if the power cable is connected 7 DisplayPort 1 2 Connect to your computer using a DisplayPort cable 8 Headphone out port Connect to a headphone ...

Страница 14: ...1 5 in 697 3 mm 27 5 in 392 3 mm 15 4 in 273550 8 mm2 423 5 in 2 Native resolution and refresh rate 2560 x 1440 at 144 Hz HDMI 2 0 2560 x 1440 at 165 Hz DisplayPort 1 2 Pixel pitch 0 2724 mm x 0 2724 mm Pixel per inch PPI 93 Viewing angle Horizontal Vertical 178 typical 178 typical Luminance output 350 cd m typical Contrast ratio 3000 to 1 typical Faceplate coating SAG 40 3H Backlight LED edgeligh...

Страница 15: ...different we recommend that users experiment with the different modes to find the setting that is right for them Curvature 1800R typical Color depth 16 7M colors RGB 8 bits Color gamut 99 sRGB Connectivity 2 x HDMI 2 0 with HDCP 2 2 2560 x 1440 up to 144 Hz 1 x DisplayPort 1 2 with HDCP 2 2 2560 x 1440 up to 165 Hz 1 x Headphone out Bezel width edge of monitor to active area Top Left Right Bottom ...

Страница 16: ... to 165 Hz DisplayPort 1 2 Maximum preset resolution 2560 x 1440 at 60 Hz with HDCP 2 2 2560 x 1440 at 144 Hz with HDCP 2 2 HDMI 2 0 2560 x 1440 at 165 Hz with HDCP 2 2 DisplayPort 1 2 Supported video modes Model S3222DGM Video display capabilities HDMI DisplayPort 480p 480i 576p 576i 720p 1080p 1080i QHD NOTE This monitor supports AMD FreeSync Premium Technology ...

Страница 17: ...0 VESA 1024 x 768 48 36 60 00 65 00 VESA 1024 x 768 60 02 75 03 78 75 VESA 1152 x 864 67 50 75 00 108 00 VESA 1280 x 800 49 31 59 91 71 00 VESA 1280 x 1024 63 98 60 02 108 00 VESA 1280 x 1024 79 98 75 02 135 00 VESA 1600 x 1200 75 00 60 00 162 00 VESA 1680 x 1050 65 29 59 95 146 25 VESA 1920 x 1080 67 50 60 00 148 50 VESA 1920 x 1080 137 26 120 00 285 50 VESA 1920 x 1080 162 27 144 00 337 52 VESA ...

Страница 18: ... x 768 60 02 75 03 78 75 VESA 1152 x 864 67 50 75 00 108 00 VESA 1280 x 1024 63 98 60 02 108 00 VESA 1280 x 1024 79 98 75 02 135 00 VESA 1600 x 900 60 00 60 00 108 00 VESA 1600 x 1200 75 00 60 00 162 00 VESA 1680 x 1050 65 29 59 95 146 25 VESA 1920 x 1080 67 50 60 00 148 50 VESA 1920 x 1080 137 26 120 00 285 50 VESA 1920 x 1080 166 59 143 98 346 50 VESA 1920 x 1080 186 50 165 00 387 81 VESA 1920 x...

Страница 19: ... W Max 2 28 W Pon 3 87 56 kWh TEC 3 1 As defined in EU 2019 2021 and EU 2019 2013 2 Max brightness and contrast setting 3 Pon Power consumption of On Mode measured with reference to Energy Star test method TEC Total energy consumption in kWh measured with reference to Energy Star test method This document is informational only and reflects laboratory performance Your product may perform differentl...

Страница 20: ...237 61 mm 9 35 in Dimensions without stand Height 424 20 mm 16 70 in Width 708 76 mm 27 90 in Depth 82 39 mm 3 24 in Stand dimensions Height 420 30 mm 16 55 in Width 284 64 mm 11 21 in Depth 237 61 mm 9 35 in Weight Weight with packaging 14 50 kg 31 97 lb Weight with stand assembly and cables 10 16 kg 22 40 lb Weight without stand assembly no cables 7 44 kg 16 40 lb Weight of stand assembly 2 27 k...

Страница 21: ...Temperature Operating 0 C to 40 C 32 F to 104 F Non operating Storage 20 C to 60 C 4 F to 140 F Shipping 20 C to 60 C 4 F to 140 F Humidity Operating 10 to 80 non condensing Non operating Storage 10 to 90 non condensing Shipping 10 to 90 non condensing Altitude Operating maximum 5 000 m 16 400 ft Non operating maximum 12 192 m 40 000 ft Thermal dissipation 171 00 BTU hour maximum 95 76 BTU hour On...

Страница 22: ...ings Most monitor installations are automatic you can select different settings if desired For more information about changing the monitor settings see Operating your monitor LCD monitor quality and pixel policy During the LCD Monitor manufacturing process it is not uncommon for one or more pixels to become fixed in an unchanging state which are hard to see and do not affect the display quality or...

Страница 23: ...e the documentation that shipped with the stand 1 Follow the instructions on the flaps of packaging box to remove the stand from the top cushion that secures it 2 Connect the stand base to the stand riser 3 Open the screw handle on the stand base and tighten the screw to secure the stand riser to the stand base 4 Close the screw handle 3 2 1 4 5 Slide the tabs on the stand assembly into the slots ...

Страница 24: ...24 About your monitor 6 Place the monitor in an upright position ...

Страница 25: ...the cables through the cable management slot before you connect them to the monitor To connect your monitor to the computer 1 Turn off your computer and disconnect the power cable 2 Connect the HDMI or DisplayPort cable from your monitor to the computer Connecting the HDMI and DisplayPort 1 2 cable HDMI 2 0 HDMI 2 0 HDMI 2 0 HDMI 2 0 DP 1 2 DP 1 2 3 Connect the power cables from your computer and ...

Страница 26: ...26 About your monitor Organizing cables Use the cable management slot to route the cables connected to your monitor 4 Turn on the monitor ...

Страница 27: ...o prevent it from falling accidentally The security lock slot is located at the bottom of the monitor See Security lock slot For more information on using the Kensington lock purchased separately see the documentation that is shipped with the lock Secure your monitor to a table using the Kensington security lock NOTE The image is for the purpose of illustration only Appearance of the lock may vary...

Страница 28: ...t and clean surface NOTE The following procedure is applicable only for the stand that shipped with your monitor If you are connecting a third party stand see the documentation that shipped with the stand 1 Place the monitor on a soft cloth or cushion at the edge of the desk 2 Press and hold the stand release button at the back of the display 1 2 ...

Страница 29: ...ft cloth or cushion at the edge of the desk 2 Remove the stand See Removing the stand 3 Remove the four screws that secure the display back cover 4 Install the mounting bracket from the wall mounting kit to the display 5 To mount the monitor on the wall see the documentation that shipped with the wall mounting kit NOTE For use only with UL or CSA or GS listed wall mount bracket with minimum weight...

Страница 30: ...ating your monitor Operating your monitor Power on the monitor Press the button to turn on the monitor Using the joystick control Use the joystick button on the rear of the monitor to adjust the image settings ...

Страница 31: ...ing your monitor 31 1 Press the joystick button to launch the OSD main menu 2 Move the joystick up down left right to toggle between options 3 Press the joystick button again to confirm the settings and exit ...

Страница 32: ...m For 2 way right and left directional navigation Move right to enter the submenu Move left to exit from the submenu Increases right or decreases left the parameters of selected menu item For 2 way up and down directional navigation Toggles between the menu items Increases up or decreases down the parameters of selected menu item Using the control buttons Use the control buttons on the rear of the...

Страница 33: ...een Display OSD and select the OSD menu See Accessing the menu system 2 Exit Use this button to go back to the main menu or exit the OSD main menu 3 Shortcut key Preset Modes Use this button for choose from a list of preset modes 4 Shortcut key Dark Stabilizer Use this button to adjust Dark Stabilizer 5 Shortcut key Brightness Use this button to adjust the brightness ...

Страница 34: ...ystem Icon Menu and Submenus Description Game Dell 32 Gaming Monitor S3222DGM Input Source Display Others Personalize Menu Brightness Contrast Audio Game Preset Modes Game Enhance Mode AMD FreeSyne Premium Response Time Dark Stabilizer Standard Off On Fast 0 Hue Saturation Reset Game ...

Страница 35: ...or settings for your gaming needs ComfortView Decreases the level of blue light emitted from the screen to make viewing more comfortable for your eyes WARNING The possible long term effects of blue light emission from the monitor may cause personal injury such as digital eye strain eye fatigue and damage to the eyes Using monitor for extended periods of time may also cause pain in parts of body su...

Страница 36: ... the perfect alignment of the video contents from multiple displays AMD FreeSync Premium Allows you to set the AMD FreeSync Premium On or Off Response Time Allows you to set the Response Time to Fast Super Fast Extreme or MPRT Dark Stabi lizer The feature improves the visibility in the dark gaming scenarios The higher the value between 0 to 3 the better visibility in dark area of the display image...

Страница 37: ... defaults Brightness Contrast Use this menu to adjust the brightness and contrast Dell 32 Gaming Monitor S3222DGM Input Source Display Others Personalize Menu Brightness Contrast Audio Game 75 75 Brightness Brightness adjusts the luminance of the backlight minimum 0 maximum 100 Move the joystick up to increase brightness Move the joystick down to decrease brightness Contrast Adjust the Brightness ...

Страница 38: ...DMI 1 or HDMI 2 input when you are using the HDMI connector Press the joystick button to confirm the selection HDMI 2 Auto Select Turn on the function to allow the monitor to automatically scan for available input sources Press the joystick button to confirm the selection Reset Input Source Resets all settings under the Input Source menu to the factory defaults Display Use the display to adjust im...

Страница 39: ...e Aspect Ratio Input Color Format Sharpness Reset Display RGB YCbCr Sharpness Makes the image look sharper or softer Move the joystick up and down to adjust the sharpness from 0 to 100 Reset Display Select this option to restore default display settings Audio Dell 32 Gaming Monitor S3222DGM Input Source Display Others Personalize Menu Brightness Contrast Audio Game Volume 50 Reset Audip Volume All...

Страница 40: ...0 s Reset Menu Language Set the OSD display to one of eight languages English Spanish French German Brazilian Portuguese Russian Simplified Chinese or Japanese Transparency Select this option to change the menu transparency bymoving the joystick up or down min 0 max 100 Timer OSD Hold Time Sets the length of time the OSD remains active after you press a button Move the joystick to adjust the slide...

Страница 41: ...rtcut key Shortcut Key 2 Shortcut Key 3 Power Button LED Allows you to set the state of the power light to save energy Downlight Allows you to turn on or turn off lights on the bottom of the monitor When the downlights are on they light up blue To turn off the touch sensor select Off Reset Per sonalization Resets all settings under the Personalize menu to the factory preset values Others Change th...

Страница 42: ...run You can enable this feature by select ing On Dell 32 Gaming Monitor S3222DGM Input Source Display Others Personalize Menu Brightness Contrast Audio Game Display Info DDC CI LCD Conditioning Firmware On Off Service Tag Reset Others Factory Reset Firmware Display the version of the firmware about the display Service Tag Display the service tag number of the display The Service Tag is a unique al...

Страница 43: ...lock menu press and hold the button 5 for four seconds A lock menu appears at the bottom right corner of the display NOTE The lock menu can be accessed using this method when the Menu and Power buttons are in unlocked state S3222DGM Dell 32 Gaming Monitor Select option To access the unlock menu press and hold the button 5 for four seconds An unlock menu appears at the bottom right corner of the di...

Страница 44: ...wer button is locked 4 Built in Diagnostics See Built in diagnostics for more information In the following scenarios the icon appears at the center of the display When the joystick and control buttons button 1 5 are pressed This indicates the OSD menu buttons are in lock state When the Power button button 6 is pressed This indicates the Power button is in lock state When any one of the six buttons...

Страница 45: ... receiving from the computer See Monitor specifications for the Horizontal and Vertical frequency ranges addressable by this monitor Recommended mode is 2560 x 1440 Before the DDC CI function is disabled the following message is displayed Dell 32 Gaming Monitor S3222DGM The function of adjusting display setting using PC application will be Do you wish to disable DDC CI function disabled When the m...

Страница 46: ... If an HDMI or DisplayPort cable is not connected a floating dialog box as shown below appears The monitor will enter Standby Mode after 4 minutes if left at this state S3222DGM The display will go into Power Save Mode in 4 minutes www dell com support S3222DGM No HDMI 1 Cable Dell 32 Gaming Monitor 1 or S3222DGM The display will go into Power Save Mode in 4 minutes www dell com support S3222DGM N...

Страница 47: ...www dell com support S3222DGM No DP Cable Dell 32 Gaming Monitor When you select OSD items of Factory Reset in Other feature the following mes sage will appear Dell 32 Gaming Monitor Yes No S3222DGM Are you sure you want to reset to default settings See Troubleshooting for more information ...

Страница 48: ... Click Advanced display settings 3 Click the dropdown list of the Resolution and select 2560 x 1440 4 Click Apply If you do not see 2560 x 1440 as an option you may need to update your graphics driver Depending on your computer complete one of the following procedures If you have a Dell desktop or portable computer Go to www dell com support enter your computer s Service Tag and download the lates...

Страница 49: ...o the stand that was shipped with your monitor To set up with any other stand see the documentation that shipped with the stand Tilt Extension 5 21 NOTE The stand is detached when the monitor is shipped from the factory Vertical Extension NOTE The stand can be extended vertically up to 100 mm 100 mm ...

Страница 50: ...age of the monitor 3 Take regular and frequent breaks for 20 minutes every two hours 4 Look away from your monitor and gaze at a distant object at 20 feet away for at least 20 seconds during the breaks 5 Perform stretches to relieve tension in the neck arm back and shoulders during the breaks Make sure that the monitor screen is at eye level or slightly lower when you are sitting in front of the m...

Страница 51: ... to organize your work so that you do not have to sit and work for extended periods of time Try to stand or get up and walk around at regular intervals Keep the area under your desk clear of obstructions and cables or power cords that may interfere with comfortable seating or present a potential trip hazard floor feet flat on the and flat wrists relaxed below eye level keyboard of the user monitor...

Страница 52: ...terials Hold the bottom edge and the side of the monitor firmly without applying excessive pressure when lifting or moving the monitor When lifting or moving the monitor ensure the screen is facing away from you and do not press on the display area to avoid any scratches or damage When transporting the monitor avoid any sudden shock or vibration to it When lifting or moving the monitor do not turn...

Страница 53: ...ossible use a special screen cleaning tissue or solution suitable for the anti static coating Do not use benzene thinner ammonia abrasive cleaners or compressed air Use a lightly dampened cloth to clean the monitor Avoid using detergent of any kind as some detergents leave a milky film on the monitor If you notice white powder when you unpack your monitor wipe it off with a cloth Handle your monit...

Страница 54: ...urn off both your computer and the monitor 2 Disconnect all video cables from the monitor This way the computer doesn t have to be involved 3 Turn on the monitor If the monitor is working correctly it detects that there is no signal and one of the following message appears While in self test mode the power LED remains white S3222DGM The display will go into Power Save Mode in 4 minutes www dell co...

Страница 55: ... Dell 32 Gaming Monitor NOTE This box also appears during normal system operation if the video cable is disconnected or damaged 4 Turn Off your monitor and reconnect the video cable then turn on your computer and the monitor If your monitor remains dark after you reconnect the cables check your video controller and computer ...

Страница 56: ...in diagnostics only when the video cable is unplugged and the monitor is in self test mode 5 6 4 3 2 1 To run the built in diagnostics 1 Ensure that the screen is clean no dust particles on the surface of the screen 2 Unplug the video cable s from the back of the computer or monitor The monitor then goes into the self test mode 3 Press and hold the button 5 for four seconds to enter the OSD lock u...

Страница 57: ...Press the joystick to change the test patterns 7 Repeat step 5 and 6 to inspect the display in red green blue black white and text pattern screens The test is complete when the text pattern screen appears To exit press the joystick right direction again If you do not detect any screen abnormalties upon using the built in diagnostic tool the monitor is functioning properly Check the video card and ...

Страница 58: ...and contrast controls using the OSD Perform monitor self test feature check Check for bent or broken pins in the video cable connector Run the built in diagnostics Ensure that the correct input source is selected via the Input Source menu Poor Focus Eliminate video extension cables Reset the monitor to Factory Settings Factory Reset Change the video resolution to the correct aspect ratio Shaky Jit...

Страница 59: ...ble connector Run the built in diagnostics Synchronization Problems Reset the monitor to Factory Settings Factory Reset Perform monitor self test feature check to determine if the scrambled screen appears in self test mode Check for bent or broken pins in the video cable connector Restart the computer in the safe mode Safety Related Issues Do not perform any troubleshooting steps Contact Dell imme...

Страница 60: ...PbPr in the Color settings OSD Run the built in diagnostics Image retention from a static image left on the monitor for a long period of time Set the screen to turn off after a few minutes of screen idle time These can be adjusted in Windows Power Options or Mac Energy Saver setting Alternatively use a dynamically changing screensaver Video Ghosting or Overshooting Change the Response Time in the ...

Страница 61: ...nitor Check if the OSD menu is locked If yes press and hold the button 5 for four seconds to unlock No Input Signal when user controls are pressed Check the signal source Ensure the computer is not in Standby Mode by moving the mouse or pressing any key on the keyboard Check if the video cable is plugged in properly Disconnect and reconnect the video cable if necessary Reset the computer or video ...

Страница 62: ...w dell com regulatory_compliance Contacting Dell For customers in the United States call 800 WWW DELL 800 999 3355 NOTE If you do not have an active Internet connection you can find contact information on your purchase invoice packing slip bill or Dell product catalog Dell provides several online and telephone based support and service options Availability varies by country and product and some se...

Отзывы: