background image

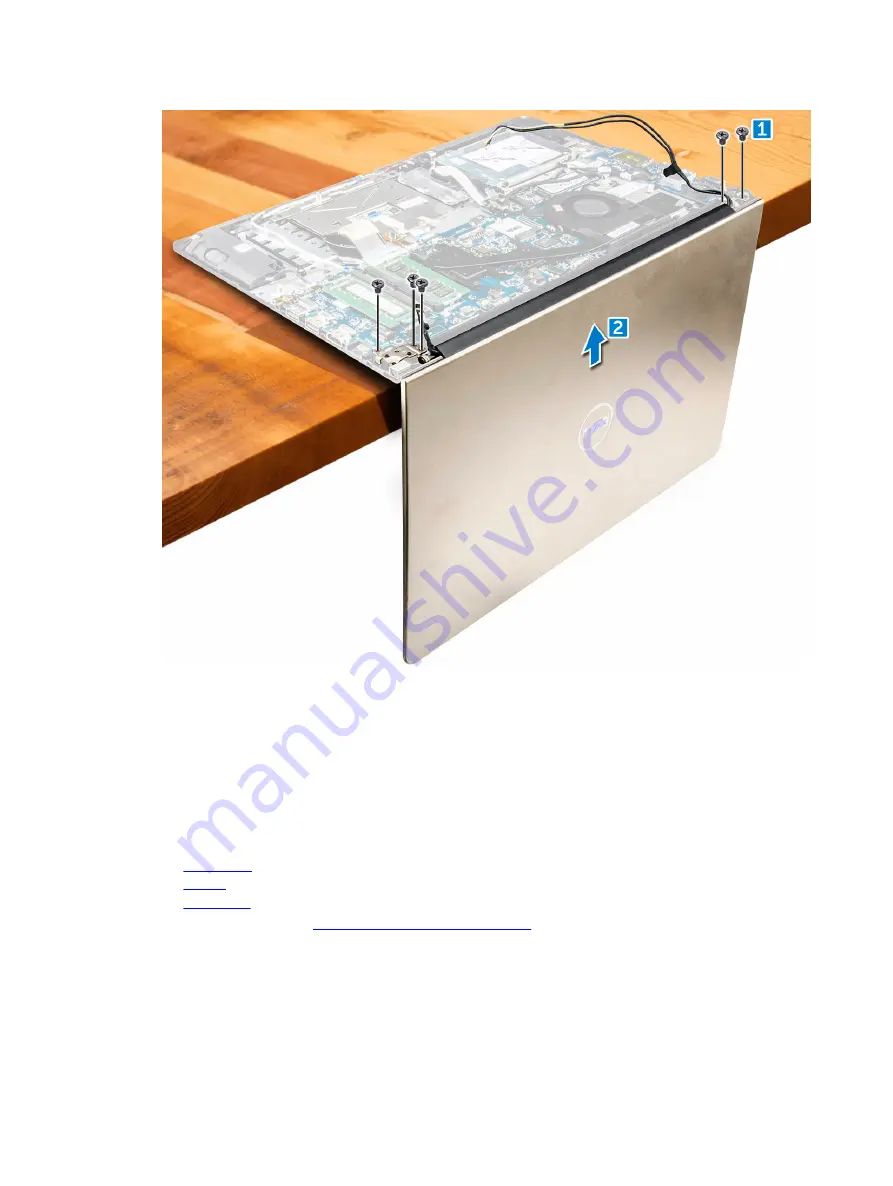
Installing the display assembly

1.

Align the display assembly with the display hinges of the computer chassis.

2.

Tighten the screws that secure the display hinges.

3.

Connect the display cables to the connector on the system board.

4.

Affix the tape to attach the display cable to the computer.

5.

Route the display cables along the system fan module on the chassis.

6.

Install the:
a.

WLAN card

b.

battery

c.

back cover

7.

Follow the procedure in 

After working inside your computer

39

Содержание P62F

Страница 1: ...Vostro 15 5568 Owner s Manual Regulatory Model P62F Regulatory Type P62F001 ...

Страница 2: ... S and international copyright and intellectual property laws Dell and the Dell logo are trademarks of Dell Inc in the United States and or other jurisdictions All other marks and names mentioned herein may be trademarks of their respective companies 2016 09 Rev A00 ...

Страница 3: ... 15 Installing the battery cable 16 Removing the solid state drive SSD bracket 16 Installing the solid state drive SSD 17 Removing the hard drive 17 Installing the hard drive 18 Removing the hard drive bracket 19 Installing the hard drive bracket 19 Removing the hard drive cable 20 Installing the hard drive cable 20 Removing the memory module 20 Installing the memory module 21 Removing the WLAN ca...

Страница 4: ...e display 43 Installing the display 45 Removing the palmrest 45 Installing the palmrest 46 Removing the power connector 47 Installing the power connector 48 4 Technology and components 49 Power adapter 49 Processors 49 Identifying the processor in Windows 10 and Windows 8 49 Verifying the processor usage in Task Manager 49 Verifying the processor usage in Resource Monitor 50 Chipsets 51 Downloadin...

Страница 5: ...amera 58 Starting the camera application 58 Memory features 59 Verifying system memory in Windows 10 59 Verifying system memory in Windows 8 59 Verifying system memory in system setup BIOS 59 Testing memory using ePSA 60 Intel chipset drivers 60 Intel HD Graphics drivers 60 Realtek HD audio drivers 61 5 System Setup 62 System Setup overview 62 Boot Sequence 62 Navigation keys 63 Updating the BIOS ...

Страница 6: ...ns 73 Security screen options 74 Secure Boot screen options 75 Performance screen options 76 Power Management screen options 77 POST Behavior screen options 78 Virtualization support screen options 79 Wireless screen options 80 Maintenance screen options 80 System Log screen options 81 8 Troubleshooting 82 Enhanced Pre Boot System Assessment ePSA diagnostics 82 LED error codes 82 Battery status li...

Страница 7: ...epairs as authorized in your product documentation or as directed by the online or telephone service and support team Damage due to servicing that is not authorized by Dell is not covered by your warranty Read and follow the safety instructions that came with the product CAUTION To avoid electrostatic discharge ground yourself by using a wrist grounding strap or by periodically touching an unpaint...

Страница 8: ...hing an unpainted metal surface such as the metal at the back of the computer While you work periodically touch an unpainted metal surface to dissipate static electricity which could harm internal components Turning off your computer After working inside your computer After you complete any replacement procedure ensure you connect any external devices cards and cables before turning on your comput...

Страница 9: ...2 Product overview Front view 1 Digital array microphone 2 Camera 3 Camera status light 4 Digital array microphone 5 Display 6 Power and battery status light hard drive activity light 9 ...

Страница 10: ...Left view 1 Power connector 2 Network connector 3 HDMI connector 4 USB 3 0 connector with PowerShare 5 USB 3 0 connector 6 Headset connector Right view 1 Memory card reader 10 ...

Страница 11: ...2 USB 3 0 connector 3 USB 3 0 connector with PowerShare 4 VGA connector 5 Security cable slot Top view 1 Power button 2 Keyboard 3 Finger print reader 4 Palmrest 5 Touch pad 11 ...

Страница 12: ... your computer Recommended tools The procedures in this document require the following tools Phillips 0 screwdriver Phillips 1 screwdriver Hex screwdriver Small plastic scribe Removing the back cover 1 Follow the procedures in Before working inside your computer 2 Remove the screws that secure the back cover to the computer 12 ...

Страница 13: ...Figure 1 3 To remove the cover a Using a scribe pry the edges of the back cover from all sides 1 b Lift the back cover from the computer 2 13 ...

Страница 14: ...procedure in After working inside your computer Removing the battery module 1 Follow the procedure in Before working inside your computer 2 Remove the back cover 3 To remove the battery a Disconnect the battery cable from the connector on the system board 1 b Remove the screws that secure the battery to the computer 2 c Lift and remove the battery from the computer 3 14 ...

Страница 15: ... 3 Connect the battery cable to the connector on the system board 4 Install the back cover 5 Follow the procedure in After working inside your computer Removing the battery cable 1 Follow the procedure in Before working inside your computer 2 Remove the a back cover b battery 3 Disconnect the battery cable from its connector on the battery 15 ...

Страница 16: ...ack cover 3 Follow the procedure in After working inside your computer Removing the solid state drive SSD bracket 1 Follow the procedure in Before working inside your computer 2 Remove the a back cover b battery 3 To remove the SSD a Remove the screws that secure the SSD 1 b Lift to remove the SSD from the computer 2 16 ...

Страница 17: ...Tighten the screws that secure the SSD 3 Install the a battery b back cover 4 Follow the procedure in After working inside your computer Removing the hard drive 1 Follow the procedure in Before working inside your computer 2 Remove the a back cover b battery 3 To remove the hard drive 17 ...

Страница 18: ...ift the hard drive from the computer 3 Installing the hard drive 1 Insert the hard drive assembly into its slot on the computer 2 Tighten the screws that secure the hard drive to the computer 3 Connect the hard drive cable to the connector on the system board 4 Install the a battery b back cover 5 Follow the procedure in After working inside your computer 18 ...

Страница 19: ... Remove the screws that secure the hard drive bracket to the hard drive 1 b Lift and remove the hard drive bracket 2 Installing the hard drive bracket 1 Place the hard drive bracket to align with the hard drive 2 Install the screws that secure the hard drive bracket 3 Install the a hard drive cable b hard drive c battery d back cover 4 Follow the procedure in After working inside your computer 19 ...

Страница 20: ...ive cable from the connector on the hard drive Installing the hard drive cable 1 Connect the hard drive cable to the hard drive 2 Install the a hard drive b battery c back cover 3 Follow the procedure in After working inside your computer Removing the memory module 1 Follow the procedure in Before working inside your computer 2 Remove the a back cover b battery 20 ...

Страница 21: ...system board 2 Installing the memory module 1 Insert the memory module into the memory module socket 2 Press the memory module until it clicks into place 3 Install the a battery b back cover 4 Follow the procedure in After working inside your computer Removing the WLAN card 1 Follow the procedures in Before working inside your computer 2 Remove the 21 ...

Страница 22: ...LAN card from the slot on the system board 4 Installing the WLAN card 1 Insert the WLAN card into the connector at a 45 degree angle 2 Close the plastic cover over the WLAN card 3 Tighten the screw to secure the WLAN card to the computer 4 Connect the antenna cables to the connectors marked on the WLAN card 5 Install the a battery b back cover 6 Follow the procedure in After working inside your co...

Страница 23: ...ery c WLAN card 3 To release the touchpad a Peel away the adhesive tape 1 b Disconnect the connector cables from the system board as indicated 2 3 4 4 To remove the metal bracket above the touchpad a Remove the screws that secure the metal bracket to the touchpad 1 b Lift the metal bracket away from the touchpad 2 23 ...

Страница 24: ...5 To remove the touchpad a Remove the screws that secure the touchpad to the computer 1 b Lift and remove the touchpad away from the computer 2 24 ...

Страница 25: ...al bracket to the touch pad assembly 5 Connect the touch pad cables to the connectors on the computer 6 Affix the adhesive tape over the touch pad assembly 7 Install the a WLAN card b battery c back cover 8 Follow the procedure in After working inside your computer Removing the coin cell battery 1 Follow the procedure in Before working inside your computer 2 Remove the a back cover b battery 3 To ...

Страница 26: ...g the coin cell battery 1 Insert the coin cell battery into the slot on the computer 2 Install the a battery b back cover 3 Follow the procedure in After working inside your computer Removing the Input Output I O board 1 Follow the procedure in Before working inside your computer 2 Remove the a back cover b battery 26 ...

Страница 27: ... c Lift and remove the I O board from the computer 5 Installing the Input Output I O board 1 Insert the I O board into the slot on the computer chassis 2 Install the screw that secures the I O board to the computer 3 Connect the I O board cables to the system board 4 Install the a WLAN card b battery c back cover 5 Follow the procedure in After working inside your computer 27 ...

Страница 28: ...connect the I O board and system board cables from the connectors on the system board 1 2 b Unroute the WLAN connector cables from the fan module 3 4 To remove the fan a Disconnect the fan connector cable from the system board 1 b Remove the screws that secure the system fan to the system board 2 c Lift and remove the system fan from the computer 3 28 ...

Страница 29: ...an module 3 Connect the I O board and system fan cable to the system board connectors 4 Install the a WLAN card b battery c back cover 5 Follow the procedure in After working inside your computer Removing the heatsink 1 Follow the procedure in Before working inside your computer 2 Remove the a back cover 29 ...

Страница 30: ...be fully removed b Remove the heatsink module from the slot on the system board 8 Installing the heatsink 1 Place the heatsink module into its slot on the system board 2 Tighten the screws to secure the heatsink module to the computer NOTE Secure the screws in the order of the callout numbers 1 2 3 4 as seen on the heatsink module Tighten the rest of the screws 3 Install the a system fan b battery...

Страница 31: ...he LED board connector cables from the system board 1 b Remove the screw that secures LED board to the computer chassis 2 c Remove the LED board from the computer 3 Installing the LED board 1 Place the LED module into its slot on the computer chassis 2 Tighten the screw to secure the LED module to the computer chassis 3 Connect the LED module cables to the computer chassis 31 ...

Страница 32: ...ing inside your computer 2 Remove the a back cover b battery 3 To remove the speaker cables a Disconnect the speaker connector cables from the system board and the LED board 1 2 b Unroute the speaker cable from around the LED board 3 4 To remove the speakers a Unroute the cables along the routing channels b Lift and remove the speakers from the computer 32 ...

Страница 33: ...ker cables to the connectors on the system board and the LED board 4 Install the a battery b back cover 5 Follow the procedure in After working inside your computer Removing the system board 1 Follow the procedure in Before working inside your computer 2 Remove the a back cover b battery c WLAN card d SSD e memory f LED board g system fan h heat sink 33 ...

Страница 34: ...he tab 1 2 3 4 6 to disconnect the cables 5 from their connectors on the system board 4 To remove the system board cables a Disconnect the display power supply cable 1 b Lift the tab to disconnect the display connector cable 2 34 ...

Страница 35: ...5 To remove the system board a Remove the screws that secure the system board to the computer chassis 1 b Lift to remove the system board away from the computer 2 35 ...

Страница 36: ...he computer 3 Connect the power supply and display cables to their connectors 4 Connect the following cables a Display power supply cable b Display connector cable 5 Install the a display assembly b system fan c LED board d heat sink e memory f SSD g WLAN card h battery i back cover 6 Follow the procedure in After working inside your computer 36 ...

Страница 37: ... entire display assembly needs to be replaced 2 Remove the a back cover b battery c WLAN card 3 To remove the display hinges a Lift the tab to disconnect the display cables from the system board 1 b Lift the display cable latch 2 c Unroute the display cable from around the system fan 3 4 d Peel away the tape that attaches the display cable to the computer 5 4 Flip the computer base around to acces...

Страница 38: ...5 To remove the display panel a Place the computer on a flat surface as indicated b Remove the screws that secure the display hinges to the computer chassis 1 c Lift to remove the display panel 2 38 ...

Страница 39: ... secure the display hinges 3 Connect the display cables to the connector on the system board 4 Affix the tape to attach the display cable to the computer 5 Route the display cables along the system fan module on the chassis 6 Install the a WLAN card b battery c back cover 7 Follow the procedure in After working inside your computer 39 ...

Страница 40: ... card e system fan f display assembly 3 To remove the display bezel a Lift the corners of the bezel with a plastic scribe to remove it Installing the display bezel 1 Place the display bezel on the display panel and press along the edges until it clicks in place 2 Install the a display assembly b WLAN card c system fan d LED board e battery 40 ...

Страница 41: ...e procedure in Before working inside your computer 2 Remove the a back cover b battery c WLAN card d LED board e system fan f display assembly g display bezel 3 To remove the display panel hinges a Remove the screws that secure the display panel hinges 1 b Lift and remove the display panel hinges from the computer 2 41 ...

Страница 42: ...n d LED board e WLAN card f battery g back cover 4 Follow the procedure in After working inside your computer Removing the camera 1 Follow the procedure in Before working inside your computer 2 Remove the a back cover b battery c WLAN card d LED board e system fan f display assembly g display bezel 3 To remove the camera a Disconnect the camera connector cable 1 b Lift to remove the camera from th...

Страница 43: ...isplay panel 3 Install the a display bezel b display assembly c system fan d LED board e WLAN card f battery g back cover 4 Follow the procedure in After working inside your computer Removing the display 1 Follow the procedure in Before working inside your computer 2 Remove the a back cover b battery c WLAN card d LED board 43 ...

Страница 44: ...ve the display a Remove the screws that secure the display 1 b Lift the display panel and turn it over 2 4 To remove the display a Peel away the adhesive tape above the display connector 1 b Disconnect the display connector and remove the display from the display panel 2 3 44 ...

Страница 45: ... edges of the display panel 4 Install the screws that secure the display to the display panel 5 Install the a display hinges b display bezel c display assembly d system fan e LED board f WLAN card g battery h back cover 6 Follow the procedure in After working inside your computer Removing the palmrest 1 Follow the procedure in Before working inside your computer 2 Remove the a back cover 45 ...

Страница 46: ...stem board 3 The palmrest can be removed after all other components have been disassembled Installing the palmrest 1 Align the palmrest into its slot on the computer chassis 2 Install the a system board b display assembly c system fan d LED board e SSD f heat sink g memory h WLAN card i battery 46 ...

Страница 47: ...e in Before working inside your computer 2 Remove the a back cover b battery c WLAN card d LED board e system fan f display assembly g SSD h memory i heat sink j system board 3 To remove the power connector a Lift the power connector cable from its routing channel 1 b Lift to remove the power connector from the computer 2 47 ...

Страница 48: ...r connector into its slot on the computer chassis 2 Install the a system board b display assembly c system fan d LED board e SSD f heat sink g memory h WLAN card i battery j back cover 3 Follow the procedure in After working inside your computer 48 ...

Страница 49: ...power strip or electrical outlet may cause fire or equipment damage Processors This laptop is shipped with the following processors 7th generation Intel Core i3 7th generation Intel Core i5 7th generation Intel Core i7 NOTE The clock speed and performance varies depending on the workload and other variables Identifying the processor in Windows 10 and Windows 8 1 Tap Search the Web and Windows 2 Ty...

Страница 50: ... usage in Resource Monitor 1 Press and hold the taskbar 2 Select Start Task Manager The Windows Task Manager window is displayed 3 Click the Performance tab in the Windows Task Manager window The processor performance details are displayed 4 Click Open Resource Monitor 50 ...

Страница 51: ...loads 5 Select the operating system installed on your laptop 6 Scroll down the page expand Chipset and select your chipset driver 7 Click Download File to download the latest version of the chipset driver for your laptop 8 After the download is complete navigate to the folder where you saved the driver file 9 Double click the chipset driver file icon and follow the instructions on the screen Ident...

Страница 52: ...Downloads 5 Select the operating system installed on your laptop 6 Scroll down the page and select the graphic driver to install 7 Click Download File to download the graphic driver for your laptop 8 After the download is complete navigate to the folder where you saved the graphic driver file 9 Double click the graphic driver file icon and follow the instructions on the screen Identifying the disp...

Страница 53: ...desktop screen A sub menu is displayed 2 Select Graphic Options Rotation and choose on of the following Rotate to Normal Rotate to 90 Degrees Rotate to 180 Degrees Rotate to 270 Degrees NOTE The Display can also be rotated using the following key combinations Ctrl Alt Up arrow key Rotate to normal Right arrow key Rotate 90 degrees Down arrow key Rotate 180 degrees Left arrow key Rotate 270 degrees...

Страница 54: ...ing the display 1 Check for any smudges or areas that has to be cleaned 2 Use a microfiber cloth to remove any obvious dust and gently brush off any dirt particles 3 Proper cleaning kits should be used to clean and keep your display in a crisp clear pristine condition NOTE Never spray any cleaning solutions directly on the screen spray it to the cleaning cloth 4 Gently wipe the screen in a circula...

Страница 55: ...ur laptop 6 Scroll down the page and expand Audio 7 Select the audio driver 8 Click Download File to download the latest version of the audio driver for your laptop 9 After the download is complete navigate to the folder where you saved the audio driver file 10 Double click the audio driver file icon and follow the instructions on the screen Identifying the audio controller in Windows 10 1 Start t...

Страница 56: ... to File Saves the key to a user selected file Replace from File Replaces the current key with a key from a user selected file Append from File Adds a key to the current database from a user selected file Delete Deletes the selected key Reset All Keys Resets to default setting Delete All Keys Deletes all the keys NOTE If you disable the Custom Mode all the changes made will be erased and the keys ...

Страница 57: ...election menu press the Volume Up button Hard drive is listed under the System Information under the General group Camera features This laptop comes with front facing camera with the image resolution of 1280 x 720 maximum This laptop also has a back facing camera NOTE The camera is at the top center of the LCD Identifying the camera in Device Manager on Windows 10 1 In the Search box type device m...

Страница 58: ... that is shipped with the laptop the camera turns on Similarly if you are chatting on the internet and the application requests to access the webcam the webcam turns on Starting the camera application 1 Tap or click the Windows button and select All apps 2 Select Camera from the apps list 3 If the Camera App is not available in the apps list search for it 58 ...

Страница 59: ... System tap About Verifying system memory in Windows 8 1 From your desktop start the Charms Bar 2 Select Control Panel and then select System Verifying system memory in system setup BIOS 1 Turn on or restart your laptop 2 Perform one of the following actions after the Dell logo is displayed With keyboard Tap F2 until the Entering BIOS setup message appears To enter the Boot selection menu tap F12 ...

Страница 60: ...agnostics from the boot menu and press Enter The PreBoot System Assessment PSA starts on your laptop NOTE If you wait too long and the operating system logo appears continue to wait until you see the desktop Turn off the laptop and try again Intel chipset drivers Verify if the Intel chipset drivers are already installed in the laptop Table 2 Intel chipset drivers Before installation After installa...

Страница 61: ...hics drivers Before installation After installation Realtek HD audio drivers Verify if the Realtek audio drivers are already installed in the laptop Table 4 Realtek HD audio drivers Before installation After installation 61 ...

Страница 62: ...changes can cause your computer to work incorrectly Boot Sequence Boot Sequence allows you to bypass the System Setup defined boot device order and boot directly to a specific device for example hard drive During the Power on Self Test POST when the Dell logo appears you can Access System Setup by pressing F2 key Bring up the one time boot menu by pressing F12 key The one time boot menu displays t...

Страница 63: ...ed and connected to a power outlet 1 Restart the computer 2 Go to Dell com support 3 Enter the Service Tag or Express Service Code and click Submit NOTE To locate the Service Tag click Where is my Service Tag NOTE If you cannot find your Service Tag click Detect My Product Proceed with the instructions on screen 4 If you are unable to locate or find the Service Tag click the Product Category of yo...

Страница 64: ...e of processor CPU Speed Displays the speed of the processor CPU ID Displays the processor ID L1 Cache Displays the processor L1 cache size L2 Cache Displays the processor L2 cache size L3 Cache Displays the processor L3 cache size Fixed HDD Displays the model number and capacity of the hard drive mSATA Device Displays the model number and capacity of the optical drive System Memory Displays the m...

Страница 65: ...or delete the administrator password Set System Password Allows you to change or delete the system password Set HDD Password Allows you to set a password on the computer s internal hard drive HDD Password Change Allows you to change the security password Password Bypass Allows you to bypass the system password and the internal HDD password prompts during a system restart resume from hibernate stat...

Страница 66: ...lb System information specifications Feature Specification DRAM bus width 64 bit Flash EPROM SPI 128 Mbits PCIe 3 0 bus 8 0 GHz Processor specifications Feature Specification Types 7th generation Intel Core i3 Processor 7th generation Intel Core i5 Processor 7th generation Intel Core i7 Processor Memory specifications Feature Specification Memory connector Two SODIMM slots Memory capacity 32 GB Me...

Страница 67: ...er 2 W RMS Microphone Digital array microphone Volume controls Media control shortcut keys Video specifications Feature Specification Type Intel UMA Integrated HD Intel Iris Gfx 15W 28W nVidia GeForce 940MX uppto 4 GB GDDR5 Controller UMA Intel core i3 i5 i7 Intel core i3 i5 i7 Intel HD Graphics 610 Intel HD Graphics 620 Intel HD Graphics 635 Intel Iris Graphics 640 Intel Iris Graphics 650 Communi...

Страница 68: ...5 F Storage 40 C to 65 C 40 F to 149 F Operating time 4 hours when the computer is off Coin cell battery 3 V CR2032 lithium coin cell Ports and connector specifications Feature Specification Audio one microphone stereo headphone speakers connector Video one 19 pin HDMI port one 15 pin VGA port Network adapter one RJ 45 connector Docking port one USB ports one 9 pin USB 3 0 compliant port with Powe...

Страница 69: ...g angles horizontal 70 minimum for HD Maximum viewing angles vertical 70 minimum for HD Pixel pitch 0 1875 mm Touchpad specifications Feature Specification Active Area X axis 99 50 mm Y axis 53 00 mm Keyboard specifications Feature Specification Number of keys 83 keys US English Thai French Canadian Korean Russian Hebrew English International 84 keys UK English French Canadian Quebec German French...

Страница 70: ... F to 104 F Temperature range nonoperating 40 C to 70 C 40 F to 158 F Environmental specifications Feature Specifications Temperature operating 0 C to 35 C 32 F to 95 F Temperature storage 40 C to 65 C 40 F to 149 F Relative humidity maximum operating 10 to 90 noncondensing Relative humidity maximum storage 0 to 95 noncondensing Altitude maximum operating 15 2 m to 3048 m 50 ft to 10 000 ft Altitu...

Страница 71: ...m Clock Speed Maximum Clock Speed Processor L2 Cache Processor L3 Cache HT Capable and 64 bit technology Device Information SATA 0 M 2 PCIe SSD 0 Video Controller Video BIOS Version Video Memory Panel Type Native Resolution Audio Controller WiFi Device WiGig Device Cellular Device Bluetooth Device Battery Information Displays the battery status and the type of AC adapter connected to the computer ...

Страница 72: ... this port The options are Enable USB Boot Support by default enable Enable External USB Port by default enable Enable Thunderbolt Port by default enable Enable Thunderbolt Boot Support This is an optional feature Always Allows Dell Docks This is an optional feature Enables Thunderbolt and PCIe behind TBT Pre boot NOTE USB keyboard and mouse always work in the BIOS setup irrespective of these sett...

Страница 73: ...light Time out on Battery The Keyboard Backlight Time out dims out with Battery option The main keyboard illumination feature is not affected Keyboard Illumination will continue to support the various illumination levels This field has an effect when the backlight is enabled Options are 5 seconds 10 seconds this option is selected by default 15 seconds 30 seconds 1 minute 5 minute 15 minute never ...

Страница 74: ...ni card Solid State Drive SSD NOTE Successful password changes take effect immediately Default setting Not set Strong Password Allows you to enforce the option to always set strong passwords Default Setting Enable Strong Password is not selected NOTE If Strong Password is enabled Admin and System passwords must contain at least one uppercase character one lowercase character and be at least 8 char...

Страница 75: ...Bypass for Disabled Commands Activate Deactivate NOTE To upgrade or downgrade TPM1 2 2 0 download the TPM wrapper tool software Computrace Allows you to activate or disable the optional Computrace software The options are Deactivate Disable Activate NOTE The Activate and Disable options will permanently activate or disable the feature and no further changes will be allowed Default setting Deactiva...

Страница 76: ...you disable the Custom Mode all the changes made will be erased and the keys will restore to default settings Performance screen options Option Description Multi Core Support This field specifies whether the process has one or all cores enabled The performance of some applications improves with the additional cores This option is enabled by default Allows you to enable or disable multi core suppor...

Страница 77: ...on automatically when an AC adapter is connected Default setting Wake on AC is not selected Auto On Time Allows you to set the time at which the computer must turn on automatically The options are Disabled Every Day Weekdays Select Days Default setting Disabled USB Wake Support Allows you to enable USB devices to wake the system from Standby NOTE This feature is only functional when the AC power a...

Страница 78: ...mode for the battery The options are Adaptive Standard Fully charges your battery at a standard rate ExpressCharge The battery charges over a shorter period of time using Dell s fast charging technology This option is enabled by default Primarily AC use Custom If Custom Charge is selected you can also configure Custom Charge Start and Custom Charge Stop NOTE All charging mode may not be available ...

Страница 79: ...cally the primary behavior of these keys The available options are Fn Lock This option is selected by default Lock Mode Disable Standard Lock Mode Enable Secondary MEBx Hotkey Allows you to specify whether the MEBx Hotkey function should enable during the system boot Default Setting Enable MEBx Hotkey Fastboot Allows you to speed up the boot process by bypassing some of the compatibility steps The...

Страница 80: ...ions Option Description Wireless Switch Allows to set the wireless devices that can be controlled by the wireless switch The options are WWAN GPS on WWAN Module WLAN WiGig Bluetooth All the options are enabled by default NOTE For WLAN and WiGig enable or disable controls are tied together and they cannot be enabled or disabled independently Wireless Device Enable Allows you to enable or disable th...

Страница 81: ...tain corrupted BIOS conditions from a recover file on the user primary hard drive or an external USB key BIOS Recovery from Hard Drive enabled by default System Log screen options Option Description BIOS Events Allows you to view and clear the System Setup BIOS POST events Thermal Events Allows you to view and clear the System Setup Thermal events Power Events Allows you to view and clear the Syst...

Страница 82: ...ntroduce additional test options to provide extra information about the failed device s View status messages that inform you if tests are completed successfully View error messages that inform you of problems encountered during testing CAUTION Use the system diagnostics to test only your computer Using this program with other computers may cause invalid results or error messages NOTE Some tests fo...

Страница 83: ... recovery 1 3 4 BIOS recovery 2 4 1 CPU configuration or CPU failure 4 2 Generic POST video error old LED pattern 1110 Battery status lights Table 10 Battery LED Behavior Battery charge LED Status LED behavior AC mode All White Fully charged Off Battery mode Low to Fully charged Off Discharging when Battery charge is 10 Solid Yellow 83 ...

Страница 84: ... based support and service options Availability varies by country and product and some services may not be available in your area To contact Dell for sales technical support or customer service issues 1 Go to Dell com support 2 Select your support category 3 Verify your country or region in the Choose a Country Region drop down list at the bottom of the page 4 Select the appropriate service or sup...

Отзывы: