background image

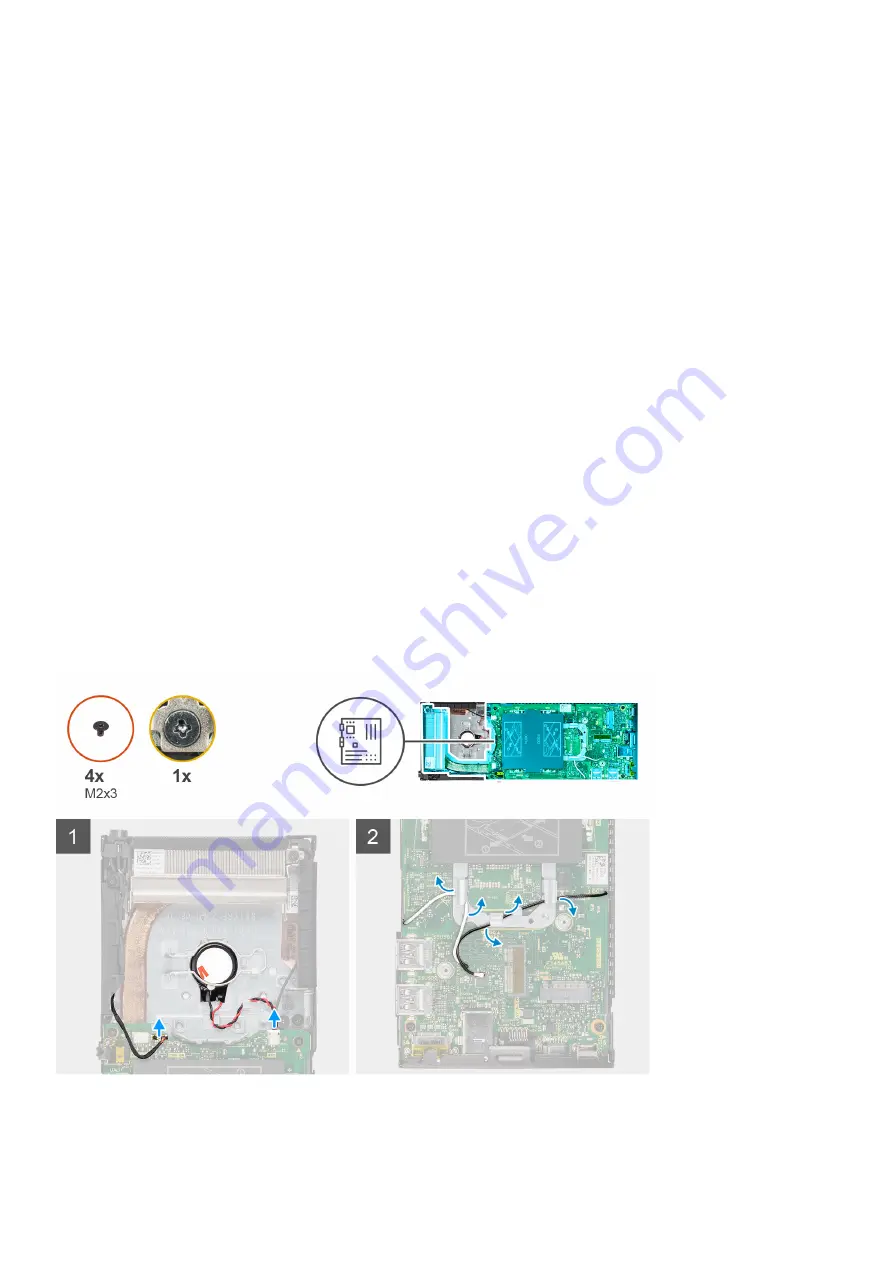
4. Route the coin-cell battery cable through the routing guide.
5. Connect the coin-cell battery cable to the connector on the system board.

Next steps

1. Install the 

system fan

.

2. Install the 

cover

.

3. Install the device on 

Fixed stand

/

Pro 1 height-adjustable stand

/

Offset VESA mount

/

Pro 2 height-adjustable stand

/

Wall

mount

.

4. Follow the procedure in 

after working on your device

.

System board

Removing the system board

Prerequisites

1. Follow the procedure in 

before working inside your device

.

2. Remove the device from 

fixed stand

/

Pro 1 height-adjustable stand

/

Offset VESA mount

/

Pro 2 height-adjustable stand

/

Wall

mount

.

3. Remove the 

hard-drive assembly

.

4. Remove the 

cover

.

5. Remove the 

system fan

.

6. Remove the 

WLAN card

.

7. Remove the 

solid-state drive

.

8. Remove the 

memory module

.

About this task

The figure indicates the location of the system board and provides a visual representation of the removal procedure.

Removing and installing components

115

Содержание OptiPlex 3090 Ultra

Страница 1: ...OptiPlex 3090 Ultra Service Manual Regulatory Model D13U Regulatory Type D13U003 August 2021 Rev A01 ...

Страница 2: ...ential damage to hardware or loss of data and tells you how to avoid the problem WARNING A WARNING indicates a potential for property damage personal injury or death 2021 Dell Inc or its subsidiaries All rights reserved Dell EMC and other trademarks are trademarks of Dell Inc or its subsidiaries Other trademarks may be trademarks of their respective owners ...

Страница 3: ...t 34 Installing device on offset VESA mount 34 Removing the device from offset VESA mount 41 Pro 2 Height adjustable stand HAS 43 Installing the device on a Pro 2 height adjustable stand 43 Removing the device from a Pro 2 height adjustable stand 58 Stand tilt pivot and swivel images 62 Wall Mount 65 Installing device on Wall Mount 65 Removing the device from Wall Mount 80 Chapter 3 Removing and i...

Страница 4: ...lling the coin cell battery 114 System board 115 Removing the system board 115 Installing the system board 116 Heat sink 118 Removing the heat sink 118 Installing the heat sink 119 Replacing the chassis 121 Chapter 4 Software 122 Drivers and downloads 122 Chapter 5 System setup 123 BIOS overview 123 Entering BIOS setup program 123 Navigation keys 123 One time boot menu 124 System setup options 124...

Страница 5: ...k diagnostics 137 Running the SupportAssist Pre Boot System Performance Check 137 Diagnostic LED 138 Recovering the operating system 138 Real Time Clock RTC Reset 139 Backup media and recovery options 139 WiFi power cycle 139 Chapter 7 Getting help and contacting Dell 140 Contents 5 ...

Страница 6: ... is not covered by your warranty See the safety instructions that is shipped with the product or at www dell com regulatory_compliance CAUTION Before touching anything inside your computer ground yourself by touching an unpainted metal surface such as the metal at the back of the computer While you work periodically touch an unpainted metal surface to dissipate static electricity which could harm ...

Страница 7: ...t strap should be secure and in full contact with your skin and ensure that you remove all jewelry such as watches bracelets or rings prior to bonding yourself and the equipment Electrostatic discharge ESD protection ESD is a major concern when you handle electronic components especially sensitive components such as expansion cards processors memory DIMMs and system boards Very slight charges can ...

Страница 8: ...est once per week A wrist strap tester is the best method for doing this test If you do not have your own wrist strap tester check with your regional office to find out if they have one To perform the test plug the wrist strap s bonding wire into the tester while it is strapped to your wrist and push the button to test A green LED is lit if the test is successful a red LED is lit and an alarm soun...

Страница 9: ...About this task After you complete any replacement procedure ensure that you connect any external devices cards and cables before turning on your device Steps 1 Replace all screws and ensure that no stray screws remain inside your device 2 Connect your computer and all attached devices to their electrical outlets 3 Turn on your device 4 If required verify that the device works correctly by running...

Страница 10: ...Fixed stand Installing the device on a fixed stand Steps 1 Align and insert the slots on the fixed stand into the tab on the stand base 2 Lift and tilt the stand base 3 Tighten the captive screw to secure the stand to the base 4 Slide the release latch on the stand until you hear a click to release the stand cover 2 10 Stands ...

Страница 11: ...ft the cover to release it from the stand 6 Remove the screw that secures the stand mounting bracket to the stand 7 Lift the mounting bracket to release the hooks on the bracket from the slots on the stand Stands 11 ...

Страница 12: ...onitor ensure that you place the monitor on a protective sheet 9 Align the screws on the mounting bracket with the screw holes on the monitor 10 Tighten the four captive screws to secure the mounting bracket to the monitor 12 Stands ...

Страница 13: ...1 Select the height at which you want to mount the monitor and align the hooks on the mounting bracket with the slots on the stand 12 Replace the screw to secure the fixed stand to the monitor Stands 13 ...

Страница 14: ...e stand until you hear a click 15 Connect the power network keyboard mouse and display cables to the device and to the power outlet NOTE To avoid any pinching or crimping of the cables while closing the stand cover it is recommended that you route the cables as indicated in the image 14 Stands ...

Страница 15: ...TE All the cables and ports are used depending on the peripherals chosen and the configuration of the computer 16 Slide the back cover along with the device into the stand until you hear a click Stands 15 ...

Страница 16: ...17 Lock the device and the stand cover 16 Stands ...

Страница 17: ...18 Press the power button to turn on the device Stands 17 ...

Страница 18: ...Removing the device from a fixed stand Prerequisites 1 Follow the procedure in before working inside your device Steps 1 Unlock the device and the stand cover 18 Stands ...

Страница 19: ...2 Slide the release latch on the stand until you hear a click to release the stand cover 3 Slide and lift the back cover to release it from the stand Stands 19 ...

Страница 20: ...4 Disconnect the keyboard mouse network power and display cable from the device NOTE All the cables and ports are used depending on the peripherals chosen and the configuration of the computer 20 Stands ...

Страница 21: ...Press and hold the power button while the device is unplugged to ground the system board NOTE To avoid electrostatic discharge ground yourself by using a wrist grounding strap or by periodically touching an unpainted metal surface at the same time as touching a connector on the back of the computer Stands 21 ...

Страница 22: ... Installing the device on a Pro 1 height adjustable stand Steps 1 Align and insert the slots on the height adjustable stand into the tab on the stand base 2 Lift and tilt the stand base 3 Tighten the captive screw to secure the stand to the base 22 Stands ...

Страница 23: ...ure that you place the monitor on a protective sheet 5 For installing the height adjustable stand to the monitor a Align and insert the hooks on the mounting bracket on the stand into the slots on the monitor until you hear a click Stands 23 ...

Страница 24: ...R to VESA bracket with the screw holes on the monitor b Install the four screw spacers and the screws to secure the QR to VESA bracket to the monitor c Align and insert the QR tabs on the stand into the slots on the QR to VESA bracket on the monitor d Tighten the thumb screw to secure the stand to the QR to VESA bracket 24 Stands ...

Страница 25: ...ide the release latch until you hear a click 8 Slide and lift the cover to release it from the stand 9 Align the vents on the device with the vents on the stand cover 10 Lower the device in the stand until you hear a click Stands 25 ...

Страница 26: ... power outlet NOTE To avoid any pinching or crimping of the cables while closing the stand cover it is recommended that you route the cables as indicated in the image NOTE All the cables and ports are used depending on the peripherals chosen and the configuration of the computer 26 Stands ...

Страница 27: ...12 Slide the back cover along with the device into the stand until you hear a click Stands 27 ...

Страница 28: ...13 Lock the device and the stand cover 28 Stands ...

Страница 29: ...14 Press the power button to turn on the device Stands 29 ...

Страница 30: ...oving the device from Pro 1 height adjustable stand Prerequisites 1 Follow the procedure in before working inside your device Steps 1 Turn off your device 2 Unlock the device and the stand cover 30 Stands ...

Страница 31: ...3 Slide the release latch on the stand until you hear a click to release the stand cover 4 Slide and lift the back cover to release it from the stand Stands 31 ...

Страница 32: ...5 Disconnect the keyboard mouse network power and display cable from the device NOTE All the cables and ports are used depending on the peripherals chosen and the configuration of the computer 32 Stands ...

Страница 33: ...Press and hold the power button while the device is unplugged to ground the system board NOTE To avoid electrostatic discharge ground yourself by using a wrist grounding strap or by periodically touching an unpainted metal surface at the same time as touching a connector on the back of the computer Stands 33 ...

Страница 34: ...ges Offset VESA mount Installing device on offset VESA mount Steps 1 Align the screw holes on the device with the screw holes on the offset VESA mount 2 Install the four screws to secure the device to the offset VESA mount 34 Stands ...

Страница 35: ...ure that you place the monitor on a protective sheet 4 Align the screw holes on the offset VESA mount with the screw holes on the monitor 5 Install the four screw spacers and the screws to secure the offset VESA mount to the monitor Stands 35 ...

Страница 36: ...6 Insert the hooks on the mounting bracket of the monitor arm stand into the slots on the offset VESA mount on the monitor 7 Lower the monitor on the monitor arm stand until you hear a click 36 Stands ...

Страница 37: ...8 To install the offset VESA mount on a Dell E Series monitor a Align and install the four screws to secure the device to the offset VESA mount Stands 37 ...

Страница 38: ...b Remove the VESA cover from the back of the monitor and secure the offset VESA mount along with the device to the monitor 38 Stands ...

Страница 39: ...Stands 39 ...

Страница 40: ...40 Stands ...

Страница 41: ...e your device Steps 1 Turn off your device 2 Disconnect the keyboard mouse network power and display cable from the device 3 Push the quick release button on the VESA mount 4 Slide and remove the monitor arm from the offset VESA mount U P series monitor NOTE For E series monitor remove the VESA cover 5 Remove the four screws that secure the offset VESA mount to the monitor 6 Remove the four holder...

Страница 42: ...the monitor 8 Remove the four screws that secure the device to the offset VESA mount 9 Lift the device away from the offset VESA mount 10 Press and hold the power button while the device is unplugged to ground the system board 42 Stands ...

Страница 43: ...able stand HAS Installing the device on a Pro 2 height adjustable stand Steps 1 Align and insert the slots on the height adjustable stand into the tab on the stand base 2 Lift and tilt the stand base 3 Tighten the captive screw to secure the stand to the base NOTE For the large height adjustable stand replacing the screw to the unlock icon screw hole in the stand base ensures the rotation of the 3...

Страница 44: ...ure that you place the monitor on a protective sheet 5 For installing the height adjustable stand to the monitor a Align and insert the hooks on the mounting bracket on the stand into the slots on the monitor until you hear a click 44 Stands ...

Страница 45: ...Stands 45 ...

Страница 46: ...R to VESA bracket with the screw holes on the monitor b Install the four screw spacers and the screws to secure the QR to VESA bracket to the monitor c Align and insert the QR tabs on the stand into the slots on the QR to VESA bracket on the monitor d Tighten the thumb screw to secure the stand to the QR to VESA bracket 46 Stands ...

Страница 47: ...Stands 47 ...

Страница 48: ...7 To release the stand cover press the button on the side of the stand chassis 8 Slide and lift the cover to release it from the stand 48 Stands ...

Страница 49: ...9 Slide and release the inner bar on the lower edge of the stand cover Stands 49 ...

Страница 50: ...10 Align the vents on the device with the vents on the stand cover and slide the device in the cover 50 Stands ...

Страница 51: ...11 Slide the inner bar back to the lower edge of the stand cover to lock the device to the cover Stands 51 ...

Страница 52: ...12 Connect the power network keyboard mouse and display cables to the device and to the power outlet 52 Stands ...

Страница 53: ...hile closing the stand cover it is recommended that you route the cables as indicated in the image NOTE All the cables and ports are used depending on the peripherals chosen and the configuration of the computer Standard Height Adjustable Stand Stands 53 ...

Страница 54: ...Large Height Adjustable Stand 54 Stands ...

Страница 55: ...14 Slide the stand cover along with the device into the stand until you hear a click Stands 55 ...

Страница 56: ...15 Lock the device and the stand cover 56 Stands ...

Страница 57: ...16 Press the power button to turn on the device Stands 57 ...

Страница 58: ...nd Prerequisites 1 Follow the procedure in before working inside your device Steps 1 Turn off your device 2 Press the button on the side of the stand chassis to release the stand cover 3 Slide and lift the back cover to release it from the stand 58 Stands ...

Страница 59: ...4 Disconnect the keyboard mouse network power and display cable from the device Stands 59 ...

Страница 60: ...5 Slide and release the inner bar on the lower edge of the stand cover that secures the device to the stand chassis 60 Stands ...

Страница 61: ...6 Slide and remove the device from the cover 7 Slide the inner bar back to the lower edge of the stand cover Stands 61 ...

Страница 62: ...m board NOTE To avoid electrostatic discharge ground yourself by using a wrist grounding strap or by periodically touching an unpainted metal surface at the same time as touching a connector on the back of the computer Stand tilt pivot and swivel images For 19 inch to 27 inch monitor Standard height adjustable stand 62 Stands ...

Страница 63: ...For 30 inch to 32 inch monitor Large height adjustable stand Stands 63 ...

Страница 64: ...For monitors 32 inch Large height adjustable stand 64 Stands ...

Страница 65: ...nstalling device on Wall Mount Steps 1 Full Function a Press the release button to open the cable cover b Align the screw holes on the wall mount in the wall and mark them against the wall using a pencil Stands 65 ...

Страница 66: ...c Drill the screw marks on the wall and insert the three screw anchors into the screw holes in the wall 66 Stands ...

Страница 67: ...d Align the screw holes on the wall mount with the screw holes on the wall and install the three screws to secure the wall mount in the wall Stands 67 ...

Страница 68: ...e Align the screw holes on the device with the screw holes on the wall mount bracket f Install the four screws to secure the device to the wall mount bracket 68 Stands ...

Страница 69: ...on the mounting bracket of the wall mount into the slots on the wall mount bracket module h Align and insert the hooks on the wall mount bracket module into the slots on the wall mount until it clicks into place Stands 69 ...

Страница 70: ...i Connect the power network keyboard mouse and display cables to the device and to the power outlet 70 Stands ...

Страница 71: ... of the cables while closing the stand cover it is recommended that you route the cables as indicated in the image NOTE All the cables and ports are used depending on the peripherals chosen and the configuration of the computer Stands 71 ...

Страница 72: ...k Close the stand cover 72 Stands ...

Страница 73: ...l Lock the device and the stand cover Stands 73 ...

Страница 74: ...2 Simple Function a Align the screw holes on the wall mount in the wall and mark them using a pencil 74 Stands ...

Страница 75: ...b Drill the screw marks on the wall and insert the two screws into the screw holes in the wall Stands 75 ...

Страница 76: ...c Align the screw holes on the device with the screw holes on the wall mount bracket d Install the four screws to secure the device to the wall mount bracket 76 Stands ...

Страница 77: ...e Connect the power network keyboard mouse and display cables to the device and to the power outlet Stands 77 ...

Страница 78: ...f Align the screws on the wall with the retention clips on the wall mount bracket module g Mount the wall mount bracket module in the screws on the wall 78 Stands ...

Страница 79: ...h Press the power button to turn on the device Stands 79 ...

Страница 80: ...ving the device from Wall Mount Prerequisites 1 Follow the procedure in before working inside your device Steps 1 Turn off your device 2 For full function wall mount a Unlock the wall mount module 80 Stands ...

Страница 81: ...b Open the wall mount cover Stands 81 ...

Страница 82: ...c Disconnect the keyboard mouse network power and display cable from the device 82 Stands ...

Страница 83: ...d Snap open the wall mount bracket module from the slots on the wall mount Stands 83 ...

Страница 84: ...e Remove the four screws that secure the device to the wall mount bracket f Lift the device away from the wall mount bracket 84 Stands ...

Страница 85: ...3 For simple function wall mount a Unmount the wall mount bracket module from the wall b Disconnect the keyboard mouse network power adapter and display cable from the device Stands 85 ...

Страница 86: ...c Remove the four screws that secure the device to the wall mount bracket d Lift the device away from the wall mount bracket 86 Stands ...

Страница 87: ...nplugged to ground the system board NOTE To avoid electrostatic discharge ground yourself by using a wrist grounding strap or by periodically touching an unpainted metal surface at the same time as touching a connector on the back of the computer Stands 87 ...

Страница 88: ...le System fan Power button Coin cell battery System board Heat sink Replacing the chassis Recommended tools The procedures in this document require the following tools Phillips 0 screwdriver Phillips 1 screwdriver Plastic scribe Screw List The following table shows the screw list and the images for different components Table 1 Screw Size List Component Screw type Quantity Image Power button M2x3 1...

Страница 89: ...Table 1 Screw Size List continued Component Screw type Quantity Image M 2 WLAN card M2x3 5 1 M 2 2230 Solid state drive or EMMC M2x3 5 1 Removing and installing components 89 ...

Страница 90: ...Major components of your system 1 Cover 90 Removing and installing components ...

Страница 91: ...ty coverages purchased by the customer Contact your Dell sales representative for purchase options Hard drive assembly Removing the hard drive assembly Prerequisites 1 Follow the procedure in before working inside your device 2 Remove the device from fixed stand Pro 1 height adjustable stand Offset VESA mount Pro 2 height adjustable stand Wall mount About this task The figure indicates the locatio...

Страница 92: ...ive cable from the routing guide on the chassis NOTE Observe the routing of the hard drive cable inside the chassis as you remove them Route the cable properly when you replace the component to prevent the cable from being pinched or crimped 5 Remove the hard drive assembly Installing the hard drive assembly Prerequisites If you are replacing a component remove the existing component before perfor...

Страница 93: ...and close the latch to secure the cable 4 Turn the hard drive assembly module and align the tabs on the hard drive assembly with the slots on the chassis 5 Align the screw hole on the hard drive assembly with the screw hole on the chassis 6 Replace the M2x3 screw to secure the hard drive assembly to the chassis Next steps 1 Install the device on Fixed stand Pro 1 height adjustable stand Offset VES...

Страница 94: ... mount Pro 2 height adjustable stand Wall mount 3 Remove the hard drive assembly About this task Steps Pull the rubber tab on the protective sleeve and lift the hard drive module out from the hard drive bracket Installing the hard drive bracket Prerequisites If you are replacing a component remove the existing component before performing the installation procedure 94 Removing and installing compon...

Страница 95: ...e in after working on your device Hard drive Removing the hard drive Prerequisites 1 Follow the procedure in before working inside your device 2 Remove the device from fixed stand Pro 1 height adjustable stand Offset VESA mount Pro 2 height adjustable stand Wall mount 3 Remove the hard drive assembly 4 Remove the hard drive bracket About this task The figure indicates the location of the hard driv...

Страница 96: ...e out of the protective sleeve Installing the hard drive Prerequisites If you are replacing a component remove the existing component before performing the installation procedure About this task The figure indicates the location of the hard drive module and provides a visual representation of the installation procedure 96 Removing and installing components ...

Страница 97: ... along the hard drive edges 3 Connect the hard drive cable to the connector on the hard drive Next steps 1 Install the hard drive bracket 2 Install the hard drive assembly 3 Install the device on Fixed stand Pro 1 height adjustable stand Offset VESA mount Pro 2 height adjustable stand Wall mount 4 Follow the procedure in after working on your device Removing and installing components 97 ...

Страница 98: ...fixed stand Pro 1 height adjustable stand Offset VESA mount Pro 2 height adjustable stand Wall mount About this task The figure indicates the location of the cover and provides a visual representation of the removal procedure Steps Slide and lift the cover to release it from the chassis 98 Removing and installing components ...

Страница 99: ... and provides a visual representation of the installation procedure Steps 1 Align the tabs on the cover with the slots on the chassis 2 Slide the cover until it clicks into place Next steps 1 Install the device on Fixed stand Pro 1 height adjustable stand Offset VESA mount Pro 2 height adjustable stand Wall mount 2 Follow the procedure in after working on your device Removing and installing compon...

Страница 100: ... Wall mount 3 Remove the cover About this task The figure indicates the location of the memory module and provides a visual representation of the removal procedure Steps 1 Lift the absorber above the memory module 2 Gently pry the retention clips away from the memory module until the memory module pops up 3 Slide and remove the memory module from the memory module slot on the system board 100 Remo...

Страница 101: ...sentation of the installation procedure Steps 1 Lift the absorber above the memory module slot and align the notch on the memory module with the tab on the memory module slot 2 Slide the memory module firmly into the slot at an angle 3 Press the memory module down until it clicks into place NOTE If you do not hear the click remove the memory module and reinstall it 4 Lower the absorber above the m...

Страница 102: ...N card Removing the WLAN card Prerequisites 1 Follow the procedure in before working inside your device 2 Remove the device from fixed stand Pro 1 height adjustable stand Offset VESA mount Pro 2 height adjustable stand Wall mount 3 Remove the cover About this task The figure indicates the location of the WLAN card and provides a visual representation of the removal procedure 102 Removing and insta...

Страница 103: ...the WLAN card Prerequisites If you are replacing a component remove the existing component before performing the installation procedure About this task The figure indicates the location of the WLAN card and provides a visual representation of the installation procedure Steps 1 Connect the WLAN antenna cables to the WLAN card The following table provides the antenna cable color scheme for the WLAN ...

Страница 104: ...he cover 2 Install the device on Fixed stand Pro 1 height adjustable stand Offset VESA mount Pro 2 height adjustable stand Wall mount 3 Follow the procedure in after working on your device Internal solid state drive Removing the solid state drive Prerequisites 1 Follow the procedure in before working inside your device 2 Remove the device from fixed stand Pro 1 height adjustable stand Offset VESA ...

Страница 105: ...lid state drive thermal pad from the system board Installing the solid state drive Prerequisites If you are replacing a component remove the existing component before performing the installation procedure About this task The figure indicates the location of the M 2 2230 solid state drive and provides a visual representation of the installation procedure Removing and installing components 105 ...

Страница 106: ...tor on the system board and slide the solid state drive at an angle into the slot 3 Replace the M2x3 5 screw to secure the solid state drive module to the system board Next steps 1 Install the cover 2 Install the device on Fixed stand Pro 1 height adjustable stand Offset VESA mount Pro 2 height adjustable stand Wall mount 3 Follow the procedure in after working on your device 106 Removing and inst...

Страница 107: ...rage module and provides a visual representation of the removal procedure Steps 1 Remove the M2x3 5 screw that secures the eMMC storage module to the connector on the system board 2 Lift and slide the eMMC storage module at an angle out from the slot Installing the eMMC storage module Prerequisites If you are replacing a component remove the existing component before performing the installation pr...

Страница 108: ...set VESA mount Pro 2 height adjustable stand Wall mount 3 Follow the procedure in after working on your device System fan Removing the system fan Prerequisites 1 Follow the procedure in before working inside your device 2 Remove the device from fixed stand Pro 1 height adjustable stand Offset VESA mount Pro 2 height adjustable stand Wall mount 3 Remove the cover About this task The figure indicate...

Страница 109: ... from the guiding rails on the heat sink bracket Installing the system fan Prerequisites If you are replacing a component remove the existing component before performing the installation procedure About this task The figure indicates the location of the system fan and provides a visual representation of the installation procedure Removing and installing components 109 ...

Страница 110: ...ro 2 height adjustable stand Wall mount 3 Follow the procedure in after working on your device Power button Removing the power button Prerequisites 1 Follow the procedure in before working inside your device 2 Remove the device from fixed stand Pro 1 height adjustable stand Offset VESA mount Pro 2 height adjustable stand Wall mount 3 Remove the cover 4 Remove the system fan About this task The fig...

Страница 111: ... prevent the cable from being pinched or crimped 3 Remove the M2x3 screw that secures the power button to the chassis 4 Lift the power button out of the chassis Installing the power button Prerequisites If you are replacing a component remove the existing component before performing the installation procedure About this task The figure indicates the location of the power button and provides a visu...

Страница 112: ...outing guides on the chassis 4 Connect the power button cable to the connector on the system board Next steps 1 Install the system fan 2 Install the cover 3 Install the device on Fixed stand Pro 1 height adjustable stand Offset VESA mount Pro 2 height adjustable stand Wall mount 4 Follow the procedure in after working on your device 112 Removing and installing components ...

Страница 113: ...t Pro 2 height adjustable stand Wall mount 3 Remove the cover 4 Remove the system fan About this task The figure indicates the location of the coin cell battery and provides a visual representation of the removal procedure Steps 1 Disconnect the coin cell battery cable from the connector on the system board 2 Unroute the coin cell battery cable from the routing guide Removing and installing compon...

Страница 114: ...the coin cell battery Installing the coin cell battery Prerequisites If you are replacing a component remove the existing component before performing the installation procedure About this task The figure indicates the location of the coin cell battery and provides a visual representation of the installation procedure Steps 1 Place the coin cell battery in the slot on the chassis 2 Close the coin c...

Страница 115: ...ice System board Removing the system board Prerequisites 1 Follow the procedure in before working inside your device 2 Remove the device from fixed stand Pro 1 height adjustable stand Offset VESA mount Pro 2 height adjustable stand Wall mount 3 Remove the hard drive assembly 4 Remove the cover 5 Remove the system fan 6 Remove the WLAN card 7 Remove the solid state drive 8 Remove the memory module ...

Страница 116: ...event the cables from being pinched or crimped 4 Loosen the M2x3 captive screw and remove the four M2x3 screws that secure the system board to the chassis 5 Slightly lift and slide the system board out of the chassis NOTE The system board is removed along with the heat sink connected to it Installing the system board Prerequisites If you are replacing a component remove the existing component befo...

Страница 117: ...ors on the system board with the connector slots on the chassis NOTE The system board is installed along with the heat sink connected to it 2 Gently slide the system board into the chassis Removing and installing components 117 ...

Страница 118: ...nstall the cover 6 Install the hard drive assembly 7 Install the device on Fixed stand Pro 1 height adjustable stand Offset VESA mount Pro 2 height adjustable stand Wall mount 8 Follow the procedure in after working on your device Heat sink Removing the heat sink Prerequisites 1 Follow the procedure in before working inside your device 2 Remove the device from fixed stand Pro 1 height adjustable s...

Страница 119: ... sink away from the system board Installing the heat sink Prerequisites If you are replacing a component remove the existing component before performing the installation procedure About this task The figure indicates the location of the heat sink and provides a visual representation of the installation procedure Removing and installing components 119 ...

Страница 120: ...xt steps 1 Install the system board 2 Install the solid state drive 3 Install the memory module 4 Install the WLAN card 5 Install the system fan 6 Install the cover 7 Install the hard drive assembly 8 Install the device on Fixed stand Pro 1 height adjustable stand Offset VESA mount Pro 2 height adjustable stand Wall mount 9 Follow the procedure in after working on your device 120 Removing and inst...

Страница 121: ...ht adjustable stand Wall mount 3 Remove the hard drive assembly 4 Remove the cover 5 Remove the system fan 6 Remove the WLAN card 7 Remove the solid state drive 8 Remove the power button 9 Remove the memory module 10 Remove the coin cell battery 11 Remove the system board About this task After removing the above components we are left with the chassis Removing and installing components 121 ...

Страница 122: ...with instructions on how to install the drivers Topics Drivers and downloads Drivers and downloads When troubleshooting downloading or installing drivers it is recommended that you read the Dell Knowledge Based article Drivers and Downloads FAQ 000123347 4 122 Software ...

Страница 123: ...view Entering BIOS setup program Navigation keys One time boot menu System setup options Updating the BIOS System and setup password Clearing BIOS System Setup and System passwords BIOS overview The BIOS manages data flow between the computer s operating system and attached devices such as hard disk video adapter keyboard mouse and printer Entering BIOS setup program Steps 1 Turn on your computer ...

Страница 124: ...he SATA drive number Optical Drive if available SATA Hard Drive if available Diagnostics The boot sequence screen also displays the option to access the System Setup screen System setup options NOTE Depending on your system and its installed devices the items that are listed in this section may or may not appear Table 4 System setup options System information menu Overview OptiPlex 3090 Ultra BIOS...

Страница 125: ... SLOT2 Displays the memory in SLOT2 Devices Information Video Controller Displays the video controller type of the system Video Memory Displays the video memory information of the system Wi Fi Device Displays the wireless device information of the system Native Resolution Displays the native resolution of the system Video BIOS Version Displays the video BIOS version of the system Audio Controller ...

Страница 126: ...n is enabled Side USB Configuration Enable or disable the individual USB ports By default the Side Port 1 Near DP and Side Port 2 options are selected NOTE USB keyboard and mouse always work in the BIOS setup irrespective of this settings Rear USB Configuration Enable or disable the individual USB ports By default all the options Rear Port 1 UP Rear Port 2 Down and Rear Port 3 Type C are selected ...

Страница 127: ...onnection menu Connection Network Controller Configuration Integrated NIC If enabled UEFI networking protocols are installed and available allowing pre OS and early OS networking features to use any enabled NIC s This may be used without PXE turned on By default Enabled with PXE option is enabled Wireless Device Enable WLAN Enable or disable the internal WLAN device By default the option enabled B...

Страница 128: ...tions By default the TPM 2 0 Security On option is enabled Attestation Enable Enables to control whether the Trusted Platform Module TPM Endorsement Hierarchy is available to the operating system By default the Attestation Enable option is enabled Key Storage Enable Enables to control whether the Trusted Platform Module TPM Storage Hierarchy is available to the operating system By default the Key ...

Страница 129: ...min Password Set change or delete the administrator password System Password Set change or delete the system password Internal HDD 1 Password Set change or delete the Internal HDD 1 password NVMe SSD0 Set change or delete the NVMe SSD0 password Password Configuration Upper Case Letter Reinforces password must have at least one upper case letter By default the option is enabled Lower Case Letter Re...

Страница 130: ...nabled BIOS Downgrade Allow BIOS Downgrade Enable or disable the flashing of the system firmware to previous revision is blocked By default the option is enabled SupportAssist OS Recovery Enable or disable the boot flow for SupportAssist OS Recovery tool in the event of certain system errors By default the option is enabled BIOSConnect Enable or disable cloud Service operating system recovery if t...

Страница 131: ...tion is disabled Table 15 System setup options Keyboard menu Keyboard Keyboard Errors Enable Keyboard Error Detection Allows keyboard related errors to be reported when the system boots By default the option is enabled Device Configuration Hotkey Access Manages whether you can access device configuration screens through hotkeys during system startup By default the option is enabled Table 16 System...

Страница 132: ... of CPU cores available to the operating system By default the All Cores option is enabled Intel SpeedStep Enable Intel SpeedStep Technology Enables the system to dynamically adjust processor voltage and core frequency decreasing average power consumption and heat production By default the option is enabled C States Control Enable C State Control Enable or disable additional processor sleep states...

Страница 133: ...IOS file for your computer 7 After the download is complete browse the folder where you saved the BIOS update file 8 Double click the BIOS update file icon and follow the on screen instructions For more information see knowledge base article 000124211 at www dell com support Updating the BIOS in Linux and Ubuntu To update the system BIOS on a computer that is installed with Linux or Ubuntu see the...

Страница 134: ...nu to see if BIOS FLASH UPDATE is listed as a boot option for your computer If the option is listed then the BIOS supports this BIOS update option NOTE Only computers with BIOS Flash Update option in the F12 One Time boot menu can use this function Updating from the One Time boot menu To update your BIOS from the F12 One Time boot menu you need the following USB drive formatted to the FAT32 file s...

Страница 135: ...tem BIOS or System Setup screen select Security and press Enter The Security screen is displayed 2 Select System Admin Password and create a password in the Enter the new password field Use the following guidelines to assign the system password A password can have up to 32 characters At least one special character _ Numbers 0 through 9 Upper case letters from A to Z Lower case letters from a to z ...

Страница 136: ...stem and or Setup password reenter the new password when prompted If you delete the System and or Setup password confirm the deletion when prompted 5 Press Esc and a message prompts you to save the changes 6 Press Y to save the changes and exit from System Setup The computer restarts Clearing BIOS System Setup and System passwords About this task To clear the system or BIOS passwords contact Dell ...

Страница 137: ...atus messages that inform you if tests are completed successfully View error messages that inform you of problems encountered during testing NOTE Some tests for specific devices require user interaction Always ensure that you are present at the computer terminal when the diagnostic tests are performed For more information see https www dell com support kbdoc 000180971 Running the SupportAssist Pre...

Страница 138: ...r is invalid 2 7 Memory Memory SPD failure 3 3 Memory No memory detected 3 5 Memory Modules incompatible or invalid configuration 3 6 BIOS Recovery On demand trigger recovery image is not found 3 7 BIOS Recovery On demand trigger recovery image is invalid NOTE For diagnostics pattern 2 amber 8 white connects an external monitor to isolate between system board or graphics controller failure Recover...

Страница 139: ...x problems that may occur with Windows Dell proposes multiple options for recovering Windows operating system on your Dell PC For more information see Dell Windows Backup Media and Recovery Options WiFi power cycle About this task If your computer is unable to access the internet due to WiFi connectivity issues a WiFi power cycle procedure may be performed The following procedure provides the inst...

Страница 140: ...r Express Service Code at www dell com support For more information on how to find the Service Tag for your computer see Locate the Service Tag on your computer Dell knowledge base articles for a variety of computer concerns 1 Go to www dell com support 2 On the menu bar at the top of the Support page select Support Knowledge Base 3 In the Search field on the Knowledge Base page type the keyword t...

Отзывы: