Back to Contents Page
Removing and Replacing Parts:
Dell™ Latitude™ CS/CS
x
Portable Computers User's
Guide
Replacing a Primary Hard-Disk Drive
NOTICE: To prevent data loss, turn off your computer before you remove the hard-disk drive. Do not remove the hard-disk drive if
the computer is in suspend (or standby) mode or if the drive access indicator is lit. Removing the drive under these conditions will
lead to loss of data.
NOTICE: Hard-
disk drives are extremely fragile and must be handled carefully to avoid damage. Follow these guidelines:
l
The primary hard-disk drive is installed in a metal carrier to protect the drive and make installation easier. When you remove and
install hard-disk drives, handle the drive carrier, not the drive itself.
l
Never press down on the top of the drive.
l
Do not drop the drive. Even a slight jar or bump can damage the drive heads and spinning plates, thus rendering the drive
inoperable.
To replace a primary hard-disk drive, perform the following steps:
1.
Save any open files, turn off the computer, and remove any installed batteries.
NOTICE: To avoid scratching the top of the computer, make sure that your work surface is clean. You may want to put down a
protective mat before turning over the computer.
2.
Remove the old hard-disk drive from the drive bay.
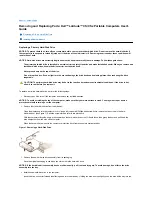
Close the display and turn the computer over. Using a #0 (very small) Phillips-
head screwdriver, remove the two screws in the hard
-
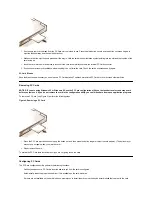
disk drive door (see Figure 1). Save the screws for use later in this procedure.
With the computer still upside-down, press upward on the hard-disk drive door until it feels loose; then grasp the door and pull it and the
drive straight out from the side of the computer.
When the hard-disk drive is not in the computer, protect the drive from exposure to static electricity.
Figure 1. Removing a Hard-Disk Drive
3.
Remove the new hard-disk drive assembly from its packaging.
Save the original packaging to use when you store or ship the hard-disk drive.
NOTICE: If the hard-disk drive assembly does not slide in easily, pull it out and try again. To avoid damage, do not force the drive
assembly into the bay.
4.
Install the new hard-disk drive in the computer.
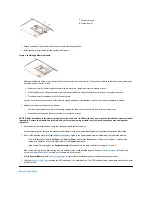
Insert the drive, connector first and label facing down, into the drive bay. Holding the drive door up slightly, push the drive all the way into the
Replacing a Primary Hard-Disk Drive
Installing a Memory Module
CAUTION: The primary hard-disk drive may be hot to the touch under extreme environmental conditions. If the drive is hot,
allow it to cool before you replace it.
Содержание Latitude CS
Страница 38: ......
Страница 43: ......
Страница 69: ...The S2D partition was successfully created Back to Contents Page ...

