
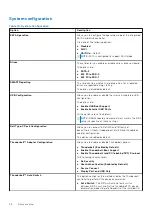


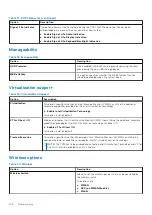


Table 20. Wireless (continued)
Option
Description
●
Bluetooth®
All the options are enabled by default.
Wireless Device Enable
Allows you to enable or disable the internal wireless devices.
The options are:
●
WWAN/GPS
●
WLAN
●
Bluetooth®
●
Contactless Smartcard/ NFC
All the options are enabled by default.
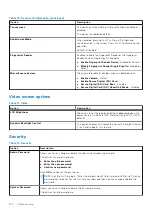
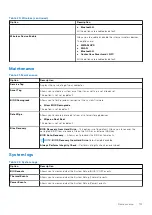
Maintenance
Table 21. Maintenance
Option
Description
Service Tag
Displays the service tag of your computer.
Asset Tag
Allows you to create a system asset tag if an asset tag is not already set.
This option is not set by default.
BIOS Downgrade
Allows you to flash previous revisions of the system firmware.
●
Allow BIOS Downgrade
This option is set by default.
Data Wipe
Allows you to securely erase data from all internal storage devices.
●
Wipe on Next Boot
This option is not set by default.
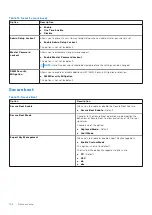
Bios Recovery
BIOS Recovery from Hard Drive
—This option is set by default. Allows you to recover the
corrupted BIOS from a recovery file on the HDD or an external USB key.
BIOS Auto-Recovery
— Allows you to recover the BIOS automatically.
NOTE:
BIOS Recovery from Hard Drive
field should be enabled.
Always Perform Integrity Check
—Performs integrity check on every boot.
System logs
Table 22. System Logs
Option
Description
BIOS events
Allows you to view and clear the System Setup (BIOS) POST events.
Thermal Events
Allows you to view and clear the System Setup (Thermal) events.
Power Events
Allows you to view and clear the System Setup (Power) events.
System setup
107
Содержание Latitude 7400 2-in-1
Страница 15: ...Major components of your system 1 Base cover 2 Heatsink shield 3 Major components of your system 15 ...
Страница 24: ...4 Pry along the left right and bottom edges of the base 24 Removing and installing components ...
Страница 27: ...2 Press along the edges of the base cover until it clicks into place Removing and installing components 27 ...
Страница 28: ...3 Tighten the 10 captive screws to secure the base cover to the computer 28 Removing and installing components ...
Страница 43: ...5 Place the metal shield on the WWAN card Removing and installing components 43 ...
Страница 51: ...8 Adhere the Mylar sheet on the system board Removing and installing components 51 ...
Страница 56: ...4 Remove the metal foil from the heatsink shield 56 Removing and installing components ...
Страница 57: ...5 Remove the heatsink shield from the system board Removing and installing components 57 ...
Страница 60: ...3 Place the heatsink shield on the heatsink 60 Removing and installing components ...
Страница 61: ...4 Adhere the metal foils on the heatsink shield Removing and installing components 61 ...
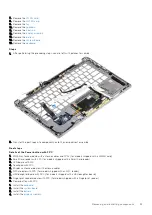
Страница 87: ...8 Lift the keyboard off the palmrest assembly Removing and installing components 87 ...


