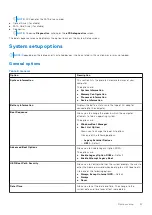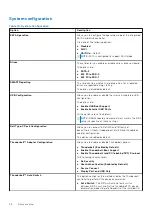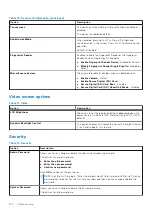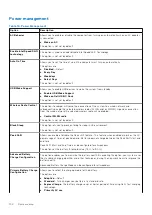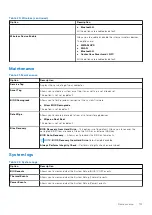
Table 12. Security (continued)
Option
Description
●
Enable
●
One Time Enable
●
Disable
Admin Setup Lockout
Allows you to prevent users from entering Setup when an administrator password is set.
●
Enable Admin Setup Lockout
This option is not set by default.
Master Password
Lockout
Allows you to disable master password support.
●
Enable Master Password Lockout
This option is not set by default.
NOTE:
Hard Disk password should be cleared before the settings can be changed.
SMM Security
Mitigation
Allows you to enable or disable additional UEFI SMM Security Mitigation protection.
●
SMM Security Mitigation
This option is not set by default.
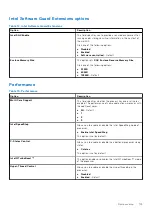
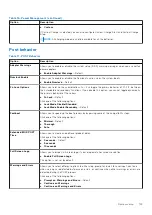
Secure boot
Table 13. Secure Boot
Option
Description
Secure Boot Enable
Allows you to enable or disable the Secure Boot Feature.
●
Secure Boot Enable
—Default
Secure Boot Mode
Changes to the Secure Boot operation mode modifies the
behaviour of Secure Boot to allow evaluation of UEFI driver
signatures.
Choose one of the option:
●
Deployed Mode
—Default
●
Audit Mode
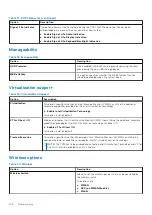
Expert Key Management
Allows you to enable or disable Expert Key Management.
●
Enable Custom Mode
This option is not set by default.
The Custom Mode Key Management options are:
●
PK
—Default
●
KEK
●
db
●
dbx
102
System setup
Содержание Latitude 7400 2-in-1
Страница 15: ...Major components of your system 1 Base cover 2 Heatsink shield 3 Major components of your system 15 ...
Страница 24: ...4 Pry along the left right and bottom edges of the base 24 Removing and installing components ...
Страница 27: ...2 Press along the edges of the base cover until it clicks into place Removing and installing components 27 ...
Страница 28: ...3 Tighten the 10 captive screws to secure the base cover to the computer 28 Removing and installing components ...
Страница 43: ...5 Place the metal shield on the WWAN card Removing and installing components 43 ...
Страница 51: ...8 Adhere the Mylar sheet on the system board Removing and installing components 51 ...
Страница 56: ...4 Remove the metal foil from the heatsink shield 56 Removing and installing components ...
Страница 57: ...5 Remove the heatsink shield from the system board Removing and installing components 57 ...
Страница 60: ...3 Place the heatsink shield on the heatsink 60 Removing and installing components ...
Страница 61: ...4 Adhere the metal foils on the heatsink shield Removing and installing components 61 ...
Страница 87: ...8 Lift the keyboard off the palmrest assembly Removing and installing components 87 ...

