•
Working Environment
– Before deploying the ESD Field Service kit, assess the situation at the customer location. For example,
deploying the kit for a server environment is different than for a desktop or portable environment. Servers are typically installed in a
rack within a data center; desktops or portables are typically placed on office desks or cubicles. Always look for a large open flat work
area that is free of clutter and large enough to deploy the ESD kit with additional space to accommodate the type of system that is
being repaired. The workspace should also be free of insulators that can cause an ESD event. On the work area, insulators such as
Styrofoam and other plastics should always be moved at least 12 inches or 30 centimeters away from sensitive parts before physically
handling any hardware components
•
ESD Packaging
– All ESD-sensitive devices must be shipped and received in static-safe packaging. Metal, static-shielded bags are
preferred. However, you should always return the damaged part using the same ESD bag and packaging that the new part arrived in.
The ESD bag should be folded over and taped shut and all the same foam packing material should be used in the original box that the
new part arrived in. ESD-sensitive devices should be removed from packaging only at an ESD-protected work surface, and parts
should never be placed on top of the ESD bag because only the inside of the bag is shielded. Always place parts in your hand, on the
ESD mat, in the system, or inside an anti-static bag.
•
Transporting Sensitive Components
– When transporting ESD sensitive components such as replacement parts or parts to be
returned to Dell, it is critical to place these parts in anti-static bags for safe transport.
ESD protection summary
It is recommended that all field service technicians use the traditional wired ESD grounding wrist strap and protective anti-static mat at all
times when servicing Dell products. In addition, it is critical that technicians keep sensitive parts separate from all insulator parts while
performing service and that they use anti-static bags for transporting sensitive components.
After working inside your Tablet
About this task
After you complete any replacement procedure, ensure that you connect any external devices, cards, and cables before turning on your
computer.
Steps
1. Connect any telephone or network cables to your computer.
CAUTION:
To connect a network cable, first plug the cable into the network device and then plug it into the
computer.
2. Connect your computer and all attached devices to their electrical outlets.
3. Turn on your computer.
4. If required, verify that the computer works correctly by running the diagnostic tool.
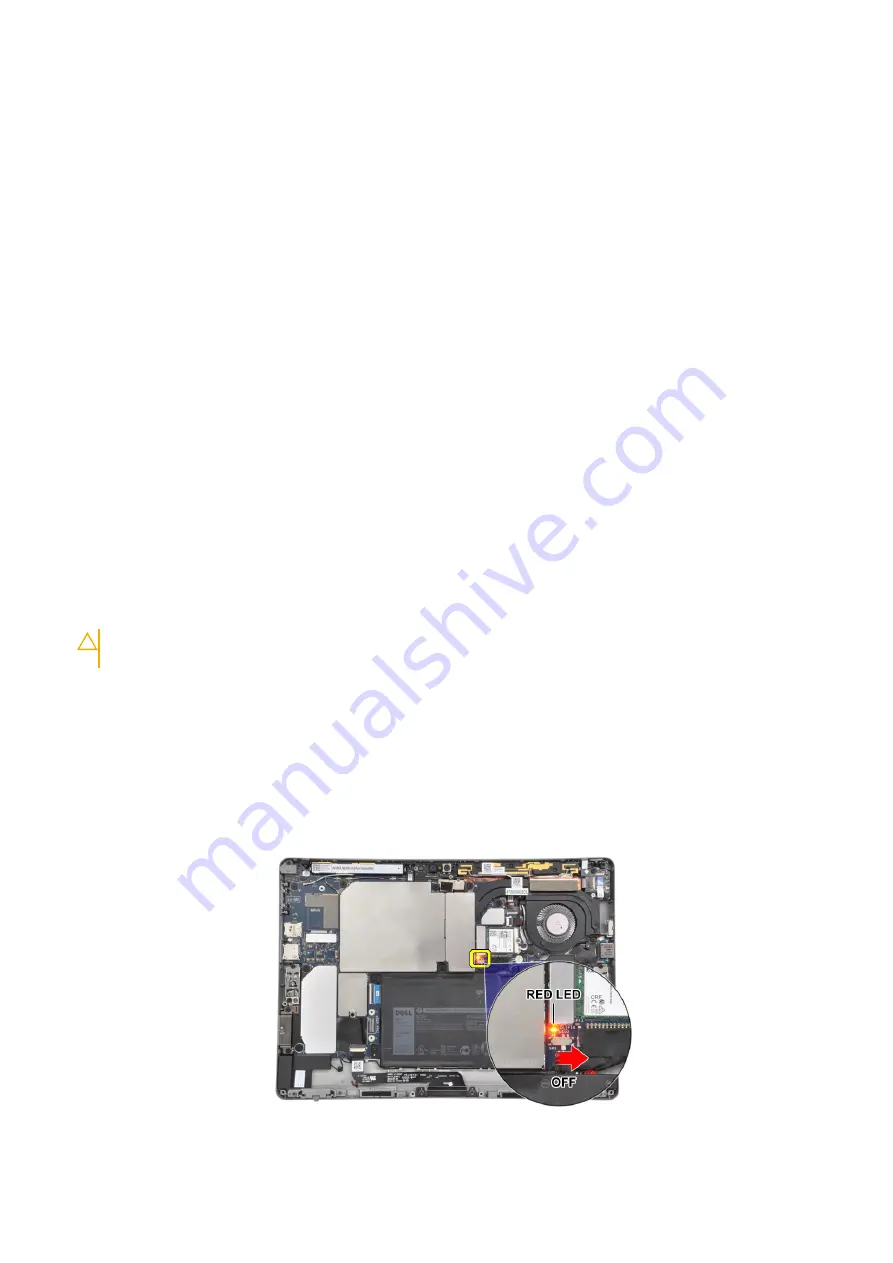
Switch off the battery power
The battery cable connector is located in a very tight space which requires removal of the battery screws to disconnect; there is a battery
switch to the left of the battery cable, which the technician must flip to the OFF position to cut-off power during any replacement
procedures.
Figure 1. Switch OFF battery power
10
Disassembly and reassembly
Содержание Latitude 7210 2-in-1
Страница 1: ...Dell Latitude 7210 2 in 1 Service Manual Regulatory Model T04J Regulatory Type T04J002 ...
Страница 31: ...3 Connect the battery cable to connector on the system board 1 Disassembly and reassembly 31 ...
Страница 46: ...46 Disassembly and reassembly ...
Страница 48: ...48 Disassembly and reassembly ...
Страница 66: ...5 Replace the a WWAN Main Antenna Module 66 Disassembly and reassembly ...
Страница 68: ...68 Disassembly and reassembly ...


