background image

Hinge Covers

Removing the Hinge Covers

Follow the procedure in 

Before working inside your computer

.

Remove the:

a

Batteries

b

Bottom chassis cover

c

WLAN card

d

WWAN card

e

PCIe heatsink assembly

f

Docking port assembly

g

Heatsink

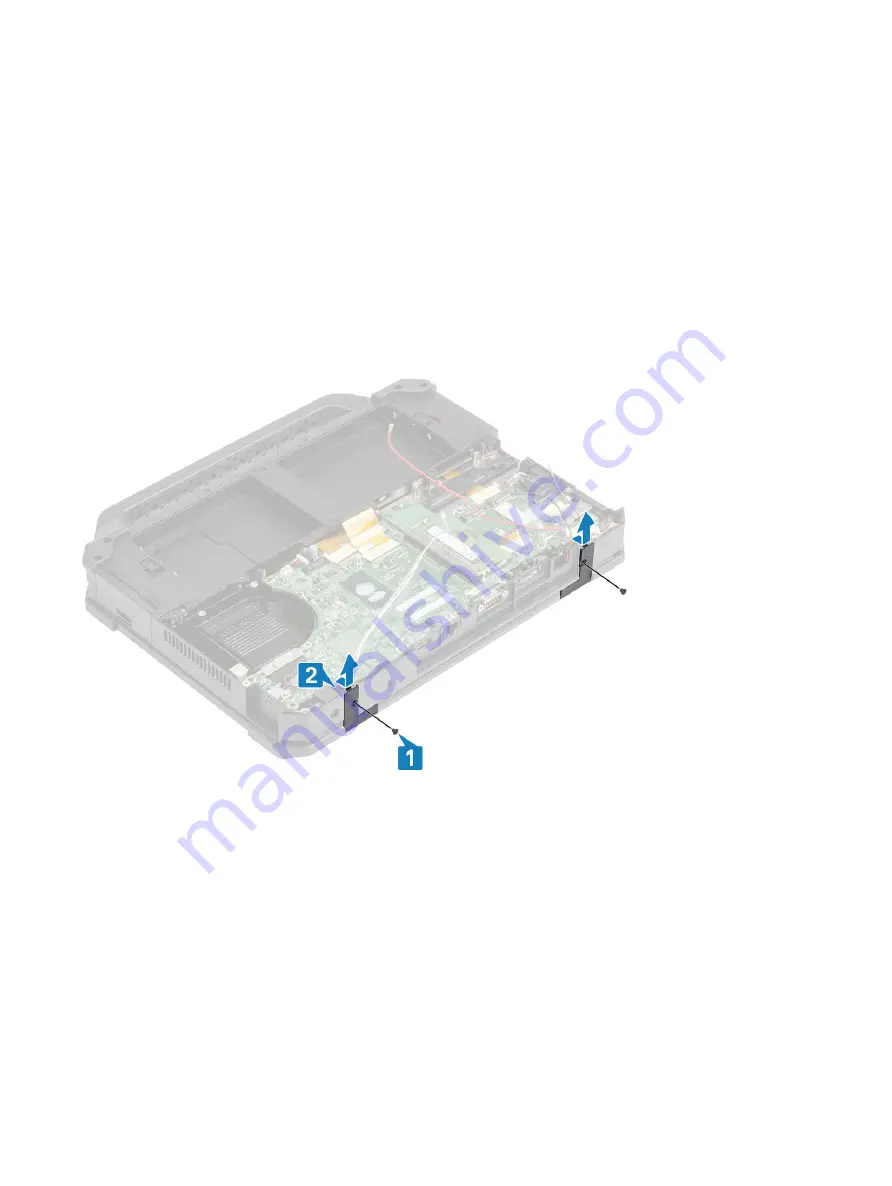
Remove the two 'M2.5*5' on either sides [1] and lift to remove the brackets [2] from the computer.

Press the latch [1] and open the LCD lid [2].

138

Removing and installing components

Содержание Latitude 5424 Rugged

Страница 1: ...Dell Latitude 5424 Rugged Owner s Manual Regulatory Model P85G Regulatory Type P85G001 ...

Страница 2: ...amage to hardware or loss of data and tells you how to avoid the problem WARNING A WARNING indicates a potential for property damage personal injury or death 2018 Dell Inc or its subsidiaries All rights reserved Dell EMC and other trademarks are trademarks of Dell Inc or its subsidiaries Other trademarks may be trademarks of their respective owners 2018 10 Rev A00 ...

Страница 3: ...ng and disabling the wireless WiFi feature 31 Hot key definition 32 AC DC Adapters 33 How to check the status of AC Adapter in BIOS 33 90W 34 130W 34 LED and Cable 35 Battery 36 Battery Specifications 36 Processors 36 Skylake processor 36 Kaby Lake 7th and 8th Generation Intel Core processors 39 Memory features 39 DDR4 40 Graphics options 41 Graphics Specifications 41 AMD Radeon 540 Graphics 46 AM...

Страница 4: ... 59 Compatibility 60 USB Powershare 60 USB Type C 60 Alternate Mode 61 USB Power Delivery 61 USB Type C and USB 3 1 61 Ethernet 61 Product Features 61 General 61 Security and Manageability 62 Performance 62 Power 62 MAC PHY Interconnect 62 Package Design 62 HDMI 2 0 63 HDMI 2 0 Features 63 Advantages of HDMI 63 Software and Troubleshooting 64 Chipsets 64 Processor 66 Verifying system memory 67 Dis...

Страница 5: ...s 102 Removing the latch doors 102 Installing the latch doors 103 Battery 104 Removing the Battery 104 Installing the Batteries 104 Bottom Chassis Cover 105 Removing the Bottom Chassis Cover 105 Installing the Bottom Chassis Cover 107 Keyboard 108 Removing the Keyboard 108 Installing the Keyboard 110 Secondary SSD carrier 112 Removing the Secondary SSD carrier 112 Installing the Secondary SSD carr...

Страница 6: ...nk assembly 133 Installing the Heatsink assembly 134 Rear Input Output Board 135 Removing the Rear I O board 135 Installing the Rear I O board 136 Hinge Covers 138 Removing the Hinge Covers 138 Installing the Hinge Covers 139 Display assembly 141 Removing the Display assembly 141 Installing the Display Assembly 143 LCD Bezel and Back Cover Assembly 145 Removing the LCD with bezel and the display b...

Страница 7: ... Guard Extensions options 183 Performance 184 Power management 185 Post behavior 186 Manageability 188 Virtualization support 188 Wireless options 188 Maintenance 189 System logs 190 About 190 Boot Sequence 191 Updating the BIOS in Windows 191 Updating BIOS on systems with BitLocker enabled 192 Updating your system BIOS using a USB flash drive 192 Updating the Dell BIOS in Linux and Ubuntu environ...

Страница 8: ... Battery Status Lights 205 Diagnostic LED 205 Wi Fi power cycle 206 BIOS recovery 206 Rollback BIOS feature 206 BIOS recovery using hard drive 207 BIOS recovery using USB key 207 Self Heal 208 Course Introduction 208 Self Heal Instruction 208 Supported Latitude Models 208 7 Getting help 210 Contacting Dell 210 8 Contents ...

Страница 9: ...e form factor It provides uncompromised performance for professionals that need to have fixed workstation performance in remote locations Features Configurability options including Intel 6th 7th and 8th generation core and i3 i5 i7 Processors FHD panel with 1000 nit brightness Dual Hot Swappable Batteries 2133 2400 MHz memory with Super Speed options Up to 3 storage spaces supporting up to 4 TB of...

Страница 10: ...2 GB GDDR5 AMD Radeon RX540 4 GB GDDR5 Audio Realtek ALC3235 Controller Waves MaxxAudio 7 5 Communication Integrated Intel i219 10 100 1000 Mb s Ethernet Wi Fi 802 11a b g n ac with Bluetooth 4 2 WWAN 4G LTE Full Mini Card optional Optional dedicated u blox NEO M8 GPS card Integrated Intel i219 10 100 1000 Mb s Ethernet Wi Fi 802 11a b g n ac with Bluetooth 4 2 WWAN 4G LTE Full Mini Card optional ...

Страница 11: ...ram 7 8 3 54 5 5 2 5 without handle and bumpers Technical specifications NOTE Offerings may vary by region The following specifications are only those required by law to ship with your computer For more information about the configuration of your computer go to Help and Support in your Windows operating system and select the option to view information about your computer System information Table 2...

Страница 12: ...essor NOTE Processor numbers are not a measure of performance Processor availability is subject to change and may vary by region country Table 4 Processor specifications Type UMA Graphics Intel Dual Core i3 7130U Kaby Lake processor Cache 3 MB of Thread T 4 Base Frequency 2 7 GHz Thermal Design Power TDP 15 W Intel HD Graphics 620 Intel Quad Core i5 8350U Kaby Lake processor 6 MB 8T 1 7 GHz 15 W I...

Страница 13: ...ary Storage HDD SSD FIPS SED Opal None PCIe M 2 2280 Tool free removable dual sided M 2 compatible carrier sled M 2 2280 SSD PCIe x4 SATA 3 FIPS SED Opal 128 GB 256 GB 512 GB 1 TB 2 TB 256 GB 512GB FIPS 140 2 compliant SED 1TB OPAL SED Secondary Storage Cache SSD HDD None 2 5 inch SATA HDD M 2 SATA 3 SSD Tool free removable storage M 2 SATA 3 M 2 2280 PCIe x4 None 256 GB 512 GB 1 TB Third Storage ...

Страница 14: ... 1 Type A port One USB 3 2 Gen 1 Type C port with PowerShare Security T Bar Slot Docking port USB Type C Monitor Stand Dock Latitude USB Type C Dock Dell Rugged Family Pogo Dock backward compatible with Gen 2 Audio Universal audio jack Global Headset Jack mic phone in line in support No Noise reduction dual array microphones Video HDMI 2 0 Network adapter One RJ 45 connector Serial port One legacy...

Страница 15: ...HD 1920x1080 Display Non Touch Touch 10 finger PCAP Glove Water Stylus capable Native Resolution 1920x1080 High Definition Yes Luminance Standard Brightness SB 220 NIT Outdoor Viewable OV 1000 NIT Height 173 95 mm 6 85 display area Width 309 4 mm 12 18 inch Megapixels 2 07 Pixels Per Inch PPI 157 Pixel pitch 0 161 mm Color depth 16 2M colors OV 262K SB Contrast ratio typical 1500 OV 700 SB Respons...

Страница 16: ...l Core i7 8650U Discrete Dedicated 2 GB DDR5 HDMI 2 0 Additional video ports via Rear Configurable IO Space VGA DisplayPort 4096 2304 60 Hz AMD Radeon RX540 Discrete Intel Core i5 8350U Intel Core i7 8650U Discrete Dedicated 4 GB DDR5 HDMI 2 0 Additional video ports via Rear Configurable IO Space VGA DisplayPort 4096 2304 60 Hz NOTE Additional video ports via Rear Configurable IO Space is availabl...

Страница 17: ... Gigabit LTE Global Positioning System GPS Module Optional U blox NEO M8 dedicated GPS card Smart card reader Table 15 Contactless smart card reader Type FIPS 201 Contacted Contactless Smart Card reader ISO certification ISO14443A Keyboard Table 16 Keyboard specifications Number of keys 83 keys US English Thai French Canadian Korean Russian Hebrew English International 84 keys UK English French Ca...

Страница 18: ...b Voltage 51 WHr 11 4 VDC Life Span 300 discharge recharge cycles Charging time when the computer is off approximate 2 hours with one battery 4 hours with two batteries Operating time Varies depending on operating conditions and can significantly reduce under certain power intensive conditions Temperature range Operating 0 C to 60 C 32 F to 140 F Temperature range Non Operating 40 C to 70 C 104 F ...

Страница 19: ...ting 40ºC to 70ºC 104ºF to 158º F Physical system dimensions Table 20 Weight Chassis weight pounds kilograms 5 5 2 5 without handle and bumpers Table 21 Chassis dimensions Dimensions Vectors Height inches centimeters 13 67 34 70 Width inches centimeters 9 56 24 30 Depth inches centimeters 1 77 4 49 Shipping weight pounds kilograms includes packaging material 9 15 4 15 Table 22 Packaging parameters...

Страница 20: ...er environment Measured using a 2 ms half sine pulse when the hard drive is in use Measured using a 2 ms half sine pulse when the hard drive head is in parked position Regulatory and Environmental Compliance Table 24 Regulatory and Environmental Compliance specifications Energy Star Version 7 EPEAT Silver Registered TAA configurations available MIL 810G For specific country participation and ratin...

Страница 21: ... Touch finger print reader FIPS 201 contacted smart card Contactless smart card NFC Control Vault 2 0 Yes Synaptics Fingerprint reader Synaptics Smart Card Reader Contactless Smart Card Security lock slot Kensington T Bar Lock Slot Yes SED Opal 2 0 SATA Interface Yes Statement of Non Volatility Yes Bundle 6 Control Vault 2 and touch fingerprint Yes POA Power On Authentication Yes Supported with Fi...

Страница 22: ...Overview This chapter illustrates the multiple chassis views along with the ports and connectors called out Topics Front View Left Side View Right Side View Bottom View Top view Back View 2 22 Chassis Overview ...

Страница 23: ... 1 Camera Shutter 2 RGB Camera 3 RGB Camera status LED 4 IR Camera 5 IR Emitter 6 IR Camera status LED 7 Handle 8 Speakers 9 LCD Latch 10 Microphone array 11 Battery Status LED Left Side View Chassis Overview 23 ...

Страница 24: ...SB 3 1 Gen 1 Type A Port With PowerShare 5 USB 3 1 Gen 1 Type A Port 6 3 5 mm Universal audio port Right Side View 1 Secondary SSD 2 Stylus slot 3 Optical Drive 4 Primary SSD 5 SD Card Reader 6 SIM Card Slot 7 USB 3 1 Gen 1 Type A Port recessed USB supports mini USB connection with doors shut 24 Chassis Overview ...

Страница 25: ...requency pass through connectors 2 Docking port 3 Service tag sticker 4 Battery 1 5 Battery 1 Latch 6 Battery charge indicator button 7 Battery charge indicator LED 8 Battery 2 Latch 9 Battery 2 Optional Chassis Overview 25 ...

Страница 26: ...Top view 1 Power button 2 Keyboard 3 Touch pad 4 Fingerprint reader optional 26 Chassis Overview ...

Страница 27: ...t SD card reader slot Express Card reader slot PC card reader slot SIM card slot should not to be used in a hazardous location WARNING Do not block push objects into or allow dust to accumulate in the air vents Do not store your Dell computer in a low airflow environment such as a closed briefcase while it is running Restricting the airflow can damage the computer The computer turns on the fan whe...

Страница 28: ...tures Graphics options Corning Gorilla Glass Pen Usage Optical Disk Drive Media Card Readers UEFI BIOS Systems management From on premises to the cloud Trusted Platform Module Fingerprint Reader USB features USB Powershare USB Type C Ethernet HDMI 2 0 Software and Troubleshooting Turning off your computer Using your computer Open the LCD Lid 3 28 Technology and components ...

Страница 29: ... not needed if Fn lock is enabled to turn on stealth mode NOTE Stealth mode is a secondary function of the F7 key The key can be used to perform other functions on the computer when not used with the Fn key to enable stealth mode 2 All the lights and sounds are turned off 3 Press the Fn F7 key combination again to turn off the stealth mode Disabling stealth mode in the system setup BIOS 1 Power of...

Страница 30: ...0 percent 75 percent and 100 percent 4 Cycle through the key combination to either adjust the brightness or turn off the keyboard backlight Changing the keyboard backlight color To change the keyboard backlight color 1 To cycle through the available backlight colors press Fn C keys 2 White Red Green and Blue are active by default up to two custom colors can be added to the cycle in the System Setu...

Страница 31: ...eys 3 Fn key NOTE Fn lock affects only the above keys F1 to F12 Secondary functions will not require the Fn key to be pressed while enabled Enabling the Function Fn lock 1 Press the Fn Esc keys NOTE Other secondary function keys on the top row are not affected and requires the use of the Fn key 2 Press the Fn Esc keys again to deactivate the function lock feature The function keys return to the de...

Страница 32: ...wn Decrease Decreases the audio volume until minimum off is reached Fn F3 Audio Volume Up Increase Increases the audio volume until maximum is reached Fn F4 Microphone Mute Silences the on board microphone so it cannot record audio There is an LED on the F4 function key that notifies the user of the state of this feature LED off microphone capable of recording audio LED on microphone muted and una...

Страница 33: ...Bluetooth Fn Insert Sleep Puts the system into the ACPI S3 State and does not wake the system Traditional programming functions like Scroll Lock are assigned to alpha keys with un printed legends Fn S Scroll Lock Fn B Pause Fn Ctrl B Break Fn R Sys Req NOTE For non backlit keyboards F10 has no function and icon on function key is purged AC DC Adapters There are a two types of AC adapters offered f...

Страница 34: ... message Entering Setup appears 3 Under General Battery Information you will see AC Adapter listed 4 The status shows the wattage of the AC adapter connected Any errors detected with the AC adapter or the DC In connector will be displayed here 90W 130W 34 Technology and components ...

Страница 35: ...th base for cable wrapping 2 Cable lock on cord for securing cable wrap 3 90 strain relief directs the cable out the side of the adapter 4 Adapter LED is implemented in two spots on opposite sides of the plug head The LED illumination will be white Technology and components 35 ...

Страница 36: ...arge will not be enabled What is BATTMAN BATTMAN is a computer controlled battery manager intended for typical rechargeable batteries It has the following capabilities Monitors self discharge Measures internal resistance Automatically performs repeated discharge charge cycles to break in new batteries Keeps a log of all operations performed which can be imported Connects via parallel port to any P...

Страница 37: ...ix Table 30 Performance features Feature Feature description SKL Y SKL U SKL H General Features Cores Dual Core Dual Core Dual Core CPU Memory Graphic Overclocking No No Yes Intel Extreme Tuning Utility No No Yes Intel Hyper Threading Technology Yes Yes Yes Intel Smart Cache Technology with last level cache LLC sharing between Processor and GFx cores Yes Yes Yes Intel Smart Sound Technology Yes Ye...

Страница 38: ...Yes Yes 16PCIe Graphic lanes configurable as 1x16 or 2x8 or 1x8 2x4 No No Yes PCIe Gen3 0 support No No Yes Switchable graphics muxless solution No Yes Yes Memory Memory Type DDR4 DDR4 DDR4 Connector Memory Down Memory down SODIMM SODIMM Speed 2133MT s for DDR4 2133MT s for DDR4 2133MT s for DDR4 Max Capacity 32 GB 32 GB 32 GB OS Support Windows 10 64 bit Yes Yes Yes Windows 7 64 bit 32bit Yes Yes...

Страница 39: ... HD visual quality and color fidelity enhancements for HD playback and immersing web browsing Integrated memory controller Intel Smart Cache Optional Intel vPro technology on i5 i7 with Active Management Technology 11 6 Intel Rapid Storage Technology Table 31 Kaby lake specifications Processor number Base Clock Speed Cache No of cores No of threads Power Memory type Graphics Intel Dual Core i3 713...

Страница 40: ...esh its memory Deep power down mode is expected to reduce standby power consumption by 40 to 50 percent DDR4 Details There are subtle differences between DDR3 and DDR4 memory modules as listed below Key notch difference The key notch on a DDR4 module is in a different location from the key notch on a DDR3 module Both notches are on the insertion edge but the notch location on the DDR4 is slightly ...

Страница 41: ... Shared system memory HDMI 2 0 4096 2304 60 Hz Intel UHD 620 Graphics UMA Intel Core i5 8350U Integrated Shared system memory HDMI 2 0 4096 2304 60 Hz Intel HD 520 Graphics UMA Intel Core i5 6300U Integrated Shared system memory HDMI 2 0 4096 2304 60 Hz AMD Radeon 540 Discrete Intel Core i5 8350U Intel Core i7 8650U Discrete Dedicated 2 GB DDR5 HDMI 2 0 Additional video ports via Rear Configurable...

Страница 42: ...solutions and Max Refresh Rates Hz Note Analog and or digital System ports Max Digital HDMI 2560x1600 4096x2304 24 Hz Docked Max Digital DisplayPort 1 2 3840 x2160 60 Hz Max Digital SL DVI 1920x1080 60 Hz Analog VGA system 14 inch 15 inch 2048x1152 60 Hz For 3 displays up to max resolution each above Numbers of Displays Supported System Ports 3 displays max with LCD plus 2 displays max on each out...

Страница 43: ...ays max combo of LCD VGA DP HDMI Intel HD Graphics 520 Table 35 Intel HD Graphics 520 Graphics specification Integrated Graphics Controller Intel UHD Graphics 620 8th Generation Intel Core Bus Type Internal PCIe Memory Interface N A unified memory architecture Graphics Level GT2 Estimated Maximum Power Consumption TDP 15 W included in the CPU power Display Support On System HDMI 2 0 USB Type C Max...

Страница 44: ...figuration DDR3 DDR4 and maximum clock rate of the specific model The fastest versions Core i7 6600U should perform similar to a dedicated GeForce 820M and handles modern games as of 2015 in low settings Features The revised video engine now decodes H 265 HEVC completely in hardware and more efficiently than before Displays can be connected using a DP 1 2 eDP 1 3 max 3840 x 2160 60 Hz whereas HDMI...

Страница 45: ...ed graphics memory or eDRAM cache the HD 520 has to access the main memory 2x 64 bit DDR3L 1600 DDR4 2133 Performance The exact performance of the HD UHD Graphics 620 depends on various factors like L3 cache size memory configuration DDR3L DDR4 and maximum clock rate of the specific model Features The revised video engine now decodes H 265 HEVC completely in hardware and more efficiently than befo...

Страница 46: ...0 x 2160 30 Hz AMD Radeon 540 Graphics Table 38 Radeon 540 Graphics specifications Graphics Controller AMD Radeon 540 Graphics Graphics memory 2 GB GDDR5 Bus type PCIe x16 Gen3 Memory Interface 64 bit Clock Speeds Up to 1124 MHz Estimated Maximum Power Consumption TDP 50W TGP GPU frame buffer Display Support HDMI mDP eDP USB C Maximum Color Depth Maximum 4 4 4 Color Depth 12 bits per pixel Maximum...

Страница 47: ...s Hz Max Digital Single DisplayPort 1 4 5120 x 2880 60 Hz mDP USB Type C to DP Max Digital Dual DisplayPort 1 4 5120 x 2880 60 Hz mDP USB Type C to DP Numbers of Display Support Up to five displays operating at 4096 x 2160 60 Hz Corning Gorilla Glass Corning Gorilla Glass 5 Corning s latest composition was formulated to address breakage the 1 consumer complaint according to Corning s research The ...

Страница 48: ...nt 107 6 poises 884 C Annealing Point 1013 2 poises 623 C Strain Point 1014 7 poises 571 C Properties Table 41 Properties Density 2 43 g cm Youngs Modulus 76 7 GPa Poissons Ratio 0 21 Shear Modulus 31 7 GPa Vickers Hardness 200 g load Un strengthened Strengthened 489 kgf mm2 596 kgf mm2 596 kgf mm2 Fracture Toughness 0 69 MPa m0 5 Coefficient of Expansion 0 C 300 C 78 8 x 10 7 C Chemical Strengthe...

Страница 49: ...t upon actual testing conditions Data reported is for Corning Gorilla Glass 5 Table 43 Chemical Durability Reagent Time Temperature ºC Weight Loss mg cm2 HCl 5 24 hrs 95 5 9 NH4F HF 10 20 min 20 1 0 HF 10 20 min 20 25 2 NaOH 5 6 hrs 95 2 7 Electrical Table 44 Electrical Frequency MHz Dielectric Constant Loss Tangent 54 7 08 0 009 163 7 01 0 010 272 7 01 0 011 272 7 00 0 010 490 7 99 0 010 599 7 97...

Страница 50: ...able 45 Pen functions Action Function Gently tap the pen tip on the screen Same as a single click on a mouse Gently tap the pen tip twice in quick succession on the screen Same as a double click on a mouse Touch the pen on the screen and hold it in place momentarily until Windows draws a complete circle around the cursor Same as a right click on a mouse Using the Pen as a Pen The handwriting recog...

Страница 51: ...o perform actions that normally require a keyboard such as pressing Page Up or using the directional arrow keys Pen flicks are quick directional gestures Draw a short line in one of eight directions When a pen flick is recognized the Tablet PC performs the action assigned You can modify the default pen flick settings 1 Click Start Control Panel Pen and Touch and click the Flicks tab 2 Modify the s...

Страница 52: ...aid out with 2295104 sectors of 2048 bytes each which comes to 4 700 372 992 bytes 4 590 208 kilobytes KiB binary kilobytes 4482 625 megabytes MiB binary megabytes or 4 377563476 gibabytes GiB binary gigabytes DVD R also DVD R DVD plus dash R or DVD plus minus R is not a separate DVD format but rather is a shorthand term for a DVD drive that can accept both of the common recordable DVD formats i e...

Страница 53: ...on in optical storage The new format offers an immense storage capacity up to 50 GB that is perfect for high definition HD video recording and distribution as well as for storing large amounts of data The format shares the same form factors as existing CD and DVD optical discs allowing for backwards compatibility Features Listed below are some of Blu ray s features Huge capacity 25 GB single layer...

Страница 54: ... drive Software Playback Cyberlink Burn and authoring Sonic Roxio Video Codecs MPEG2 MPEG4 AVC VC 1 must be capable of H 264 HW accel Audio Codecs LPCM Dolby Dolby Digital Dolby Lossless DTS DTS HD Display 20 inch high definition flat panel HDFP 2007FPW 24 inch high definition flat panel HDFP 2407FPW Must have HDCP support with digital connectors WSXGA 1680x1050 WUXGA 1920x1200 There are a few pos...

Страница 55: ... UEFI specification defines a new model for the interface between personal computer operating systems and platform firmware The interface consists of data tables that contain platform related information plus boot and runtime service calls that are available to the operating system and its loader Together these provide a standard environment for booting an operating system and running pre boot app...

Страница 56: ...d automates and streamlines systems management tasks saving time money and resources It consists of the following modules that can be used independently or with a variety of systems management consoles such as SCCM Dell Command Deploy enables easy operating system OS deployment across all major OS deployment methodologies and provides numerous system specific drivers that have been extracted and r...

Страница 57: ... Command Integration Suite for Systems Center Intel Standard Manageability ISM ISM offers a limited set of out of band features like remote power on off Serial over LAN redirect Wake on LAN etc To learn more about Intel ISM visit Intel s website at https software intel com en us blogs 2009 03 27 what is standard manageability Trusted Platform Module Trusted Platform Module TPM is a dedicated crypt...

Страница 58: ... quick look on the USB evolution referencing to the table below Table 49 USB evolution Type Data Transfer Rate Category Introduction Year USB 2 0 480 Mbps High Speed 2000 USB 3 0 USB 3 1 Gen 1 5 Gbps Super Speed 2010 USB 3 1 Gen 2 10 Gbps Super Speed 2013 USB 3 0 USB 3 1 Gen 1 SuperSpeed USB For years the USB 2 0 has been firmly entrenched as the de facto interface standard in the PC world with ab...

Страница 59: ...meras etc USB 2 0 may not be fast enough Furthermore no USB 2 0 connection could ever come close to the 480Mbps theoretical maximum throughput making data transfer at around 320Mbps 40MB s the actual real world maximum Similarly USB 3 0 USB 3 1 Gen 1 connections will never achieve 4 8Gbps We will likely see a real world maximum rate of 400MB s with overheads At this speed USB 3 0 USB 3 1 Gen 1 is ...

Страница 60: ...uld have USB 3 1 Gen 1 support perhaps not on its immediate release but in a subsequent Service Pack or update It is not out of the question to think that following a successful release of USB 3 0 USB 3 1 Gen 1 support in Windows 7 SuperSpeed support would trickle down to Vista Microsoft has confirmed this by stating that most of their partners share the opinion that Vista should also support USB ...

Страница 61: ... your laptop as you used it as an external display all via the one little USB Type C connection To use this the device and the cable have to support USB Power Delivery Just having a USB Type C connection doesn t necessarily mean they do USB Type C and USB 3 1 USB 3 1 is a new USB standard USB 3 s theoretical bandwidth is 5 Gbps while USB 3 1 s is 10 Gbps That s double the bandwidth as fast as a fi...

Страница 62: ...opriate Intel chipset components Performance Jumbo Frames up to 9 Kb 802 1Q 802 1p Receive Side Scaling RSS Two Queues Tx Rx Power Ultra Low Power at cable disconnect 1 mW enables platform support for connected standby Reduced power consumption during normal operation and power down modes Integrated Intel Auto Connect Battery Saver ACBS Single pin LAN disable for easier BIOS implementation Fully i...

Страница 63: ...d for a separate audio cable 3D Defines input output protocols for major 3D video formats paving the way for true 3D gaming and 3D home theater applications Content Type Real time signaling of content types between display and source devices enabling a TV to optimize picture settings based on content type Additional Color Spaces Adds support for additional color models used in digital photography ...

Страница 64: ...onality Software and Troubleshooting Chipsets All laptops or notebook communicate with the CPU through the chipset This laptop is shipped with the Intel Sky Lake or Kaby Lake chipset Identifying the chipset in Device Manager on Windows 10 1 Click All Settings on the Windows 10 Charms Bar 2 From the Control Panel select Device Manager 3 Expand System Devices and search for the chipset Identifying c...

Страница 65: ...omputer 2 Go to Dell com support 3 Click Product Support enter the Service Tag of your computer and then click Submit NOTE If you do not have the Service Tag use the autodetect feature or manually browse for your computer model 4 Click Drivers and Downloads 5 Select the operating system installed in your computer 6 Scroll down the page expand Chipset and select your chipset driver Technology and c...

Страница 66: ...nd Windows 2 Type Device Manager 3 Tap Processor The basic information of the processor is displayed Identifying processors in Windows 7 1 Click Start Control Panel Device Manager 2 Select Processor The basic information of the processor is displayed Verifying the processor usage in Task Manager 1 Press and hold the taskbar 2 Select Start Task Manager The Windows Task Manager window is displayed 3...

Страница 67: ...indows Task Manager window The processor performance details are displayed 4 Click Open Resource Monitor Verifying system memory Windows 10 1 Tap the Windows button and select All Settings System 2 Under System tap About Windows 8 1 From your desktop start the Charms Bar 2 Select Control Panel and then select System Windows 7 Click Start Control Panel System Technology and components 67 ...

Страница 68: ... ePSA 1 Turn on or restart your system 2 Perform one of the following actions after the Dell logo is displayed With keyboard Press F12 The PreBoot System Assessment PSA starts on your system NOTE If you wait too long and the operating system logo appears continue to wait until you see the desktop Turn off the laptop and try again Display Identifying the display adapter 1 Start the Search Charm and...

Страница 69: ...r file icon and follow the instructions on the screen Adjusting brightness in Windows 10 To enable or disable automatic screen brightness adjustment 1 Swipe in from the right edge of the display to access the Action Center 2 Tap or click All Settings System Display 3 Use the Adjust my screen brightness automatically slider to enable or disable automatic brightness adjustment NOTE You can also use ...

Страница 70: ...ss the Windows logo P key 3 Select one of the following modes PC screen only Duplicate Extend Second Screen only NOTE For more information see the document that shipped with your display device Changing the display settings in Intel HD Graphics Control Panel 1 Right click your desktop and select Graphics Properties to launch the Intel HD Graphics Control Panel 2 Click Display 3 Change the display ...

Страница 71: ...ides of the touch screen to remove any dirt or fingerprints Application Promise Consistent experience across form factors is what s necessary a user can download any application from the Windows Store and it runs great on their machine There is no application that runs great on one device but not on another This means developers can target all Windows 8 and this version of Windows touch devices wi...

Страница 72: ...nabled and do not occur any time a mouse or other external device is used then the issue is related to the touch pad 4 Check for mechanical problems If the problem cannot be corrected by adjusting the settings mentioned above and only occurs with the touch pad enabled and then this could indicate a mechanical problem Press down on the palm rest on first the left side of the touch pad and then the ...

Страница 73: ...ppen with different speakers then the problem is related to the external device If it persists then there is a problem with either the audio connector or the audio controller Confirm this by running Dell Diagnostics 2 If the problem is internal only try shaking the unit and see if the sound returns or plays intermittently If it does then a connection for the speakers is loose and the unit needs se...

Страница 74: ...on external speakers Reseating the speaker connection usually corrects the problem 2 Check the volume control in Windows and make sure the balance slider is not set all the way to one side 3 If this problem is happening only on internal speakers try shaking the unit to see if sound comes back or if it comes and goes intermittently If either of these occurs a loose speaker connection most likely is...

Страница 75: ... if you tap the Skype software that is shipped with the laptop the camera turns on Similarly if you are chatting on the internet and the application requests to access the webcam the webcam turns on Starting the camera application 1 Tap or click the Windows button and select All apps 2 Select Camera from the apps list 3 If the Camera App is not available in the apps list search for it Technology a...

Страница 76: ...gs on the Windows 10 Charms Bar 2 Tap or click Control Panel select Device Manager and expand Disk drives The hard drive is listed under Disk drives Identifying the hard drive in Windows 7 1 Click Start Control Panel Device Manager The hard drive is listed under Disk drives 2 Expand Disk drives 76 Technology and components ...

Страница 77: ... failure when the system is configured for any one of three fault tolerant RAID levels RAID 1 RAID 5 and RAID 10 By seamlessly storing copies of data on one or more additional hard drives any hard drive can fail without data loss or system downtime When the failed drive is removed and a replacement hard drive is installed data fault tolerance is easily restored Intel Rapid Storage Technology can a...

Страница 78: ...Next to continue the installation Once the installation completes user will get the Intel Rapid Storage Technology icon on the Windows task bar Create a RAID Array 1 Double click Intel Rapid Storage Technology icon then below main screen appears 2 Click the Create icon to create a RAID array Here we take RAID 1 for example 78 Technology and components ...

Страница 79: ...Next 4 In Configure Volume you need to key in the Volume Name with 1 16 letters select the RAID disks and then specify the volume size Click Next 5 In Confirm Volume Creation you may review the selected configuration Then click Create Volume Technology and components 79 ...

Страница 80: ...tition your new volume by using Windows Desk Management before adding any data Click OK 7 You will see the current status 8 In Windows Desk Management you need to initialize a disk before Logical Disk Management can access it Click OK 80 Technology and components ...

Страница 81: ...9 Right click on Disk 0 click New Simple Volume 10 Then follow the instructions on the New Simple Volume Wizard 11 Finally you can start to use RAID 1 function Technology and components 81 ...

Страница 82: ...mmand Configure The new features for the Dell Command Configure includes Dell Client Configuration Toolkit CCTK is re branded as Dell Command Configure DCC New User Interface Support for Red Hat Enterprise Linux 7 0 Client version 64 bit operating system Support for x6 client platforms Support for Advanced System Management ASM 2 0 on Dell Precision Workstations for setting the non critical upper ...

Страница 83: ...asic Input Output System BIOS configurations supported by Command Configure Using the GUI you can perform the following tasks Create BIOS configuration for client systems Validate the BIOS configuration against the BIOS configuration of the host system Export the customized BIOS configurations as a configuration file ini cctk Self Contained Executable SCE shell script or report NOTE To apply the c...

Страница 84: ...figure GUI Command Configure WINPE Allows access to the Windows PE scripts to create a bootable image For more details see the Dell Command Configure Installation Guide Uninstall Uninstalls Command Configure User s Guide Online Provides access to the Command Configure online documentation Launching The Command Configure GUI NOTE The Command Configure GUI is supported only on systems running the Mi...

Страница 85: ...gure Command Configure Command Prompt NOTE If you are using Microsoft Windows Vista operating system or later right click Command Configure Command Prompt and select Run as administrator 2 Navigate to the x86 or x86_64 directory depending on the architecture of the operating system 3 Run the Command Configure commands Bootable Image To run Command Configure commands 1 Copy Dell Command Configure w...

Страница 86: ... down NOTE Ensure that the computer and all attached devices are turned off If your computer and attached devices did not automatically turn off when you shut down your operating system press and hold the power button for about 6 seconds to turn them off Turning off your computer Windows 7 CAUTION To avoid losing data save and close all open files and exit all open programs before you turn off you...

Страница 87: ...ding strap or by periodically touching an unpainted metal surface at the same time as touching a connector on the back of the computer CAUTION Handle components and cards with care Do not touch the components or contacts on a card Hold a card by its edges or by its metal mounting bracket Hold a component such as a processor by its edges not by its pins CAUTION When you disconnect a cable pull on i...

Страница 88: ...power must be completely unplugged before the case is opened Systems that incorporate standby power are essentially powered while turned off The internal power enables the system to be remotely turned on wake on LAN suspended into a sleep mode and have other advanced power management features After you unplug a system and before you remove components wait approximately 30 to 45 seconds to allow th...

Страница 89: ...oduce outward symptoms related to the damage The weakened trace may take weeks or months to melt and in the meantime may cause degradation of memory integrity intermittent memory errors etc NOTE Intermittent failures represent approximately 80 percent of ESD related failures The high rate of intermittent failures means that most of the time when damage occurs it is not immediately recognizable The...

Страница 90: ...itive component place it in an anti static container or packaging The ESD Field Service Kit The unmonitored Field Service kit is the most commonly used Each Field Service kit includes three main components anti static mat wrist strap and bonding wire Figure 11 ESD Field Service Kit The anti static mat is dissipative and should be used to safely place parts on during service procedures When using a...

Страница 91: ...id accidental ESD hardware damage It is recommended to test the wrist strap and bonding wire a minimum of once per week Table 54 Wrist Straps Wrist Strap and Bonding Wire Wireless ESD Strap Unacceptable ESD Wrist Strap Tester The wires inside of an ESD strap are prone to damage over time When using an unmonitored kit it is best practice to regularly test the strap prior to each service call and at...

Страница 92: ...r cubicles Always look for a large open flat work area that is free of clutter and large enough to deploy the ESD kit with additional space to accommodate the type of system that is being repaired The workspace should also be free of insulators that can cause an ESD event On the work area insulators such as Styrofoam and other plastics should always be moved at least 12 inches or 30 centimeters aw...

Страница 93: ...tion Summary It is strongly suggested that all field service engineers use the traditional wired ESD grounding wrist strap and protective anti static mat at all times when servicing Dell products In addition it is critical that engineers keep sensitive parts separate from all insulator parts while performing service and that they use anti static bags for transporting sensitive components Lifting E...

Страница 94: ... not use batteries designed for other Dell computers 1 Connect any external devices such as a port replicator or media base and replace any cards such as an ExpressCard 2 Connect any telephone or network cables to your computer CAUTION To connect a network cable first plug the cable into the network device and then plug it into the computer 3 Connect your computer and all attached devices to their...

Страница 95: ...r 70 M2 0 3 0 SSD Carrier Power FPC and Bracket Left I O DB Speakers 28 M2 0 5 0 HDD Carrier 2 M2 0 7 0 Battery Bay 9 M2 5 3 0 Keyboard 6 M2 5 4 0 Battery PCB Holder Corner Bumpers Docking port assembly Speaker LCD Latch Keyboard Fan HDD ODD Support Brackets GPS Daughterboard Placeholder Hinge Covers L R USB Type C Bracket Rear I O Daughterboard Smart Card Cover System board Bottom chassis cover D...

Страница 96: ...46 M2 5 6 0 LCD Hinges 14 M3 0 7 0 Handle 2 M3 5 7 0 Cap Screws 4 2 for Serial Port on System board and 2 optioned with VGA or Serial Port on the Rear I O Space Stylus Removing the stylus 1 Press the latch 1 and open the right I O door 2 2 Withdraw the stylus out of the slot 96 Removing and installing components ...

Страница 97: ...Installing the stylus 1 Insert the stylus in the slot 2 Close the I O door 1 and press the door until it latches 2 Removing and installing components 97 ...

Страница 98: ...SIM card Removing the SIM card 1 Remove the SIM card out of the slot on the system board 2 Close the right I O door 98 Removing and installing components ...

Страница 99: ... the procedure in Before working inside your computer 2 Open the right I O door 3 Insert the SIM card into the slot on the system board Memory card Installing the memory card 1 Open the right I O door 2 Insert the memory card in the slot on the system board Removing and installing components 99 ...

Страница 100: ...Removing the memory card 1 Remove the memory card from the slot on the system board 2 Close the right I O door 100 Removing and installing components ...

Страница 101: ...er 2 Remove the two M3 5 7 screws 1 that secures the handle to the computer 3 Separate the handle from the computer 2 Installing the Handle 1 Install the handle on the computer 1 2 Tighten the two M3 5 7 screws 2 securing the handle to the computer Removing and installing components 101 ...

Страница 102: ...Latch Doors Removing the latch doors 1 Follow the procedure in Before working inside your computer 2 Open the I O door 3 Remove the screws 1 securing door hinges to the computer and lift the I O door 2 away from the computer 102 Removing and installing components ...

Страница 103: ... procedure in After working inside your computer NOTE Depending on its location each door may have one two or three screws Table 57 Screw description of latched doors Location No of Doors Screws Left 2 2x M3 3 Screws 1x M3 3 Screw Right 2 2x M3 3 Screws 3x M3 3 Screws Rear 3 2x M3 3 Screws 2x M3 3 Screws 1x M3 3 Screw Removing and installing components 103 ...

Страница 104: ...ngage locking mechanism 3 Pry on the recess point 2 and slide the battery forward 3 to remove it from the computer Installing the Batteries 1 Slide in the battery in battery bay to align the battery contacts 1 with one on the computer 2 Press the edge of the battery 2 to engage the latch mechanism and lock the battery 3 104 Removing and installing components ...

Страница 105: ...e batteries primary and optional both the batteries follows the same installation and removal procedure Bottom Chassis Cover Removing the Bottom Chassis Cover 1 Follow the procedure in Before working inside your computer 2 Unlock 1 and open the left right and rear I O door 2 Removing and installing components 105 ...

Страница 106: ...3 Remove the 19 M2 5 5 screws on the bottom chassis cover 1 two M2 5 6 screws 2 in the rear I O space 4 Remove the bottom chassis cover 3 from the computer 106 Removing and installing components ...

Страница 107: ...e bottom chassis cover over the bottom base 1 of the computer 2 Install the two M2 5 6 screws 2 in the rear I O space and 19 M2 5 5 screws 3 on the bottom chassis cover 3 Close the left right and rear I O doors Removing and installing components 107 ...

Страница 108: ...mputer Keyboard Removing the Keyboard 1 Follow the procedure in Before working inside your computer 2 Remove the Batteries 3 Remove the six M2 5 5 screws on the keyboard 1 and pry at the bottom edge of the keyboard 2 108 Removing and installing components ...

Страница 109: ... keyboard slightly 1 towards touch pad and flip it over inclined over the LCD panel 2 5 Remove the four M2 3 screws 1 on the keyboard cover and remove it from the computer 2 Removing and installing components 109 ...

Страница 110: ...ess the keyboard and back light FPC connectors on the system board 7 Separate the keyboard from the system 3 Installing the Keyboard 1 Install the keyboard 1 and connect the keyboard and back light FPC to the system board 2 2 Secure keyboard and back light FPC connections using an insulation tape 3 110 Removing and installing components ...

Страница 111: ...ard cover 1 and tighten the four M2 3 screws 2 to secure it to the chassis 4 Flip the keyboard 3 over on the chassis 3 5 Slide the keyboard towards LCD 1 to align it to screw holes 2 Removing and installing components 111 ...

Страница 112: ...ter Secondary SSD carrier Removing the Secondary SSD carrier 1 Follow the procedure in Before working inside your computer 2 Open the right I O door 3 Release the SSD carrier by sliding the blue hard drive release latch towards left 1 4 Pull the SSD carrier out of the system using the blue tab 2 112 Removing and installing components ...

Страница 113: ...e the secondary SSD carrier 1 in to the slot on the computer 2 Push the carrier in the slot until blue tab clicks and close the right I O door 2 3 Follow the procedure in After working inside your computer Removing and installing components 113 ...

Страница 114: ...otential data loss 2 Remove the Batteries 3 Release the SSD carrier by sliding the blue hard drive release latch 1 towards right 4 Slide the SSD carrier out of the computer using the blue pull tab 2 out of the computer Installing the Primary SSD carrier 1 Insert the primary SSD carrier 1 in to the computer 2 Push the carrier into the slot until the blue tab clicks and close the right I O door 2 11...

Страница 115: ...computer 2 Remove the a Batteries b SSD Primary or Secondary 3 Remove the two M2 5 screws 1 and flip over the SSD carrier 2 4 Remove the single M2 5 screw 3 and separate the cover from the SSD carrier 4 5 Separate the SSD and interposer 1 from the SSD carrier tray 6 Flip over the assembly and disconnect the SSD from the interposer 3 Removing and installing components 115 ...

Страница 116: ...ith new thermal pad 3 3 Install the cover 1 on the SSD carrier and install the single M2 5 screw 2 4 Flip over the SSD carrier 3 and tighten the two M2 5 screws 4 securing the cover to the SSD carrier 5 Install the a SSD Primary or Secondary b Batteries 6 Follow the procedure in After working inside your computer 116 Removing and installing components ...

Страница 117: ...3 Pull the clips securing the memory module 1 until the socket disengages and remove the memory module from the memory socket 2 on the system board Installing the Memory 1 Align and insert the memory module along the keyed notch 1 at an acute angle and press the memory module 2 until securing clips engages Removing and installing components 117 ...

Страница 118: ...ter WLAN card Removing the WLAN card 1 Remove the a Batteries b Bottom chassis cover 2 Remove the single M2 3 screw 1 and remove the metal bracket 2 on the WLAN card 3 Disconnect the antennae cables 3 and remove the WLAN card out from the M 2 slot 4 on the system board 118 Removing and installing components ...

Страница 119: ...puter Installing the WLAN card 1 Install the WLAN card into the M 2 slot 1 on the system board and connect the antennae cables 2 2 Place the metal bracket on the WLAN card 3 and secure it using the single M2 3 screw 4 Removing and installing components 119 ...

Страница 120: ...ove the single M2 3 screw 1 remove the metal bracket 2 on the WWAN card 4 Disconnect the antennae cables and remove the WWAN card 4 out of the M 2 slot on the system board Installing the WWAN card 1 Install the WWAN card in the M 2 slot 1 on the system board and connect the antennae cables 2 2 Secure the WWAN card using the metal bracket 3 and tighten the single M2 3 screw 4 securing the WWAN card...

Страница 121: ... Follow the procedure in Before working inside your computer 2 Remove the a Batteries b Bottom chassis cover 3 Unroute the aux cables 1 for WLAN and WWAN and disconnect the antennae cable 2 on GPS module 4 Unroute the main antennae cables 3 and loosen the single M2 5 5 screw 4 to separate the RF bracket 5 from the system board Removing and installing components 121 ...

Страница 122: ...ductive tape on the GPS FPC connector 1 and disconnect the GPS FPC connector 2 from GPS module 6 Remove the two M2 5 5 screws 3 and separate the GPS module 4 from the system board 122 Removing and installing components ...

Страница 123: ...rd side first 3 and secure it using a piece of tape 4 3 Install the RF bracket 1 on the system board and secure it using the single M2 5 5 screw 2 4 Route the aux cables for WLAN and WWAN cards through the RF bracket 3 5 Connect the antennae cable 4 on GPS module and route the main antennae cables 5 through the RF bracket Removing and installing components 123 ...

Страница 124: ... your computer Coin cell battery Removing the Coin cell 1 Follow the procedure in Before working inside your computer 2 Remove the a Bottom chassis cover b Batteries 3 Disconnect the coin cell connector from the system board 1 and remove it from the system 2 124 Removing and installing components ...

Страница 125: ...nstall the coin cell 1 and connect the coin cell connector to the system board 2 2 Install the a Bottom chassis cover b Batteries 3 Follow the procedure in After working inside your computer Removing and installing components 125 ...

Страница 126: ...the seven M2 5 5 screws 2 from the heat sink pipe and loosen the three captive screws from fan case 3 5 Remove the PCIe heatsink fan assembly from the computer 4 Installing the PCIe heatsink fan assembly 1 Install the PCIe heatsink fan assembly 1 in the chassis and tighten the three captive screws 2 on the fan case 2 Install the seven M2 5 screws 3 on the heat sink pipe and connect the fan cable 4...

Страница 127: ...imary SSD rail 1 Follow the procedure in Before working inside your computer 2 Remove the a Batteries b Bottom chassis cover c PCIe heatsink assembly 3 Peel off the inductive tape on the SSD FPC connector 1 on system board and disconnect it 2 4 Remove the 4 M2 3 screws 3 and remove it from the computer 4 Removing and installing components 127 ...

Страница 128: ... screws 2 securing it to the system board 2 Connect the SSD FPC connector 3 to the system board and secure it using a piece of tape 4 3 Install the a PCIe heatsink fan assembly b Bottom chassis cover c Batteries 4 Follow the procedure in After working inside your computer 128 Removing and installing components ...

Страница 129: ...ve the a Batteries b Bottom chassis cover c PCIe Heatsink assembly 3 Peel off the tape securing the dock FPC 1 and disconnect the dock FPC 2 4 Disconnect the antennae cables from RF passthrough connectors 1 and unroute the antennae cables 2 from the routing channels on the dock assembly Removing and installing components 129 ...

Страница 130: ... separate the docking board assembly from the chassis 2 Installing the Docking Port Assembly 1 Install the docking port assembly 1 and install the two M2 5 5 screws 2 securing it to the system board 130 Removing and installing components ...

Страница 131: ...the dock FPC 1 and secure it using a piece of tape 2 3 Secure the antennae cables along the routing channels 1 and connect the antennae cables on RF passthrough connectors 2 Removing and installing components 131 ...

Страница 132: ... installed after installing the docking assembly to avoid any damage to the board 4 Install the a PCIe Heatsink assembly b Batteries c Bottom chassis cover 5 Follow the procedure in After working inside your computer 132 Removing and installing components ...

Страница 133: ... Bottom chassis cover c WLAN card d WWAN card e PCIe Heatsink fan assembly f Docking port assembly 3 Unroute the antennae cables from the tabs on the heatsink pipe 4 Remove the six M2 5 5 screws 1 and single M1 6 5 2 screw from the thermal module 5 Lift and the heat sink assembly from the computer 3 Removing and installing components 133 ...

Страница 134: ... the heatsink assembly 1 in the computer and tighten the single M1 6 5 2 screw near the CPU 2 Install the six M2 5 5 cap screws 3 on the thermal module securing the thermal module to the system board 3 Route the antennae cables along the routing channel on the heatsink pipe 134 Removing and installing components ...

Страница 135: ...re in Before working inside your computer NOTE A 5 mm socket wrench should be used to remove install the caps screws located in rear I O space 2 Remove the a Batteries b Bottom chassis Cover c WLAN card d WWAN card e PCIe heatsink fan assembly 3 Peel off the inductive tape on the I O board FPC connector 1 to disconnect it from the system board 2 4 Remove the two cap screws on the serial port in th...

Страница 136: ... O board away from the system 2 Installing the Rear I O board 1 Install the rear I O board on the system board and slide the serial port through the face plate 1 2 Secure the I O board using three M2 5 5 screws 2 136 Removing and installing components ...

Страница 137: ... FPC 2 to the system board and then to I O board itself 3 and secure it using a piece of tape 3 5 Install the a PCIe heatsink fan assembly b WWAN card c WLAN card d Bottom chassis cover e Batteries 6 Follow the procedure in After working inside your computer Removing and installing components 137 ...

Страница 138: ...Remove the a Batteries b Bottom chassis cover c WLAN card d WWAN card e PCIe heatsink assembly f Docking port assembly g Heatsink 3 Remove the two M2 5 5 on either sides 1 and lift to remove the brackets 2 from the computer 4 Press the latch 1 and open the LCD lid 2 138 Removing and installing components ...

Страница 139: ... LCD lid at an obtuse angle and push the hinge covers from the rear end to remove it from the computer Installing the Hinge Covers 1 Press the latch 1 and open the LCD lid 2 Removing and installing components 139 ...

Страница 140: ...CD lid open at an obtuse angle and insert the hinge covers from front until it clicks in its place 3 Place the brackets 1 and secure it using two M2 5 5 on either sides 2 140 Removing and installing components ...

Страница 141: ...dure in Before working inside your computer 2 Remove the a Batteries b Bottom chassis cover c PCIe heatsink assembly d Docking port assembly e WLAN card f WWAN card g GPS module h Heatsink assembly i Hinge covers 3 Remove the two M2 3 screws 1 on the EDP bracket and turn it up side down 2 4 Pull and disconnect the EDP cable from the system board 3 and remove the two M2 3 screws 4 securing the hing...

Страница 142: ...5 Open the LCD lid 6 Loosen the four screws on hinges 1 to separate the LCD assembly from the computer 2 142 Removing and installing components ...

Страница 143: ...Installing the Display Assembly 1 Tighten the two screws on left 1 and on the right 2 side 2 Close the lid 3 Removing and installing components 143 ...

Страница 144: ...assembly 1 and rethread the antennae cables 2 4 Connect the EDP cable 3 to the system board and place the EDP bracket over the cable 4 5 Install the two M2 3 screws 5 and secure the EDP bracket to the system board 144 Removing and installing components ...

Страница 145: ...working inside your computer LCD Bezel and Back Cover Assembly Removing the LCD with bezel and the display back cover assembly 1 Follow the procedure in Before working inside your computer 2 Remove the a Batteries b Bottom chassis cover c WLAN card d WWAN card e PCIe heatsink assembly f Docking port assembly g Heatsink h Hinge covers i Display assembly Removing and installing components 145 ...

Страница 146: ...d pry at bottom edge to separate the two subassemblies 2 5 Peel off the tape on the LCD connections 1 and open the connector 2 to disconnect the EDP cable 3 from the LCD 6 Peel off the reflective tape 4 on the LCD panel and the touch connector 5 and disconnect the cable from the board 6 146 Removing and installing components ...

Страница 147: ...on the LCD connector close the connector 2 and secure it using a piece of tape 3 2 Connect the touch controller cable 5 and use insulation tape on the connector 6 3 Align and place the bezel on the back cover 1 and secure it using the four M2 5 epoxy screws 2 Removing and installing components 147 ...

Страница 148: ... assembly 5 Install the a Display assembly b Hinge covers c Heatsink d PCIe heatsink assembly e Docking port assembly f WWAN card g WLAN card h Bottom chassis cover i Batteries 6 Follow the procedure in After working inside your computer 148 Removing and installing components ...

Страница 149: ...d f PCIe heatsink assembly g Docking port assembly h Heatsink i Hinge covers j Display assembly k LCD bezel and back cover assembly 3 Peel off the tape securing the microphone daughterboard 1 and remove the two M2 3 screws to turn the daughterboard 3 up side down 4 Peel off the insulation tape 1 and disconnect the EDP cable connectors 2 Removing and installing components 149 ...

Страница 150: ...1 and secure it using a piece of tape 2 2 Turn over the microphone daughterboard on the back cover 1 and tighten the two M2 3 screws 2 3 Secure the microphone daughterboard using a piece of reflective tape on either sides 3 to the LCD back cover 150 Removing and installing components ...

Страница 151: ...Follow the procedure in After working inside your computer Camera Removing the Camera 1 Follow the procedure in Before working inside your computer 2 Remove the a Batteries b Bottom chassis cover c Memory d WLAN card e WWAN card f PCIe heatsink assembly g Docking port assembly h Heatsink i Hinge covers j Display assembly k LCD Bezel and back cover assembly Removing and installing components 151 ...

Страница 152: ...ack cover 5 to remove it from the computer CAUTION Do not touch the Camera Lens fused to the LCD with bezel assembly Installing the Camera 1 Install the camera module 1 on the back cover and install the two M2 3 screws 2 2 Connect the EDP cable to the camera module 3 stick a piece of insulation tape 4 on the EDP connectors 3 Secure the camera module on the back cover using a piece of reflective ta...

Страница 153: ...ide your computer Battery Bay Removing the Battery bay 1 Follow the procedure in Before working inside your computer 2 Remove the a Batteries b Bottom chassis cover c PCIe Heatsink assembly 3 Disconnect both the battery connections from the system board 4 Remove the five M2 5 3 1 and nine M2 5 5 2 screws securing the battery bay to chassis and lift to separate the battery bay 3 from the computer R...

Страница 154: ...attery bay 1 Install the battery bay 1 on the computer and tighten the five M2 5 3 2 and nine M2 5 5 3 securing it to the chassis 2 Connect the battery cables to the system board 154 Removing and installing components ...

Страница 155: ... O daughterboard 1 Follow the procedure in Before working inside your computer 2 Remove the a Batteries b Bottom chassis cover c PCIe Heatsink fan assembly d Battery bay 3 Peel off the tape 1 disconnect the left I O daughterboard FPC connector 2 from the system board 4 Disconnect the speaker cable from the left I O daughterboard 3 Removing and installing components 155 ...

Страница 156: ...ews 1 and lift the Left I O daughterboard from the computer 2 Installing the Left I O Board 1 Install the left I O daughterboard 1 and secure it using the two M2 3 screws 2 to the computer 156 Removing and installing components ...

Страница 157: ...f insulation tape 2 3 Connect the speaker cable to the left I O daughterboard 3 4 Install the a Battery bay b PCIe Heatsink fan assembly c Bottom chassis cover d Batteries 5 Follow the procedure in After working inside your computer Removing and installing components 157 ...

Страница 158: ...the a Batteries b Bottom chassis cover c PCIe heatsink assembly d Battery bay e Left I O daughterboard 3 Peel off the tape on express card FPC connector 1 and disconnect it 2 from system board 4 Remove the six M2 5 screws 1 and lift the express card up to remove it from the computer 2 158 Removing and installing components ...

Страница 159: ... Installing the ExpressCard Reader 1 Insert the express card reader in the left I O face plate 2 Align and place the express card reader 1 on the computer and install the four M2 5 screws 2 securing it to the computer Removing and installing components 159 ...

Страница 160: ...stem board 1 and secure it using a piece of tape 2 4 Install the a WWAN card b WLAN card c PCIe heatsink assembly d Batteries e Bottom chassis cover 5 Follow the procedure in After working inside your computer 160 Removing and installing components ...

Страница 161: ...eatsink assembly d Battery bay 3 Remove the tape from the smart card reader connector 1 and disconnect it 2 from the USH board 4 Remove the tape from the fingerprint reader connector 3 and disconnect it from the USH board 4 5 Remove the two M2 3 screws 1 securing the USH board to the bottom base and turn it up side down 2 Removing and installing components 161 ...

Страница 162: ...ve the tape 1 and disconnect the Smartcard Reader FPC connector 2 from the USH board 7 Loosen the four M2 3 screws 1 and remove the smart card 2 reader from the computer 162 Removing and installing components ...

Страница 163: ...t card reader through the I O face plate 1 and install the four M2 3 screws to secure it to the bottom chassis 2 Connect the Smart Card FPC on the underside of the USH board 1 and secure it using a piece of tape 2 Removing and installing components 163 ...

Страница 164: ...the USH board to the chassis 2 4 Connect the smart card FPC connector 1 and securing it with a piece of tape 2 5 Connect the finger print reader FPC 3 and secure it using a piece of tap 4 to the USH board 164 Removing and installing components ...

Страница 165: ...side your computer Speaker Removing the Speaker 1 Follow the procedure in Before working inside your computer 2 Remove the a Batteries b Bottom chassis cover c PCIe heatsink assembly d Handle e Left I O daughterboard 3 Remove the two M2 5 7 screws 1 and remove the speaker from the computer 2 Removing and installing components 165 ...

Страница 166: ... on the computer and install the two M2 5 7 screws to secure the speaker to the base 2 2 Install the a Handle b Left I O daughterboard c PCIe Heatsink assembly d Docking port assembly e Bottom Chassis Cover f Batteries 166 Removing and installing components ...

Страница 167: ...f Primary SSD g Secondary SSD h Heat Sink i Memory j WLAN card k WWAN card l GPS module m Primary SSD rail n Battery bay o Rear I O board 3 Peel off the tape 1 disconnect the SSD ODD assembly 2 from the system board 4 Peel off the tape 3 from touch pad connectors and disconnect it from the system board 4 5 Peel off the tape 1 and disconnect the rear I O board FPC connector 2 from the system board ...

Страница 168: ... 1 and disconnect the express card FPC 2 from the system board 10 Peel off the tape 1 and disconnect the power button FPC connector 2 from the system board 11 Peel off the tape 3 and disconnect the USH board FPC and touch pad connector 4 from the system board 168 Removing and installing components ...

Страница 169: ...P cable 3 and disconnect the DC In connector 4 from the system board 14 Remove the two M2 5 5 screws and two M1 6 3 0 screws 1 from the USB Type C bracket 15 Remove the USB Type C bracket 2 and the two cap screws in the rear I O space 3 from the system board Removing and installing components 169 ...

Страница 170: ...he system board 3 from the computer Installing the System board 1 Install the system board inserting the serial port on the system board through chassis 1 and install the eight M2 5 screws 2 and single M2 3 screw epoxy screw 3 on the system board 170 Removing and installing components ...

Страница 171: ...t 2 and secure it with two M2 5 5 screws and two M1 6 3 0 screws on the system board 3 4 Connect the EDP cable 1 and install the EDP bracket on the system board 2 5 Install the two M2 3 screws 3 on the EDP bracket and connect the DC In cable to the system board 4 Removing and installing components 171 ...

Страница 172: ... 7 Connect the USH board and touch pad cable 3 to the system board and secure it using a piece of tape 4 8 Connect the express card FPC cable 1 and secure it using a piece of tape 2 9 Connect the left I O FPC cable 3 and secure it using a piece of tape 4 172 Removing and installing components ...

Страница 173: ...e 3 and secure it using a piece of tape 4 12 Connect the docking port FPC cable 5 and secure it using a piece of tape 6 13 Connect the SSD ODD assembly 1 and secure it using a piece of tape 2 14 Connect the touch pad connectors to the system board 3 and secure it using a tape 4 Removing and installing components 173 ...

Страница 174: ...chassis cover o Batteries 16 Follow the procedure in After working inside your computer Bottom Base Assembly 1 To replace the bottom base assembly remove the following components from old base a Batteries b Bottom chassis cover c Keyboard d PCIe heatsink assembly e Docking port assembly f Primary SSD g Secondary SSD h Heatsink assembly i Memory j WLAN card k WWAN card l GPS module 174 Removing and...

Страница 175: ...ed to the chassis Replace the Base Assembly for any issues with the power button or ODD or secondary SSD 3 Install the following components to the new base a System board b Rear I O board c Battery Bay d Primary SSD rail e GPS module f WWAN card g WLAN card h Memory i Heatsink assembly j Secondary SSD k Primary SSD l Docking port assembly m PCIe heatsink assembly n Keyboard o Bottom chassis cover ...

Страница 176: ...p options Boot Sequence Updating the BIOS in Windows System and setup password Boot menu Press F12 when the Dell logo appears to initiate a one time boot menu with a list of the valid boot devices for the system Diagnostics and BIOS Setup options are also included in this menu The devices listed on the boot menu depend on the bootable devices in the system This menu is useful when you are attempti...

Страница 177: ...may not appear General options Table 58 General Option Description System Information This section lists the primary hardware features of your computer The options are System Information Memory Configuration Processor Information Device Information Battery Information Displays the battery status and the type of AC adapter connected to the computer Boot Sequence Allows you to change the order in wh...

Страница 178: ...er Serial Port 1 Allows you to configure disable and re mapping the serial port s Click one of the following options Disabled Com1 Default Port is configured with 3F8h with IRQ 4 Com3 Port is configured with 3E8h with IRQ 4 NOTE Serial Port 2 is available when the system has Serial Port in the rear configurable I O space Serial Port 2 SATA Operation Allows you to configure the operating mode of th...

Страница 179: ... to enable or disable the integrated audio controller By default the Enable Audio option is selected The options are Enable Microphone Enable Internal Speaker This option is set by default Keyboard Illumination This option lets you choose the operating mode of the keyboard illumination feature The options are Disabled 25 50 75 100 Keyboard Backlight Timeout on AC Allows to define the timeout value...

Страница 180: ... controls whether the touchscreen is enabled or disabled Stealth mode Control This option allows configuration of Dell Stealth mode feature Configurable control features Onboard LEDs LCD screen Speakers Fans Radio GPS receiver WLAN radio WWAN radio Miscellaneous devices Allows you to enable or disable various on board devices Enable PC Card Enable Camera Default Enable Hard Drive Free Fall Protect...

Страница 181: ...e or delete the password System Password Allows you to set change or delete the System password The entries to set password are Enter the old password Enter the new password Confirm new password Click OK once you set the password NOTE For the first time login Enter the old password field is marked to Not set Hence password has to be set for the first time you login and then you can change or delet...

Страница 182: ... or disable the Trusted Platform Module TPM during POST The options are TPM On Default Clear PPI Bypass for Enable Command Default PPI Bypass for Disbale Command PPI Bypass for Clear Command Attestation Enable Default Key Storage Enable Default SHA 256 Default Computrace R Allows you to activate or disable the optional Computrace software The options are Deactivate Disable Activate Default OROM ke...

Страница 183: ...tion mode modifies the behaviour of Secure Boot to allow evaluation of UEFI driver signatures Choose one of the option Deployed Mode Default Audit Mode Expert Key Management Allows you to enable or disable Expert Key Management Enable Custom Mode This option is not set by default The Custom Mode Key Management options are PK Default KEK db dbx Intel Software Guard Extensions options Table 63 Intel...

Страница 184: ...additional cores All Default 1 2 3 Intel SpeedStep Allows you to enable or disable the Intel SpeedStep mode of processor Enable Intel SpeedStep This option is set by default C States Control Allows you to enable or disable the additional processor sleep states C states This option is set by default Intel TurboBoost Allows you to enable or disable the Intel TurboBoost mode of the processor Enable I...

Страница 185: ...network the selected wireless radio will ne enabled Control WLAN radio Control WWAN radio This option is not set by default Wake on LAN This option allows the computer to power up from the off state when triggered by a special LAN signal Wake up from the Standby state is unaffected by this setting and must be enabled in the operating system This feature only works when the computer is connected to...

Страница 186: ...be available for all the batteries Battery 2 Charge Configuration Type C connector Power This option allows you to set maximum power that can be drawn from the Type C connector The options are 7 5 Watts Default 15 Watts Power Usage Mode This field lets you choose the system power usage mode The options are Power Saver Balanced Default High Performance Post behavior Table 66 POST Behavior Option De...

Страница 187: ...ions 0 seconds Default 5 seconds 10 seconds Full Screen Logo Allows you to display full screen logo if your image matches screen resolution Enable Full Screen Logo This option is not set by default Warnings and Errors Allows you to select different options to either stop prompt and wait for user input continue when warnings are detected but pause on errors or continue when either warnings or error...

Страница 188: ...This option is set by default VT for Direct I O Enables or disables the Virtual Machine Monitor VMM from utilizing the additional hardware capabilities provided by the Intel Virtualization technology for direct I O Enable VT for Direct I O This option is set by default Trusted Execution This option allows Measured Virtual Machine Monitor MVMM to use additional hardware capabilities provisioned by ...

Страница 189: ...by default BIOS Downgrade Allows you to flash previous revisions of the system firmware Allow BIOS Downgrade This option is set by default Data Wipe Allows you to securely erase data from all internal storage devices Wipe on Next Boot This option is not set by default Bios Recovery BIOS Recovery from Hard Drive This option is set by default Allows you to recover the corrupted BIOS from a recovery ...

Страница 190: ... EXPRESS OR IMPLIED WARRANTIES INCLUDING BUT NOT LIMITED TO THE IMPLIED WARRANTIES OF MERCHANTABILITY AND FITNESS FOR A PARTICULAR PURPOSE ARE DISCLAIMED IN NO EVENT SHALL THE COPYRIGHT OWNER OR CONTRIBUTORS BE LIABLE FOR ANY DIRECT INDIRECT INCIDENTAL SPECIAL EXEMPLARY OR CONSEQUENTIAL DAMAGES INCLUDING BUT NOT LIMITED TO PROCUREMENT OF SUBSTITUTE GOODS OR SERVICES LOSS OF USE DATA OR PROFITS OR ...

Страница 191: ...isplays the option to access the System Setup screen Updating the BIOS in Windows It is recommended to update your BIOS System Setup when you replace the system board or if an update is available For laptops ensure that your computer battery is fully charged and connected to a power outlet NOTE If BitLocker is enabled it must be suspended prior to updating the system BIOS and then re enabled after...

Страница 192: ...ll need to use a bootable USB Flash drive Please refer to the following article for further details https www dell com support article us en 19 sln143196 1 Download the BIOS update EXE file to another system 2 Copy the file e g O9010A12 EXE onto the bootable USB Flash drive 3 Insert the USB Flash drive into the system that requires the BIOS update 4 Restart the system and press F12 when the Dell S...

Страница 193: ...n the numbers 0 through 9 Only lower case letters are valid upper case letters are not allowed Only the following special characters are allowed space 3 Type the system password that you entered earlier in the Confirm new password field and click OK 4 Press Esc and a message prompts you to save the changes 5 Press Y to save the changes The computer reboots Deleting or changing an existing system s...

Страница 194: ...5 Press Esc and a message prompts you to save the changes 6 Press Y to save the changes and exit from System Setup The computer reboot 194 System setup ...

Страница 195: ...orm you if tests are completed successfully View error messages that inform you of problems encountered during testing NOTE The Enhanced Pre boot System Assessment window displays listing all devices detected in the computer The diagnostics starts running the tests on all the detected devices Running ePSA diagnostics Invoke diagnostics by either of the methods that are suggested below Tap F12 key ...

Страница 196: ...creen The advanced screen allows more directed testing and contains more detail information about the overall health of the system The user can get to this screen by simply swiping your finger to the left on touchscreen systems or clicking the next page button on the lower right hand side of the basic screen 196 Diagnostics ...

Страница 197: ...and click Yes to stop the diagnostic test 2 Select the device from the left pane and click Run Tests or use Advanced Option to include or exclude any Test ePSA Error Messages When the Dell ePSA Diagnostic detects an error while running it will pause the test and then popup a window as shown below Diagnostics 197 ...

Страница 198: ...ute the beeping sound code when there is an error by pressing on at the bottom right side of the error window NOTE Some tests for specific devices require user interaction Always ensure that you are present at the computer terminal when the diagnostic tests are performed Validation Tools This section contains information on how to validate the ePSA error code Error code verification can be done us...

Страница 199: ...ode validation code and service tag Part serial number is optional NOTE For error code use only the last 3 or 4 digits of the code user can enter 0142 or 142 instead of 2000 0142 4 Click on Submit once all the necessary information is entered Diagnostics 199 ...

Страница 200: ...Valid Error Code Example 200 Diagnostics ...

Страница 201: ... Part Replacement If customer is still covered under Dell Warranty Case reference number if there is an open case under the service tag Invalid Error Code Example QR APP Validation Tool Besides using the online tool customer can also validate the error code by scanning the QR code with a QR APP on smart phone 1 User to obtain the QR code from ePSA error Windows Diagnostics 201 ...

Страница 202: ...can use any QR code scanner application via smart phone to scan the QR code 3 QR code scanner application will scan the code and automatically generate the link out Click on the link to proceed 202 Diagnostics ...

Страница 203: ...pport website which contains information of Confirmation of the error code and result outcome Suggested Part Replacement If customer is still covered under Dell Warranty Case reference number if there is an open case under the service tag Diagnostics 203 ...

Страница 204: ...ce to isolate the LCD screen by running the built in self test BIST How to invoke LCD BIST Test 1 Power off the Dell laptop PC 2 Disconnect any peripherals connected to the PC Connect only the AC adapter charger to the PC 3 Make sure that the LCD screen is clean no dust particles on the surface of the screen 4 Press and hold D key and Power on the PC to enter LCD built in self test BIST mode Conti...

Страница 205: ...tic pattern will consist of a two digit number being represented by a first group of LED blinks 1 through 9 in green followed by a 1 5 second pause with the LED off and then a second group of LED blinks 1 through 9 in white This is then followed by a 3 second pause with the LED off before repeating over again Each LED blink takes 0 5 seconds The system will not shutdown when displaying the Diagnos...

Страница 206: ...ruption ME corruption or a hardware related issue The BIOS recovery image should be available on the unencrypted partition on the drive for BIOS recovery feature Rollback BIOS feature Two versions of the BIOS recovery image are saved on the hard drive Current running BIOS old To be updated BIOS new The old version is already stored on the hard drive The BIOS adds new version to the hard drive main...

Страница 207: ...pt type set id 07 to set the partition ID NOTE The partition will be visible to the OS as Local Disk E to read and write data g Create the following folders in Local Disk E E EFI Dell BIOS Recovery h Copy both the BIOS files BIOS_CUR rcv and BIOS_PRE rcv to the recovery folder on Local Disk E i In the Command Prompt window at the DISKPART prompt type set id DE After the executing this command the ...

Страница 208: ...ts power Wi Fi and HDD It will turn on 7 The system will try to restart twice and will boot on the third attempt 8 Place the CMOS battery and the AC adapter back in the system 9 If self heal recovers the failure update the system with the latest BIOS and perform ePSA to ensure proper functionality of the system NOTE During installation or removal of any hardware always ensure all data is backed up...

Страница 209: ...neers to perform the Self Heal procedure as one of the mandatory initial steps Advise them that if the Self Heal procedure is unsuccessful to continue with the regular troubleshooting before part replacement Onsite Engineer Action The Latitude Self Heal procedure has to be a mandatory initial step If the Self Heal procedure is unsuccessful continue with the regular troubleshooting before part repl...

Страница 210: ...port and service options Availability varies by country and product and some services may not be available in your area To contact Dell for sales technical support or customer service issues 1 Go to Dell com support 2 Select your support category 3 Verify your country or region in the Choose a Country Region drop down list at the bottom of the page 4 Select the appropriate service or support link ...

Отзывы: