background image

Installing the heatsink

Steps

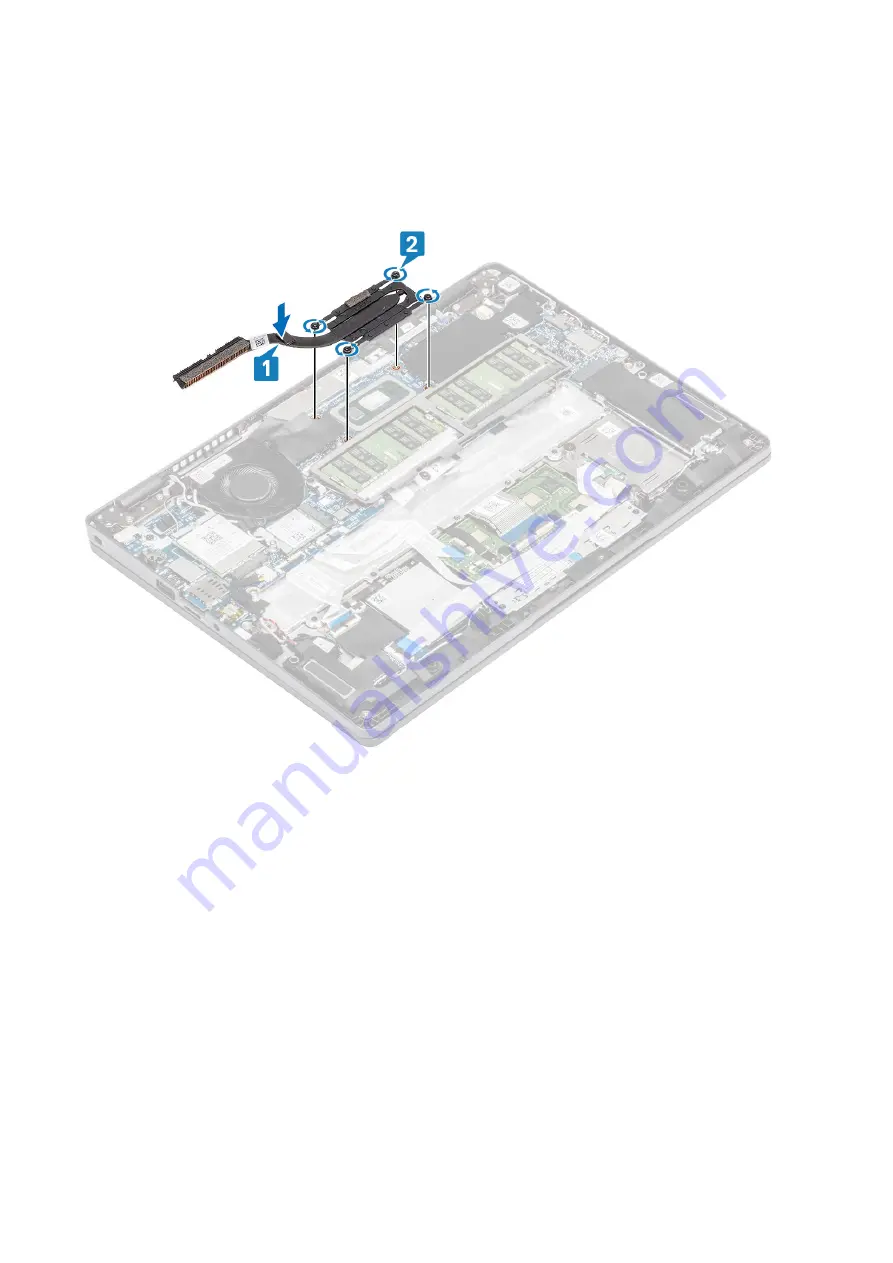
1. Place the heatsink on the system board and align the screw holes on the heatsink with the screw holes on the system board [1].
2. In sequential order (as indicated on the heatsink), tighten the four captive screws that secure the heatsink to the system board [2].

Next steps

1. Replace the 

battery

.

2. Replace the 

base cover

.

3. Replace the 

microSD card

.

4. Follow the procedure in 

after working inside your computer

.

DC-in port

Removing the DC-in port

Prerequisites

1. Follow the procedure in 

before working inside your computer

.

2. Remove the 

microSD card

.

3. Remove the 

base cover

.

4. Remove the 

battery

.

50

Disassembly and reassembly

Содержание Latitude 5310 2-in-1

Страница 1: ...Dell Latitude 5310 2 in 1 Service Manual Regulatory Model P96G Regulatory Type P96G003 May 2020 Rev A00 ...

Страница 2: ...ential damage to hardware or loss of data and tells you how to avoid the problem WARNING A WARNING indicates a potential for property damage personal injury or death 2020 Dell Inc or its subsidiaries All rights reserved Dell EMC and other trademarks are trademarks of Dell Inc or its subsidiaries Other trademarks may be trademarks of their respective owners ...

Страница 3: ...d 17 Installing the microSD card 18 SIM card tray 19 Removing the SIM card tray 19 Installing the SIM card tray 20 Base cover 21 Removing the base cover 21 Installing the base cover 23 Battery 26 Lithium ion battery precautions 26 Removing the battery 26 Installing the battery 28 WWAN card 30 Removing the WWAN card 30 Installing the WWAN card 31 WLAN card 32 Removing the WLAN card 32 Installing th...

Страница 4: ...ving the system board 63 Installing the system board 69 Coin cell battery 76 Removing the coin cell battery 76 Installing the coin cell battery 76 Display assembly 77 Removing the display assembly 77 Installing the display assembly 80 Keyboard 83 Removing the keyboard 83 Installing the keyboard 86 Smart card reader board 89 Removing the smart card reader board 89 Installing the smart card reader b...

Страница 5: ...g a wrist grounding strap or by periodically touching an unpainted metal surface at the same time as touching a connector on the back of the computer CAUTION Handle components and cards with care Do not touch the components or contacts on a card Hold a card by its edges or by its metal mounting bracket Hold a component such as a processor by its edges not by its pins CAUTION When you disconnect a ...

Страница 6: ... cards processors memory DIMMs and system boards Very slight charges can damage circuits in ways that may not be obvious such as intermittent problems or a shortened product life span As the industry pushes for lower power requirements and increased density ESD protection is an increasing concern Due to the increased density of semiconductors used in recent Dell products the sensitivity to static ...

Страница 7: ...ive devices such as plastic heat sink casings away from internal parts that are insulators and often highly charged Working Environment Before deploying the ESD Field Service kit assess the situation at the customer location For example deploying the kit for a server environment is different than for a desktop or portable environment Servers are typically installed in a rack within a data center d...

Страница 8: ...e network device and then plug it into the computer 2 Connect your computer and all attached devices to their electrical outlets 3 Turn on your computer 4 If required verify that the computer works correctly by running the diagnostic tool 8 Working on your computer ...

Страница 9: ...SB 3 0 USB 3 1 Gen 1 finally has the answer to the consumers demands with a theoretically 10 times faster than its predecessor In a nutshell USB 3 2 Gen 1 features are as follows Higher transfer rates up to 20 Gbps Increased multilane operation of 10 Gbps each Increased maximum bus power and increased device current draw to better accommodate power hungry devices New power management features Full...

Страница 10: ...and thus new cables to take advantage of the higher speed capability of the new protocol the connector itself remains the same rectangular shape with the four USB 2 0 contacts in the exact same location as before Five new connections to receive and transmit data independently are present on USB 3 0 USB 3 2 Gen 1 cables and only come into contact when connected to a proper SuperSpeed USB connection...

Страница 11: ...Power Delivery Up to 130W on supported computers Key Features of Thunderbolt 3 over USB Type C 1 Thunderbolt USB DisplayPort and power on USB Type C on a single cable features vary between different products 2 USB Type C connector and cables which are compact and reversible 3 Supports Thunderbolt Networking varies between different products 4 Supports up to 4K displays 5 Up to 40 Gbps NOTE Data tr...

Страница 12: ...ost complexity and confusion of multiple cables currently used in A V systems HDMI supports communication between the video source such as a DVD player and the DTV enabling new functionality Power button LED behavior On certain Dell Latitude systems the power button LED is used to provide an indication of the system status and as a result the power button illuminates when pressed The systems with ...

Страница 13: ...ight operates as follows 1 Solid white the battery is charging When the charge is complete the LED turns off If the computer is running on a battery the battery light operates as follows 1 Off the battery is adequately charged or the computer is turned off 2 Solid amber the battery charge is critically low A low battery state is approximately 30 minutes or less of battery life remaining Camera LED...

Страница 14: ...3 14 Major components of your system ...

Страница 15: ...Major components of your system Major components of your system 15 ...

Страница 16: ...rd 13 Touchpad button board 14 Coin cell battery 15 WLAN card 16 WWAN card 17 System fan NOTE Dell provides a list of components and their part numbers for the original system configuration purchased These parts are available according to warranty coverages purchased by the customer Contact your Dell sales representative for purchase options 16 Major components of your system ...

Страница 17: ...e cover Battery WWAN card WLAN card Memory modules Solid state drive Speakers System fan Heat sink DC in port LED board Touchpad button board System board Coin cell battery Display assembly Keyboard Smart card reader board Palmrest assembly MicroSD card Removing the microSD card Prerequisites Follow the procedure in Before working inside your computer Steps 1 Push the microSD card to release it fr...

Страница 18: ...Installing the microSD card Steps 1 Align the microSD card to its slot on the computer 1 2 Slide the microSD card into the slot until it clicks into place 2 18 Disassembly and reassembly ...

Страница 19: ...ay Removing the SIM card tray Prerequisites Follow the procedure in Before working inside your computer Steps 1 Insert a pin into the hole of the SIM card tray and push inward until the tray is released 1 2 2 Slide the SIM card tray out of the computer 3 Disassembly and reassembly 19 ...

Страница 20: ...M card into the SIM card tray with the metallic contact facing up 1 2 Align the SIM card tray with the slot on the computer and carefully slide it in 2 3 Slide the SIM card tray into the slot until it clicks into place 3 20 Disassembly and reassembly ...

Страница 21: ...ur computer Base cover Removing the base cover Prerequisites 1 Follow the procedure in before working inside your computer 2 Remove the microSD card Steps 1 Loosen the eight captive screws that secure the base cover to the computer Disassembly and reassembly 21 ...

Страница 22: ...2 Using a plastic scribe 1 pry the base cover from the top left corner and continue to work on the sides to open the base cover 2 22 Disassembly and reassembly ...

Страница 23: ...cover To remove the SIM cover pry the dummy SIM card upwards from the recess point which is the area between the dummy SIM card and system chassis Installing the base cover Steps 1 Transfer the SIM cover to the new base cover 2 Align and place the base cover on the computer Disassembly and reassembly 23 ...

Страница 24: ...3 Press the edges and sides of the base cover until it snaps into place 24 Disassembly and reassembly ...

Страница 25: ...4 Tighten the eight captive screws to secure the base cover to the computer Disassembly and reassembly 25 ...

Страница 26: ...n or against the battery Ensure any screws during the servicing of this product are not lost or misplaced to prevent accidental puncture or damage to the battery and other system components If the battery gets stuck inside your computer as a result of swelling do not try to release it as puncturing bending or crushing a lithium ion battery can be dangerous In such an instance contact Dell technica...

Страница 27: ...3 Loosen the two captive screws that secure the battery to the palm rest assembly 1 4 Lift and slide the battery away from the palm rest assembly 2 Disassembly and reassembly 27 ...

Страница 28: ... Steps 1 Align the tabs on the battery with the slots on the palm rest assembly 1 2 Place the battery in the battery bay 3 Tighten the two captive screws to secure the battery to the palmrest 2 28 Disassembly and reassembly ...

Страница 29: ...4 Connect the battery cable to the connector on the system board 1 5 Affix the adhesive tapes on the battery 2 Disassembly and reassembly 29 ...

Страница 30: ...efore working inside your computer 2 Remove the microSD card 3 Remove the base cover 4 Disconnect the battery cable Steps 1 Remove the single M2x3 screw that secures the WWAN card bracket to the WWAN card 1 2 Remove the WWAN card bracket from the WWAN card 2 3 Disconnect the antenna cables from the WWAN card 3 4 Slide and remove the WWAN card from the WWAN card slot 4 30 Disassembly and reassembly...

Страница 31: ...e notch on the WWAN card with the tab on the WWAN card slot and insert the WWAN card at an angle into the WWAN card slot 1 2 Connect the antenna cables to the WWAN card 2 3 Place the WWAN card bracket on the WWAN card 3 4 Replace the single M2x3 screw to secure the WWAN card bracket to the WWAN card 4 Disassembly and reassembly 31 ...

Страница 32: ...ide your computer 2 Remove the microSD card 3 Remove the base cover 4 Disconnect the battery cable Steps 1 Remove the single M2x2 screw that secures the WLAN card bracket to the system board 1 2 Remove the WLAN card bracket that secures the WLAN antenna cables 2 3 Disconnect the WLAN antenna cables from the connectors on the WLAN card 3 4 Slide and lift the WLAN card away from the connector on the...

Страница 33: ...sert the WLAN card into the connector on the system board 1 2 Connect the WLAN antenna cables to the connectors on the WLAN card 2 3 Place the WLAN card bracket to secure the WLAN antenna cables to the WLAN card 3 4 Replace the single M2x3 screw to secure the WLAN card bracket to the WLAN card 4 Disassembly and reassembly 33 ...

Страница 34: ...es Removing the memory module Prerequisites 1 Follow the procedure in before working inside your computer 2 Remove the microSD card 3 Remove the base cover 4 Disconnect the battery cable Steps 1 Pry the retention clips securing the memory module until the memory module pops up 1 2 Remove the memory module from the memory module slot 2 34 Disassembly and reassembly ...

Страница 35: ...odule with the tab on the memory module slot 2 Slide the memory module firmly into the slot at an angle 1 3 Press the memory module down until the clips secure it 2 NOTE If you do not hear the click remove the memory module and reinstall it Disassembly and reassembly 35 ...

Страница 36: ...d 3 Remove the base cover 4 Disconnect the battery cable About this task NOTE The computer supports one M 2 2230 solid state drive or one M 2 2280 solid state drive at a time The following instructions indicates the steps to remove only one M 2 SSD card as both the cards utilizes the same slot Steps 1 Remove the two M2x3 screws that secure the M 2 SSD support bracket to the palmrest 1 2 Slightly t...

Страница 37: ...3 Remove the single M2x2 screw that secures the M 2 SSD to the palmrest 1 4 Lift the M 2 SSD away from the computer 2 Disassembly and reassembly 37 ...

Страница 38: ...80 solid state drive at a time The following instructions indicates the steps to install only one M 2 SSD card as both the cards utilizes the same slot Steps 1 Place the M 2 SSD into the slot on the palmrest 1 2 Replace the single M2x2 screw to secure the M 2 SSD to the palmrest 2 38 Disassembly and reassembly ...

Страница 39: ...3 Align and place the SSD support bracket above the M 2 SSD 1 4 Replace the two M2x3 screws to secure the SSD support bracket to the palmrest 2 Disassembly and reassembly 39 ...

Страница 40: ...akers Removing the speakers Prerequisites 1 Follow the procedure in before working inside your computer 2 Remove the microSD card 3 Remove the base cover 4 Remove the battery Steps 1 Disconnect the speaker cable from the connector on the system board 1 2 Peel the adhesive tape that secures the speaker cable to the palmrest 2 40 Disassembly and reassembly ...

Страница 41: ...3 Disconnect the touchpad cable from the connector on the daughter board 4 Peel the adhesive tapes and unroute the speaker cable Disassembly and reassembly 41 ...

Страница 42: ...5 Lift and remove the speakers away from the palmrest 42 Disassembly and reassembly ...

Страница 43: ...alling the speakers Steps 1 Using the alignment posts and rubber grommets place the speakers in their slots on the palmrest 2 Route the speaker cable through the routing guides Disassembly and reassembly 43 ...

Страница 44: ...3 Affix the adhesive tape to secure the speaker cable to the palmrest 1 4 Connect the speaker cable to the connector on the system board 2 44 Disassembly and reassembly ...

Страница 45: ...working inside your computer System fan Removing the system fan Prerequisites 1 Follow the procedure in before working inside your computer 2 Remove the microSD card 3 Remove the base cover 4 Remove the battery Steps 1 Disconnect the system fan cable from the connector on the system board Disassembly and reassembly 45 ...

Страница 46: ...2 Remove the two M2x5 screws that secure the system fan to the palmrest 1 3 Lift the system fan away from the computer 2 46 Disassembly and reassembly ...

Страница 47: ...e system fan Steps 1 Place and align the screw holes on the system fan with the screw holes on to the palmrest 1 2 Replace the two M2x5 screws to secure the system fan to the palmrest 2 Disassembly and reassembly 47 ...

Страница 48: ...3 Connect the system fan cable to the connector on the system board 48 Disassembly and reassembly ...

Страница 49: ...1 Follow the procedure in before working inside your computer 2 Remove the microSD card 3 Remove the base cover 4 Remove the battery Steps 1 Loosen the four captive screws that secure the heatsink to the system board 1 NOTE Loosen the screws in the order of the callout numbers 1 2 3 4 as indicated on the heatsink 2 Lift the heatsink away from the system board 2 Disassembly and reassembly 49 ...

Страница 50: ...ur captive screws that secure the heatsink to the system board 2 Next steps 1 Replace the battery 2 Replace the base cover 3 Replace the microSD card 4 Follow the procedure in after working inside your computer DC in port Removing the DC in port Prerequisites 1 Follow the procedure in before working inside your computer 2 Remove the microSD card 3 Remove the base cover 4 Remove the battery 50 Disa...

Страница 51: ...em board 1 2 Lift the Type C bracket away from the computer 2 3 Press the DC in port cable and then pull the cable horizontally to disconnect the DC in port cable from the connector on the system board 1 Lift the DC in port away from the computer 2 Disassembly and reassembly 51 ...

Страница 52: ...Installing the DC in port Steps 1 Place the DC in port to its slot on the computer 1 2 Connect the DC in port cable to the connector on the system board 2 52 Disassembly and reassembly ...

Страница 53: ...3 Place the Type C bracket on its slot on the computer 1 4 Replace the two M2x4 screws to secure the Type C bracket to the palmrest 2 Disassembly and reassembly 53 ...

Страница 54: ...our computer LED board Removing the LED board Prerequisites 1 Follow the procedure in before working inside your computer 2 Remove the microSD card 3 Remove the base cover 4 Remove the battery Steps 1 Disconnect the LED board cable from the connector on the system board 1 2 Unroute the LED board cable 2 54 Disassembly and reassembly ...

Страница 55: ...3 Peel the adhesive tape that secures the LED board cable connector to the LED board 1 4 Peel the grey adhesive tape that secures the LED board 2 Disassembly and reassembly 55 ...

Страница 56: ...5 Remove the single M2x2 5 screw that secures the LED board to the palmrest 1 6 Lift the LED board away from the computer 2 56 Disassembly and reassembly ...

Страница 57: ... board Steps 1 Place the LED board and align the screw hole on the LED board with the screw hole on the palmrest 1 2 Replace the single M2x2 5 screw to secure the LED board to the palmrest 2 Disassembly and reassembly 57 ...

Страница 58: ...3 Affix the grey adhesive tape to secure the LED board 1 4 Affix the adhesive tape to secure the LED board 2 58 Disassembly and reassembly ...

Страница 59: ...5 Connect the LED board cable to the connector on the system board and route the LED board cable 1 2 Disassembly and reassembly 59 ...

Страница 60: ...e microSD card 3 Remove the base cover 4 Remove the battery 5 Remove the speaker 6 Remove the LED board NOTE Removal of system board and heatsink are not required to remove the touchpad button board Steps 1 Open the latch and disconnect the touchpad button board cable from the connector on the touchpad board 2 Remove the two M2x3 screws that secure the touchpad button bracket to the palmrest 1 3 L...

Страница 61: ... the touchpad button board Steps 1 Place the touchpad button board into the slot on the palmrest 1 2 Replace the two M2x3 screws to secure the touchpad button board to the palmrest 2 Disassembly and reassembly 61 ...

Страница 62: ...3 Connect the touchpad button board cable to the connector on the touchpad board 62 Disassembly and reassembly ...

Страница 63: ...ocedure in before working inside your computer 2 Remove the microSD card 3 Remove the base cover 4 Remove the battery 5 Remove the speaker 6 Remove the heatsink 7 Remove the memory module 8 Remove the system fan 9 Remove the DC in 10 Remove the WLAN card 11 Remove the WWAN card Steps 1 Remove the three M2x3 screws that secure the memory module frame to the system board 1 2 Remove the memory module...

Страница 64: ...3 Disconnect the following cables a USH cable 1 b LED board cable 2 c touchpad cable 3 64 Disassembly and reassembly ...

Страница 65: ...ingle M2 5x4 screw that secures the fingerprint support bracket to the system board 1 5 Lift the fingerprint support bracket away from the computer 2 6 Disconnect the fingerprint port 3 Disassembly and reassembly 65 ...

Страница 66: ...the adhesive tape that secures the eDP bracket 2 9 Remove the single M2x4 screw that secures the eDP bracket to the system board 3 10 Remove the eDP bracket away from the computer 4 11 Lift the latch and disconnect the eDP cable from the connector on the system board 5 66 Disassembly and reassembly ...

Страница 67: ...12 Disconnect the sensor board cable from the connector on the system board 1 13 Release the coin cell battery from the palmrest 2 Disassembly and reassembly 67 ...

Страница 68: ...14 Remove the single M2 5x4 screw that secures the system board to the palmrest 1 15 Lift the system board away from the computer 2 68 Disassembly and reassembly ...

Страница 69: ...Installing the system board Steps 1 Align and place the system board to the palmrest 1 2 Replace the single M2 5x4 screw to secure the system board to the palmrest 2 Disassembly and reassembly 69 ...

Страница 70: ...3 Connect the sensor cable to the connector on the system board 1 4 Place the coin cell battery into its slot on the plamrest 2 70 Disassembly and reassembly ...

Страница 71: ...Connect the eDP cable to the connector on the system board 2 7 Place the eDP support bracket above the eDP connector 3 8 Replace the single M2x4 screw to secure the eDP bracket to the system board 4 9 Adhere the adhesive tape to secure the eDP support bracket 5 Disassembly and reassembly 71 ...

Страница 72: ...print cable to the connector on the system board 1 11 Place the fingerprint support bracket 2 12 Replace the single M2 5x4 screw to secure the fingerprint support bracket to the system board 3 72 Disassembly and reassembly ...

Страница 73: ...13 Connect the following cables a USH cable 1 b LED board cable 2 c touchpad cable 3 Disassembly and reassembly 73 ...

Страница 74: ...14 Align and place the memory module frame in its slot on the system board 1 15 Replace the three M2x3 screws to secure the memory module frame to the system board 2 74 Disassembly and reassembly ...

Страница 75: ...e Dc in 4 Replace the memory module 5 Replace the system fan 6 Replace the heatsink 7 Replace the speaker 8 Replace the battery 9 Replace the base cover 10 Replace the microSD card 11 Follow the procedure in after working inside your computer Disassembly and reassembly 75 ...

Страница 76: ...heatsink 7 Remove the memory module 8 Remove the system fan 9 Remove the DC in 10 Remove the WLAN card 11 Remove the WWAN card 12 Remove the system board Steps Turn the system board and disconnect the coin cell battery cable from the connector on the system board Installing the coin cell battery Steps Turn the system board and connect the coin cell battery cable to the connector on the system boar...

Страница 77: ...8 Replace the speaker 9 Replace the battery 10 Replace the base cover 11 Replace the microSD card 12 Follow the procedure in after working inside your computer Display assembly Removing the display assembly Prerequisites 1 Follow the procedure in before working inside your computer 2 Remove the microSD card 3 Remove the base cover 4 Remove the battery Disassembly and reassembly 77 ...

Страница 78: ...gle M2x4 screw that secures the eDP cable bracket to the system board 2 3 Lift the eDP cable bracket from the system board 3 4 Disconnect and unroute the eDP cable 4 5 Open the display assembly to a 180 degree angle and flip over the system and then place the system on a flat surface 78 Disassembly and reassembly ...

Страница 79: ...6 Remove the four M2 5x4 screws that secure the display assembly to the system chassis 1 7 Remove the display assembly from the system 2 Disassembly and reassembly 79 ...

Страница 80: ...he maximum before replacing the display assembly on the palmrest and keyboard assembly Steps 1 Align and place the system chassis under the hinges of the display assembly 1 2 Replace the four M2 5x4 screws that secure the display assembly to the system chassis 2 80 Disassembly and reassembly ...

Страница 81: ...3 Seat the system chassis on the display assembly Disassembly and reassembly 81 ...

Страница 82: ...d adhere the adhesive tape 1 5 Reroute the eDP cable and connect it to the eDP connector 2 6 Place the eDP cable bracket on the system board 3 7 Replace the single M2x4 screw that secures the eDP cable bracket to the system board 4 82 Disassembly and reassembly ...

Страница 83: ...our computer Keyboard Removing the keyboard Prerequisites 1 Follow the procedure in before working inside your computer 2 Remove the microSD card 3 Remove the base cover 4 Remove the battery 5 Remove the speaker 6 Remove the memory module 7 Remove the system fan 8 Remove the DC in 9 Remove the WLAN card Disassembly and reassembly 83 ...

Страница 84: ...emoved with heatsink attached 12 Remove the coin cell battery Steps 1 Peel the adhesive tape securing the keyboard and the smartcard reader 2 Lift the latch and disconnect the backlit cable and the keyboard cables from the connectors on the touchpad 84 Disassembly and reassembly ...

Страница 85: ...3 Remove the 19 M2x2 screws that secure the keyboard to the palmrest 1 4 Remove the keyboard away from the computer 2 Disassembly and reassembly 85 ...

Страница 86: ...Installing the keyboard Steps 1 Align and place the keyboard on the palmrest 1 2 Replace the 19 M2x2 screws to secure the keyboard to the palmrest 2 86 Disassembly and reassembly ...

Страница 87: ...3 Connect the backlit cable and the keyboard cables to the connectors on the touchpad Disassembly and reassembly 87 ...

Страница 88: ...4 Adhere the adhesive tape securing the keyboard and the smartcard board 88 Disassembly and reassembly ...

Страница 89: ... 12 Follow the procedure in after working inside your computer Smart card reader board Removing the smart card reader board Prerequisites 1 Follow the procedure in before working inside your computer 2 Remove the microSD card 3 Remove the base cover 4 Remove the battery 5 Remove the speaker 6 Remove the memory module 7 Remove the system fan 8 Remove the DC in 9 Remove the WLAN card 10 Remove the W...

Страница 90: ...2 Remove the two M2x2 5 screws that secure the smart card reader to the palmrest 1 3 Lift the smart card reader board away from the computer 2 90 Disassembly and reassembly ...

Страница 91: ...he smart card reader board Steps 1 Align and place the smart card reader board on the palmrest 1 2 Replace the two M2x2 5 screws to secure the smart card reader board to the palmrest 2 Disassembly and reassembly 91 ...

Страница 92: ...3 Reroute the smart card reader cable 92 Disassembly and reassembly ...

Страница 93: ...lace the battery 10 Replace the base cover 11 Replace the microSD card 12 Follow the procedure in after working inside your computer Palmrest assembly Replacing the palmrest and keyboard assembly Prerequisites 1 Follow the procedure in before working inside your computer 2 Remove the microSD card 3 Remove the base cover 4 Remove the battery 5 Remove the speaker 6 Remove the memory module Disassemb...

Страница 94: ...h the palmrest and keyboard assembly Next steps 1 Replace the SmartCard reader board 2 Replace the coin cell battery 3 Replace the system board NOTE System board can be replaced with heatsink attached 4 Replace the WWAN card 5 Replace the WLAN card 6 Replace the DC in 7 Replace the memory module 8 Replace the system fan 9 Replace the speaker 10 Replace the battery 11 Replace the base cover 12 Repl...

Страница 95: ...rts running the tests on all the detected devices Running SupportAssist diagnostics Invoke diagnostics by either of the methods that are suggested below Tap F12 key on keyboard as the Dell splash screen appears until you get the message Diagnostic Boot Selected On the one time boot menu screen use the Up Down arrow key to select the Diagnostics option and then press Enter Press and Hold Function F...

Страница 96: ...touchscreen systems or clicking the next page button on the lower left hand side of the basic screen To run the test on specific device or run a specific test 1 To run a diagnostic test on a specific device press Esc and click Yes to stop the diagnostic test 2 Select the device from the using the checkbox in the top left of the test tile and click Run Tests or use Thorough Option check run more in...

Страница 97: ...Power adapter is connected and the battery has more than 5 percent charge Amber Computer is running on battery and the battery has less than 5 percent charge Off Power adapter is connected and the battery is fully charged Computer is running on battery and the battery has more than 5 percent charge Computer is in sleep state hibernation or turned off The power and battery status light blinks amber...

Страница 98: ...is in use Solid white Camera is in use Off Camera is not in use Caps Lock status light Indicates whether Caps Lock is enabled or disabled Solid white Caps Lock enabled Off Caps Lock disabled WiFi power cycle About this task If your computer is unable to access the internet due to WiFi connectivity issues a WiFi power cycle procedure may be performed The following procedure provides the instruction...

Страница 99: ... related articles Learn and know the following information about your product Product specifications Operating system Setting up and using your product Data backup Troubleshooting and diagnostics Factory and system restore BIOS information See Me and My Dell at www dell com support manuals To locate the Me and My Dell relevant to your product identify your product through one of the following Sele...

Отзывы: