background image

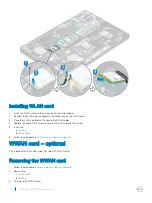
Installing keyboard lattice

Place the keyboard lattice on the keyboard and press along the edges as well as in between the rows of keys until the lattice clicks in 
place.

Follow the procedure in 

After working inside your computer

.

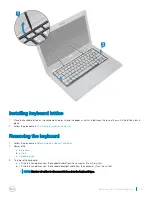
Removing the keyboard

Follow the procedure in 

Before working inside your computer

.

Remove the:

a

base cover

b

battery

c

keyboard lattice

To remove the keyboard:

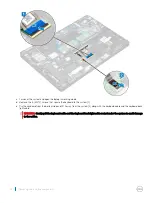
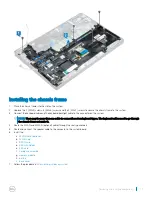
a Lift the latch and disconnect the keyboard cable from the connector [1] on the system.
b Lift the latch and disconnect the keyboard backlight cable from the connector [2] on the system.

NOTE: 

Number of cables to disconnect is based on the keyboard type.

Removing and installing components

21

Содержание Latitude 5290

Страница 1: ...Latitude 5290 Owner s Manual Regulatory Model P27S Regulatory Type P27S002 ...

Страница 2: ... to hardware or loss of data and tells you how to avoid the problem WARNING A WARNING indicates a potential for property damage personal injury or death Copyright 2018 Dell Inc or its subsidiaries All rights reserved Dell EMC and other trademarks are trademarks of Dell Inc or its subsidiaries Other trademarks may be trademarks of their respective owners 2018 01 Rev A00 ...

Страница 3: ... advanced power management features Unplugging pressing and holding the power button for 15 seconds should discharge residual power in the system board notebooks Bonding Bonding is a method for connecting two or more grounding conductors to the same electrical potential This is done through the use of a field service electrostatic discharge ESD kit When connecting a bonding wire ensure that it is ...

Страница 4: ...and bonding wire can be either directly connected between your wrist and bare metal on the hardware if the ESD mat is not required or connected to the anti static mat to protect hardware that is temporarily placed on the mat The physical connection of the wrist strap and bonding wire between your skin the ESD mat and the hardware is known as bonding Use only Field Service kits with a wrist strap m...

Страница 5: ...ON If your computer has an RJ45 port disconnect the network cable by first unplugging the cable from your computer 5 Disconnect your computer and all attached devices from their electrical outlets 6 Open the display 7 Press and hold the power button for few seconds to ground the system board CAUTION To guard against electrical shock unplug your computer from the electrical outlet before performing...

Страница 6: ...tor port Chassis frame SmartCard module Speaker System board Display assembly Display bezel Display hinge cover Display hinges Display panel Camera Display eDP cable Display back cover assembly Palm rest Recommended tools The procedures in this document require the following tools Phillips 0 screwdriver Phillips 1 screwdriver Plastic scribe NOTE The 0 screw driver is for screws 0 1 and the 1 screw...

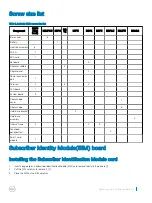
Страница 7: ... 2 LED board 1 System board 3 Display hinge cover 2 Display hinge 6 Hard drive bracket 4 Hard drive assembly 4 Chassis frame 2 2 3 Touchpad panel button 2 Smart card module 2 Subscriber Identity Module SIM board Installing the Subscriber Identification Module card 1 Insert a paperclip or a Subscriber Identification Module SIM card removal tool into the pinhole 1 2 Pull the SIM card tray to remove ...

Страница 8: ... pinhole on the SIM card tray 2 Pull the SIM card tray to remove it 3 Remove the SIM card from the SIM card tray 4 Push the SIM card tray into the slot until it clicks into place Base cover Removing the base cover 1 Follow the procedure in Before working inside your computer 2 To remove the base cover a Loosen the 8 M2 5x6 3 captive screws that secure the base cover to the system 1 b Pry the base ...

Страница 9: ...Installing the base cover 1 Place the base cover to align with the screw holders on the system 2 Tighten the 8 captive screws to secure the base cover to the system Removing and installing components 9 ...

Страница 10: ...able from the routing channel b Loosen the single M2x6 captive screw that secures the battery to the system 2 c Lift the battery away from the system 3 Installing the battery 1 Insert the battery into the slot on the system 2 Route the battery cable through the routing channel 3 Tighten the single M2x6 captive screw to secure the battery to the system 4 Connect the battery cable to the connector o...

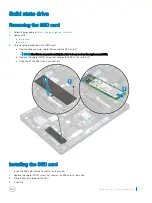
Страница 11: ...card 1 NOTE Need to be removed carefully in order to be reused on the replacement SSD b Remove the single M2 3 screw that secures the SSD to the system 2 c Slide and lift the SSD from the system 3 Installing the SSD card 1 Insert the SSD card into the connector on the system 2 Replace the single M2 3 screw that secures the SSD card to the system 3 Place the Mylar shield over the SSD 4 Install the ...

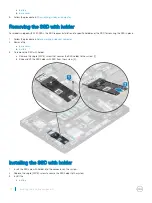
Страница 12: ...Before working inside your computer 2 Remove the a base cover b battery 3 To remove the SSD with holder a Remove the single M2 3 screw that secures the SSD holder to the system 1 b Slide and lift the SSD holder with SSD from the system 2 Installing the SSD with holder 1 Insert the SSD card with holder into the connector on the system 2 Replace the single M2 3 screw to secure the SSD holder to the ...

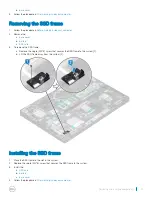
Страница 13: ...e SSD frame a Remove the single M2 3 screw that secures the SSD frame to the system 1 b Lift the SSD frame away from the system 2 Installing the SSD frame 1 Place the SSD frame to the slot in the system 2 Replace the single M2 3 screw that secures the SSD frame to the system 3 Install the a SSD card b battery c base cover 4 Follow the procedure in After working inside your computer Removing and in...

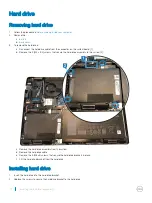
Страница 14: ... x 5 4 screws that secure the hard drive assembly to the system 2 c Remove the hard drive assembly from the system d Remove the hard drive cable e Remove the 4 M3x3 screws that secure the hard drive brackets in place f Lift the hard drive bracket from the hard drive Installing hard drive 1 Insert the hard drive into the hard drive bracket 2 Replace the screws to secure the hard drive bracket to th...

Страница 15: ... After working inside your system Coin cell battery Removing the coin cell battery 1 Follow the procedure in Before working inside your computer 2 Remove the a base cover b battery 3 To remove the coin cell battery a Disconnect the coin cell battery cable from the connector on the system board 1 b Lift the coin cell battery to release from the adhesive and lift it away from the system board 2 Remo...

Страница 16: ... inside your computer 2 Remove the a base cover b battery 3 To remove the heat sink assembly a Disconnect the system fan cable from the connector on the system board 1 b Remove the 2 M2 3 screws that secure the fan and the 4 M2x3 screws that secure the heat sink on the system board 2 NOTE Remove the heat sink screws in sequential order as indicated on the heat sink The WLAN cables need to be moved...

Страница 17: ...ll the a battery b base cover 4 Follow the procedure in After working inside your computer WLAN card Removing WLAN card 1 Follow the procedure in Before working inside your computer 2 Remove the a base cover b battery 3 To remove the WLAN card a Remove the single M2 3 screw that secures the WLAN card bracket to the system 1 b Remove the WLAN card bracket that secures the WLAN antenna cables 2 c Di...

Страница 18: ...he single M2 3 screw to secure the WLAN card to the system 5 Install the a battery b base cover 6 Follow the procedure in After working inside your computer WWAN card optional This is optional as the system might not ship with WWAN card Removing the WWAN card 1 Follow the procedure in Before working inside your computer 2 Remove the a base cover b battery 3 To remove the WWAN card 18 Removing and ...

Страница 19: ...N card 1 Insert the WWAN card into the slot on the system 2 Connect the WWAN antenna cables to the connectors on the WWAN card 3 Replace the screw to secure the WWAN card to the computer 4 Install the a battery b base cover 5 Follow the procedure in After working inside your computer Memory modules Removing the memory module 1 Follow the procedure in Before working inside your computer 2 Remove th...

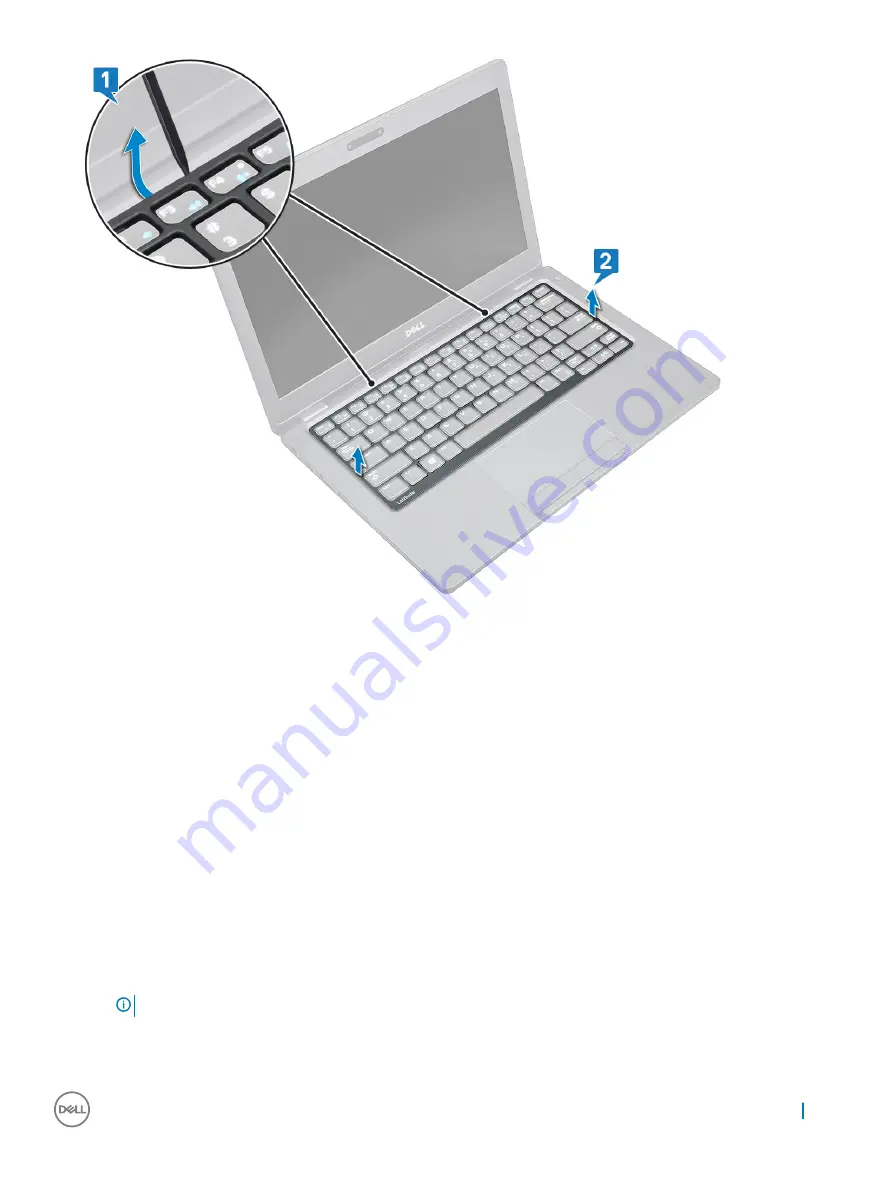
Страница 20: ...into the slot Then depress the module until the clips secure the memory module 2 Install the a battery b base cover 3 Follow the procedure in After working inside your computer Keyboard Removing keyboard lattice 1 Follow the procedure in Before working inside your computer 2 Pry the keyboard lattice from the edges 1 and lift the lattice away from the system 2 NOTE Gently pull or lift keyboard latt...

Страница 21: ...g the keyboard 1 Follow the procedure in Before working inside your computer 2 Remove the a base cover b battery c keyboard lattice 3 To remove the keyboard a Lift the latch and disconnect the keyboard cable from the connector 1 on the system b Lift the latch and disconnect the keyboard backlight cable from the connector 2 on the system NOTE Number of cables to disconnect is based on the keyboard ...

Страница 22: ...the system 1 e Pry the keyboard from the bottom side and lift it away from the system 2 along with the keyboard cable and the keyboard back light cable WARNING Gently pull the keyboard cable and the keyboard back light cable routed under the system to avoid damage to the cables 22 Removing and installing components ...

Страница 23: ...Removing and installing components 23 ...

Страница 24: ...nstall the a keyboard lattice b battery c base cover 7 Follow the procedure in After working inside your computer Power connector port Removing the power connector port 1 Follow the procedure in Before working inside your computer 2 Remove the a base cover b battery 3 To remove the power connector port a Disconnect the power connector cable from the connector on the system board 1 b Remove the sin...

Страница 25: ...racket to the power connector port 4 Connect the power connector cable to the connector on the system board 5 Install the a battery b base cover 6 Follow the procedure in After working inside your computer Chassis frame Removing the chassis frame 1 Follow the procedure in Before working inside your computer 2 Remove the a base cover b battery c memory module d hard drive assembly e SSD card Removi...

Страница 26: ... from the routing channel d Lift the latch and disconnect the keyboard backlight cable and the keyboard cable from the connector 3 4 on the system NOTE There may be more than one cable to disconnect based on the keyboard type 4 To remove the chassis frame a Remove the 2 M2x3 screws 3 M2x5 screws and the 2 M2x2 screws that secure the chassis frame to the system 1 b Lift the chassis frame away from ...

Страница 27: ...an one cable to connect based on keyboard types The keyboard cables need to go through the chassis frame not under it 4 Route the WLAN and WWAN optional cables through the routing channels 5 Route and connect the speaker cable to the connector in the system board 6 Install the a WWAN card optional b WLAN card c SSD frame d SSD with holder e SSD card f hard drive assembly g memory module h battery ...

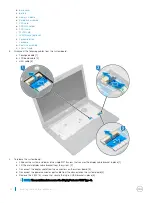
Страница 28: ...AN card optional i chassis frame 3 To release the smart card reader board a Lift the latch and disconnect the smart card reader board cable from the connector 1 b Peel the cable from the palmrest 2 4 To remove the smart card reader board a Remove the 2 M2x3 screws that secure the smart card reader board to the palmrest 1 b Slide and lift the smart card reader from the slot in the system 2 28 Remov...

Страница 29: ...card reader board to the system 3 Affix the smart card reader board cable and connect the cable to the connector 4 Install the a chassis frame b WWAN card optional c WLAN card d SSD frame e SSD with holder f SSD card g hard drive assembly h battery i base cover 5 Follow the procedure in After working inside your computer Removing and installing components 29 ...

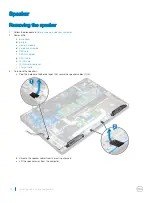
Страница 30: ...d hard drive assembly e SSD card f SSD with holder g SSD frame h WLAN card i WWAN card optional j chassis frame 3 To remove the speakers a Peel the 3 pieces of adhesive tapes that secure the speaker cables 1 2 b Unroute the speaker cables from the routing channels c Lift the speaker away from the computer 30 Removing and installing components ...

Страница 31: ...aker cable 4 Install the a chassis frame b WWAN card optional c WLAN card d SSD frame e SSD with holder f SSD card g hard drive assembly h memory module i battery j base cover 5 Follow the procedure in After working inside your computer System board Removing system board 1 Follow the procedure in Before working inside your computer 2 Remove the a SIM card Removing and installing components 31 ...

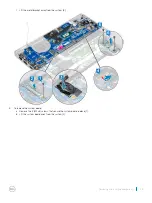
Страница 32: ...elease the system board a Flip over the system and remove the single M2 3 screw that secures the display cable bracket in place 1 b Lift the metal display cable bracket from the system 2 c Disconnect the display cable from the connectors on the system board 3 d Disconnect the power connector port cable from the connector on the system board 4 e Remove the 2 M2 5 screws that secure the type C USB b...

Страница 33: ...tal bracket away from the system 6 5 To remove the system board a Remove the 3 M2x3 screws that secure the system board in place 1 b Lift the system board away from the system 2 Removing and installing components 33 ...

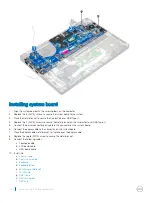
Страница 34: ... connector port cable to the connector on the system board 6 Connect the display cable to the connector on the system board 7 Place the display cable metal bracket to its place over the display cable 8 Replace the single M2 3 screw to secure the metal bracket 9 Connect the following cables a Touchpad cable b LED board cable c USH board cable 10 Install the a chassis frame b heat sink assembly c ke...

Страница 35: ... the a base cover b battery c memory module d WLAN card e WWAN card optional 3 To disconnect the display cable a Release the WLAN and WWAN cables from the routing channels 1 b Remove the single M2x3 screw that secures the display cable bracket in place 2 c Remove the display cable bracket that secures the display cable from the system 3 d Disconnect the display cable from the connector on the syst...

Страница 36: ...he display assembly to the system 4 Lift the computer and close the display 5 Connect the display cable to the connector on the system board 6 Place the metal bracket to secure the display cable 7 Replace the single M2 5 screw to secure the metal bracket to the system 8 Route the WLAN and WWAN cables through the routing channels 9 Install the a WWAN card optional b WLAN card c hinge cover d batter...

Страница 37: ...stay stuck to the LCD portion and can peel the layers up or crack the glass when trying to pry the two items apart Installing display bezel non touch 1 Place the display bezel on the display assembly NOTE Remove the protective covering on the adhesive on the LCD bezel before placing on the display assembly 2 Starting from the top corner press on the display bezel and work around the entire bezel u...

Страница 38: ...module d WLAN card e WWAN card optional f display assembly g display bezel 3 To remove the display hinge cover a Remove the single M2 5 3 screw that secures the display hinge cover to the chassis 1 b Lift the display hinge cover away from the display hinge 2 c Repeat step a and step b to remove the other display hinge cover 3 4 38 Removing and installing components ...

Страница 39: ...the procedure in After working inside your computer Display hinges Removing display hinge non touch 1 Follow the procedure in Before working inside your computer 2 Remove the a base cover b battery c memory module d WLAN card e WWAN card optional f display hinge cover g display assembly h display bezel 3 To remove the display hinge a Remove the 6 M2 5x3 screws that secure the display hinge to the ...

Страница 40: ...ay hinge to the display assembly 3 Repeat step 1 and step 2 to install the other display hinge 4 Install the a display bezel b display assembly c display hinge cover d WLAN card e WWAN card optional f memory module g battery h base cover 5 Follow the procedure in After working inside your computer 40 Removing and installing components ...

Страница 41: ...isplay bezel 3 Remove the 2 M2 2 screws that secure the display panel to the display assembly 1 and lift to turn over the display panel to access the display cable 2 4 To remove the display panel a Peel the conductive tape 1 b Remove the adhesive strip that secures the display cable 2 c Lift the latch and disconnect the display cable from the connector on the display panel 3 4 Removing and install...

Страница 42: ...isplay cable 3 Replace the display panel to align with the screw holders on the display assembly 4 Replace the 2 M2 2 screws to secure the display panel to the display assembly 5 Install the a display bezel b display assembly c WLAN card d WWAN card optional e battery f base cover 6 Follow the procedure in After working inside your computer 42 Removing and installing components ...

Страница 43: ... card d WWAN card optional e display assembly f display bezel g display panel 3 To remove the camera a Peel the 2 conductive tape that secures the camera in place 1 b Disconnect the camera cable from the connector 2 c Carefully pry and remove the camera module from the display back cover 3 Removing and installing components 43 ...

Страница 44: ... procedure in After working inside your computer Display eDP cable Removing display cable non touch 1 Follow the procedure in Before working inside your computer 2 Remove the a base cover b battery c WLAN card d WWAN card optional e display assembly f display bezel g display hinge cover h display panel i camera 3 To remove the display cable a Slide the display cable and peel the conductive tape fr...

Страница 45: ... display hinge cover d display bezel e display assembly f WLAN card g WWAN card optional h battery i base cover 4 Follow the procedure in After working inside your computer Display back cover assembly Removing the display back cover assembly non touch 1 Follow the procedure in Before working inside your computer 2 Remove the a base cover Removing and installing components 45 ...

Страница 46: ... removing all the components Installing the display back cover assembly non touch 1 Place the display back cover assembly on a flat surface 2 Install the a camera b display cable c display hinge d display panel e display hinge cover f display bezel g display assembly h WLAN card i WWAN card optional j memory module k battery l base cover 3 Follow the procedure in After working inside your computer...

Страница 47: ... e hard drive f SSD card g SSD with holder h SSD frame i WLAN card j WWAN card optional k keyboard lattice l keyboard m heat sink assembly n chassis frame o smartcard module p speaker q system board r display assembly s display hinge cover 3 The palm rest is the remaining component after removing all the components Removing and installing components 47 ...

Страница 48: ...eaker e smartcard module f chassis frame g heat sink assembly h keyboard i keyboard lattice j WWAN card optional k WLAN card l SSD frame m SSD with holder n SSD card o hard drive assembly p memory module q battery r base cover s SIM card 3 Follow the procedure in After working inside your computer 48 Removing and installing components ...

Страница 49: ...gies and allows up to 512 GB in capacity compared to the DDR3 s maximum of 128 GB per DIMM DDR4 synchronous dynamic random access memory is keyed differently from both SDRAM and DDR to prevent the user from installing the wrong type of memory into the system DDR4 needs 20 percent less or just 1 2 volts compared to DDR3 which requires 1 5 volts of electrical power to operate DDR4 also supports a ne...

Страница 50: ...he system or under the keyboard as in some portable systems HDMI 1 4 This topic explains the HDMI 1 4 and its features along with the advantages HDMI High Definition Multimedia Interface is an industry supported uncompressed all digital audio video interface HDMI provides an interface between any compatible digital audio video source such as a DVD player or A V receiver and a compatible digital au...

Страница 51: ... and functionality of a digital interface while also supporting uncompressed video formats in a simple cost effective manner Audio HDMI supports multiple audio formats from standard stereo to multichannel surround sound HDMI combines video and multichannel audio into a single cable eliminating the cost complexity and confusion of multiple cables currently used in A V systems HDMI supports communic...

Страница 52: ... of eight connections in the connectors and cabling USB 3 0 USB 3 1 Gen 1 utilizes the bidirectional data interface rather than USB 2 0 s half duplex arrangement This gives a 10 fold increase in theoretical bandwidth With today s ever increasing demands placed on data transfers with high definition video content terabyte storage devices high megapixel count digital cameras etc USB 2 0 may not be f...

Страница 53: ...tor itself remains the same rectangular shape with the four USB 2 0 contacts in the exact same location as before Five new connections to carry receive and transmitted data independently are present on USB 3 0 USB 3 1 Gen 1 cables and only come into contact when connected to a proper SuperSpeed USB connection Windows 8 10 will be bringing native support for USB 3 1 Gen 1 controllers This is in con...

Страница 54: ...cessor Total cache 3 M Cache Intel Core i5 7300U Dual Core 2 6GHz 15W vPro 3M Cache Intel Core i3 7130U Dual Core 2 7GHz 15W 6 M Cache Intel Core i5 8250U Quad Core 1 6GHz 15W 6 M Cache Intel Core i5 8350U Quad Core 1 7GHz 15W vPro 8 M Cache Intel Core i7 8650U Quad Core 1 9GHz 15W vPro Processor specification Feature Specification Types 8th Gen Intel Core Processors up to i7 U Quad Core 7th Gen I...

Страница 55: ...ou order you will see either a HDD or M 2 PCIe SSD in your system Feature Specification Storage HDD 2 5 inch up to 1 TB Hybrid OPAL SED options SSD M 2 2280 SATA up to 512 GB OPAL SED options SSD M 2 2230 PCIe NVMe up to 512GB SSD M 2 2280 PCIe x2 NVMe up to 1 TB OPAL SED options Dell Fast Response Free Fall Sensor and HDD Isolation standard feature Audio specifications Feature Specification Types...

Страница 56: ... sensor technology Resolution Motion video Up to 1280 X 720 1 MP Resolution Still image Up to 1280 X 720 1 MP Imaging rate Up to 30 frames per second Communication specification Features Specification Network adapter 10 100 1000 Mb s Ethernet RJ 45 Wireless LAN Options Qualcomm QCA61x4A 802 11ac Dual Band 2x2 Wireless Adapter Bluetooth 4 1 Qualcomm QCA6174A Extended Range 802 11ac MU MIMO Dual Ban...

Страница 57: ...tor USB Two USB 3 1 Gen 1 one with PowerShare Memory SD card reader microSD 4 0 Memory card reader SmartCard reader Optional DisplayPort over USB Type C One Display Port over USB Type C Other docking port Noble Wedge Lock slot Contactless smart card Feature Specification Supported Smart Cards Technologies FIPS 201 Contacted Smart Card Display specification Feature Specification Type HD 1366 x 768 ...

Страница 58: ...84 keys Size Full sized X 18 05 mm key pitch Y 18 05 mm key pitch Backlit keyboard Yes optional Touchpad specifications Feature Specification Active Area X axis 99 5 mm 3 92 inches Y axis 53 mm 2 086 inches Multi Touch Support 4 fingers Battery specifications Feature Specification Type 42 WHr 51 WHr 68 WHr 4 cell Long Cycle Life Battery 42 Whr Length 181mm 7 126 inch Width 95 9mm 3 78 inch Height ...

Страница 59: ... 122 F Discharge 0 C to 70 C 32 F to 158 F Operating 0 C to 35 C 32 F to 95 F Non operating 20 C to 65 C 4 F to 149 F Coin cell battery 3 V CR2032 lithium coin cell AC Adapter specifications Feature Specification Type 65 W adapter 7 4 mm barrel 65 W BFR PVC Halogen Free adapter 7 4 mm barrel 90 W adapter 7 4 mm barrel Input voltage 100 V AC to 240 V AC Input current maximum 65 W adapter 1 7 A 65 W...

Страница 60: ...1 4 mm Width 12 0 inches 305 1 mm Depth 8 3 inches 211 3 mm Weight 2 99 lbs 1 36 kg Environmental specifications Temperature Specifications Operating 0 C to 35 C 32 F to 95 F Storage 40 C to 65 C 40 F to 149 F Relative humidity maximum Specifications Operating 10 to 90 non condensing Storage 5 to 95 non condensing Altitude maximum Specifications Operating 0 m to 3048 m 0 ft to 10 000 ft Non operat...

Страница 61: ...n F4 Mic Mute Fn F5 Num Lock Fn F6 Scroll Lock Fn F7 optional Increase keyboard back light brightness Fn F8 Display Toggle Win P Fn F9 Search Fn F10 Increase keyboard back light brightness Fn F11 Print screen Fn F12 Insert Fn Home WLAN on off Fn End Sleep Fn up arrow Increase display brightness Fn down arrow Decrease display brightness System specifications 61 ...

Страница 62: ... the Dell logo appears to initiate a one time boot menu with a list of the valid boot devices for the system Diagnostics and BIOS Setup options are also included in this menu The devices listed on the boot menu depend on the bootable devices in the system This menu is useful when you are attempting to boot to a particular device or to bring up the diagnostics for the system Using the boot menu doe...

Страница 63: ...save any unsaved changes and restarts the system System setup options NOTE Depending on the notebook and its installed devices the items listed in this section may or may not appear General options Table 4 General Option Description System Information This section lists the primary hardware features of your computer The options are System Information Memory Configuration Processor Information PCI ...

Страница 64: ...iately System configuration Table 5 System Configuration Option Description Integrated NIC This option allows pre OS and early OS networking features to use any enabled NICs Enabled UEFI Network Stack This options allow you to configure the integrated network controller Click one of the following options Disabled Enabled Enabled w PXE Default SATA Operation Allows you to configure the operating mo...

Страница 65: ...rShare Allows you to configure the USB PowerShare feature behavior Enable USB PowerShare This option is not set by default Audio Allows you to enable or disable the integrated audio controller Enable Audio Enable Microphone Enable Internal Speaker All the options are set by default Keyboard Illumination This field allows to choose the operating mode of the keyboard illumination feature The keyboar...

Страница 66: ...all light and sound emissions in the system To resume normal operation press Fn F7 again Enable Unobtrusive Mode This option is disabled by default Miscellaneous devices Allows you to enable or disable various on board devices The options are Enable Camera Default Enable Secure Digital SD Card Default Enable Hard Drive Free Fall Protection Default Secure Digital SD Card Boot Default Secure Digital...

Страница 67: ...ce the option to always set strong password Enable Strong Password This option is not set by default Password Configuration You can define the length of your password Min 4 Max 32 Password Bypass Allows you to bypass the System password and the Internal HDD password when it is set during a system restart Click one of the options Disabled Default Reboot bypass Password Change Allows you to change t...

Страница 68: ...option is set by default OROM Keyboard Access Allows you to determine whether users are able to enter the Option ROM Configuration screens via hotkeys during boot The options are Click one of the following options Enabled Default One Time Enable Disabled Admin Setup Lockout Allows you to prevent users from entering Setup when an administrator password is set Enable Admin Setup Lockout This option ...

Страница 69: ... default The Custom Mode Key Management options are PK Default KEK db dbx Intel Software Guard Extensions Table 9 Performance Option Description Intel SGX Enable This fields specifies you to provide a secured environment for running code storing sensitive information in the context of the main OS The options are Disabled Enabled Software Controlled Default Enclave Memory Size This option sets SGX ...

Страница 70: ...n is set by default C States Control Allows you to enable or disable the additional processor sleep states C states This option is set by default Intel TurboBoost Allows you to enable or disable the Intel TurboBoost mode of the processor Enable Intel TurboBoost This option is set by default Hyper Thread Control Allows you to enable or disable the HyperThreading in the processor Disabled Enabled De...

Страница 71: ...re only works when the computer is connected to AC power supply Disabled Does not allow the system to power on by special LAN signals when it receives a wake up signal from the LAN or wireless LAN LAN Only Allows the system to be powered on by special LAN signals WLAN Allows the system to be powered on by special LAN signals LAN or WLAN Allows the system to be powered on by special LAN or wireless...

Страница 72: ...ad that is embedded in the internal keyboard Fn Key Only Default By Numlock NOTE When setup is running this option has no effect Setup works in Fn Key Only mode Numlock Enable Allows you to enable the Numlock option when the computer boots Enable Numlock Default Fn Key Emulation Allows you to set the option where the Scroll Lock key is used to simulate the Fn key feature Enable Fn Key Emulation Th...

Страница 73: ...Manageability Option Description USB Provision Allows you to provision Intel AMT using the local provisioning file via a USB storage device Enable USB Provision NOTE When disabled provisioning Intel AMT from a USB storage device is blocked This option is not set by default MEBx Hotkey Allows you to specify if the MEBx Hotkey function should be enabled when the system boots Enable MEBx Hotkey This ...

Страница 74: ...ble 15 Wireless screen options Option Description Wireless Switch Allows to set the wireless devices that can be controlled by the wireless switch The options are WWAN GPS on WWAN Module WLAN WiGi Bluetooth All the options are set by default Wireless Device Enable Allows you to enable or disable the internal wireless devices WWAN GPS WLAN Bluetooth All the options are set by default Maintenance Ta...

Страница 75: ...le 17 System Logs Option Description BIOS Events Allows you to view and clear the System Setup BIOS POST events Clear Log This option is not set by default Thermal Events Allows you to view and clear the System Setup Thermal events Clear Log This option is not set by default Power Events Allows you to view and clear the System Setup Power events s Clear Log This option is not set by default Suppor...

Страница 76: ...ecommended not to update the BIOS version for more than three revisions For example If you want to update the BIOS from 1 0 to 7 0 then install version 4 0 first and then install version 7 0 Updating BIOS on systems with bitlocker enabled CAUTION If BitLocker is not suspended before updating the BIOS the next time you reboot the system it will not recognize the BitLocker key You will then be promp...

Страница 77: ...indows using a bootable USB key or you can also update the BIOS from the F12 One Time boot menu on the system Most Dell systems built after 2012 have this capability and you can confirm by booting your system to the F12 One Time Boot Menu to see if BIOS FLASH UPDATE is listed as a boot option for your system If the option is listed then the BIOS supports this BIOS update option NOTE Only systems w...

Страница 78: ... you copied the flash into a USB port of the system 2 Power on the system and press the F12 key to access the One Time Boot Menu Highlight BIOS Flash Update using the arrow keys then press Enter 3 The Bios flash menu will open then click the browse button 4 The E5450A14 exe file is shown as an example in the following screenshot The actual file name may vary 78 System Setup ...

Страница 79: ...5 Once the file is selected it will show in the file selection box and you can click the OK button to continue 6 Click the Begin Flash Update button System Setup 79 ...

Страница 80: ...ecute the system will reboot and then the BIOS flash will start and a progress bar will show the progress of the flash Depending on the changes included in the update the progress bar may go from zero to 100 multiple times and the flash process could take as long as 10 minutes Generally this process takes two to three minutes 80 System Setup ...

Страница 81: ...d Assigning a system password and setup password You can assign a new System Password only when the status is in Not Set To enter the system setup press F2 immediately after a power on or re boot 1 In the System BIOS or System Setup screen select Security and press Enter The Security screen is displayed 2 Select System Password and create a password in the Enter the new password field Use the foll...

Страница 82: ...screen select System Security and press Enter The System Security screen is displayed 2 In the System Security screen verify that Password Status is Unlocked 3 Select System Password alter or delete the existing system password and press Enter or Tab 4 Select Setup Password alter or delete the existing setup password and press Enter or Tab NOTE If you change the System and or Setup password re ent...

Страница 83: ...ws 10 Home 64 bit Other Ubuntu 16 04 LTS SP1 64 bit NeoKylin v6 0 64 bit Downloading drivers 1 Turn on the notebook 2 Go to Dell com support 3 Click Product Support enter the Service Tag of your notebook and then click Submit NOTE If you do not have the Service Tag use the auto detect feature or manually browse for your notebook model 4 Click Drivers and Downloads 5 Select the operating system ins...

Страница 84: ...ds 5 Select the operating system installed on your laptop 6 Scroll down the page expand Chipset and select your chipset driver 7 Click Download File to download the latest version of the chipset driver for your laptop 8 After the download is complete navigate to the folder where you saved the driver file 9 Double click the chipset driver file icon and follow the instructions on the screen Intel ch...

Страница 85: ...Video driver Verify if the video driver is already installed in the system Software 85 ...

Страница 86: ...stem comes with both LAN and WiFi drivers and is able to detect the LAN and WiFi without going through the drivers installation USB driver Verify if the USB drivers are already installed in the system Storage driver Verify if the storage controller drivers are installed in the system 86 Software ...

Страница 87: ... driver Verify if the security device driver is installed in the system HID Verify if the HID driver is installed in the system Control Vault Device Verify if the control vault device driver is installed in the system Smart card reader Verify if the smart card reader drivers are installed in the system Software 87 ...

Страница 88: ...Image device driver Verify if the image device driver is installed in the system 88 Software ...

Страница 89: ...system from a power off state only if it is connected to AC power Press and hold the power button for 25 seconds The system RTC reset occurs after you release the power button NOTE If AC power is disconnected from the system during the process or the power button is held longer than 40 seconds the RTC reset process is aborted The RTC reset will reset the BIOS to Defaults un provision Intel vPro an...

Страница 90: ... service options Availability varies by country and product and some services may not be available in your area To contact Dell for sales technical support or customer service issues 1 Go to Dell com support 2 Select your support category 3 Verify your country or region in the Choose a Country Region drop down list at the bottom of the page 4 Select the appropriate service or support link based on...

Отзывы: