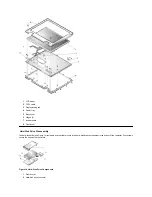


3.
Remove the left speaker cover, speaker, and speaker cable.
4.
Remove the speaker wire harness.
5.
Remove the two 4-mm screws securing the right speaker cover.
6.
Remove the right speaker cover, speaker, and speaker cable.
The display latch is no longer secured by the speaker covers. Be careful not to lose the spring.
7.
Remove the display latch and spring.
To replace the speaker, resolder the speaker cable to the new speaker.
When reinstalling the speakers, be especially careful to route the speaker cables and speaker wire harness through the appropriate slots and pins.
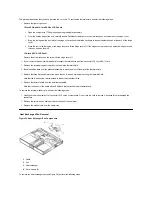
PC Card Heat Sink Removal
Figure 31. PC Card Heat Sink Components
To remove the PC Card heat sink (see Figure 31), perform the following steps:
1.
Remove the two 4-mm screws securing the PC Card heat sink.
2.
Remove the heat sink.
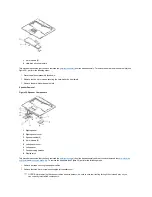
DC-DC Board Removal
Figure 32. DC-DC Board
1
PC Card heat sink
2
4-mm screws (2)
Содержание Inspiron 7500
Страница 6: ...Back to Contents Page AC Adapter Dell Inspiron 7500 ...
Страница 7: ...Back to Contents Page Audio Jacks Dell Inspiron 7500 ...
Страница 10: ...Back to Contents Page Component Locations Back View Dell Inspiron 7500 ...
Страница 12: ...Back to Contents Page Battery Charge Gauge Dell Inspiron 7500 ...
Страница 13: ...Back to Contents Page Removing and Installing a Battery Dell Inspiron 7500 ...
Страница 26: ...Back to Contents Page ...
Страница 38: ...Exploded View of 13 3 Inch Display Assembly Dell Inspiron 7500 ...
Страница 39: ...Exploded View of 14 1 Inch Display Assembly Dell Inspiron 7500 ...
Страница 40: ...Back to Contents Page Exploded View of 15 Inch SXGA Display Assembly Dell Inspiron 7500 New artwork pending ...
Страница 42: ...Back to Contents Page Exploded View of 15 4 Inch SXGA Display Assembly Dell Inspiron 7500 New artwork pending ...
Страница 44: ...Back to Contents Page Exploded View of Computer Dell Inspiron 7500 ...
Страница 45: ...Back to Contents Page Exploded View of Palmrest Assembly Dell Inspiron 7500 Back to Contents Page ...
Страница 47: ...Back to Contents Page Component Locations Front View Dell Inspiron 7500 New artwork pending ...
Страница 54: ...Back to Contents Page I O Connectors Dell Inspiron 7500 ...
Страница 60: ...Back to Contents Page 30 Cone of Infrared Light Dell Inspiron 7500 ...
Страница 64: ...Back to Contents Page Embedded Numeric Keypad Dell Inspiron 7500 ...
Страница 88: ...system You can also double click the PC Card icon on the Windows 98 desktop Back to Contents Page ...
Страница 89: ...Back to Contents Page PC Card Slots Dell Inspiron 7500 ...
Страница 103: ...Back to Contents Page Removing the Memory Module Dell Inspiron 7500 ...
Страница 104: ...Back to Contents Page Removing the Memory Module Cover Dell Inspiron 7500 ...
Страница 136: ...Back to Contents Page Removing the Hard Disk Drive Dell Inspiron 7500 ...
Страница 138: ...Back to Contents Page Removing Devices From the Media Bay Dell Inspiron 7500 ...
Страница 140: ...Back to Contents Page Security Cable Slot Dell Inspiron 7500 ...
Страница 159: ...Back to Contents Page Touch Pad Dell Inspiron 7500 ...
Страница 162: ...8 Unlatch the display assembly and lift the assembly off the computer base Back to Contents Page ...