background image

Steps

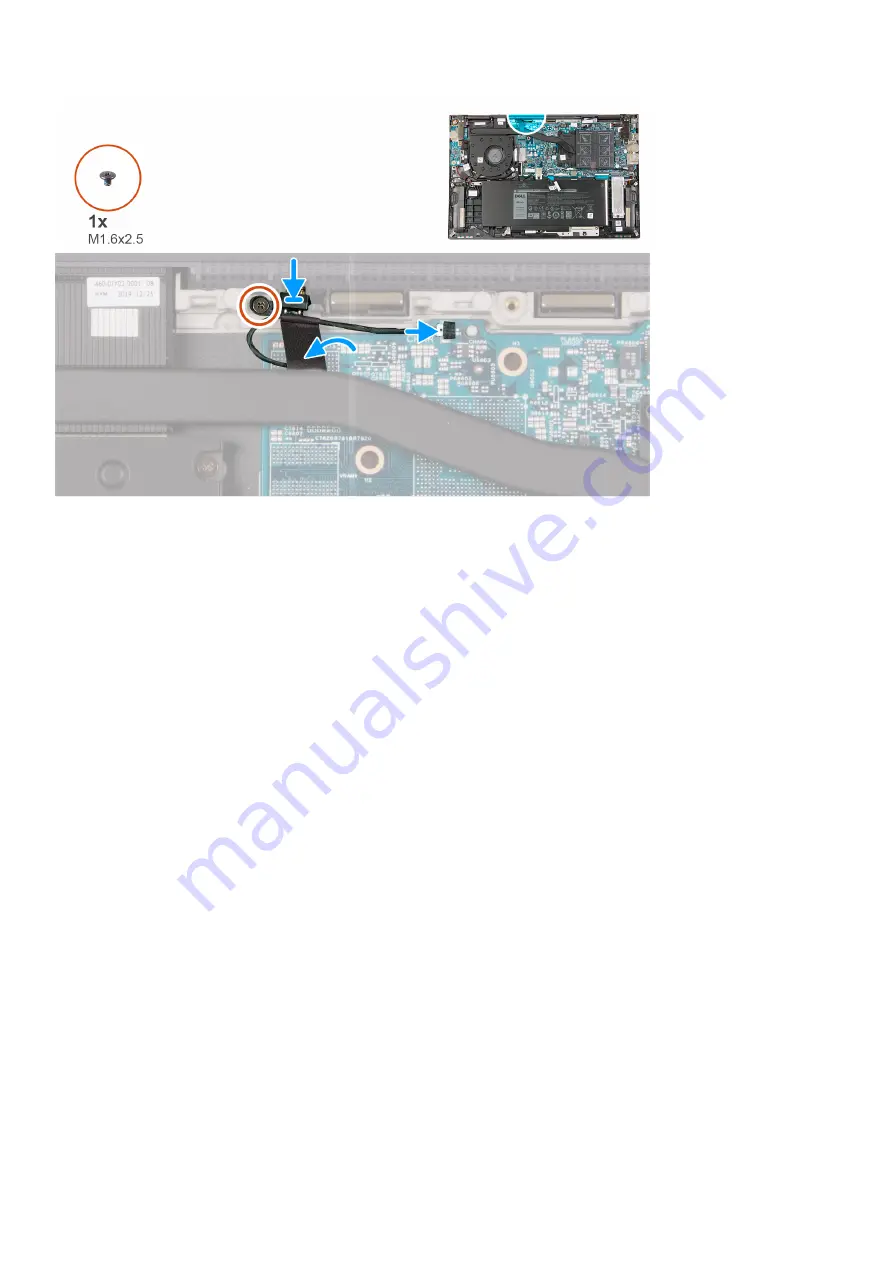
1. Align the screw hole on the pen-garage cable with the screw hole on the palm-rest and keyboard assembly.
2. Replace the screw (M1.6x2.5) that secures the pen-garage cable to the palm-rest and keyboard assembly.
3. Adhere the tape to secure the pen-garage cable to the system board.
4. Connect the pen-garage cable to the system board.

Next steps

1. Install the 

base cover

.

2. Follow the procedure in 

After working inside your computer

.

Solid-state drive

Removing the M.2 2230 solid-state drive

Prerequisites

1. Follow the procedure in 

Before working inside your computer

.

2. Remove the 

base cover

.

About this task

The following image indicates the location of the M.2 2230 solid-state drive and provides a visual representation of the removal procedure.

Removing and installing components

31

Содержание Inspiron 7500 2n1 Silver

Страница 1: ...Inspiron 7500 2n1 Black Service Manual Regulatory Model P97F Regulatory Type P97F004 ...

Страница 2: ...mage to hardware or loss of data and tells you how to avoid the problem WARNING A WARNING indicates a potential for property damage personal injury or death 2020 Dell Inc or its subsidiaries All rights reserved Dell EMC and other trademarks are trademarks of Dell Inc or its subsidiaries Other trademarks may be trademarks of their respective owners April 2020 Rev A00 ...

Страница 3: ...in cell battery 17 Removing the coin cell battery 17 Installing the coin cell battery 18 Memory modules 19 Removing the memory modules 19 Installing the memory modules 20 Speakers 22 Removing the speakers 22 Installing the speakers 23 Heat sink 24 Removing the heat sink 24 Installing the heat sink 24 Power adapter port 25 Removing the power adapter port 25 Installing the power adapter port 26 Touc...

Страница 4: ...ard 48 Removing the system board 48 Installing the system board 52 Palm rest and keyboard assembly 55 Removing the palm rest and keyboard assembly 55 Installing the palm rest and keyboard assembly 56 3 Drivers and downloads 58 4 System setup 59 Entering BIOS setup program 59 Navigation keys 59 Boot Sequence 59 One time boot menu 60 System setup options 60 Clearing CMOS settings 69 Clearing BIOS Sy...

Страница 5: ...onnect your computer from all power sources before opening the computer cover or panels After you finish working inside the computer replace all covers panels and screws before connecting your computer to an electrical outlet CAUTION To avoid damaging the computer ensure that the work surface is flat dry and clean CAUTION To avoid damaging the components and cards handle them by their edges and av...

Страница 6: ...e anti static packing material until you are ready to install the component Before unwrapping the anti static packaging ensure that you discharge static electricity from your body Before transporting a static sensitive component place it in an anti static container or packaging ESD field service kit The unmonitored Field Service kit is the most commonly used service kit Each Field Service kit incl...

Страница 7: ...sport ESD protection summary It is recommended that all field service technicians use the traditional wired ESD grounding wrist strap and protective anti static mat at all times when servicing Dell products In addition it is critical that technicians keep sensitive parts separate from all insulator parts while performing service and that they use anti static bags for transporting sensitive compone...

Страница 8: ...TE Screw color may vary with the configuration ordered Table 1 Screw list Component Secured to Screw type Quantity Screw image Base cover Palm rest and keyboard assembly M2x4 6 Battery Palm rest and keyboard assembly M2x3 2 Wireless card bracket Wireless card and palm rest and keyboard assembly M2x3 1 Solid state drive 2230 Palm rest and keyboard assembly M2x3 1 Solid state drive thermal bracket 2...

Страница 9: ... keyboard assembly M2 5x5 2 Power adapter port Palm rest and keyboard assembly M2x3 1 Power button bracket Palm rest and keyboard assembly M1 6x2 5 2 USB Type C bracket System board and palm rest and keyboard assembly M2x3 2 System board Palm rest and keyboard assembly M2x2 2 Major components of Inspiron 7500 2n1 Black The following image shows the major components of Inspiron 7500 2n1 Black Remov...

Страница 10: ... bracket 14 Power button with fingerprint reader 15 I O board 16 Pen garage cable 17 Solid state drive 18 Solid state drive thermal bracket NOTE Dell provides a list of components and their part numbers for the original system configuration purchased These parts are available according to warranty coverages purchased by the customer Contact your Dell sales representative for purchase options 10 Re...

Страница 11: ...isites 1 Follow the procedure in Before working inside your computer About this task The following images indicate the location of the base cover and provide a visual representation of the removal procedure Removing and installing components 11 ...

Страница 12: ...12 Removing and installing components ...

Страница 13: ...he base cover from the palm rest and keyboard assembly NOTE The following step is applicable only if you want to further remove any other component from your computer 4 Disconnect the battery cable from the system board 5 Turn your computer over and press the power button for 15 seconds to drain the flea power Installing the base cover Prerequisites If you are replacing a component remove the exis...

Страница 14: ...14 Removing and installing components ...

Страница 15: ...1 Follow the procedure in After working inside your computer Battery Lithium ion battery precautions CAUTION Exercise caution when handling Lithium ion batteries Discharge the battery as much as possible before removing it from the system This can be done by disconnecting the AC adapter from the system to allow the battery to drain Do not crush drop mutilate or penetrate the battery with foreign o...

Страница 16: ...s Removing the battery Prerequisites 1 Follow the procedure in Before working inside your computer 2 Remove the base cover About this task The following image indicates the location of the battery and provides a visual representation of the removal procedure Steps 1 Remove the two screws M2x3 that secure the battery to the palm rest and keyboard assembly 2 Loosen the captive screw that secures the...

Страница 17: ...xt steps 1 Install the base cover 2 Follow the procedure in After working inside your computer Coin cell battery Removing the coin cell battery Prerequisites 1 Follow the procedure in Before working inside your computer NOTE Removing the I O board cable is equivalent to removing the coin cell battery It resets the BIOS setup program s settings to default It is recommended that you note the BIOS se...

Страница 18: ...c scribe peel the coin cell battery off the palm rest and keyboard assembly Installing the coin cell battery Prerequisites If you are replacing a component remove the existing component before performing the installation procedure About this task The following image indicates the location of the coin cell battery and provides a visual representation of the installation procedure 18 Removing and in...

Страница 19: ...e palm rest and keyboard assembly Next steps 1 Install the base cover 2 Follow the procedure in After working inside your computer Memory modules Removing the memory modules Prerequisites 1 Follow the procedure in Before working inside your computer 2 Remove the base cover About this task The following image indicates the location of the memory modules and provides a visual representation of the r...

Страница 20: ... module slot NOTE Repeat step 2 to step 3 to remove any other memory modules installed in your computer Installing the memory modules Prerequisites If you are replacing a component remove the existing component before performing the installation procedure About this task The following image indicates the location of the memory modules and provides a visual representation of the installation proced...

Страница 21: ... into the memory module slot 4 Press the memory module down until it clicks into place NOTE If you do not hear the click remove the memory module and reinstall it NOTE Repeat step 2 to step 4 to install any other memory modules in your computer Next steps 1 Install the base cover 2 Follow the procedure in After working inside your computer Removing and installing components 21 ...

Страница 22: ...entation of the removal procedure Steps 1 Remove the I O board cable from the routing guides on the fan 2 Disconnect the speaker cable from the system board 3 Peel the tape that secures the speaker cable to the palm rest and keyboard assembly 4 Remove the speaker cable from the routing guides on the palm rest and keyboard assembly 5 Lift both the speakers along with the cables off the palm rest an...

Страница 23: ...bber grommets place the speakers on the slots of the palm rest and keyboard assembly 2 Route the speaker cable through the routing guides on the palm rest and keyboard assembly 3 Adhere the tape that secures the speaker to the palm rest and keyboard assembly 4 Connect the speaker cable to the system board 5 Route the I O board cable through the routing guides on the fan Next steps 1 Install the ba...

Страница 24: ...s task The following image indicates the location of the heat sink and provides a visual representation of the removal procedure Steps 1 Peel the tape that secures the touchscreen cable to the heat sink 2 In reverse sequential order as indicated on the heat sink loosen the four captive screws that secure the heat sink to the system board 3 Lift the heat sink off the system board Installing the hea...

Страница 25: ...as indicated on the heat sink tighten the four captive screws that secure the heat sink to the system board 3 Adhere the tape that secures the touchscreen cable to the heat sink Next steps 1 Install the base cover 2 Follow the procedure in After working inside your computer Power adapter port Removing the power adapter port Prerequisites 1 Follow the procedure in Before working inside your compute...

Страница 26: ...ures the power adapter port to the palm rest and keyboard assembly 6 Remove the power adapter port cable from the routing guide on the palm rest and keyboard assembly 7 Lift the power adapter port along with its cable off the palm rest and keyboard assembly Installing the power adapter port Prerequisites If you are replacing a component remove the existing component before performing the installat...

Страница 27: ... that secure the right display hinge to the system board and palm rest and keyboard assembly 7 Replace the screw M2 5x5 that secures the right display hinge to the system board and palm rest and keyboard assembly Next steps 1 Install the base cover 2 Follow the procedure in After working inside your computer Touchpad Removing the touchpad Prerequisites 1 Follow the procedure in Before working insi...

Страница 28: ...and keyboard assembly 5 Remove the two screws M2x2 that secure the touchpad to the palm rest and keyboard assembly 6 Slide and lift the touchpad off the palm rest and keyboard assembly Installing the touchpad Prerequisites If you are replacing a component remove the existing component before performing the installation procedure About this task The following image indicates the location of the tou...

Страница 29: ...assembly 6 Replace the three screws M2x2 that secure the touchpad bracket to the palm rest and keyboard assembly 7 Adhere the tape that secures the speaker cable to the touchpad bracket Next steps 1 Install the battery 2 Install the base cover 3 Follow the procedure in After working inside your computer Pen garage cable Removing the pen garage cable Prerequisites 1 Follow the procedure in Before w...

Страница 30: ...ard assembly 4 Lift the pen garage cable off the palm rest and keyboard assembly Installing the pen garage cable Prerequisites If you are replacing a component remove the existing component before performing the installation procedure About this task The following image indicates the location of the pen garage cable and provides a visual representation of the installation procedure 30 Removing and...

Страница 31: ...ct the pen garage cable to the system board Next steps 1 Install the base cover 2 Follow the procedure in After working inside your computer Solid state drive Removing the M 2 2230 solid state drive Prerequisites 1 Follow the procedure in Before working inside your computer 2 Remove the base cover About this task The following image indicates the location of the M 2 2230 solid state drive and prov...

Страница 32: ...d state drive from the solid state drive slot Installing the M 2 2230 solid state drive Prerequisites If you are replacing a component remove the existing component before performing the installation procedure About this task This computer supports two solid state drive form factors M 2 2230 M 2 2280 If you are replacing the M 2 2230 solid state drive with an M 2 2280 solid state drive the followi...

Страница 33: ...The following image indicates the location of the M 2 2230 solid state drive and provides a visual representation of the installation procedure Removing and installing components 33 ...

Страница 34: ...the screw M1 6x2 5 that secures the solid state drive bracket to the palm rest and keyboard assembly 5 Slide the solid state drive firmly into the solid state drive slot at an angle 6 Replace the screw M2x3 that secures the solid state drive to the solid state drive bracket 7 Align the screw hole on the solid state drive thermal bracket with the screw hole on the palm rest and keyboard assembly 8 ...

Страница 35: ...ift the solid state drive thermal bracket off the solid state drive 3 Slide and remove the solid state drive from the solid state drive slot Installing the M 2 2280 solid state drive Prerequisites If you are replacing a component remove the existing component before performing the installation procedure About this task This computer supports two solid state drive form factors M 2 2230 M 2 2280 If ...

Страница 36: ...Perform step 1 to step 3 if you are replacing the M 2 2280 solid state drive with an M 2 2230 solid state drive Steps 1 Remove the screw M1 6x2 5 that secures the solid state drive bracket to the palm rest and keyboard assembly 2 Shift the solid state drive bracket to the other side of the solid state drive slot 36 Removing and installing components ...

Страница 37: ...embly 8 Replace the two screws M2x3 that secures the solid state drive thermal bracket to the palm rest and keyboard assembly Next steps 1 Install the base cover 2 Follow the procedure in After working inside your computer Fan Removing the fan Prerequisites 1 Follow the procedure in Before working inside your computer 2 Remove the base cover About this task The following image indicates the locati...

Страница 38: ...e alignment posts place the fan on the palm rest and keyboard assembly 2 Replace the two screws M2x2 that secure the system fan to the palm rest and keyboard assembly 3 Connect the fan cable to the system board Next steps 1 Install the base cover 2 Follow the procedure in After working inside your computer I O board Removing the I O board Prerequisites 1 Follow the procedure in Before working insi...

Страница 39: ... the pull tab disconnect the I O board cable from the I O board 5 Disconnect the coin cell battery cable from the I O board 6 Peel the tape that secures the fingerprint reader cable to the I O board 7 Remove the two screws M2x3 that secure the I O board to the palm rest and keyboard assembly 8 Open the latch and disconnect the fingerprint reader cable from the I O board 9 Slide and lift the I O bo...

Страница 40: ...nto the connector on the I O board and close the latch to secure the cable 5 Connect the I O board cable to the I O board 6 Connect the coin cell battery cable to the I O board 7 Adhere the tape that secures the fingerprint reader cable to the I O board 8 Close the left display hinge 9 Replace the two screws M2x3 5 that secure the left display hinge to the I O board and palm rest and keyboard asse...

Страница 41: ... 2 Lift the power button bracket off the palm rest and keyboard assembly 3 Lift the flap to access the fingerprint reader board 4 Open the latch and disconnect the power button board cable from the fingerprint reader board 5 Lift the power button board along with its cable off the slot on the palm rest and keyboard assembly Installing the power button board Prerequisites If you are replacing a com...

Страница 42: ... 5 that secure power button board bracket to the palm rest and keyboard assembly Next steps 1 Install the I O board 2 Install the fan 3 Install the base cover 4 Follow the procedure in After working inside your computer Fingerprint reader daughter board Removing the fingerprint reader daughter board Prerequisites 1 Follow the procedure in Before working inside your computer 2 Remove the base cover...

Страница 43: ...nt reader daughter board along with its cable off the palm rest and keyboard assembly Installing the fingerprint reader daughter board Prerequisites If you are replacing a component remove the existing component before performing the installation procedure About this task The following image indicates the location of the fingerprint reader daughter board and provides a visual representation of the...

Страница 44: ...the fingerprint reader board and close the latch to secure the cable Next steps 1 Install the I O board 2 Install the fan 3 Install the base cover 4 Follow the procedure in After working inside your computer Display assembly Removing the display assembly Prerequisites 1 Follow the procedure in Before working inside your computer 2 Remove the base cover About this task The following image indicates...

Страница 45: ...Removing and installing components 45 ...

Страница 46: ...e computer at the edge of a table 7 Remove the four screws M2x3 5 that secure the display hinges to the palm rest and keyboard assembly 8 Remove the two screws M2 5x5 that secure the display hinges to the palm rest and keyboard assembly 9 Lift the display assembly off the palm rest and keyboard assembly Installing the display assembly Prerequisites If you are replacing a component remove the exist...

Страница 47: ...cure the display hinges to the palm rest and keyboard assembly 3 Replace the two screws M2 5x5 that secure the display hinges to the palm rest and keyboard assembly 4 Close the display and turn the computer over 5 Route the display cable through the routing guides on the fan and palm rest and keyboard assembly Removing and installing components 47 ...

Страница 48: ...System board Removing the system board Prerequisites 1 Follow the procedure in Before working inside your computer 2 Remove the base cover 3 Remove the battery 4 Remove the coin cell battery 5 Remove the memory modules 6 Remove the M 2 2230 solid state drive or M 2 2280 solid state drive as applicable 7 Remove the fan 8 Remove the heat sink About this task The following image indicates the connect...

Страница 49: ...The following image indicates the location of the system board and provides a visual representation of the removal procedure Removing and installing components 49 ...

Страница 50: ...50 Removing and installing components ...

Страница 51: ... display hinge to the system board and palm rest and keyboard assembly 7 Open the hinge at an angle of 90 degrees 8 Peel the tape that secures the pen garage cable to the system board 9 Disconnect the pen garage cable from the system board 10 Disconnect the fan cable from the system board 11 Peel the tape that secures the touchscreen cable to the palm rest and keyboard assembly 12 Open the latch a...

Страница 52: ...est and keyboard assembly Installing the system board Prerequisites If you are replacing a component remove the existing component before performing the installation procedure About this task The following image indicates the connectors on your system board Figure 2 System board connectors 1 Power adapter port cable 2 Display cable 3 Pen garage cable 4 Fan cable 5 Touchscreen cable 6 I O board cab...

Страница 53: ...Removing and installing components 53 ...

Страница 54: ...on the palm rest and keyboard assembly 2 Replace the two screws M2x2 that secures the system board to the palm rest and keyboard assembly 3 Connect the display cable on to the connector on the system board 54 Removing and installing components ...

Страница 55: ...tem board and palm rest and keyboard assembly 20 Replace the screw M2 5x5 that secures the right display hinge to the system board and palm rest and keyboard assembly 21 Adhere the tape that secures the antenna cables to the system board and route the antenna cables on the system board and palm rest and keyboard assembly 22 Connect the antenna cables to the wireless card 23 Align the screw hole on...

Страница 56: ... of the removal procedure Steps After performing the steps in the pre requisites you are left with the palm rest and keyboard assembly Installing the palm rest and keyboard assembly Prerequisites If you are replacing a component remove the existing component before performing the installation procedure About this task The following image indicates the location of the palm rest and keyboard assembl...

Страница 57: ... board 6 Install the touchpad 7 Install the power adapter port 8 Install the fan 9 Install the heat sink 10 Install the speakers 11 Install the I O board 12 Install the M 2 2230 solid state drive or M 2 2280 solid state drive as applicable 13 Install the memory modules 14 Install the coin cell battery 15 Install the battery 16 Install the base cover 17 Follow the procedure in After working inside ...

Страница 58: ...rivers and downloads When troubleshooting downloading or installing drivers it is recommended that you read the Dell Knowledge Based article Drivers and Downloads FAQ SLN128938 3 58 Drivers and downloads ...

Страница 59: ... Setup options changes that you make are recorded but do not take effect until you restart the system Table 2 Navigation keys Keys Navigation Up arrow Moves to the previous field Down arrow Moves to the next field Enter Selects a value in the selected field if applicable or follow the link in the field Spacebar Expands or collapses a drop down list if applicable Tab Moves to the next focus area NO...

Страница 60: ...e listed in this section may or may not be displayed Table 3 System setup options System information menu Overview Inspiron 7500 2n1 BIOS Version Displays the BIOS version number Service Tag Displays the Service Tag of the computer Asset Tag Displays the Asset Tag of the computer Manufacture Date Displays the manufacture date of the computer Ownership Date Displays the ownership date of the comput...

Страница 61: ...OT2 Displays the memory configuration of DIMM SLOT2 DEVICES Panel Type Displays the Panel Type of the computer Video Controller Displays the integrate graphics information of the computer Video Memory Displays the video memory information of the computer Wi Fi Device Displays the Wi Fi device installed in the computer Native Resolution Displays the native resolution of the computer Video BIOS Vers...

Страница 62: ...ology SMART Default OFF Enable Audio Enables or disables all integrated audio controller Default ON Enable Microphone Enables or disables microphone By default Enable Microphone is selected Enable Internal Speaker Enables or disables internal speaker By default Enable Internal Speaker is selected USB Configuration Enables or disables booting from USB mass storage devices such as external hard driv...

Страница 63: ... Table 6 System setup options Video menu Video LCD Brightness Brightness on battery power Sets the screen brightness when the computer is running on battery power Default 50 Brightness on AC power Sets the screen brightness when the computer is running on AC power Default 100 Table 7 System setup options Security menu Security Enable Admin Setup Lockout Enables or disables the user from entering B...

Страница 64: ...easurements into the TPM PCRs during BIOS boot Default ON Clear Enables or disables the computer to clear the PTT owner information and returns the PTT to the default state Default OFF TPM State Enables or disables the TPM This is the normal operating state for the TPM when you want to use its complete array of capabilities Default Enabled SMM Security Mitigation Enables or disables additional UEF...

Страница 65: ...t Key Management menu Expert Key Management Enable Custom Mode Enables or disables the keys in the PK KEK db and dbx security key databases to be modified Default OFF Custom Mode Key Management Selects the custom values for expert key management Default PK Table 11 System setup options Performance menu Performance Multi Core Support Active Cores Changes the number of CPU cores available to the ope...

Страница 66: ...ng power usage hours Use the below options to prevent AC power usage between certain times of each day Default Adaptive Battery settings are adaptively optimized based on your typical battery usage pattern Enable Advanced Battery Charge Configuration Enables Advanced Battery Charge Configuration from the beginning of the day to a specified work period Advanced Battery Charged maximizes battery hea...

Страница 67: ...the operation of the computer hardware will always halt the computer Enable Adapter Warnings Enables or disables the computer to display adapter warning messages when adapters with too little power capacity are detected Default ON Enable Dock Warning Messages Enables or disables dock warning messages Default ON Fastboot Configures the speed of the UEFI boot process Default Thorough Performs comple...

Страница 68: ...OS image as long as the Boot Block portion is intact and functioning Default ON NOTE BIOS recovery is designed to fix the main BIOS block and cannot work if the Boot Block is damaged In addition this feature cannot work in the event of EC corruption ME corruption or a hardware issue The recovery image must exist on an unencrypted partition on the drive BIOS Auto Recovery Enables the computer to au...

Страница 69: ... the value specified by the Auto OS Recovery Threshold setup option Default ON Clearing CMOS settings About this task CAUTION Clearing CMOS settings will reset the BIOS settings on your computer Steps 1 Turn off your computer 2 Remove the base cover NOTE The battery must be disconnected from the system board See Step 4 in Removing the base cover 3 Press and hold the power button for 15 seconds to ...

Страница 70: ...tion or turned off Blinking power and battery charge status light The power and battery status light blinks alternately between amber and off to indicate issues that your computer is encountering For example the power and battery status light blinks amber two times followed by a pause and then blinks white three times followed by a pause This 2 3 pattern continues until the computer is turned off ...

Страница 71: ...teps to flash the BIOS Steps 1 Turn on your computer 2 Go to www dell com support 3 Click Product support enter the Service Tag of your computer and then click Submit NOTE If you do not have the Service Tag use the auto detect feature or manually browse for your computer model 4 Click Drivers downloads Find it myself 5 Select the operating system installed on your computer 6 Scroll down the page a...

Страница 72: ...vide a modem router combo device Steps 1 Turn off your computer 2 Turn off the modem 3 Turn off the wireless router 4 Wait for 30 seconds 5 Turn on the wireless router 6 Turn on the modem 7 Turn on your computer Flea power release About this task Flea power is the residual static electricity that remains on the computer even after it has been powered off and the battery has been disconnected from ...

Страница 73: ... topic or model number and then click or tap the search icon to view the related articles Learn and know the following information about your product Product specifications Operating system Setting up and using your product Data backup Troubleshooting and diagnostics Factory and system restore BIOS information See Me and My Dell at www dell com support manuals To locate the Me and My Dell relevant...

Отзывы: