background image

ប្ោយស្្ថនភាររឹង

/Intel Optane

ការលោះប្ោយស្្ថនភាររឹង

/Intel Optane

អ្នកចាំរាច់ប្តទែរិទឧរករណ៍

 Intel Optane 

មុនលរល


លោះងលចញរីកុំរ្យទទ័រររស់អ្នក។


សប្មារ់រ័ត៌មានរដន្ថមសតាីរីការរិទឧរករណ៍

 Intel Optane 

សូមលមប្ល


ការរិទអង្គចងចាំ

 Intel Optane


ចំណាំ


មុននឹងលធ្វប្ការលៅខាងក្នុងកុំរ្យទទ័រររស់អ្នក


សូមអានរ័ត៌មានសុែត្ថិភារដែលមកពាមួយនឹងកុំរ្យទទ័រររស់អ្នក


និងអនុែតតាតាមជំហាននានាលៅក្នុង


មុននឹងលធ្វប្ការលៅខាងក្នុងកុំរ្យទទ័រររស់អ្នក


រនាទារ់រីលធ្វប្ការលៅខាងក្នុងកុំរ្យទទ័រររស់អ្នក


សូមអនុែតតាតាមការដណនាំលៅក្នុង

រនាទារ់រីលធ្វប្ការលៅខាងក្នុង

កុំរ្យទទ័រររស់អ្នក


សប្មារ់រ័តមានរដន្ថម


សតាីរីការអនុែតតាប្រករលោយសុែត្ថិភាររំលុត


សូមលមប្លលរហទំរ័រ


ការអនុែតតាតាមរទរញញាតតាិ


តាមរយៈ


www.dell.com/regulatory_compliance


Prerequisites

1. Remove the 

optical drive

 (applicable only to computers shipped with optical drive).

2. Remove the 

base cover

.

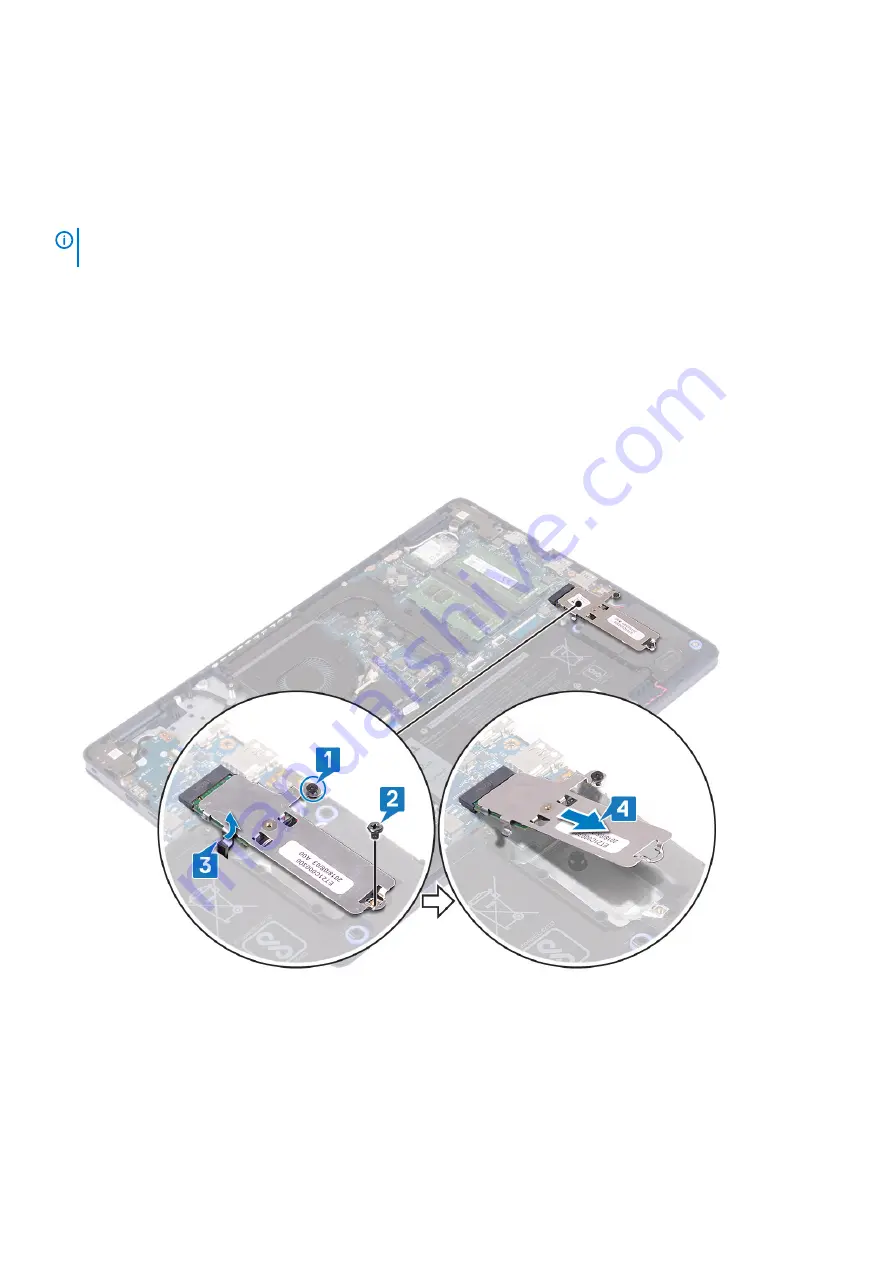
Procedure to remove the M.2 2230 solid-state drive

1. Loosen the captive screw that secures the M.2 2230 shield to the palm-rest and keyboard assembly.
2. Remove the screw (M2x3) that secures the M.2 2230 shield to the palm-rest and keyboard assembly.
3. Slide and remove the tab on the M.2 2230 thermal shield from the slot on the palm-rest and keyboard assembly.
4. Lift the solid-state drive and M.2 2230 thermal shield at an angle and remove it from the M.2 slot on the system board.

5. Turn the M.2 2230 thermal shield over.
6. Remove the screw (M2x2) that secures the solid-state drive to the M.2 2230 thermal shield.
7. Lift the solid-state drive off the M.2 2230 thermal shield.

30

ការលោះ


និងែំលេប្ងសមាសភារនានា

Содержание Inspiron 3593

Страница 1: ...Inspiron 3593 Service Manual Regulatory Model P75F Regulatory Type P75F013 ...

Страница 2: ...លោកអ នកអំរីរលប របរលជសសងងនូែរញ ហា ទាំងអស លនះ ការប រមាន ការប រមាន ការប រមានរង ហា ញរីសកាតា នុរលដែលនាំឱ យមានការខូចខាតែល ប ទរ យសម បតតាិ ររួសលលប ែងខួនន ឬក លសចកតាីស ួ រ 2019 ប កុមហ ុន Dell Inc ឬប កុមហ ុនរុប តសម ព ន ធររស ខួនន រក សាសិទ ធិប ររ យ ា ង ប កុមហ ុន Dell EMC និងពាណិជ ជសញ ញា លលសេងលទសតរជាពា ពាណិជ ជសញ ញា ររស ប កុមហ ុន Dell Inc ឬប កុមហ ុនរុប ត សម ព ន ធររស ខួនន សញ ញា ពាណិជ ជកម មលលសេងៗលទសតអាចពាពាណិជ ជសញ...

Страница 3: ...ះរប មររាត 13 ការោក រប មររាតចូលែិញ 15 ថ ម 18 ការលោះថ ម 18 ការោក ថ មចូលែិញ 19 មាូឌុលអង គចងចាំ 21 ការលោះមាូឌុលអង គចងចាំ 21 ការរដាទរមាូឌុលអង គចងចាំ 21 កាតឥតដខសេ 22 ការលោះកាតឥតដខសេ 22 ការរដាទរកាតឥតដខសេ 23 Optical drive connector board 24 ការលោះផ ទា ំងឧរករណ ភា ជ រ ប ោយអុរទិក 24 ការោក ផ ទា ំងឧរករណ ភា ជ រ ប ោយអុរទិក 25 ថ មប រារ សំដរាត 26 ការលោះថ មប រារ សំដរាត 26 ការរដាទរថ មប រារ សំដរាត 26 កង ហា រ 27 ការលោ...

Страница 4: ...ពាមួយកម មែិធីអានស ន មប កល ៅា ដែ 56 ការរដាទររ ូតុងថាមរលពាមួយកម មែិធីអានស ន មប កល ៅា ដែ 57 កដនួងោក រាតដែ និងលប រងងែំលេប ងកាតា រចុច 58 ការលោះកដនួងោក រាតដែ និងលប រងងតលមួប ងកាដា រចុច 58 ការរដាទរកដនួងោក រាតដែ និងលប រងងតលមួប ងកាដា រចុច 59 ស ុមលអប កង 60 ការលោះស ុមលប ៅររស លអប កង 60 ការលោះស ុមលប ៅររស លអប កង 61 កាលមរ ា 62 ការលោះកាលមរ ា 62 ការរដាទរកាលមរ ា 62 ផ ទា ំងលអប កង 63 លែប ម បីលោះផ ទា ំងលអប កង 63 ការោក ...

Страница 5: ... ការសមាអា ត BIOS តលមួប ងប ររ ន ធ និង លលខសមា ង ត ប ររ ន ធ 76 5 ការលោះប ស យរញ ហា 77 ការែិនិច ឆ យលលប ការងយតដមួប ររ ន ធរ ូតពាមុនដែលរានដកលមអា ePSA 77 ការែំលណប រការែិនិច ឆ យ ePSA 77 រនួជាែិនិច ឆ យប ររ ន ធ 77 ការសល គង គ ះប ររ ន ធប រតិរតតាិការ 78 ការលរប កផ ួ ស BIOS 78 ការលរប កអង គចងចាំ Intel Optane 79 ការរិទអង គចងចាំ Intel Optane 79 ការជប មះ BIOS ប រារ ចុច USB 79 ែែតាថាមរល WiFi 79 ការរលញចាញថាមរលលសសសល រនាទ...

Страница 6: ...មិនដមនទាញដខសេលោយផ ទា ល លនាះលទ ដខសេមួយចំនួនមានឧរករណ ពារ រនួឹះ ឬល ចចា មូលលោយដែដែលអ នកប តទែដតលោះលចញមុនលរលផ តា ច ដខសេ លៅលរលអ នកផ ដា ច ដខសេលចញ ប តទែោក តលប មបររួកងឲ យប តទែរា ន លែប ម បី លជសសងងការលកាងឬលែសចភីនររស ឧរករណ ភា ជ រ ណាមួយ លៅលរលភា ជ រ ដខសេ ប តទែប រាកែថារន ធនិងឧរករណ ភា ជ រ ប តទែោក ចំ និងរានប តឹមប តទែ ប រយ ត ន ចុច លហប យប ចានលចញកាតដែលរានែំលេប ងណាមួយរីកម មែិធីអានកាតលមលឌស ចំណាំ រណ ដនកុំរ យទទ រររស អ នក ...

Страница 7: ...ាតា ហ ឧរករណ លធ វប លតសតាដខសេពាក នឹងកដែរជាពាែិធីស គសតាែ លអាលែប ម បីលធ វប លតសតារលរសនលនះ ប រសិនលរប អ នកមិនមានឧរករណ លធ វប លតសតាដខសេពាក នឹងកដែររស អ នកផ ទា ល លទ សូមរិនិត យពាមួយការិយ ល យប រចាំតំរន ររស អ នកលែប ម បីរកលមប លថាលតប រួកលរមានមួយឬលទ លែប ម បីអនុែតតាការលធ វប លតសតា សូមភា ជ រ ដខសេភា ជ រ នឹងកដខសេដែលៅនឹង ឧរករណ លតសតា ខណៈលរលដែលងប តទែរានភា ជ រ លៅនឹងកដែររស អ នកលហប យចុចរ ូតុងលែប ម បីលតសតា លភួប ងរណ ដរតង រញ ជ ...

Страница 8: ...ូរលៅខាងក នុងកុំរ យទទ រររស អ នកអាចលធ វប កុំរ យទទ រររស អ នកខូចខាតធ ងន ធ ងរ 1 រដាទរល ចចា ទាំងអស និងប តទែប រាកែថាមិនមានល ចចា លប រប ដលងលកប តសល លៅខាងក នុងកុំរ យទទ រររស អ នក 2 ភា ជ រ ឧរករណខាងលប ៅ លប រងងកុំរ យទទ រ ឬដខសេណាមួយដែលអ នករានលោះលចញមុននឹងលធ វប ការលៅលលប កុំរ យទទ រររស អ នក 3 រដាទរកាតលមលឌស ឌីសណាមួយ ឬលប រងងរនាួ ស លលសេងលទសតណាមួយដែលអ នករានលោះលចញមុននឹងលធ វប ការលៅលលប កុំរ យទទ រររស អ នក 4 ភា ជ រ កុំរ យទទ រ...

Страница 9: ... ចចា អាចខុសរា ន លៅតាមការកំណត លរលរញ ជ ទិញ តារ ង 1 Screw list Component Secured to Screw type Quantity Screw image Base cover Palm rest and keyboard assembly M2x2 2 Base cover Palm rest and keyboard assembly M2x4 1 Base cover Palm rest and keyboard assembly M2 5x7 6 Battery Palm rest and keyboard assembly M2x3 4 Display panel Display back cover and antenna assembly M2x2 4 Fan Palm rest and keyboard ...

Страница 10: ...d assembly M2x2 4 Wireless card bracket System board M2x3 1 Optical drive ការលោះប ោយអុរទិច ចំណាំ មុននឹងលធ វប ការលៅខាងក នុងកុំរ យទទ រររស អ នក សូមអានរ ត មានសុែត ថិភារដែលមកពាមួយនឹងកុំរ យទទ រររស អ នក និងអនុែតតាតាមជំហាននានាលៅក នុង មុននឹងលធ វប ការលៅខាងក នុងកុំរ យទទ រររស អ នក រនាទា រ រីលធ វប ការលៅខាងក នុងកុំរ យទទ រររស អ នក សូមអនុែតតាតាមការដណនាំលៅក នុងរនាទា រ រីលធ វប ការលៅខាងក នុង កុំរ យទទ រររស អ នក សប មា...

Страница 11: ...ាងក នុងកុំរ យទទ រររស អ នក សូមអានរ ត មានសុែត ថិភារដែលមកពាមួយនឹងកុំរ យទទ រររស អ នក និងអនុែតតាតាមជំហាននានាលៅក នុង មុននឹងលធ វប ការលៅខាងក នុងកុំរ យទទ រររស អ នក រនាទា រ រីលធ វប ការលៅខាងក នុងកុំរ យទទ រររស អ នក សូមអនុែតតាតាមការដណនាំលៅក នុងរនាទា រ រីលធ វប ការលៅខាងក នុង កុំរ យទទ រររស អ នក សប មារ រ តមានរដន ថម សតាីរីការអនុែតតាប រករលោយសុែត ថិភាររំលុត សូមលមប លលរហទំរ រ ការអនុែតតាតាមរទរញញាតតាិ តាមរយៈ www dell com...

Страница 12: ... the optical drive bracket with the screw holes on the optical drive 3 Replace the two screws M2x3 that secure the optical drive bracket to the optical drive 4 Slide the optical drive assembly into the optical drive bay 5 Align the screw hole on the optical drive bracket with the screw hole on the base cover Replace the screw M2x2 that secures the optical drive assembly to the base cover 12 ការលោះ...

Страница 13: ...មលមប លលរហទំរ រ ការអនុែតតាតាមរទរញញាតតាិ តាមរយៈ www dell com regulatory_compliance Prerequisites Remove the optical drive optional Procedure for computers shipped without optical drive 1 Loosen the three captive screws on the base cover 2 Remove the screw M2x4 that secures the base cover to the palm rest and keyboard assembly 3 Remove the six screws M2 5x7 that secure the base cover to the palm rest...

Страница 14: ... computers that are shipped with optical drive 1 Loosen the three captive screws on the base cover 2 Remove the screw M2x4 that secures the base cover to the palm rest and keyboard assembly 3 Remove the two screws M2x2 that secure the base cover to the palm rest and keyboard assembly 4 Remove the six screws M2 5x7 that secure the base cover to the palm rest and keyboard assembly 5 Pry the base cov...

Страница 15: ...ទទ រររស អ នក សូមអានរ ត មានសុែត ថិភារដែលមកពាមួយនឹងកុំរ យទទ រររស អ នក និងអនុែតតាតាមជំហាននានាលៅក នុង មុននឹងលធ វប ការលៅខាងក នុងកុំរ យទទ រររស អ នក រនាទា រ រីលធ វប ការលៅខាងក នុងកុំរ យទទ រររស អ នក សូមអនុែតតាតាមការដណនាំលៅក នុងរនាទា រ រីលធ វប ការលៅខាងក នុង កុំរ យទទ រររស អ នក សប មារ រ តមានរដន ថម សតាីរីការអនុែតតាប រករលោយសុែត ថិភាររំលុត សូមលមប លលរហទំរ រ ការអនុែតតាតាមរទរញញាតតាិ តាមរយៈ www dell com regulatory_c...

Страница 16: ...ase cover against the power adapter port when you snap the base cover to the computer base 4 Tighten the three captive screws that secure the base cover to the palm rest and keyboard assembly 5 Replace the six screws M2 5x7 that secure the base cover to the palm rest and keyboard assembly 6 Replace the screw M2x4 that secures the base cover to the palm rest and keyboard assembly 16 ការលោះ និងែំលេប...

Страница 17: ...ctor on the system board if applicable 2 Place the base cover on the palm rest and keyboard assembly 3 Snap the base cover into place starting from the power adapter port CAUTION To avoid accidental damage to the power adapter port do not press the base cover against the power adapter port when you snap the base cover to the computer base ការលោះ និងែំលេប ងសមាសភារនានា 17 ...

Страница 18: ... cover to the palm rest and keyboard assembly Post requisites Replace the optical drive optional ថ ម ការលោះថ ម ចំណាំ មុននឹងលធ វប ការលៅខាងក នុងកុំរ យទទ រររស អ នក សូមអានរ ត មានសុែត ថិភារដែលមកពាមួយនឹងកុំរ យទទ រររស អ នក និងអនុែតតាតាមជំហាននានាលៅក នុង មុននឹងលធ វប ការលៅខាងក នុងកុំរ យទទ រររស អ នក រនាទា រ រីលធ វប ការលៅខាងក នុងកុំរ យទទ រររស អ នក សូមអនុែតតាតាមការដណនាំលៅក នុងរនាទា រ រីលធ វប ការលៅខាងក នុង កុំរ...

Страница 19: ...Dell សប មារ ជំនួយ សូមលមប ល www dell com contactdell ប តទែដតទិញថ មសុទ ធរិតប រាកែរី www dell com ឬដែរូដចកចាយ និងអ នកលក រនតាររស Dell ដែលរានអនុញ ញា ត Prerequisites 1 Remove the optical drive applicable only to computers shipped with optical drive 2 Remove the base cover Procedure 1 Remove the four screws M2x3 that secure the battery to the palm rest and keyboard assembly 2 Lift the battery off the pal...

Страница 20: ... ក ក នុងករណីដររលនះ សូមទាក ទងរកជំនួយ និងលសចកតាីដណនាំរដន ថម ប រសិនលរប ថ មប តទែរានពារ ក នុងឧរករណ លោយស រលរាា ង ហាមយកថ មលនាះលចញលោយការកាត រត ឬកំលទចថ មលីចូមអុីយាុង លប ពាះថាងអាចមានលប រាះថា ន ក ចំលពាះរញ ហា លនះ សូមទាក ទងជំនួយរលចចាកលទសររស Dell សប មារ ជំនួយ សូមលមប ល www dell com contactdell ប តទែដតទិញថ មសុទ ធរិតប រាកែរី www dell com ឬដែរូដចកចាយ និងអ នកលក រនតាររស Dell ដែលរានអនុញ ញា ត Procedure 1 Align the scre...

Страница 21: ...le only to computers shipped with optical drive 2 Remove the base cover Procedure 1 Locate the memory module on your computer 2 Use your fingertips to carefully spread apart the securing clips on each end of the memory module slot until the memory module pops up 3 Remove the memory module from the memory module slot ការរដាទរមាូឌុលអង គចងចាំ ចំណាំ មុននឹងលធ វប ការលៅខាងក នុងកុំរ យទទ រររស អ នក សូមអានរ ...

Страница 22: ...ឹងលធ វប ការលៅខាងក នុងកុំរ យទទ រររស អ នក សូមអានរ ត មានសុែត ថិភារដែលមកពាមួយនឹងកុំរ យទទ រររស អ នក និងអនុែតតាតាមជំហាននានាលៅក នុង មុននឹងលធ វប ការលៅខាងក នុងកុំរ យទទ រររស អ នក រនាទា រ រីលធ វប ការលៅខាងក នុងកុំរ យទទ រររស អ នក សូមអនុែតតាតាមការដណនាំលៅក នុងរនាទា រ រីលធ វប ការលៅខាងក នុង កុំរ យទទ រររស អ នក សប មារ រ តមានរដន ថម សតាីរីការអនុែតតាប រករលោយសុែត ថិភាររំលុត សូមលមប លលរហទំរ រ ការអនុែតតាតាមរទរញញាតតាិ តាមរយ...

Страница 23: ...ីរីការអនុែតតាប រករលោយសុែត ថិភាររំលុត សូមលមប លលរហទំរ រ ការអនុែតតាតាមរទរញញាតតាិ តាមរយៈ www dell com regulatory_compliance Procedure CAUTION To avoid damage to the wireless card do not place any cables under it 1 Connect the antenna cables to the wireless card The following table provides the antenna cable color scheme for the wireless card supported by your computer Table 2 Antenna cable color schem...

Страница 24: ... នក សប មារ រ តមានរដន ថម សតាីរីការអនុែតតាប រករលោយសុែត ថិភាររំលុត សូមលមប លលរហទំរ រ ការអនុែតតាតាមរទរញញាតតាិ តាមរយៈ www dell com regulatory_compliance Prerequisites 1 Remove the optical drive applicable only to computers shipped with optical drive 2 Remove the base cover Procedure NOTE Applicable only to computers that are shipped with optical drive 1 Lift the latch and disconnect the optical drive co...

Страница 25: ...តតាតាមរទរញញាតតាិ តាមរយៈ www dell com regulatory_compliance Procedure 1 Align the screw hole on the optical drive connector board with the screw hole on the palm rest and keyboard assembly 2 Replace the screw M2x2 Big Head that secures the optical drive connector board to the palm rest and keyboard assembly 3 Connect the optical drive connector board cable to the system board and close the latch th...

Страница 26: ...ive 2 Remove the base cover Procedure CAUTION Removing the coin cell battery resets the BIOS setup program s settings to default Before removing the coin cell battery it is recommended to note the BIOS setup program s settings Using a plastic scribe gently pry the coin cell battery out of the battery socket on the I O board ការរដាទរថ មប រារ សំដរាត ចំណាំ មុននឹងលធ វប ការលៅខាងក នុងកុំរ យទទ រររស អ នក ...

Страница 27: ...ll com regulatory_compliance Prerequisites 1 Remove the optical drive applicable only to computers shipped with optical drive 2 Remove the base cover Procedure 1 Lift the latch and disconnect the optical drive connector board cable from the system board applicable only to computers shipped with optical drive 2 Lift the latch and disconnect the optical drive connector board cable from the optical d...

Страница 28: ...ក នុងកុំរ យទទ រររស អ នក រនាទា រ រីលធ វប ការលៅខាងក នុងកុំរ យទទ រររស អ នក សូមអនុែតតាតាមការដណនាំលៅក នុងរនាទា រ រីលធ វប ការលៅខាងក នុង កុំរ យទទ រររស អ នក សប មារ រ តមានរដន ថម សតាីរីការអនុែតតាប រករលោយសុែត ថិភាររំលុត សូមលមប លលរហទំរ រ ការអនុែតតាតាមរទរញញាតតាិ តាមរយៈ www dell com regulatory_compliance Procedure 1 Align the screw holes on the fan with the screw holes on to the palm rest and keyboard assembly ...

Страница 29: ... computers that are shipped with optical drive 6 Press down on the latch to connect the optical drive connector board cable to the optical drive connector board 7 Press down on the latch to connect the optical drive connector board cable to the system board Post requisites 1 Replace the base cover 2 Replace the optical drive applicable only to computers shipped with optical drive ការលោះ និងែំលេប ង...

Страница 30: ... com regulatory_compliance Prerequisites 1 Remove the optical drive applicable only to computers shipped with optical drive 2 Remove the base cover Procedure to remove the M 2 2230 solid state drive 1 Loosen the captive screw that secures the M 2 2230 shield to the palm rest and keyboard assembly 2 Remove the screw M2x3 that secures the M 2 2230 shield to the palm rest and keyboard assembly 3 Slid...

Страница 31: ...e drive to the palm rest and keyboard assembly 3 Slide and remove the M 2 2280 thermal shield from the slot on the palm rest and keyboard assembly 4 Lift the solid state drive at an angle and remove it from the M 2 slot on the system board ការោក ប ោយស ថ នភាររឹង Intel Optane លរប កឧរករណ Intel Optane រនាទា រ រីអ នកោក ងរួច សប មារ រ ត មានរដន ថមអំរីការលរប កឧរករណ Intel Optane សូមលមប ល ការលរប កអង គចងចាំ I...

Страница 32: ... 2 2230 solid state drive 1 Place the solid state drive into the slot at the back of the M 2 2230 thermal shield 2 Replace the screw M2x2 that secures the solid state drive to the M 2 2230 thermal shield 3 Turn over the solid state drive and M 2 2230 thermal shield 4 Align the notch on the solid state drive with the tab on the M 2 slot and slide the solid state drive into place 5 Insert the tab on...

Страница 33: ...the M 2 2280 thermal shield into the slot on the palm rest and keyboard assembly 3 Replace the screw M2x3 that secures the M 2 2280 thermal shield and solid state drive to the palm rest and keyboard assembly 4 Tighten the captive screw that secures the M 2 2280 thermal shield to the palm rest and keyboard assembly Post requisites 1 Replace the base cover ការលោះ និងែំលេប ងសមាសភារនានា 33 ...

Страница 34: ... នុង កុំរ យទទ រររស អ នក សប មារ រ តមានរដន ថម សតាីរីការអនុែតតាប រករលោយសុែត ថិភាររំលុត សូមលមប លលរហទំរ រ ការអនុែតតាតាមរទរញញាតតាិ តាមរយៈ www dell com regulatory_compliance ប រយ ត ន ប ោយថាសរឹងង យដរករាក សូមប រយ ត នលរលកាន ប ោយថាសរឹង ប រយ ត ន លែប ម បីលជសសងងការរាត រង ទិន នន យ សូមកុំលោះប ោយថាសរឹងខណៈកុំរ យទទ រកំរុងលែក ឬមិនមានែំលណប រការ Prerequisites 1 Remove the optical drive applicable only to computers ship...

Страница 35: ...ារលៅខាងក នុងកុំរ យទទ រររស អ នក រនាទា រ រីលធ វប ការលៅខាងក នុងកុំរ យទទ រររស អ នក សូមអនុែតតាតាមការដណនាំលៅក នុងរនាទា រ រីលធ វប ការលៅខាងក នុង កុំរ យទទ រររស អ នក សប មារ រ តមានរដន ថម សតាីរីការអនុែតតាប រករលោយសុែត ថិភាររំលុត សូមលមប លលរហទំរ រ ការអនុែតតាតាមរទរញញាតតាិ តាមរយៈ www dell com regulatory_compliance ប រយ ត ន ប ោយថាសរឹងង យដរករាក សូមប រយ ត នលរលកាន ប ោយថាសរឹង Procedure 1 Align the screw holes on the ha...

Страница 36: ...cure the hard drive assembly to the palm rest and keyboard assembly 6 Connect the hard drive cable to the system board and close the latch to secure the cable Post requisites 1 Replace the battery 2 Replace the base cover 3 Replace the optical drive applicable only to computers shipped with optical drive 36 ការលោះ និងែំលេប ងសមាសភារនានា ...

Страница 37: ...equisites 1 Remove the optical drive applicable only to computers shipped with optical drive 2 Remove the base cover 3 Remove the battery Procedure 1 Open the latch and disconnect the hard drive cable from the system board 2 Open the latch and disconnect the touchpad cable from the system board 3 Open the latch and disconnect the keyboard back light cable if available from the system board 4 Gentl...

Страница 38: ...palm rest and keyboard assembly and the gap on either sides of the touchpad is equal 1 Using the alignment post slide and place the touchpad into the slot on the palm rest and keyboard assembly 2 Replace the four screws M2x2 that secure the touchpad to the palm rest and keyboard assembly 3 Adhere the tape that secures the touchpad to the palm rest and keyboard assembly 4 Slide the hard drive cable...

Страница 39: ...ុងរនាទា រ រីលធ វប ការលៅខាងក នុង កុំរ យទទ រររស អ នក សប មារ រ តមានរដន ថម សតាីរីការអនុែតតាប រករលោយសុែត ថិភាររំលុត សូមលមប លលរហទំរ រ ការអនុែតតាតាមរទរញញាតតាិ តាមរយៈ www dell com regulatory_compliance Prerequisites 1 Remove the optical drive applicable only to computers shipped with optical drive 2 Remove the base cover 3 Remove the solid state drive Intel Optane Procedure 1 Disconnect the speaker cable ...

Страница 40: ...តាមរយៈ www dell com regulatory_compliance Procedure NOTE If the rubber grommets are pushed out when removing the speakers push them back in before replacing the speakers 1 Using the alignment posts and rubber grommets place the speakers in the slots on the palm rest and keyboard assembly 2 Route the speaker cable through the routing guides on the palm rest and keyboard assembly 3 Connect the speak...

Страница 41: ...sen the four captive screws that secure the heat sink to the system board 2 Lift the heat sink off the system board ការោក កដនួងទទួលកំលៅ ចំណាំ មុននឹងលធ វប ការលៅខាងក នុងកុំរ យទទ រររស អ នក សូមអានរ ត មានសុែត ថិភារដែលមកពាមួយនឹងកុំរ យទទ រររស អ នក និងអនុែតតាតាមជំហាននានាលៅក នុង មុននឹងលធ វប ការលៅខាងក នុងកុំរ យទទ រររស អ នក រនាទា រ រីលធ វប ការលៅខាងក នុងកុំរ យទទ រររស អ នក សូមអនុែតតាតាមការដណនាំលៅក នុងរនាទា រ រ...

Страница 42: ... dell com regulatory_compliance Prerequisites 1 Remove the optical drive applicable only to computers shipped with optical drive 2 Remove the base cover 3 Remove the wireless card Procedure NOTE Steps 1 to 3 are applicable only for the computers that are shipped with optical drive 1 Lift the latch and disconnect the optical drive connector board cable from the system board 2 Lift the latch and dis...

Страница 43: ... rest and keyboard assembly NOTE For computers shipped without optical drive there is an additional screw on the left hinge 7 Open the hinges 8 Lift the palm rest and keyboard assembly at an angle 9 Slide and remove the palm rest and keyboard assembly off the display assembly ការលោះ និងែំលេប ងសមាសភារនានា 43 ...

Страница 44: ...នុងកុំរ យទទ រររស អ នក សូមអនុែតតាតាមការដណនាំលៅក នុងរនាទា រ រីលធ វប ការលៅខាងក នុង កុំរ យទទ រររស អ នក សប មារ រ តមានរដន ថម សតាីរីការអនុែតតាប រករលោយសុែត ថិភាររំលុត សូមលមប លលរហទំរ រ ការអនុែតតាតាមរទរញញាតតាិ តាមរយៈ www dell com regulatory_compliance Procedure NOTE Ensure that the hinges are opened to the maximum before replacing the display assembly on palm rest and keyboard assembly 1 Slide the palm rest...

Страница 45: ...he system board and the palm rest and keyboard assembly NOTE For computers shipped without optical drive there is an additional screw on the left hinge 5 Route the display cable through the routing guides on the fan and the palm rest and keyboard assembly 6 Slide the display cable to the connector on the system board and close the latch to secure the cable ការលោះ និងែំលេប ងសមាសភារនានា 45 ...

Страница 46: ...រររស អ នក សូមអនុែតតាតាមការដណនាំលៅក នុងរនាទា រ រីលធ វប ការលៅខាងក នុង កុំរ យទទ រររស អ នក សប មារ រ តមានរដន ថម សតាីរីការអនុែតតាប រករលោយសុែត ថិភាររំលុត សូមលមប លលរហទំរ រ ការអនុែតតាតាមរទរញញាតតាិ តាមរយៈ www dell com regulatory_compliance Prerequisites 1 Remove the optical drive applicable only to computers shipped with optical drive 2 Remove the base cover 3 Remove the wireless card Procedure 1 Remove the...

Страница 47: ...ការអនុែតតាតាមរទរញញាតតាិ តាមរយៈ www dell com regulatory_compliance Procedure 1 Align the screw hole on the power adapter port with the screw hole on the palm rest and keyboard assembly 2 Replace the screw M2x2 that secures the power adapter port to the palm rest and keyboard assembly 3 Route the power adapter port cable through the routing guides on the palm rest and keyboard assembly 4 Connect the...

Страница 48: ...I O board cable from the system board 2 Peel the I O board cable from the palm rest and keyboard assembly 3 Remove the screw M2x4 that secures the I O board to the palm rest and keyboard assembly 4 Lift the I O board along with the cable off the palm rest and keyboard assembly ការរដាទរផ ទា ំង I O ចំណាំ មុននឹងលធ វប ការលៅខាងក នុងកុំរ យទទ រររស អ នក សូមអានរ ត មានសុែត ថិភារដែលមកពាមួយនឹងកុំរ យទទ រររស អ ...

Страница 49: ...អ នក សប មារ រ តមានរដន ថម សតាីរីការអនុែតតាប រករលោយសុែត ថិភាររំលុត សូមលមប លលរហទំរ រ ការអនុែតតាតាមរទរញញាតតាិ តាមរយៈ www dell com regulatory_compliance Prerequisites 1 Remove the optical drive applicable only to computers shipped with optical drive 2 Remove the base cover 3 Remove the fan Procedure 1 Remove the two screws M2 5x5 that secure the right hinge to the palm rest and keyboard assembly NOTE F...

Страница 50: ...នាទា រ រីលធ វប ការលៅខាងក នុងកុំរ យទទ រររស អ នក សូមអនុែតតាតាមការដណនាំលៅក នុងរនាទា រ រីលធ វប ការលៅខាងក នុង កុំរ យទទ រររស អ នក សប មារ រ តមានរដន ថម សតាីរីការអនុែតតាប រករលោយសុែត ថិភាររំលុត សូមលមប លលរហទំរ រ ការអនុែតតាតាមរទរញញាតតាិ តាមរយៈ www dell com regulatory_compliance Procedure 1 Place the power button on the palm rest and keyboard assembly and align the screw hole on the power button with the screw...

Страница 51: ...over 3 Replace the optical drive applicable only to computers shipped with optical drive ផ ទា ំងប ររ ន ធ ការលោះផ ទា ំងប ររ ន ធ ចំណាំ មុននឹងលធ វប ការលៅខាងក នុងកុំរ យទទ រររស អ នក សូមអានរ ត មានសុែត ថិភារដែលមកពាមួយនឹងកុំរ យទទ រររស អ នក និងអនុែតតាតាមជំហាននានាលៅក នុង មុននឹងលធ វប ការលៅខាងក នុងកុំរ យទទ រររស អ នក រនាទា រ រីលធ វប ការលៅខាងក នុងកុំរ យទទ រររស អ នក សូមអនុែតតាតាមការដណនាំលៅក នុងរនាទា រ រីលធ វប កា...

Страница 52: ...able from the system board 2 Disconnect the speaker cable from the system board 3 Open the latch and disconnect the keyboard from the system board 4 Open the latch and disconnect the keyboard back light cable from the system board 5 Open the latch and disconnect the touchpad cable from the system board 6 Open the latch and disconnect the hard drive cable from the system board 7 Open the latch and ...

Страница 53: ... the right hinge to the system board 15 Open the right hinge 16 Remove the screw M2x4 that secures the system board to palm rest and keyboard assembly 17 Lift the system board off the palm rest and keyboard assembly ការលោះ និងែំលេប ងសមាសភារនានា 53 ...

Страница 54: ...រ យទទ រររស អ នកប តទែរានរក សាទុកលៅក នុងផ ទា ំងប ររ ន ធ អ នកប តទែដតរញចាទលស ួ កលសងកម មលៅក នុងកម មែិធីែំលេប ង BIOS រនាទា រ រីអ នកលោះផ ទា ំងប ររ ន ធ ចំណាំ ការរដាទរផ ទា ំងប ររ ន ធលនះនឹងលុរការផ ួ ស រដាទរដែលអ នករានលធ វប ចំលពាះ BIOS លោយលប រប កម មែិធីែំលេប ង BIOS អ នកប តទែលធ វប ការផ ួ ស រតាទរឱ យរានប តឹមប តទែមតាងលទសតរនាទា រ រីអ នករដាទរផ ទា ំងប ររ ន ធ Procedure 1 Align the screw hole on the system board with ...

Страница 55: ...onnector on the system board and close the latch 11 Connect the speaker cable to the system board 12 Connect the power adapter port cable to the system board 13 Slide the power button board cable into the connector on the system board and close the latch 14 Open the latch and connect the display cable to the system board 15 Align the optical drive connector board cable to the connectors on the sys...

Страница 56: ...ម ម ចំណាំ ស ួកលសងកម មរជាពាឧរករនា កំនាត អកលខររតមសលខ និងអកលសរមានទីតាំងលៅខាងសរាត យកុំរ យទទ ររលរ អ នក រ ូតុងថាមរលដែលមានឧរករណ អានស ន មប មាមដែ ការលោះរ ូតុងថាមរលពាមួយកម មែិធីអានស ន មប កល ៅា ដែ ចំណាំ មុននឹងលធ វប ការលៅខាងក នុងកុំរ យទទ រររស អ នក សូមអានរ ត មានសុែត ថិភារដែលមកពាមួយនឹងកុំរ យទទ រររស អ នក និងអនុែតតាតាមជំហាននានាលៅក នុង មុននឹងលធ វប ការលៅខាងក នុងកុំរ យទទ រររស អ នក រនាទា រ រីលធ វប ការលៅខាងក នុងកុំរ យ...

Страница 57: ...f the palm rest and keyboard assembly ការរដាទររ ូតុងថាមរលពាមួយកម មែិធីអានស ន មប កល ៅា ដែ ចំណាំ មុននឹងលធ វប ការលៅខាងក នុងកុំរ យទទ រររស អ នក សូមអានរ ត មានសុែត ថិភារដែលមកពាមួយនឹងកុំរ យទទ រររស អ នក និងអនុែតតាតាមជំហាននានាលៅក នុង មុននឹងលធ វប ការលៅខាងក នុងកុំរ យទទ រររស អ នក រនាទា រ រីលធ វប ការលៅខាងក នុងកុំរ យទទ រររស អ នក សូមអនុែតតាតាមការដណនាំលៅក នុងរនាទា រ រីលធ វប ការលៅខាងក នុង កុំរ យទទ រររស អ នក សប មារ ...

Страница 58: ... វប ការលៅខាងក នុងកុំរ យទទ រររស អ នក សូមអនុែតតាតាមការដណនាំលៅក នុងរនាទា រ រីលធ វប ការលៅខាងក នុង កុំរ យទទ រររស អ នក សប មារ រ តមានរដន ថម សតាីរីការអនុែតតាប រករលោយសុែត ថិភាររំលុត សូមលមប លលរហទំរ រ ការអនុែតតាតាមរទរញញាតតាិ តាមរយៈ www dell com regulatory_compliance Prerequisites 1 Remove the optical drive applicable only to computers shipped with optical drive 2 Remove the base cover 3 Remove the battery 4 ...

Страница 59: ...ាងក នុងកុំរ យទទ រររស អ នក សូមអានរ ត មានសុែត ថិភារដែលមកពាមួយនឹងកុំរ យទទ រររស អ នក និងអនុែតតាតាមជំហាននានាលៅក នុង មុននឹងលធ វប ការលៅខាងក នុងកុំរ យទទ រររស អ នក រនាទា រ រីលធ វប ការលៅខាងក នុងកុំរ យទទ រររស អ នក សូមអនុែតតាតាមការដណនាំលៅក នុងរនាទា រ រីលធ វប ការលៅខាងក នុង កុំរ យទទ រររស អ នក សប មារ រ តមានរដន ថម សតាីរីការអនុែតតាប រករលោយសុែត ថិភាររំលុត សូមលមប លលរហទំរ រ ការអនុែតតាតាមរទរញញាតតាិ តាមរយៈ www dell com...

Страница 60: ... អ នក និងអនុែតតាតាមជំហាននានាលៅក នុង មុននឹងលធ វប ការលៅខាងក នុងកុំរ យទទ រររស អ នក រនាទា រ រីលធ វប ការលៅខាងក នុងកុំរ យទទ រររស អ នក សូមអនុែតតាតាមការដណនាំលៅក នុងរនាទា រ រីលធ វប ការលៅខាងក នុង កុំរ យទទ រររស អ នក សប មារ រ តមានរដន ថម សតាីរីការអនុែតតាប រករលោយសុែត ថិភាររំលុត សូមលមប លលរហទំរ រ ការអនុែតតាតាមរទរញញាតតាិ តាមរយៈ www dell com regulatory_compliance Prerequisites 1 Remove the optical drive applicable ...

Страница 61: ...ការអនុែតតាប រករលោយសុែត ថិភាររំលុត សូមលមប លលរហទំរ រ ការអនុែតតាតាមរទរញញាតតាិ តាមរយៈ www dell com regulatory_compliance Procedure NOTE This procedure is applicable only for computers shipped with non touchscreen displays Align the display bezel with the display back cover and antenna assembly and then gently snap the display bezel into place Post requisites 1 Replace the display assembly 2 Replace th...

Страница 62: ...scribe gently pry the camera off the display back cover and antenna assembly 2 Disconnect the camera cable from the camera module 3 Lift the camera module from the display back cover and antenna assembly ការរដាទរកាលមរ ា ចំណាំ មុននឹងលធ វប ការលៅខាងក នុងកុំរ យទទ រររស អ នក សូមអានរ ត មានសុែត ថិភារដែលមកពាមួយនឹងកុំរ យទទ រររស អ នក និងអនុែតតាតាមជំហាននានាលៅក នុង មុននឹងលធ វប ការលៅខាងក នុងកុំរ យទទ រររស អ នក រ...

Страница 63: ...ការដណនាំលៅក នុងរនាទា រ រីលធ វប ការលៅខាងក នុង កុំរ យទទ រររស អ នក សប មារ រ តមានរដន ថម សតាីរីការអនុែតតាប រករលោយសុែត ថិភាររំលុត សូមលមប លលរហទំរ រ ការអនុែតតាតាមរទរញញាតតាិ តាមរយៈ www dell com regulatory_compliance Prerequisites 1 Remove the optical drive applicable only to computers shipped with optical drive 2 Remove the base cover 3 Remove the wireless card 4 Remove the display assembly 5 Remove the di...

Страница 64: ... រ រីលធ វប ការលៅខាងក នុងកុំរ យទទ រររស អ នក សូមអនុែតតាតាមការដណនាំលៅក នុងរនាទា រ រីលធ វប ការលៅខាងក នុង កុំរ យទទ រររស អ នក សប មារ រ តមានរដន ថម សតាីរីការអនុែតតាប រករលោយសុែត ថិភាររំលុត សូមលមប លលរហទំរ រ ការអនុែតតាតាមរទរញញាតតាិ តាមរយៈ www dell com regulatory_compliance Procedure NOTE This procedure is applicable only for computers shipped with non touchscreen displays 1 Place the display panel on a flat ...

Страница 65: ... to computers shipped with optical drive ប តលចសកលអប កង ការលោះប តលចសកលអប កង ចំណាំ មុននឹងលធ វប ការលៅខាងក នុងកុំរ យទទ រររស អ នក សូមអានរ ត មានសុែត ថិភារដែលមកពាមួយនឹងកុំរ យទទ រររស អ នក និងអនុែតតាតាមជំហាននានាលៅក នុង មុននឹងលធ វប ការលៅខាងក នុងកុំរ យទទ រររស អ នក រនាទា រ រីលធ វប ការលៅខាងក នុងកុំរ យទទ រររស អ នក សូមអនុែតតាតាមការដណនាំលៅក នុងរនាទា រ រីលធ វប ការលៅខាងក នុង កុំរ យទទ រររស អ នក សប មារ រ តមានរដន ថម ស...

Страница 66: ...ុំរ យទទ រររស អ នក សូមអានរ ត មានសុែត ថិភារដែលមកពាមួយនឹងកុំរ យទទ រររស អ នក និងអនុែតតាតាមជំហាននានាលៅក នុង មុននឹងលធ វប ការលៅខាងក នុងកុំរ យទទ រររស អ នក រនាទា រ រីលធ វប ការលៅខាងក នុងកុំរ យទទ រររស អ នក សូមអនុែតតាតាមការដណនាំលៅក នុងរនាទា រ រីលធ វប ការលៅខាងក នុង កុំរ យទទ រររស អ នក សប មារ រ តមានរដន ថម សតាីរីការអនុែតតាប រករលោយសុែត ថិភាររំលុត សូមលមប លលរហទំរ រ ការអនុែតតាតាមរទរញញាតតាិ តាមរយៈ www dell com regulat...

Страница 67: ... តមានរដន ថម សតាីរីការអនុែតតាប រករលោយសុែត ថិភាររំលុត សូមលមប លលរហទំរ រ ការអនុែតតាតាមរទរញញាតតាិ តាមរយៈ www dell com regulatory_compliance Prerequisites 1 Remove the optical drive applicable only to computers shipped with optical drive 2 Remove the base cover 3 Remove the wireless card 4 Remove the display assembly 5 Remove the display bezel 6 Remove the display panel 7 Remove the display hinges Proce...

Страница 68: ...ll com regulatory_compliance Procedure NOTE This procedure is applicable only for computers shipped with non touchscreen displays 1 Route the display cable along the routing guides starting from the bottom of the display near the hinges 2 Route the rest of the display cable along the routing guides on the left side of the display back cover and antenna assembly 3 Slide the camera cable into the co...

Страница 69: ...s card 4 Remove the display assembly 5 Remove the display bezel 6 Remove the camera 7 Remove the display panel 8 Remove the display hinges 9 Remove the display cable Procedure NOTE This procedure is applicable only for computers shipped with non touchscreen displays After performing all the above steps we are left with the display back cover and antenna assembly ការោក រប មរលប កាយលអប កង និងលប រងងែំ...

Страница 70: ...ay cable 2 Replace the display hinges 3 Replace the display panel 4 Replace the camera 5 Replace the display bezel 6 Replace the display assembly 7 Replace the wireless card 8 Replace the base cover 9 Replace the optical drive applicable only to computers shipped with optical drive 70 ការលោះ និងែំលេប ងសមាសភារនានា ...

Страница 71: ...ownload លែប ម បីទាញយកប ោយែឺអូឌីយាូសប មារ កុំរ យទទ រររស អ នក 16 រនាទា រ រីរញចារ ការទាញយក សូមចូលលៅកាន ថតកកស រដែលអ នករានរក សាទុកកកស រប ោយែឺអូឌីយាូ 17 ចុចរីរែងលលប រូរតំណាងថតកកស រប ោយែឺអូឌីយាូ លហប យអនុែតតាតាមការដណនាំលៅលលប លអប កង លែប ម បីែំលេប ងប ោយលែស ការទាញយកប ោយែឺរណា តា ញ 1 លរប កកុំរ យទទ រររស អ នក 2 ចូលលមប លលរហទំរ រ www dell com support 3 ងយរញចាទលស ួ កលសងកម មររស កុំរ យទទ ររស អ នក រនាទា រ មកចុចលលប ពាក...

Страница 72: ...ាក កាល សូមចុចលលប Category 14 ចុចលលប Chipset ក នុងតារ ងដែលនាួ ក ចុះ 15 ចុចលលប download លែប ម បីទាញយកប ោយែឺសំណុ ំឈីរសប មារ កុំរ យទទ រររស អ នក 16 រនាទា រ រីរញចារ ការទាញយក សូមចូលលៅកាន ថតកកស រដែលអ នករានរក សាទុកកកស រប ោយែឺសំណុ ំឈីរ 17 ចុចរីរែងលលប រូរតំណាងថតកកស រប ោយលែសសំណុ ំឈីរ លហប យអនុែតតាតាមការដណនាំលៅលលប លអប កង លែប ម បីែំលេប ងប ោយលែស ការទាញយកប ោយែឺឧរករណ អានកាតលមលឌស 1 លរប កកុំរ យទទ រររស អ នក 2 ចូលលមប ល...

Страница 73: ...ុំរ យទទ រររស អ នក 16 រនាទា រ រីរញចារ ការទាញយក សូមចូលលៅកាន ថតកកស រដែលអ នករានរក សាទុកកកស រប ោយលែស WiFi 17 ចុចរីរែងលលប រូរតំណាងថតកកស រប ោយលែស WiFi លហប យអនុែតតាតាមការដណនាំលៅលលប លអប កង លែប ម បីែំលេប ងប ោយែឺ ការទាញយកប ោយលែស USB 1 លរប កកុំរ យទទ រររស អ នក 2 ចូលលមប លលរហទំរ រ www dell com support 3 ងយរញចាទលស ួ កលសងកម មររស កុំរ យទទ ររស អ នក រនាទា រ មកចុចលលប ពាក យ Submit ចំណាំ លរប សិនអ នកមិនមានស ួ កលសងកម ម សូ...

Страница 74: ...tall លែប ម បីទាញយក និងែំលេប ងរចចាុរ បន នភារដនប ោយលែសទាំងអស សប មារ កុំរ យទទ រររស អ នក 10 លប ជប សលរសសទីតាំសប មារ រក សាទុកកកស រ 11 ប រសិនលោតរង ហា ញលេប ង សូមកកភារនឹងសំលណប ររី User Account Control លែប ម បីលធ វប ការផ ួ ស រតាទរលលប ប ររ ន ធ 12 កម មែិធីែំលេប ងប ោយលែស និងរចចាុរ បន នភារទាំងអស ដែលរានកំណត អតតាសញ ញា ណរាន ចំណាំ មិនដមនកកស រទាំងអស នឹងប តទែែំលេប ងលោយស វ យប រែតតាិលនាះលេប យ រិនិត យលសចកតាីសលង ខរដនការែ...

Страница 75: ... F2 លនាះការចុចលនះប តទែរានរាត រង ប រសិនលរប អ នករង ចាំយូរលរក លហប យនិមិតតាសញ ញា ប ររ ន ធ ប រតិរតតាិការរង ហា ញលេប ង សូមរនតារង ចាំរហូតែល អ នកលញប ញរូរកុំរ យទទ រលលប ដលទាតុ រនាទា រ មករិទកុំរ យទទ រររស អ នក រួចរ យាយ មមតាងលទសត ប រារ ចុចរុករក ចំណាំ ចំលពាះជលប មប ស System Setup ែំលេប ងប ររ ន ធ ភារលប ចប ន ការផ ួ ស រដាទរដែលអ នកលធ វប ប តទែរានថតទុក រាុដនតាមិនទាន មានប រសិទ ធភារលទលុះប តាដតអ នកចារ លលដាប មប ររ ន ធលេប ង...

Страница 76: ...រស អ នក 1 លោះ រប មររាត 2 ផ ដា ច ដខសេថ មលចញរីផ ទា ំងប ររ ន ធ 3 លោះ ថ មប រារ សំដរាត 4 រង ចាំមួយនាទី 5 ោក ថ មប រារ សំដរាតចូល 6 ភា ជ រ ដខសេថ មលៅនឹងផ ទា ំងប ររ ន ធ 7 ោក រប មររាតចូល ការសមាអា ត BIOS តលមួប ងប ររ ន ធ និង លលខសមា ង ត ប ររ ន ធ លែប ម បីជប មះប ររ ន ធ ឬពាក យសមា ង ត BIOS សូមលធ វប ការទំនាក ទំនងលៅកាន អ នករលចចាកលទសជំនួយររស ប កុមហ ុន Dell តាមរយៈ www dell com contactdell ចំណាំ សប មារ រ ត មានអំរីរលរសរក...

Страница 77: ... ជុងខាងស ដា ំដល នកខាងលប កាមលែប ម បីលៅកាន ទំរ រដែលមានរង ហា ញ នាតុដែលរានរកលញប ញប តទែរានរង ហា ញ 6 លែប ម បីែំលណប រការលធ វប លតសតាែិនិច ឆ យលៅលលប ឧរករណ ពាក ោក ចុចលលប Yes រាទ ចាស លែប ម បីរញ ឈរ ការលធ វប លតសដាែិនិច ឆ យ 7 លប ជប សលរសសឧរករណ រីផ ទា ំងខាងលឆ វង រួចចុចលលប Run Tests ែំលណប រការលធ វប លតសដា 8 ប រសិនលរប មានរញ ហា ណាមួយ លលខកូែកំហុសនឹងរង ហា ញលេប ង កត ប តាកូែកំហុស និងលលខលលទាបងផ ទា ត លហប យទាក ទងលៅប កុមហ ុន ...

Страница 78: ...ា តឲ យអ នកែិនិច ឆ យរញ ហា ហាែដែរ ជួសជុលកុំរ យទទ រររស អ នក រប មុងទុកកកស រររស អ នក ឬស តា រកុំរ យទទ រររស អ នកលៅកាន ស ថ នភារលែប ម អ នកអាចទាញយកងរីលរហទំរ ររាំប ទររស Dell លែប ម បីលោះប ស យរញ ហា និងជួសជុលកុំរ យទទ រររស អ នកលៅលរលដែលងររ ជ យលែប ម បីរ ូតលៅកាន ប ររ ន ធប រតិរតតាិការរមម លោយស រការររ ជ យដល នកសូហ វដែរ ឬហាែដែរ សប មារ រ ត មានរដន ថមអំរី Dell SupportAssist OS Recovery សូមចូលលមប ល លសសែលណដណនាំអ នកលប រប ប រា...

Страница 79: ...le រិទ លែប ម បីរិទអង គចងចាំ Intel Optane ចំណាំ ចំលពាះកុំរ យទទ រដែលលប រប ប រាស អង គចងចាំ Intel Optane ពាទំហំលទាុករមម សូមកុំរិទែំលណប រការអង គចងចាំ Intel Optane ជលប មប ស Disable រិទ នឹងដប រពារណ ប រលលះ 4 ចុច Yes រាទ ចាស ប រសិនលរប អ នកទទួលយកលសចកតាីរប មាម ែំលណប រការដនការរិទរានរង ហា ញលចញ 5 ចុច Reboot រសរ ូត លែប ម បីរញចារ ការរិទអង គចងចាំ Intel Optane ររស អ នក រួចលរប កកុំរ យទទ រស រពាថ មី ការជប មះ BIOS ប រា...

Страница 80: ...ប តទែរានរិទ លហប យថ មប តទែរានែកលចញក លោយ ែិធីខាងលប កាមលតាល នូែការដណនាំរីរលរសររំលោះថាមរលលសសសល រនាទា រ រីរិទលចញ 1 រិទកុំរ យទទ រររស អ នក 2 ផ តា ច អាោរ ទ រថាមរលលចញរីកុំរ យទទ រ 3 ចុចរ ូតុងថាមរលឲ យពារ រយៈលរល 15 ែិនាទីលែប ម បីរំលោះថាមរលលសសសល លចញ 4 ភា ជ រ អាោរ ទ រថាមរលលៅនឹងកុំរ យទទ រររស អ នក 5 លរប កកុំរ យទទ រររស អ នក 80 ការលោះប ស យរញ ហា ...

Страница 81: ...ត ថរទដែលទាក ទង ដស វងយល និងែឹងរ ត មានែូចខាងលប កាមអំរីលលិតលលររស អ នក លក ខណៈរលចចាកលទសដនលលិតលល ប ររ ន ធែំលណប រការ ការតលមួប ង និងលប រប ប រាស លលិតលលររស អ នក ការរប មុងទុកទិន នន យ ការលោះប ស យរញ ហា និងការែិភារ ការស តា ររីលរ ងចប ក និងប ររ ន ធ រ ត មាន BIOS សូមចូលលមប ល Me and My Dell តាមរយៈលរហទំរ រ www dell com support manuals លែប ម បីដស វងរក Me and My Dell ដែលទាក ទងនឹងលលិតលលររស អ នក សូមកំណត អតតាសញ ញា ណលលិតលល...

Отзывы: