


Replacing the display assembly
WARNING: Before working inside your computer, read the safety
information that shipped with your computer and follow the steps in
. After working inside your computer, follow
the instructions in
After working inside your computer
. For more safety best
practices, see the Regulatory Compliance home page at
.
Procedure
CAUTION: Place the computer on a soft and clean surface to avoid
scratching the display.
1
Place the display assembly on the palm-rest assembly.
2
Align the screw holes on the display hinges with the screw holes on the palm-
rest assembly.
3
Replace the four screws (M2.5x6 Big Head) that secure the display assembly to
the palm-rest assembly.
4
Close the display and turn the computer over.
5
Adhere the tape that secures the antenna cables to the palm-rest assembly.
6
Slide the display cable and the touch-screen board cable into their respective
connectors on the system board and close the latches to secure the cables.
7
Adhere the tapes that secure the display cable and the touch-screen board cable
to their respective connectors on the system board.
Post-requisites
1
Replace the
.
2
Replace the
.
3
Replace the
.
77
Содержание Inspiron 17 7000 Series
Страница 28: ...Post requisites 1 Replace the battery 2 Replace the base cover 28 ...
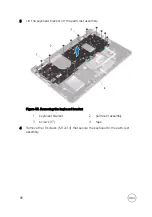
Страница 55: ...4 Lift the fan off the palm rest assembly Figure 19 Removing the fan 1 screws 2 2 fan 3 tape 4 fan cable 55 ...
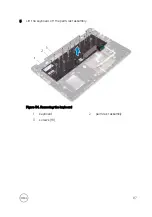
Страница 76: ...8 Lift the display assembly off the palm rest assembly Figure 28 Display assembly 1 display assembly 76 ...
Страница 89: ...12 Replace the base cover 89 ...
Страница 93: ...19 Replace the base cover 93 ...
Страница 99: ...Figure 38 Display back cover and antenna assembly 1 display back cover and antenna assembly 99 ...


