background image

About this task

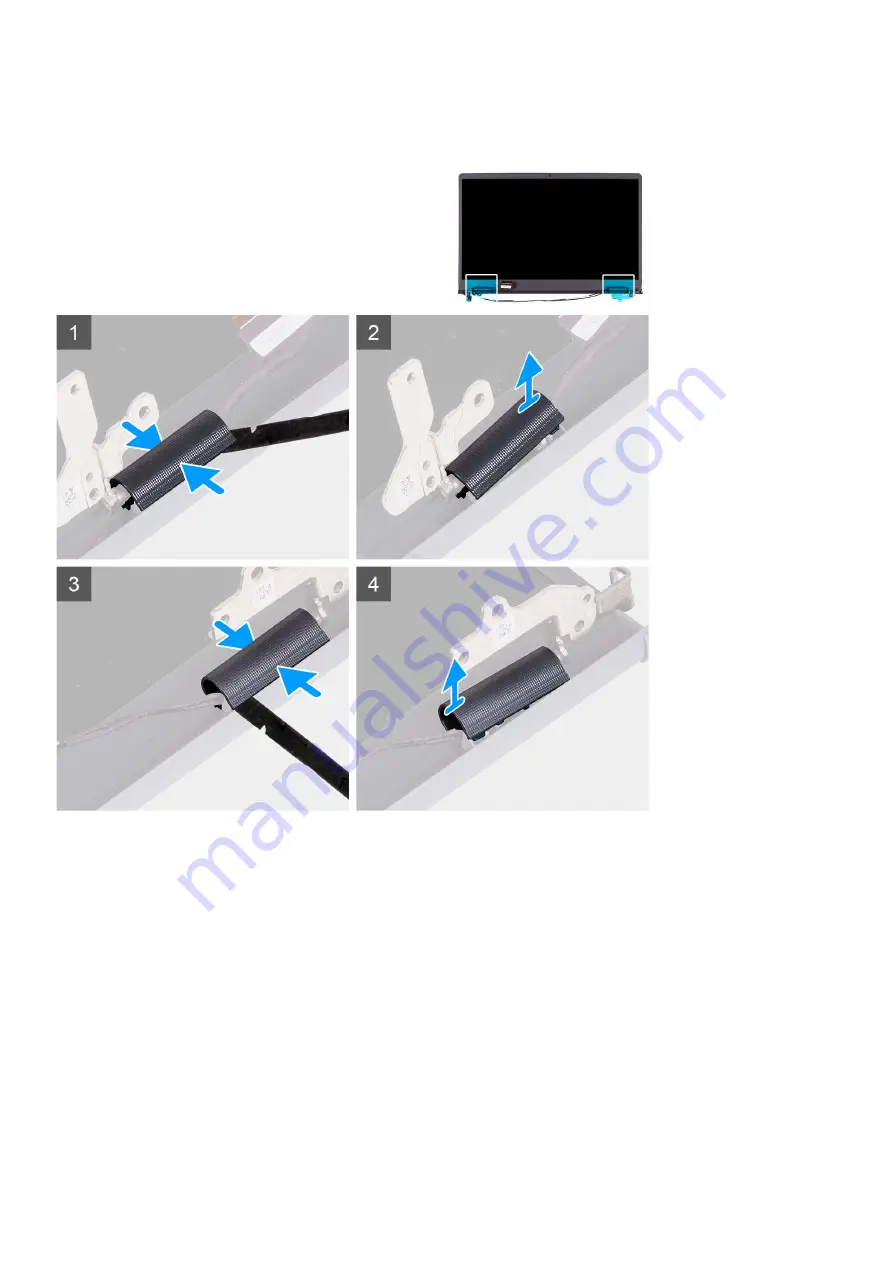
The following images indicate the location of the display hinge caps and provide a visual representation of the removal
procedure.

Steps

1. Place the system on the edge of a flat surface and gently open the display hinges to at least 90 degrees.
2. Pinch the left-hinge cap in the center.
3. Using a plastic scribe, pry open the left-hinge cap from its right side and remove it from the left hinge.
4. Pinch the right-hinge cap in the center.
5. Using a plastic scribe, pry open the right-hinge cap from its left side and remove it from the right hinge.

Installing the display hinge caps

Prerequisites

If you are replacing a component, remove the existing component before performing the installation procedure.

48

Removing and installing components

Содержание Inspiron 15 3521

Страница 1: ...Inspiron 15 3521 Service Manual Regulatory Model P112F Regulatory Type P112F004 February 2022 Rev A00 ...

Страница 2: ...ential damage to hardware or loss of data and tells you how to avoid the problem WARNING A WARNING indicates a potential for property damage personal injury or death 2022 Dell Inc or its subsidiaries All rights reserved Dell EMC and other trademarks are trademarks of Dell Inc or its subsidiaries Other trademarks may be trademarks of their respective owners ...

Страница 3: ...se cover 17 Battery 18 Lithium ion battery precautions 18 Removing the 3 cell battery 19 Installing the 3 cell battery 20 Removing the 4 cell battery 21 Installing the 4 cell battery 22 Memory module 23 Removing the memory module 23 Installing the memory module 24 M 2 solid state drive 25 Removing the M 2 2230 solid state drive 25 Installing the M 2 2230 solid state drive 26 Removing the M 2 2280 ...

Страница 4: ... system board 63 Installing the system board 66 I O daughter board flexible flat cable 70 Removing the I O daughter board flexible flat cable 70 Installing the I O daughter board flexible flat cable 71 I O daughter board 72 Removing the I O daughter board 72 Installing the I O daughter board 73 Power button 75 Removing the power button 75 Installing the power button 75 Power button with optional f...

Страница 5: ...system setup password 93 Clearing BIOS System Setup and System passwords 94 Chapter 5 Troubleshooting 95 Handling swollen Lithium ion batteries 95 Dell SupportAssist Pre boot System Performance Check diagnostics 95 Running the SupportAssist Pre Boot System Performance Check 96 Built in self test BIST 96 M BIST 96 LCD Power rail test L BIST 97 LCD Built in Self Test BIST 97 System diagnostic lights...

Страница 6: ...touching anything inside your computer ground yourself by touching an unpainted metal surface such as the metal at the back of the computer While you work periodically touch an unpainted metal surface to dissipate static electricity which could harm internal components CAUTION When you disconnect a cable pull it by its connector or its pull tab not the cable itself Some cables have connectors with...

Страница 7: ...t strap should be secure and in full contact with your skin and ensure that you remove all jewelry such as watches bracelets or rings prior to bonding yourself and the equipment Electrostatic discharge ESD protection ESD is a major concern when you handle electronic components especially sensitive components such as expansion cards processors memory DIMMs and system boards Very slight charges can ...

Страница 8: ...t once per week A wrist strap tester is the best method for doing this test If you do not have your own wrist strap tester check with your regional office to find out if they have one To perform the test plug the wrist strap s bonding wire into the tester while it is strapped to your wrist and push the button to test A green LED is lit if the test is successful a red LED is lit and an alarm sounds...

Страница 9: ...ts that you removed before working on your computer 4 Connect your computer and all attached devices to their electrical outlets 5 Turn on your computer BitLocker CAUTION If BitLocker is not suspended before updating the BIOS the next time you reboot the system it will not recognize the BitLocker key You will then be prompted to enter the recovery key to progress and the system will ask for this o...

Страница 10: ...box This is to ensure that the correct number of screws and correct screw type is restored when the component is replaced NOTE Some computers have magnetic surfaces Ensure that the screws are not left attached to such surfaces when replacing a component NOTE Screw color may vary with the configuration ordered Table 1 Screw list Component Screw type Quantity Screw image Base cover M2x5 Captive scre...

Страница 11: ... Display assembly M2 5x5 4 Display hinges M2 5x3 8 6 System board M2x2 M2x3 5 1 3 I O daughter board M2x3 5 3 Power button M2x2 1 Power button with optional fingerprint reader M2x2 1 Power adapter port M2 5x5 2 Major components of Inspiron 15 3521 The following image shows the major components of Inspiron 15 3521 Removing and installing components 11 ...

Страница 12: ...1 Base cover 2 Battery 3 Speakers 4 Power button assembly 5 Touchpad assembly 6 Touchpad assembly bracket 7 Power adapter port 8 M 2 solid state drive shield 12 Removing and installing components ...

Страница 13: ...t your Dell sales representative for purchase options Secure Digital SD Card Removing the secure digital card Prerequisites 1 Follow the procedure in Before working inside your computer About this task The following images indicate the location of the secure digital card and provide a visual representation of the removal procedure Steps 1 Push the secure digital card to release it from the secure ...

Страница 14: ...ter working inside your computer Base cover Removing the base cover Prerequisites 1 Follow the procedure in Before working inside your computer 2 Remove the secure digital card About this task NOTE Before removing the base cover ensure that there is no secure digital card installed in the secure digital card slot on your system The following images indicate the location of the base cover and provi...

Страница 15: ...Removing and installing components 15 ...

Страница 16: ... base cover starting from the recesses which are located in the U shaped indents at the top edge of the base cover near the hinges 4 Pry open the top side of the base cover and continue working on the left and right sides to open the base cover 5 Lift and remove the base cover off the palm rest and keyboard assembly 6 Use the pull tab to disconnect the battery cable from the connector system board...

Страница 17: ...component remove the existing component before performing the installation procedure About this task The following images indicate the location of the base cover and provide a visual representation of the installation procedure Removing and installing components 17 ...

Страница 18: ...rd assembly Next steps 1 Install the secure digital card 2 Follow the procedure in After working inside your computer Battery Lithium ion battery precautions CAUTION Exercise caution when handling Lithium ion batteries Discharge the battery completely before removing it Disconnect the AC power adapter from the system and operate the computer solely on battery power the battery is fully discharged ...

Страница 19: ... from www dell com or authorized Dell partners and resellers Swollen batteries should not be used and should be replaced and disposed properly For guidelines on how to handle and replace swollen Lithium ion batteries see Handling swollen Lithium ion batteries Removing the 3 cell battery Prerequisites 1 Follow the procedure in Before working inside your computer 2 Remove the secure digital card 3 R...

Страница 20: ...edure Steps 1 Connect the battery cable to the 3 cell battery 2 Place the 3 cell battery along with the battery cable on the palm rest and keyboard assembly NOTE Connect the hard drive flexible flat cable to its connector on the system board after placing the 3 cell battery in its slot on the palm rest and keyboard assembly to avoid tugging of the 3 cell battery on the hard drive flexible flat cab...

Страница 21: ...ell battery to the palm rest and keyboard assembly 2 Lift the 4 cell battery along with the battery cable off the palm rest and keyboard assembly 3 Disconnect and remove the battery cable from the 4 cell battery 4 Carefully push and remove the battery rubber stopper out of the bottom left screw hole of the 4 cell battery NOTE When replacing the 4 cell battery use a plastic scribe to push upward th...

Страница 22: ...the installation procedure About this task The following image indicates the location of the 4 cell battery and provides a visual representation of the installation procedure Steps 1 Carefully push and insert the battery rubber stopper into the bottom left screw hole of the 4 cell battery 22 Removing and installing components ...

Страница 23: ... palm rest and keyboard assembly 5 Replace the four screws M2x3 to secure the 4 cell battery to the palm rest and keyboard assembly Next steps 1 Install the base cover 2 Install the secure digital card 3 Follow the procedure in After working inside your computer Memory module Removing the memory module Prerequisites 1 Follow the procedure in Before working inside your computer 2 Remove the secure ...

Страница 24: ...y module from the memory module slot on the system board Installing the memory module Prerequisites If you are replacing a component remove the existing component before performing the installation procedure About this task The following images indicate the location of the memory module and provide a visual representation of the installation procedure 24 Removing and installing components ...

Страница 25: ...se cover 2 Install the secure digital card 3 Follow the procedure in After working inside your computer M 2 solid state drive Removing the M 2 2230 solid state drive Prerequisites 1 Follow the procedure in Before working inside your computer 2 Remove the secure digital card 3 Remove the base cover About this task NOTE This procedure applies only to systems shipped with a M 2 2230 solid state drive...

Страница 26: ... drive thermal pate off the M 2 2230 solid state drive 3 Slide and remove the M 2 2230 solid state drive from the M 2 card slot on the system board Installing the M 2 2230 solid state drive Prerequisites If you are replacing a component remove the existing component before performing the installation procedure About this task The following images indicate the location of the M 2 2230 solid state d...

Страница 27: ...ng the M 2 2230 solid state drive thermal plate on the system tuck the tabs on the M 2 2230 solid state drive thermal plate under the hooks on the palm rest and keyboard assembly 4 Align the screw hole on the M 2 2230 solid state drive thermal plate with the screw hole on the palm rest and keyboard assembly 5 Replace the screw M2x2 to secure the M 2 2230 solid state drive thermal plate to the palm...

Страница 28: ...your computer 2 Remove the secure digital card 3 Remove the base cover About this task NOTE This procedure applies only to systems shipped with a M 2 2280 solid state drive installed NOTE The M 2 card that is installed on your system depends on the configuration ordered Supported card configurations on the M 2 card slot are M 2 2230 solid state drive M 2 2280 solid state drive The following images...

Страница 29: ...dure Steps 1 Align the notch on the M 2 2280 solid state drive with the tab on the M 2 card slot on the system board 2 Slide the M 2 2280 solid state drive into the M 2 card slot on the system board 3 Place the M 2 2280 solid state drive thermal plate on the M 2 2280 solid state drive NOTE When installing the M 2 2280 solid state drive thermal plate on the system tuck the tabs on the M 2 2280 soli...

Страница 30: ...ram NOTE A list of storage devices are displayed under the System Information in the General group c If you have replaced the primary storage device that had the operating system installed see Reinstall Windows 11 to the Dell factory image using recovery media in the knowledge base article 000192698 2 5 inch hard drive Removing the 2 5 inch hard drive Prerequisites 1 Follow the procedure in Before...

Страница 31: ... interposer with the flexible flat cable from the hard drive 5 Remove the four screws M3x3 that secure the hard drive to the hard drive bracket 6 Remove the hard drive from the hard drive bracket Installing the 2 5 inch hard drive Prerequisites If you are replacing a component remove the existing component before performing the installation procedure About this task The following images indicate t...

Страница 32: ...e interposer and cable on to the palm rest and keyboard assembly 6 Align the screw holes on the hard drive assembly to the screw holes on the palm rest and keyboard assembly 7 Replace the four screws M2x3 5 to secure the hard drive assembly to the palm rest and keyboard assembly 8 Connect the hard drive flexible flat cable to the system board and close the latch to secure the cable Next steps 1 In...

Страница 33: ...the wireless card and provide a visual representation of the removal procedure Steps 1 Remove the screw M2x3 5 that secures the wireless card bracket to the system board 2 Slide and remove the wireless card bracket from the wireless card 3 Disconnect the WLAN antenna cables from the connectors on the wireless card 4 Slide and remove the wireless card from the wireless card slot on the system board...

Страница 34: ...enna cable color scheme for the wireless card supported by your system Table 2 WLAN Antenna cable color scheme Connectors on the wireless card Antenna cable color Main white triangle White Auxiliary black triangle Black 2 At an angle slide the wireless card into the wireless card slot on the system board 3 Place the wireless card bracket on the wireless card 4 Align the screw hole on the wireless ...

Страница 35: ...rd 3 Remove the base cover About this task The following image indicates the location of the speakers and provides a visual representation of the removal procedure Steps 1 Disconnect the speaker cable from the connector on the system board NOTE To disconnect the speaker cable featuring an eight pin connector from the system board pry up the bottom side of the cable connector s head first and then ...

Страница 36: ...isites If you are replacing a component remove the existing component before performing the installation procedure About this task NOTE If the rubber grommets are pushed out when removing the speakers push them back in before replacing the speakers The following image indicates the location of the speakers and provides a visual representation of the installation procedure 36 Removing and installin...

Страница 37: ...ong the bottom side of the palm rest and keyboard assembly over the WLAN antenna cables Then secure the speaker cable into the routing guides on the palm rest and keyboard assembly NOTE The speaker cable must be routed through the routing guides to avoid damaging the speaker cable when installing the base cover 3 Connect the speaker cable to the connector on the system board Next steps 1 Install t...

Страница 38: ...ard thermal plate The oils in your skin can reduce the heat transfer capability of the thermal grease The following image indicates the location of the system board thermal plate and provides a visual representation of the removal procedure Steps 1 Remove the two screws M2x5 and four screws M2x3 that secure the system board thermal plate to the system board NOTE Loosen the four screws M2x3 in the ...

Страница 39: ...wo screws M2x5 and four screws M2x3 to secure the system board thermal plate to the system board NOTE Tighten the four screws M2x3 in the sequential order mentioned on the system board thermal plate 1 2 3 4 Next steps 1 Install the base cover 2 Install the secure digital card 3 Follow the procedure in After working inside your computer Touchpad Removing the touchpad Prerequisites 1 Follow the proc...

Страница 40: ...e flat cable from the connector on the system board 6 Remove the touchpad along with the touchpad flexible flat cable from the system Installing the touchpad Prerequisites If you are replacing a component remove the existing component before performing the installation procedure About this task NOTE Ensure that the touchpad is aligned with the guides available on the palm rest and keyboard assembl...

Страница 41: ...e touchpad 5 Align the screw holes on the touchpad bracket to the screw holes on the palm rest and keyboard assembly 6 Replace the three screws M2x2 to secure the touchpad bracket to the palm rest and keyboard assembly 7 Connect the hard drive flexible flat cable to the connector on the system board Next steps 1 Install the 3 cell battery or the 4 cell battery whichever applicable 2 Install the ba...

Страница 42: ... working inside your computer 2 Remove the secure digital card 3 Remove the base cover 4 Remove the wireless card About this task The following images indicate the location of the display assembly and provide a visual representation of the removal procedure 42 Removing and installing components ...

Страница 43: ...Steps 1 Disconnect the display cable and the speaker cable from the respective connectors on the system board Removing and installing components 43 ...

Страница 44: ...d remove it from the display assembly NOTE The power adapter port is secured in place by the left display hinge There is no screw tape or adhesives securing the power adapter port to the palm rest As a result technicians should take note of whether the power adapter port has fallen out of the system during subsequent removal procedures Installing the display assembly Prerequisites If you are repla...

Страница 45: ...Removing and installing components 45 ...

Страница 46: ...Steps 1 Place the palm rest and keyboard assembly on a flat surface 46 Removing and installing components ...

Страница 47: ...the display hinges to the palm rest and keyboard assembly 5 Route the speaker cable through the routing guides on the palm rest and keyboard assembly 6 Route the WLAN antenna cables into the routing hooks on the palm rest and keyboard assembly and under the speaker cable 7 Connect the display cable and speaker cable to the respective connectors on the system board Next steps 1 Install the wireless...

Страница 48: ...t hinge cap in the center 3 Using a plastic scribe pry open the left hinge cap from its right side and remove it from the left hinge 4 Pinch the right hinge cap in the center 5 Using a plastic scribe pry open the right hinge cap from its left side and remove it from the right hinge Installing the display hinge caps Prerequisites If you are replacing a component remove the existing component before...

Страница 49: ...e right hinge cap down on the right hinge until it clicks in place 3 Align the rib inside the left hinge cap to the right outer side of the left hinge 4 Push the left hinge cap down on the right hinge until it clicks in place Next steps 1 Install the display assembly 2 Install the wireless card 3 Install the base cover 4 Install the secure digital card 5 Follow the procedure in After working insid...

Страница 50: ... of the display bezel and provides a visual representation of the removal procedure Steps 1 Using a plastic scribe pry open the display bezel from the outer edge of openings at the bottom side of the display assembly near the display hinges 2 Carefully pry open the outer edge of the bottom side of the display bezel 3 Using the plastic scribe pry open the outside edge of the left right and top side...

Страница 51: ... display panel and display assembly on a clean and flat surface 2 Align and place the display bezel on the display assembly 3 Starting from the top corner press on the display bezel and work around the entire bezel until it clicks onto the display assembly Next steps 1 Install the display hinge caps 2 Install the display assembly 3 Install the wireless card 4 Install the base cover 5 Install the s...

Страница 52: ...e wireless card 5 Remove the display assembly 6 Remove the display hinge caps 7 Remove the display bezel About this task The following images indicate the location of the display hinges and provide a visual representation of the removal procedure Steps 1 Remove the three screws M2 5x3 8 that secure the left hinge to the display panel and back cover 52 Removing and installing components ...

Страница 53: ...rforming the installation procedure About this task The following images indicate the location of the display hinges and provide a visual representation of the installation procedure Steps 1 Align and place the left hinge on the display assembly 2 Replace the three screws M2 5x3 8 to secure the left hinge to the display panel and back cover 3 Align and place the right hinge on the display assembly...

Страница 54: ... the display panel Prerequisites 1 Follow the procedure in Before working inside your computer 2 Remove the secure digital card 3 Remove the base cover 4 Remove the wireless card 5 Remove the display assembly 6 Remove the display hinge caps 7 Remove the display bezel 8 Remove the display hinges About this task The following images indicate the location of the display panel and provide a visual rep...

Страница 55: ...Removing and installing components 55 ...

Страница 56: ... back the Mylar tape securing the display cable on the rear of the display panel NOTE Ensure that the panel has a clean and smooth surface to rest on to prevent damage 6 Disconnect the display cable from the display panel assembly and lift the display panel away from the system NOTE Do not remove the metal brackets from the panel Installing the display panel Prerequisites If you are replacing a co...

Страница 57: ...Removing and installing components 57 ...

Страница 58: ...p of the display back cover 6 Gently push down on the edges of the display panel until it clicks into the tabs on the display back cover Next steps 1 Install the display hinges 2 Install the display bezel 3 Install the display hinge caps 4 Install the display assembly 5 Install the wireless card 6 Install the base cover 7 Install the secure digital card 8 Follow the procedure in After working insi...

Страница 59: ...om its connector on the camera module 2 Using a plastic scribe gently pry the camera off the display back cover and antenna assembly 3 Remove the camera module from the display assembly Installing the camera Prerequisites If you are replacing a component remove the existing component before performing the installation procedure About this task The following images indicate the location of the came...

Страница 60: ...ure digital card 9 Follow the procedure in After working inside your computer Display cable Removing the display cable Prerequisites 1 Follow the procedure in Before working inside your computer 2 Remove the secure digital card 3 Remove the base cover 4 Remove the wireless card 5 Remove the display assembly 6 Remove the display hinge caps 7 Remove the display bezel 8 Remove the display hinges 9 Re...

Страница 61: ...lay back cover Installing the display cable Prerequisites If you are replacing a component remove the existing component before performing the installation procedure About this task The following image indicates the location of the display cable and provides a visual representation of the installation procedure Removing and installing components 61 ...

Страница 62: ...steps 1 Install the display panel 2 Install the display hinges 3 Install the display bezel 4 Install the display hinge caps 5 Install the display assembly 6 Install the wireless card 7 Install the base cover 8 Install the secure digital card 9 Follow the procedure in After working inside your computer 62 Removing and installing components ...

Страница 63: ...tate drive installed 6 Remove the wireless card 7 Remove the system board thermal plate if required 8 Remove the display assembly About this task The following image indicates the connectors on your system board 1 I O daughter board FFC connector 2 eDP connector 3 DC in port connector 4 Keyboard FFC connector 5 Keyboard backlight FFC connector 6 Battery connector 7 Memory module connector 8 Touchp...

Страница 64: ...oard thermal plate attached to it in order to simplify the procedure and preserve the thermal bond between the system board and system board thermal plate The following images indicate the location of the system board and provide a visual representation of the removal procedure 64 Removing and installing components ...

Страница 65: ... c Keyboard FFC d Keyboard backlight FFC if applicable NOTE This step applies only to systems shipped with a keyboard backlight installed e Touchpad FFC f Hard disk drive FFC if applicable NOTE This step applies only to systems shipped with a 2 5 inch hard disk drive installed Removing and installing components 65 ...

Страница 66: ... the system board thermal plate to the palm rest and keyboard assembly 3 Carefully lift and remove the system board away from the palm rest and keyboard assembly Installing the system board Prerequisites If you are replacing a component remove the existing component before performing the installation procedure About this task The following image indicates the connectors on your system board 66 Rem...

Страница 67: ...drive FFC connector 10 Wireless card connector 11 Speaker cable connector 12 Solid state drive connector NOTE When removing the system board to replace access other parts the system board can be installed with the system board thermal plate attached to it in order to simplify the procedure and preserve the thermal bond between the system board and system board thermal plate Removing and installing...

Страница 68: ...The following images indicate the location of the system board and provide a visual representation of the installation procedure 68 Removing and installing components ...

Страница 69: ... Align the screw holes on the system board with the screw holes on the palm rest and keyboard assembly NOTE When installing the system board with the system board thermal plate replace the two screws M2x5 to secure the system board thermal plate to the palm rest and keyboard assembly Removing and installing components 69 ...

Страница 70: ...d Next steps 1 Install the display assembly 2 Install the system board thermal plate if applicable 3 Install the wireless card 4 Install the M 2 2230 solid state drive or the M 2 2280 solid state drive whichever applicable NOTE This procedure applies only to systems shipped with a M 2 solid state drive installed 5 Install the memory module 6 Install the base cover 7 Install the secure digital card...

Страница 71: ... I O daughter board flexible flat cable from the connector on the system board 3 Lift the I O daughter board flexible flat cable off the palm rest and keyboard assembly Installing the I O daughter board flexible flat cable Prerequisites If you are replacing a component remove the existing component before performing the installation procedure About this task The following image indicates the locat...

Страница 72: ...oard flexible flat cable connector to secure it to the I O daughter board Next steps 1 Install the base cover 2 Install the secure digital card 3 Follow the procedure in After working inside your computer I O daughter board Removing the I O daughter board Prerequisites 1 Follow the procedure in Before working inside your computer 2 Remove the secure digital card 3 Remove the base cover 4 Remove th...

Страница 73: ...r board if applicable NOTE This step applies only to systems shipped with a fingerprint reader installed 5 Remove the three screws M2x3 5 that secure the I O daughter board in place to the palm rest and keyboard assembly 6 Lift the I O daughter board off the palm rest and keyboard assembly Installing the I O daughter board Prerequisites If you are replacing a component remove the existing componen...

Страница 74: ...onnector to secure it to the I O daughter board if applicable NOTE This step applies only to systems shipped with a fingerprint reader installed 6 Connect the I O daughter board flexible flat cable to the connector on the I O daughter board 7 Close the latch on the I O daughter board flexible flat cable connector to secure it to the I O daughter board 8 Close the right hinge towards the I O daught...

Страница 75: ... visual representation of the removal procedure Steps 1 Remove the screw M2x2 that secures the power button to the palm rest and keyboard assembly 2 Lift the power button off the slot on the palm rest and keyboard assembly Installing the power button Prerequisites If you are replacing a component remove the existing component before performing the installation procedure About this task The followi...

Страница 76: ...ng inside your computer Power button with optional fingerprint reader Removing the power button with optional fingerprint reader Prerequisites 1 Follow the procedure in Before working inside your computer 2 Remove the secure digital card 3 Remove the base cover 4 Remove the wireless card 5 Remove the display assembly 6 Remove the I O daughter board About this task NOTE This procedure applies only ...

Страница 77: ...ures the power button with optional fingerprint reader to the palm rest and keyboard assembly 5 Lift the power button with optional fingerprint reader off the slot on the palm rest and keyboard assembly Installing the power button with optional fingerprint reader Prerequisites If you are replacing a component remove the existing component before performing the installation procedure About this tas...

Страница 78: ...ght hinge towards the power button with optional fingerprint reader on the palm rest and keyboard assembly 6 Replace the two screws M2 5x5 to secure the right hinge in place to the palm rest and keyboard assembly Next steps 1 Install the I O daughter board 2 Install the display assembly 3 Install the wireless card 4 Install the base cover 5 Install the secure digital card 6 Follow the procedure in...

Страница 79: ...t on the palm rest and keyboard assembly NOTE The power adapter port is secured in place by the left display hinge There is no screw tape or adhesives securing the power adapter port to the palm rest As a result technicians should take note of whether the power adapter port has fallen out of the system during subsequent removal procedures Installing the power adapter port Prerequisites If you are ...

Страница 80: ...nd keyboard assembly 4 Replace the two screws M2 5x5 to secure the left hinge in place to the palm rest and keyboard assembly Next steps 1 Install the display assembly 2 Install the wireless card 3 Install the base cover 4 Install the secure digital card 5 Follow the procedure in After working inside your computer Display back cover and antenna assembly Removing the display back cover and antenna ...

Страница 81: ... assembly after the pre removal parts procedures have been performed for any display back cover and antenna assembly replacement Steps After performing the pre requisites you are left with the display back cover and antenna assembly Installing the display back cover and antenna assembly Prerequisites If you are replacing a component remove the existing component before performing the installation ...

Страница 82: ...ess card 9 Install the base cover 10 Install the secure digital card 11 Follow the procedure in After working inside your computer Palm rest and keyboard assembly Removing the palm rest and keyboard assembly Prerequisites 1 Follow the procedure in Before working inside your computer 2 Remove the secure digital card 3 Remove the base cover 4 Remove the memory module 5 Remove the M 2 2230 solid stat...

Страница 83: ...te attached to it in order to simplify the procedure and preserve the thermal bond between the system board and system board thermal plate NOTE The palm rest and keyboard assembly cannot be further disassembled once all the pre removal parts procedures are completed If the keyboard is malfunctioning and is required to be replaced replace the entire palm rest and keyboard assembly The image below s...

Страница 84: ...hichever applicable 3 Install the power adapter port 4 Install the I O daughter board 5 Install the I O daughter board flexible flat cable 6 Install the touchpad 7 Install the display assembly 8 Install the 3 cell battery or the 4 cell battery whichever applicable 9 Install the speakers 10 Install the wireless card 11 Install the 2 5 inch hard disk drive if applicable NOTE This procedure applies o...

Страница 85: ...rivers and downloads When troubleshooting downloading or installing drivers it is recommended that you read the Dell Knowledge Based article Drivers and Downloads FAQ 000123347 3 Drivers and downloads 85 ...

Страница 86: ...g or disabling base devices BIOS overview The BIOS manages data flow between the computer s operating system and attached devices such as hard disk video adapter keyboard mouse and printer Entering BIOS setup program Steps 1 Turn on your computer 2 Press F2 immediately to enter the BIOS setup program NOTE If you wait too long and the operating system logo appears continue to wait until you see the...

Страница 87: ...m setup options NOTE Depending on your system and its installed devices the items that are listed in this section may or may not appear Table 4 System setup options Main menu Main System Time Displays the current time in hh mm ss format System Date Displays the current date in mm dd yyyy format BIOS Version Displays the BIOS version Product Name Displays the model number of your system Service Tag...

Страница 88: ...to disable the USB wake support feature NOTE If USB PowerShare is enabled a device that is connected to the USB PowerShare connector may not wake the system NOTE To enable wake support for the fingerprint reader the USB Wake Support is required to be enabled in the BIOS To enable USB wake support complete the steps in the knowledge base article 000131547 Default Disabled SATA Operation Allows you ...

Страница 89: ... user primary hard drive or an external USB key BIOS Auto Recovery Enables BIOS to automatically recover BIOS without user actions Default Disabled SupportAssist System Resolution Auto OS Recovery Threshold Controls the automatic boot flow for SupportAssist System Resolution Console and for the Dell OS Recovery tool Default 2 SupportAssist OS Recovery Enables or disables the boot flow for the Supp...

Страница 90: ...re TPM Default Enabled PPI Bypass for Clear Command Allows you to control the TPM Physical Presence Interface PPI When enabled this setting allows the operating system to skip BIOS PPI user prompts when issuing the Clear command Changes to this setting take effect immediately Default Disabled TPM Security TPM 2 0 Security options UEFI Firmware Capsule Updates Enables or disables BIOS updates throu...

Страница 91: ...d to download the BIOS file for your computer 7 After the download is complete browse the folder where you saved the BIOS update file 8 Double click the BIOS update file icon and follow the on screen instructions For more information see knowledge base article 000124211 at www dell com support Updating the BIOS using the USB drive in Windows About this task CAUTION If BitLocker is not suspended be...

Страница 92: ...ot menu can use this function Updating from the One Time boot menu To update your BIOS from the F12 One Time boot menu you need the following USB drive formatted to the FAT32 file system key does not have to be bootable BIOS executable file that you downloaded from the Dell Support website and copied to the root of the USB drive AC power adapter that is connected to the computer Functional compute...

Страница 93: ...w password field and click OK 4 Press Esc and save the changes as prompted by the pop up message 5 Press Y to save the changes The computer restarts Deleting or changing an existing system setup password Prerequisites Ensure that the Password Status is Unlocked in the System Setup before attempting to delete or change the existing System and or Setup password You cannot delete or change an existin...

Страница 94: ...ut this task To clear the system or BIOS passwords contact Dell technical support as described at www dell com contactdell NOTE For information on how to reset Windows or application passwords refer to the documentation accompanying Windows or your application 94 BIOS setup ...

Страница 95: ...the battery Do not bend the battery Do not use tools of any type to pry on or against the battery If a battery gets stuck in a device as a result of swelling do not try to free it as puncturing bending or crushing a battery can be dangerous Do not attempt to reassemble a damaged or swollen battery into a laptop Swollen batteries that are covered under warranty should be returned to Dell in an appr...

Страница 96: ...sues error codes are displayed Note the error code and validation number and contact Dell Built in self test BIST M BIST M BIST Built In Self Test is the system board s built in self test diagnostics tool that improves the diagnostics accuracy of system board embedded controller EC failures NOTE M BIST can be manually initiated before POST Power On Self Test How to run M BIST NOTE M BIST must be i...

Страница 97: ...e flickering distortion clarity issues fuzzy or blurry image horizontal or vertical lines color fade etc it is always a good practice to isolate the LCD screen by running the Built In Self Test BIST How to invoke LCD BIST Test 1 Power off the Dell laptop 2 Disconnect any peripherals that are connected to the laptop Connect only the AC adapter charger to the laptop 3 Ensure that the LCD screen is c...

Страница 98: ... If problem persists replace the system board 3 6 SBIOS flash corruption Flash latest BIOS version If problem persists replace the system board 3 7 ME error Flash latest BIOS version If problem persists replace the system board NOTE Blinking 3 3 3 LEDs on Lock LED Caps Lock or Nums Lock Power button LED without Fingerprint reader and Diagnostic LED indicates failure to provide input during LCD pan...

Страница 99: ... PC For more information see Dell Windows Backup Media and Recovery Options WiFi power cycle About this task If your computer is unable to access the internet due to WiFi connectivity issues a WiFi power cycle procedure may be performed The following procedure provides the instructions on how to conduct a WiFi power cycle NOTE Some ISPs Internet Service Providers provide a modem router combo devic...

Страница 100: ... the power button for 20 seconds to drain the flea power 6 Install the battery 7 Install the base cover 8 Connect the power adapter to your computer 9 Turn on your computer NOTE For more information about performing a hard reset see the knowledge base article 000130881 at www dell com support 100 Troubleshooting ...

Страница 101: ...r Express Service Code at www dell com support For more information on how to find the Service Tag for your computer see Locate the Service Tag on your computer Dell knowledge base articles for a variety of computer concerns 1 Go to www dell com support 2 On the menu bar at the top of the Support page select Support Knowledge Base 3 In the Search field on the Knowledge Base page type the keyword t...

Отзывы: