


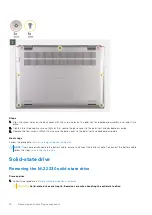


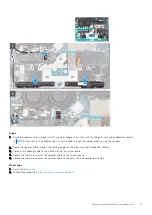

Steps
1. Remove the four screws (M2x4) that secure the base cover to the palm-rest and keyboard assembly.
2. Loosen the three captive screws (M2x6) that secure the base cover to the palm-rest and keyboard assembly.
3. Pry the base cover from the gap created between the base cover and palm-rest and keyboard assembly, and continue to
work on the sides to open the base cover.
4. Lift the base cover off the palm-rest and keyboard assembly.
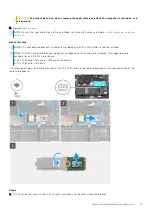
Installing the base cover
Prerequisites
If you are replacing a component, remove the existing component before performing the installation process.
About this task
The following image(s) indicate the location of the base cover and provides a visual representation of the installation procedure.
Removing and installing components
13
Содержание Inspiron 13 5320
Страница 1: ...Inspiron 13 5320 Service Manual Regulatory Model P156G Regulatory Type P156G001 February 2022 Rev A00 ...
Страница 12: ...12 Removing and installing components ...
Страница 38: ...38 Removing and installing components ...
Страница 49: ...Removing and installing components 49 ...
Страница 52: ...52 Removing and installing components ...


