


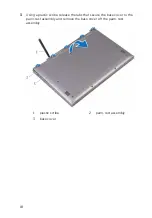


Before working inside your
computer
NOTE: The images in this document may differ from your computer
depending on the configuration you ordered.
Before you begin
1
Save and close all open files and exit all open applications.
2
Shut down your computer.
The shut-down instruction varies depending on the operating system
installed on your computer.
– Windows 10: Click or tap
Start
→
Power
→
Shut down
.
– Windows 8.1: On the
Start
screen, click or tap the power icon
→
Shut down
.
– Windows 7: Click or tap
Start
→
Shut down
.
NOTE: If you are using a different operating system, see the
documentation of your operating system for shut-down
instructions.
3
Disconnect your computer and all attached devices from their electrical
outlets.
4
Disconnect all cables such as telephone cables and network cables, from
your computer.
5
Disconnect all attached devices and peripherals, such as keyboard,
mouse, and monitor, from your computer.
6
Remove any media card and optical disc from your computer, if
applicable.
Safety instructions
Use the following safety guidelines to protect your computer from potential
damage and ensure your personal safety.
12
Содержание Inspiron 13 5000
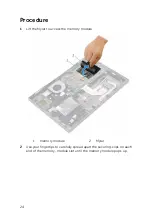
Страница 28: ...2 Replace the base cover 28 ...
Страница 47: ...3 Lift the fan off the palm rest assembly 1 palm rest assembly 2 fan 3 screws 2 4 fan cable 5 system board 47 ...
Страница 50: ...2 Lift the heat sink off the system board 1 heat sink 2 captive screws 4 3 system board 50 ...
Страница 62: ...7 Lift the touch pad off the palm rest assembly 1 screws 4 2 palm rest assembly 3 touch pad 62 ...
Страница 70: ...6 Lift the display assembly off the palm rest assembly 1 display assembly 70 ...
Страница 78: ...9 Lift the system board off the palm rest assembly 1 screw 2 system board 3 palm rest assembly 78 ...
Страница 82: ...1 palm rest 82 ...
Страница 89: ...1 display back cover and antenna assembly 2 antenna cables 89 ...
Страница 98: ...3 Lift the sensor board off the display panel 1 sensor board 2 screw 3 tape 4 sensor board cable 5 latch 98 ...
Страница 127: ...127 ...


