


Technology and components
Audio
The Inspiron-5378 is shipped with Realtek ALC3253 with Waves MaxxAudio
Pro, which is the utility to adjust various audio settings.
NOTE: The audio drivers are already installed when you receive your
computer.
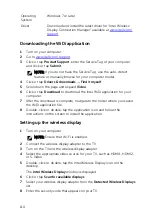
Downloading the audio driver
1
Turn on your computer.
2
Go to
.
3
Click or tap
Product support
, enter the Service Tag of your computer
and then click or tap
Submit
.
NOTE: If you do not have the Service Tag, use the auto-detect
feature or manually browse for your computer model.
4
Click or tap
Drivers & downloads
→
Find it myself
.
5
Scroll down the page and expand
Audio
.
6
Click or tap
Download
to download the audio driver for your computer.
7
After the download is complete, navigate to the folder where you saved
the audio driver file.
8
Double-click or double-tap the audio driver file icon and follow the
instructions on the screen to install the driver.
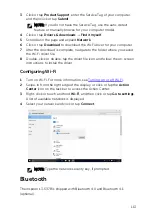
Identifying the audio controller
1
On the taskbar, click or tap the search box, and then type
Device
Manager
.
2
Click or tap
Device Manager
.
The
Device Manager
window is displayed.
101
Содержание Inspiron 13 5000
Страница 28: ...2 Replace the base cover 28 ...
Страница 47: ...3 Lift the fan off the palm rest assembly 1 palm rest assembly 2 fan 3 screws 2 4 fan cable 5 system board 47 ...
Страница 50: ...2 Lift the heat sink off the system board 1 heat sink 2 captive screws 4 3 system board 50 ...
Страница 62: ...7 Lift the touch pad off the palm rest assembly 1 screws 4 2 palm rest assembly 3 touch pad 62 ...
Страница 70: ...6 Lift the display assembly off the palm rest assembly 1 display assembly 70 ...
Страница 78: ...9 Lift the system board off the palm rest assembly 1 screw 2 system board 3 palm rest assembly 78 ...
Страница 82: ...1 palm rest 82 ...
Страница 89: ...1 display back cover and antenna assembly 2 antenna cables 89 ...
Страница 98: ...3 Lift the sensor board off the display panel 1 sensor board 2 screw 3 tape 4 sensor board cable 5 latch 98 ...
Страница 127: ...127 ...


