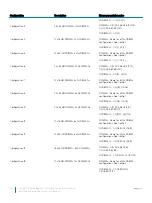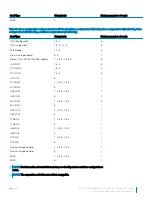
Table 41. Memory population rules
Processor
Configuration
Memory population
Memory population information
Single CPU
Optimizer (Independent channel)
population order
1, 2, 3, 4, 5, 6, 7, 8, 9, 10, 11, 12
Populate in this order, odd amount
allowed.
Mirror population order
{1, 2, 3, 4, 5, 6}, {7, 8, 9, 10, 11, 12} Mirroring is supported with 6 or 12
DIMMs per CPU.
Single rank spare population order
1, 2, 3, 4, 5, 6, 7, 8, 9, 10, 11, 12
Populate in this order, odd amount
allowed. Requires two ranks or more
per channel.
Multi rank spare population order
1, 2, 3, 4, 5, 6, 7, 8, 9, 10, 11, 12
Populate in this order, odd amount
allowed. Requires three ranks or more
per channel.
Fault resilient population order
{1, 2, 3, 4, 5, 6}, {7, 8, 9, 10, 11, 12} Supported with 6 or 12 DIMMs per
CPU.
Dual CPU (Starting with
CPU1, CPU1 and CPU2
population should
match)
Optimized (Independent channel)
population order
C1{1}, C2{1}, C1{2}, C2{2}, C1{3},
C2{3}...
Odd amount of DIMMs per CPU
allowed.
Mirroring population order
C1{1, 2, 3, 4, 5, 6}, C2{1, 2, 3, 4, 5,
6}, C1{7, 8, 9, 10, 11, 12}, C2{7, 8,
9, 10, 11, 12}
Mirroring is supported with 6 or 12
DIMMs per CPU.
Single rank sparing population order C1{1}, C2{1}, C1{2}, C2{2}, C1{3},
C2{3}...
Populate in this order, odd amount per
CPU allowed. Requires two ranks or
more per channel.
Multi rank spare population order
C1{1}, C2{1}, C1{2}, C2{2}, C1{3},
C2{3}, C1{4}, C2{4}, C1{5},
C2{5}...
Populate in this order, odd amount per
CPU allowed. Requires three ranks or
more per channel.
Fault resilient population order
C1{1, 2, 3, 4, 5, 6}, C2{1, 2, 3, 4, 5,
6}, C1{7, 8, 9, 10, 11, 12}, C2{7, 8,
9, 10, 11, 12}
Supported with 6 or 12 DIMMs per
CPU.
Removing a memory module
The procedure for removing a memory module and NVDIMM-N is identical.
Prerequisites
1
Follow the safety guidelines listed in
2
Follow the procedure listed in
Before working inside your system
.
CAUTION:
To prevent data loss and potential damage to your system, ensure that your system, LEDs on system, LEDs
on NVDIMM-N and LEDs on NVDIMM-N battery are turned off before removing the NVDIMM-N battery.
3
If applicable, remove the air shroud.
WARNING:
Allow the memory modules to cool after you power off the system. Handle the memory modules by the card edges
and avoid touching the components or metallic contacts on the memory module.
Steps
1
Locate the appropriate memory module socket.
CAUTION:
Handle each memory module only by the card edges, ensuring not to touch the middle of the memory
module or metallic contacts.
2
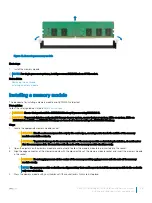
Push the ejectors outward on both ends of the memory module socket to release the memory module from the socket.
3
Lift and remove the memory module from the system.
94
Dell EMC PowerEdge R740 Installation and Service Manual
Installing and removing system components

