background image

Steps

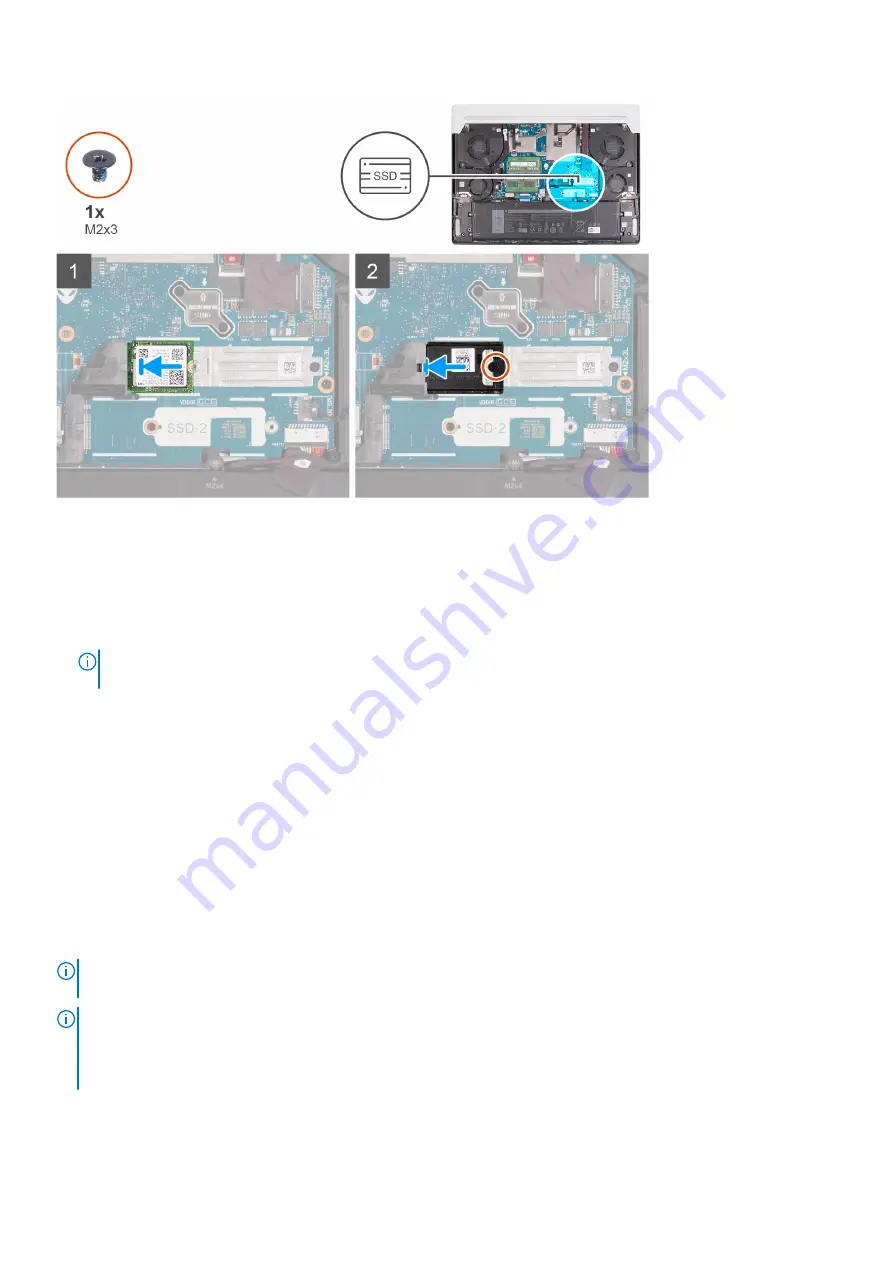
1. Align the notch on the M.2 2230 solid-state drive with the tab on the M.2 card slot on the system board.
2. Slide the M.2 2230 solid-state drive into the M.2 card slot on the system board.
3. Slide the tab on the M.2 thermal shield into the M.2 card slot and align the screw hole on the thermal shield to the screw

hole on the system board.

4. Replace the screw (M2x3) that secures the M.2 thermal shield to the 2230 mounting bracket.

NOTE:

 Your computer can have up to two M.2 2230 solid-state drives installed. Repeat steps 1 to 4 to install the

second M.2 2230 solid-state drive.

Next steps

1. Install the 

base cover

.

2. Follow the procedure in 

After working inside your computer

.

Removing the M.2 2280 solid-state drive

Prerequisites

1. Follow the procedure in 

Before working inside your computer

.

2. Remove the 

base cover

.

About this task

NOTE:

 This procedure applies only to computers shipped with an M.2 2280 solid-state drive installed in M.2 slot one

(SSD-1) and/or M.2 slot two (SSD-2).

NOTE:

 The M.2 card installed on M.2 slot one (SSD-1) and M.2 slot two (SSD-2) will depend on the configuration ordered.

Supported card configurations:

M.2 2230 solid-state drive + 2230 mounting bracket

M.2 2280 solid-state drive

The following image(s) indicate the location of the M.2 2280 solid-state drive and provides a visual representation of the
removal procedure.

Removing and installing components

21

Содержание Alienware x17 R1

Страница 1: ...Alienware x17 R1 Service Manual Regulatory Model P48E Regulatory Type P48E001 June 2021 Rev A01 ...

Страница 2: ...ential damage to hardware or loss of data and tells you how to avoid the problem WARNING A WARNING indicates a potential for property damage personal injury or death 2021 Dell Inc or its subsidiaries All rights reserved Dell EMC and other trademarks are trademarks of Dell Inc or its subsidiaries Other trademarks may be trademarks of their respective owners ...

Страница 3: ...olid state drive 19 Battery 24 Battery cable 26 Rear I O cover 28 Power adapter port 30 Headset port 32 Speakers 34 Fans 36 Heat pipe 40 Display assembly 43 Touchpad 47 Keyboard controller board 49 System board 51 Fan and heat sink assembly 58 Power button 60 I O board 62 Keyboard bracket 64 Palm rest and keyboard assembly 67 Chapter 3 Drivers and downloads 70 Chapter 4 System setup 71 Entering BI...

Страница 4: ...ce Tag or Express Service Code of your Dell computer 77 System diagnostic lights 77 SupportAssist diagnostics 78 Recovering the operating system 78 Flashing BIOS USB key 78 Flashing the BIOS 79 WiFi power cycle 79 Drain residual flea power perform hard reset 79 Chapter 6 Getting help and contacting Alienware 81 4 Contents ...

Страница 5: ...r computer WARNING Before working inside your computer read the safety information that is shipped with your computer For more safety best practices see the Regulatory Compliance home page at www dell com regulatory_compliance WARNING Disconnect your computer from all power sources before opening the computer cover or panels After you finish working inside the computer replace all covers panels an...

Страница 6: ...failures The high rate of intermittent failures means that most of the time when damage occurs it is not immediately recognizable The DIMM receives a static shock but the tracing is merely weakened and does not immediately produce outward symptoms related to the damage The weakened trace may take weeks or months to melt and in the meantime may cause degradation of memory integrity intermittent mem...

Страница 7: ...Styrofoam and other plastics should always be moved at least 12 inches or 30 centimeters away from sensitive parts before physically handling any hardware components ESD Packaging All ESD sensitive devices must be shipped and received in static safe packaging Metal static shielded bags are preferred However you should always return the damaged part using the same ESD bag and packaging that the new...

Страница 8: ...re that no stray screws remain inside your computer 2 Connect any external devices peripherals or cables you removed before working on your computer 3 Replace any media cards discs or any other parts that you removed before working on your computer 4 Connect your computer and all attached devices to their electrical outlets 5 Turn on your computer 8 Working inside your computer ...

Страница 9: ...ect number of screws and correct screw type is restored when the component is replaced NOTE Some computers have magnetic surfaces Ensure that the screws are not left attached to such surfaces when replacing a component NOTE Screw color may vary with the configuration ordered Table 1 Screw list Component Screw type Quantity Screw image Base cover M2 5x9 2 Base cover M2 5x5 captive 4 Base cover M2 5...

Страница 10: ...bly M2 5x5 6 System board M2x3 5 Touchpad M1 6x2 4 Keyboard controller board M1 6x1 7 2 Wireless card bracket M2x3 1 System board M2x3 4 System board M2x4 1 Fan and heat sink assembly M2x3 8 Power button bracket M1 6x2 3 I O board M2x3 4 Keyboard bracket M1 2x2 30 Major components of Alienware x17 R1 The following image shows the major components of Alienware x17 R1 10 Removing and installing comp...

Страница 11: ...t pipe 6 Power adapter port bracket 7 Power adapter port 8 Battery 9 Keyboard bracket 10 Keyboard 11 Palm rest 12 Touchpad 13 Keyboard controller board 14 Speakers 15 Power button 16 Power button bracket 17 Display assembly 18 Left fan Removing and installing components 11 ...

Страница 12: ...e that there is no micro SD card installed in the micro SD card slot on your computer NOTE This computer is designed without an RTC coin cell battery After a service incident where the computer battery is disconnected when the battery is fully discharged or when the computer is reassembled and turned on an RTC reset cycle will occur When an RTC Reset cycle occurs the computer turns on and off thre...

Страница 13: ...Removing and installing components 13 ...

Страница 14: ...14 Removing and installing components ...

Страница 15: ...mbly NOTE The following steps are needed only if other components are being removed from your computer 5 Disconnect the battery cable from the system board 6 Turn over the computer and press the power button for 15 seconds to drain the flea power Installing the base cover Prerequisites If you are replacing a component remove the existing component before performing the installation process About t...

Страница 16: ...16 Removing and installing components ...

Страница 17: ...ly 4 Replace the two screws M2 5x9 that secure the base cover to the palm rest and keyboard assembly 5 Replace the two screws M2 5x5 that secure the base cover to the palm rest and keyboard assembly Next steps 1 Follow the procedure in After working inside your computer Memory module Removing the memory Prerequisites 1 Follow the procedure in Before working inside your computer 2 Remove the base c...

Страница 18: ...ule from the memory module slot on the system board NOTE Your computer has two memory modules installed Repeat steps 1 to 2 for the memory module installed in the second memory slot Installing the memory Prerequisites If you are replacing a component remove the existing component before performing the installation process About this task The following image s indicate the location of the memory an...

Страница 19: ...the M 2 2230 solid state drive Prerequisites 1 Follow the procedure in Before working inside your computer 2 Remove the base cover About this task NOTE This procedure applies only to computers shipped with an M 2 2230 solid state drive installed in M 2 slot one SSD 1 and or M 2 slot two SSD 2 NOTE The M 2 card installed on M 2 slot one SSD 1 and M 2 slot two SSD 2 will depend on the configuration ...

Страница 20: ...e drive Prerequisites If you are replacing a component remove the existing component before performing the installation process About this task NOTE This procedure applies if you are installing a M 2 2220 solid state drive into M 2 slot one SSD 1 or M 2 slot two SSD 2 NOTE Supported card configurations on M 2 slot one SSD 1 and M 2 slot two SSD 2 M 2 2230 solid state drive 2230 mounting bracket M ...

Страница 21: ...ps 1 Install the base cover 2 Follow the procedure in After working inside your computer Removing the M 2 2280 solid state drive Prerequisites 1 Follow the procedure in Before working inside your computer 2 Remove the base cover About this task NOTE This procedure applies only to computers shipped with an M 2 2280 solid state drive installed in M 2 slot one SSD 1 and or M 2 slot two SSD 2 NOTE The...

Страница 22: ...2280 solid state drive Prerequisites If you are replacing a component remove the existing component before performing the installation process About this task NOTE This procedure applies if you are installing a M 2 2280 solid state drive into M 2 slot one SSD 1 or M 2 slot two SSD 2 NOTE Supported card configurations on M 2 slot one SSD 1 and M 2 slot two SSD 2 M 2 2230 solid state drive 2230 moun...

Страница 23: ... to the system board NOTE Your computer can have up to two M 2 2280 solid state drives installed Repeat steps 1 to 4 to install the second M 2 2280 solid state drive Next steps 1 Install the base cover 2 Follow the procedure in After working inside your computer Removing and installing the M 2 2230 solid state drive mounting bracket About this task The following image provides a visual representat...

Страница 24: ...this product are not lost or misplaced to prevent accidental puncture or damage to the battery and other system components If the battery gets stuck inside your computer as a result of swelling do not try to release it as puncturing bending or crushing a lithium ion battery can be dangerous In such an instance contact Dell technical support for assistance See www dell com contactdell Always purcha...

Страница 25: ... the battery and provides a visual representation of the removal procedure Steps 1 Peel the tape that secures the battery cable to the battery 2 Ensure that the battery cable has been disconnected from the system board 3 Remove the six screws M2x4 that secure the battery to the palm rest and keyboard assembly 4 Lift the battery off the palm rest and keyboard assembly Installing the battery Prerequ...

Страница 26: ...the battery is fully discharged when the computer no longer turns on when the power button is pressed Do not crush drop mutilate or penetrate the battery with foreign objects Do not expose the battery to high temperatures or disassemble battery packs and cells Do not apply pressure to the surface of the battery Do not bend the battery Do not use tools of any kind to pry on or against the battery E...

Страница 27: ...owing image s indicate the location of the battery cable and provides a visual representation of the removal procedure Steps 1 Turn the battery over 2 Peel the battery cable off the battery 3 Disconnect the battery cable from the battery 4 Lift the battery cable off the battery Installing the battery cable Prerequisites If you are replacing a component remove the existing component before performi...

Страница 28: ...cedure in After working inside your computer Rear I O cover Removing the rear I O cover Prerequisites 1 Follow the procedure in Before working inside your computer 2 Remove the base cover About this task The following image s indicate the location of the rear I O cover and provides a visual representation of the removal procedure 28 Removing and installing components ...

Страница 29: ...ear I O cover 4 Firmly grasp the sides of your computer with both hands and push the rubber feet on the rear I O cover outwards with your thumbs to release the rear I O cover from the palm rest and keyboard assembly 5 Lift the rear I O cover from the palm rest and keyboard assembly Installing the rear IO cover Prerequisites If you are replacing a component remove the existing component before perf...

Страница 30: ... to the palm rest and keyboard assembly 3 Connect the left Tron light cable to the system board and close the latch 4 Connect the right Tron light cable to the system board and close the latch Next steps 1 Install the base cover 2 Follow the procedure in After working inside your computer Power adapter port Removing the power adapter port Prerequisites 1 Follow the procedure in Before working insi...

Страница 31: ...acket off the palm rest and keyboard assembly 4 Disconnect the power adapter port from the system board 5 Peel the tapes that secure the power adapter port connector to the system board 6 Peel the power adapter port cable from the palm rest and keyboard assembly Installing the power adapter port Prerequisites If you are replacing a component remove the existing component before performing the inst...

Страница 32: ... 6 Replace the two screws M2 5x5 that secure the power adapter port bracket to the palm rest and keyboard assembly 7 Replace the screw M2x3 that secures the power adapter port bracket to the palm rest and keyboard assembly Next steps 1 Install the rear I O cover 2 Install the base cover 3 Follow the procedure in After working inside your computer Headset port Removing the headset port Prerequisite...

Страница 33: ...ble off the palm rest and keyboard assembly and lift the headset port and its cable off the palm rest and keyboard assembly Installing the headset port Prerequisites If you are replacing a component remove the existing component before performing the installation process About this task The following image s indicate the location of the headset port and provides a visual representation of the inst...

Страница 34: ...tem board 4 Move the I O board cable back into place and connect the I O board cable to the system board Next steps 1 Install the rear I O cover 2 Install the base cover 3 Follow the procedure in After working inside your computer Speakers Removing the speakers Prerequisites 1 Follow the procedure in Before working inside your computer 2 Remove the base cover 34 Removing and installing components ...

Страница 35: ...ting guides on the palm rest and keyboard assembly 3 Lift the speakers along with their cables off the palm rest and keyboard assembly Installing the speakers Prerequisites If you are replacing a component remove the existing component before performing the installation process About this task The following image s indicate the location of the speakers and provides a visual representation of the i...

Страница 36: ...y 3 Connect the speaker cable to the system board Next steps 1 Install the battery 2 Install the base cover 3 Follow the procedure in After working inside your computer Fans Removing the left fan Prerequisites 1 Follow the procedure in Before working inside your computer 2 Remove the base cover 3 Remove the battery About this task The following image s indicate the location of the left fan and pro...

Страница 37: ...s M2x3 that secure the right fan to the palm rest and keyboard assembly 5 Lift the fan off the palm rest and keyboard assembly Installing the left fan Prerequisites If you are replacing a component remove the existing component before performing the installation process About this task The following image s indicate the location of the left fan and provides a visual representation of the installat...

Страница 38: ...guides on the left fan 6 Adhere the tape that secures the antenna cable to the palm rest and keyboard asssembly Next steps 1 Install the battery 2 Install the base cover 3 Follow the procedure in After working inside your computer Removing the right fan Prerequisites 1 Follow the procedure in Before working inside your computer 2 Remove the base cover 3 Remove the battery About this task The follo...

Страница 39: ...hat secure the right fan to the palm rest and keyboard assembly 5 Lift the fan off the palm rest and keyboard assembly Installing the right fan Prerequisites If you are replacing a component remove the existing component before performing the installation process About this task The following image s indicate the location of the right fan and provides a visual representation of the installation pr...

Страница 40: ...2 Install the base cover 3 Follow the procedure in After working inside your computer Heat pipe Removing the heat pipe Prerequisites 1 Follow the procedure in Before working inside your computer 2 Remove the base cover About this task CAUTION The heat sink may become hot during normal operation Allow sufficient time for the heat sink to cool before you touch it NOTE For maximum cooling of the proc...

Страница 41: ...d 5 Move the power adapter port cable off the system board 6 Lift the latch and disconnect the display cable from the system board 7 Remove the two screws M2x4 that secure the heat pipe to the system boad 8 Remove the three screws M2x3 that secure the heat pipe to the system boad 9 Lift the heat pipe off the system board Installing the heat pipe Prerequisites If you are replacing a component remov...

Страница 42: ...oles on the system board 3 Replace the two screws M2x4 that secure the heat pipe to the system boad 4 Replace the three screws M2x3 that secure the heat pipe to the system boad 5 Connect the display cable to the system board and close the latch 6 Adhere the tape that secures the display cable connector latch to the system board 7 Adhere the power adapter port cable to the system board 8 Connect th...

Страница 43: ...rerequisites 1 Follow the procedure in Before working inside your computer 2 Remove the base cover 3 Remove the rear I O cover About this task The following image s indicate the location of the display assembly and provides a visual representation of the removal procedure Removing and installing components 43 ...

Страница 44: ...ket to the palm rest and keyboard assembly 9 Turn the computer over 10 Remove the display cable from the routing guide on the palm rest and keyboard assembly 11 Remove the Tobii eye cable from the routing guide on the palm rest and keyboard assembly 12 Remove the four screws M2 5x5 that secure the display assembly to the palm rest and keyboard assembly 13 Lift the display assembly off the palm res...

Страница 45: ...Removing and installing components 45 ...

Страница 46: ...hat secures the display cable connector latch to the system board 7 Replace the two screws M2 5x5 that secure the power adapter port bracket to the palm rest and keyboard assembly 8 Move the power adapter port cable back into place over the system board 9 Adhere the tapes that secure the power adapter port cable to the system board 10 Conect the camera cable to the connector on the system board an...

Страница 47: ...sk The following image s indicate the location of the touchpad and provides a visual representation of the removal procedure Steps 1 Lift the latch and disconnect the keyboard cable from the keyboard controller board 2 Peel and move the keyboard cable off the touchpad 3 Lift the latches and disconnect the keyboard controller board cable from the system board and keyboard controller board Removing ...

Страница 48: ...m rest and keyboard assembly Installing the touchpad Prerequisites If you are replacing a component remove the existing component before performing the installation process About this task The following image s indicate the location of the touchpad and provides a visual representation of the installation procedure Steps 1 At an angle slide the touchpad assembly into the slot on the palm rest and k...

Страница 49: ...er board on the palm rest and keyboard assembly connect the cable to the keyboard controller board and system board and close the latches Next steps 1 Install the battery 2 Install the base cover 3 Follow the procedure in After working inside your computer Keyboard controller board Removing the keyboard controller board Prerequisites 1 Follow the procedure in Before working inside your computer 2 ...

Страница 50: ...d 5 Lift the latch and disconnect the keyboard cable from the system board 6 Remove the two screws M1 6x1 7 that secures the keyboard controller board to the palm rest and keyboard assembly 7 Life the keyboard controller board off the palm rest and keyboard assembly Installing the keyboard controller board Prerequisites If you are replacing a component remove the existing component before performi...

Страница 51: ... latches 6 Connect the keyboard backlight cable to the keyboard controller board and close the latch 7 Connect the keyboard controller board cable to the system board and keyboard controller board and close the latches NOTE A keyboard controller board setup in the BIOS is required after replacing the keyboard controller board Next steps 1 Install the battery 2 Install the base cover 3 Follow the p...

Страница 52: ... cable 2 Display cable 3 Left Tron light cable 4 Power button cable 5 Right fan cable 6 Battery cable 7 Keyboard controller board cable 8 Speaker cable 9 Left fan cable 10 Headset port cable 11 I O board cable 12 Power button cable 13 Right Tron light cable The following image s indicate the location of the system board and provides a visual representation of the removal procedure 52 Removing and ...

Страница 53: ...Removing and installing components 53 ...

Страница 54: ...sembly to the palm rest and keyboard assembly 16 Remove the screw M2x4 that secures the system board to the palm rest and keyboard assembly 17 Hold firmly on the left and right fans and lift the system board assembly off the palm rest and keyboard assembly 18 Remove the fan and heat sink assembly NOTE Before returning the old system board Adhere the processor CPU sticker over the processor CPU chi...

Страница 55: ... 5 Right fan cable 6 Battery cable 7 Keyboard controller board cable 8 Speaker cable 9 Left fan cable 10 Headset port cable 11 I O board cable 12 Power button cable 13 Right Tron light cable The following image s indicate the location of the system board and provides a visual representation of the installation procedure Removing and installing components 55 ...

Страница 56: ...56 Removing and installing components ...

Страница 57: ...re the system board and heat sink assembly to the palm rest and keyboard assembly 6 Replace the screw M2x4 that secures the system board to the palm rest and keyboard assembly 7 Connect the antenna cables to the wireless card on the system board Table 2 Antenna cable color scheme Connectors on the wireless card Antenna cable color Silkscreen marking Main White MAIN white triangle Auxiliary Black A...

Страница 58: ...e drive 10 Install the memory 11 Install the base cover Fan and heat sink assembly Removing the fan and heat sink assembly Prerequisites 1 Follow the procedure in Before working inside your computer 2 Remove the base cover 3 Remove the battery 4 Remove the rear I O cover 5 Remove the power adapter port 6 Remove the headset port 7 Remove the left fan 8 Remove the right fan 9 Remove the heat pipe 10...

Страница 59: ... conductive metal particles If these conductive metal particles come into contact with the surface of the system board it will cause the an electrical short when system is powered on Installing the fan and heat sink assembly Prerequisites If you are replacing a component remove the existing component before performing the installation process About this task NOTE If either the system board or the ...

Страница 60: ...ssembly fan cables to the system board Next steps 1 Install the system board 2 Install the heat pipe 3 Install the left fan 4 Install the right fan 5 Install the headset port 6 Install the power adapter port 7 Install the rear I O cover 8 Install the battery 9 Install the base cover 10 Follow the procedure in After working inside your computer Power button Removing the power button Prerequisites 1...

Страница 61: ...isual representation of the removal procedure Steps 1 Remove the three screws M1 6x2 that secure the power button bracket to the palm rest and keyboard assembly 2 Lift the power button bracket off the palm rest and keyboard assembly 3 Peel the power button cable off the palm rest and keyboard assembly and lift the power button and its cable off the palm rest and keyboard assembly Installing the po...

Страница 62: ...t and keyboard assembly Next steps 1 Install the system board 2 Install the heat pipe 3 Install the left fan 4 Install the right fan 5 Install the headset port 6 Install the power adapter port 7 Install the rear I O cover 8 Install the battery 9 Install the base cover 10 Follow the procedure in After working inside your computer I O board Removing the I O board Prerequisites 1 Follow the procedure...

Страница 63: ...icate the location of the I O board and provides a visual representation of the removal procedure Steps 1 Remove the four screws M2x3 that secure the I O board to the palm rest and keyboard assembly 2 Lift the I O board and its cable off the palm rest and keyboard assembly Installing the I O board Prerequisites If you are replacing a component remove the existing component before performing the in...

Страница 64: ...Install the right fan 5 Install the headset port 6 Install the power adapter port 7 Install the rear I O cover 8 Install the battery 9 Install the base cover 10 Follow the procedure in After working inside your computer Keyboard bracket Removing the keyboard bracket Prerequisites 1 Follow the procedure in Before working inside your computer 2 Remove the base cover 3 Remove the memory 4 Remove the ...

Страница 65: ... and solid state drives This simplifies the removal and installation procedure and avoids breaking the thermal bond between the system board and heat sink 16 Remove the power button 17 Remove the I O board About this task The following image s indicate the location of the keyboard bracket and provides a visual representation of the removal procedure Steps 1 Peel and lift the power button cable off...

Страница 66: ... 6 Remove the 30 screws M1 2x2 that secure the keyboard bracket to the keyboard 7 Lift the keyboard bracket off the keyboard Installing the keyboard bracket Prerequisites If you are replacing a component remove the existing component before performing the installation process About this task The following image s indicate the location of the keyboard bracket and provides a visual representation of...

Страница 67: ...tall the headset port 12 Install the power adapter port 13 Install the rear I O cover 14 Install the battery 15 Install the memory 16 Install the base cover 17 Follow the procedure in After working inside your computer Palm rest and keyboard assembly Removing the palm rest and keyboard assembly Prerequisites 1 Follow the procedure in Before working inside your computer 2 Remove the base cover 3 Re...

Страница 68: ...he pre requisites you are left with the palm rest and keyboard assembly Installing the palm rest and keyboard assembly Prerequisites If you are replacing a component remove the existing component before performing the installation process About this task The following image s indicate the location of the palm rest and keyboard assembly and provides a visual representation of the installation proce...

Страница 69: ...an and heat sink assembly 5 Install the system board 6 Install the touchpad 7 Install the display assembly 8 Install the heat pipe 9 Install the left fan 10 Install the right fan 11 Install the speakers 12 Install the headset port 13 Install the power adapter port 14 Install the rear I O cover 15 Install the battery 16 Install the memory 17 Install the base cover 18 Follow the procedure in After w...

Страница 70: ...rivers and downloads When troubleshooting downloading or installing drivers it is recommended that you read the Dell Knowledge Based article Drivers and Downloads FAQ SLN128938 3 70 Drivers and downloads ...

Страница 71: ...t until you restart the system Keys Navigation Up arrow Moves to the previous field Down arrow Moves to the next field Enter Selects a value in the selected field if applicable or follow the link in the field Spacebar Expands or collapses a drop down list if applicable Tab Moves to the next focus area Esc Moves to the previous page until you view the main screen Pressing Esc in the main screen dis...

Страница 72: ...e processor L1 cache size L2 Cache Displays the processor L2 cache size L3 Cache Displays the processor L3 cache size M 2 PCIe SSD 1 Display the M 2 PCIe SSD device information of the computer M 2 PCIe SSD 2 Display the M 2 PCIe SSD device information of the computer AC Adapter Type Displays the type of AC adapter System Memory Displays the size of memory installed Memory Speed Displays the speed ...

Страница 73: ...s running on battery power Default 1 minute Battery Health Displays the battery health Battery Charge Configuration Set the battery charge settings with a preselected custom charge start and stop Default Adaptive Advance Battery Charge Configuration Set the battery charge settings with a preselected custom charge start and stop Default Adaptive Power on LID open Selects the power on option when th...

Страница 74: ...lute Software Default Deactivate Absolute Status Enables or disables SED Block SID Authentication Default Disabled Windows SMM Security Mitigations Table WSMT Enables or disables the Windows SMM Security Mitigations Table It allows the system firmware to confirm to the OS that certain security best practices have been implemented in the System Management Mode SMM software Default Disabled Firmware...

Страница 75: ...password Table 8 System and setup password Password type Description System password Password that you must enter to log on to your system Setup password Password that you must enter to access and make changes to the BIOS settings of your computer You can create a system password and a setup password to secure your computer CAUTION The password features provide a basic level of security for the da...

Страница 76: ...BIOS or System Setup screen select System Security and press Enter The System Security screen is displayed 2 In the System Security screen verify that Password Status is Unlocked 3 Select System Password alter or delete the existing system password and press Enter or Tab 4 Select Setup Password alter or delete the existing setup password and press Enter or Tab NOTE If you change the System and or ...

Страница 77: ... may also blink red or blue according to pre defined beep codes indicating various failures For example the power and battery status light blinks red two times followed by a pause and then blinks blue three times followed by a pause This 2 3 pattern continues until the computer is turned off indicating no memory or RAM is detected The following table shows different power and battery status light ...

Страница 78: ...Recovering the operating system When your computer is unable to boot to the operating system even after repeated attempts it automatically starts Dell SupportAssist OS Recovery Dell SupportAssist OS Recovery is a standalone tool that is preinstalled in all Dell computers installed with Windows 10 operating system It consists of tools to diagnose and troubleshoot issues that may occur before your c...

Страница 79: ...follow the instructions on the screen WiFi power cycle About this task If your computer is unable to access the internet due to WiFi connectivity issues a WiFi power cycle procedure may be performed The following procedure provides the instructions on how to conduct a WiFi power cycle NOTE Some ISPs Internet Service Providers provide a modem router combo device Steps 1 Turn off your computer 2 Tur...

Страница 80: ...ver 4 Remove the battery 5 Press and hold the power button for 20 seconds to drain the flea power 6 Install the battery 7 Install the base cover 8 Connect the power adapter to your computer 9 Turn on your computer NOTE For more information about performing a hard reset see the knowledge base article SLN85632 at www dell com support 80 Troubleshooting ...

Страница 81: ... by a Service Tag or Express Service Code To view relevant support resources for your Dell computer enter the Service Tag or Express Service Code at www dell com support For more information on how to find the Service Tag for your computer see Locate the Service Tag on your computer VR Support www dell com VRsupport Videos providing step by step instructions to service your computer www youtube co...

Отзывы: